67 guides ready to print - choose Save as PDF in the print window for a handout. Back to the help centre
TinERP user guide
The TinERP user guide
Printed 3 October 2026 · the latest version is always in the help centre online
Contents
Getting started
Set up your organization
Everyday tasks
Sign in and find your way around
Your day at a glance
Book leave
Approve requests
Your tasks
Fill in your timesheet
Claim expenses and request advances
Ask for something to be bought
Notifications
Your profile and account
Managers
Your team's leave
Approve your team's timesheets
Administrators
Manage users
Roles and permissions
Set who approves what
Security settings
The audit log
Document numbers
HR
How HR works
Set up grades, positions and checklists
Set up leave
Add an employee
Keep employee records up to date
When someone leaves
Run leave for everyone
Joiners and leavers
The org chart
HR reports
Projects
How Projects works
Start a project
Plan the work on the board
Set up timesheets
Follow progress and hours
Finance
How Finance works
Set up Finance
The chart of accounts
Opening balances
Journals
Everyday journal examples
Customers, invoices and receipts
Bills and payments
Banking and reconciliation
VAT and WHT returns
Pay expense claims and advances
Budgets and grant budgets
Prepayments and deferred income
Reports and financial statements
Close a month and the year
Procurement
How Procurement works
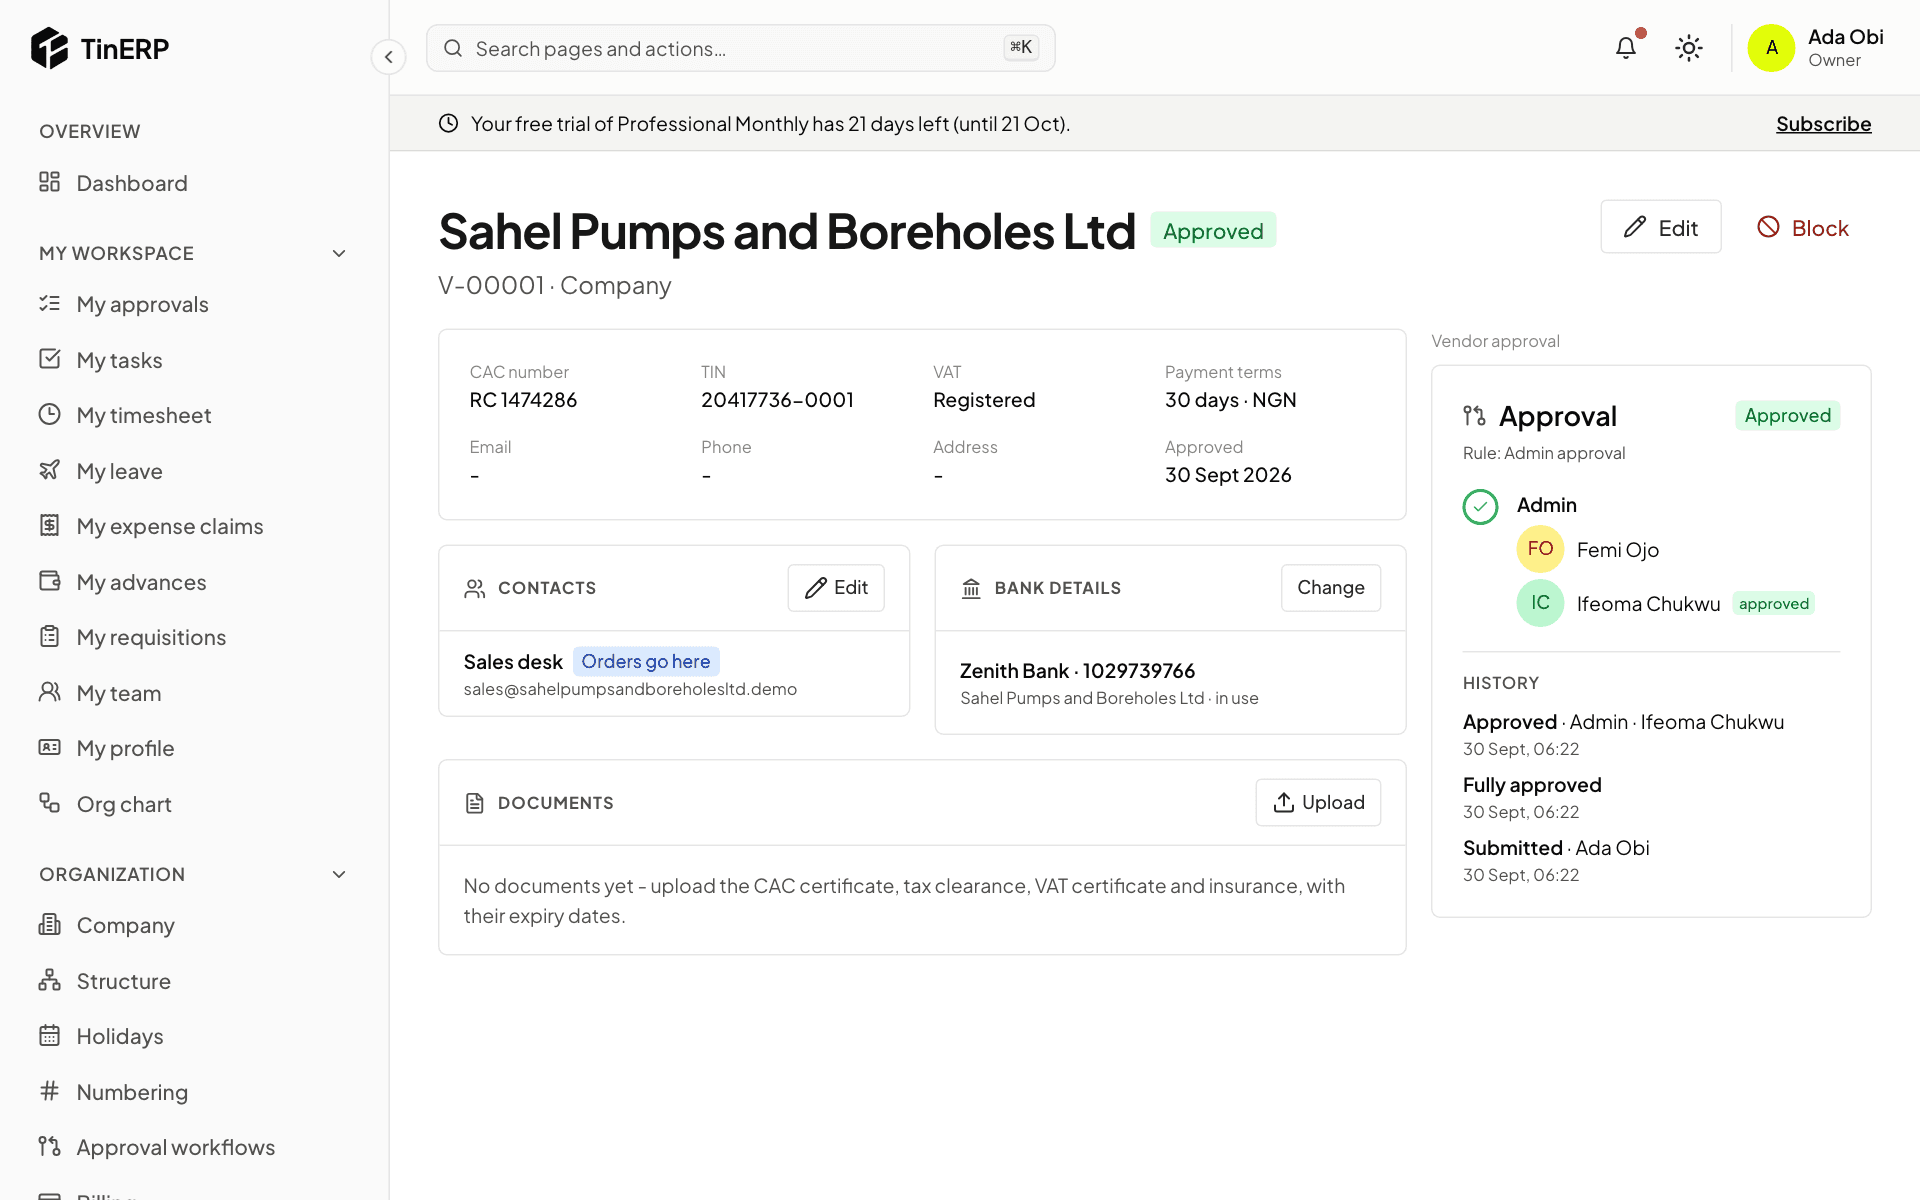
Add and approve vendors
Categories, items and settings
Raise and send purchase orders
Get quotations
Receive deliveries
Match and approve vendor invoices
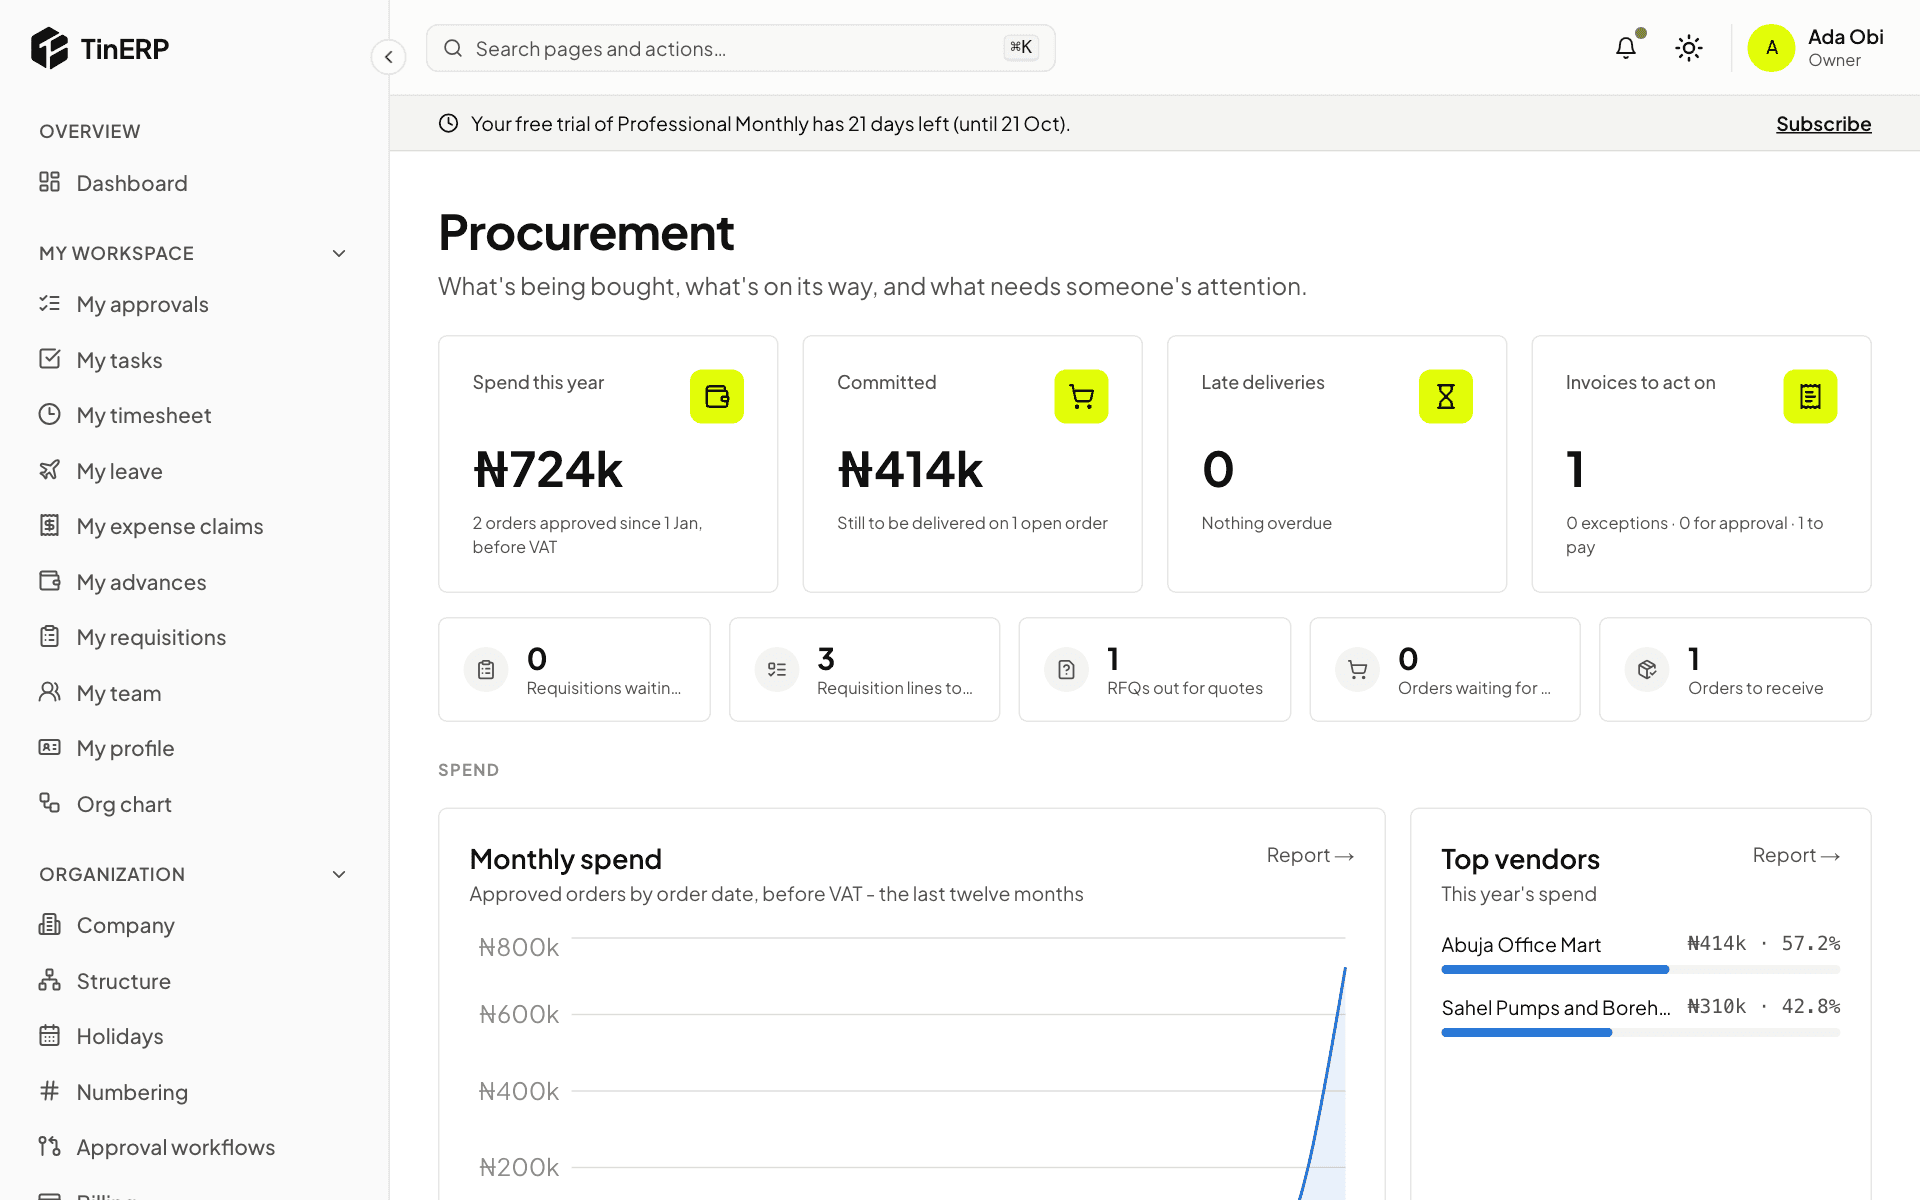
Procurement reports
Reports
Find and run a report
Build and share your own reports
Dashboards
Reports on a schedule
Walk-throughs
Buying, from request to payment
Month-end
An NGO grant, from award to donor report
Troubleshooting
Signing in and access
Leave, timesheets and approvals
Finance messages
Getting started · Owners and admins · about 30 min
Set up your organization
Do these steps in order: each one prepares something the next ones use. You can stop at any point and come back - everything is saved as you go, and the Get started checklist on your dashboard shows what's left. Setup is free: if you'd like help, our team will do it with you.
1. Create your account
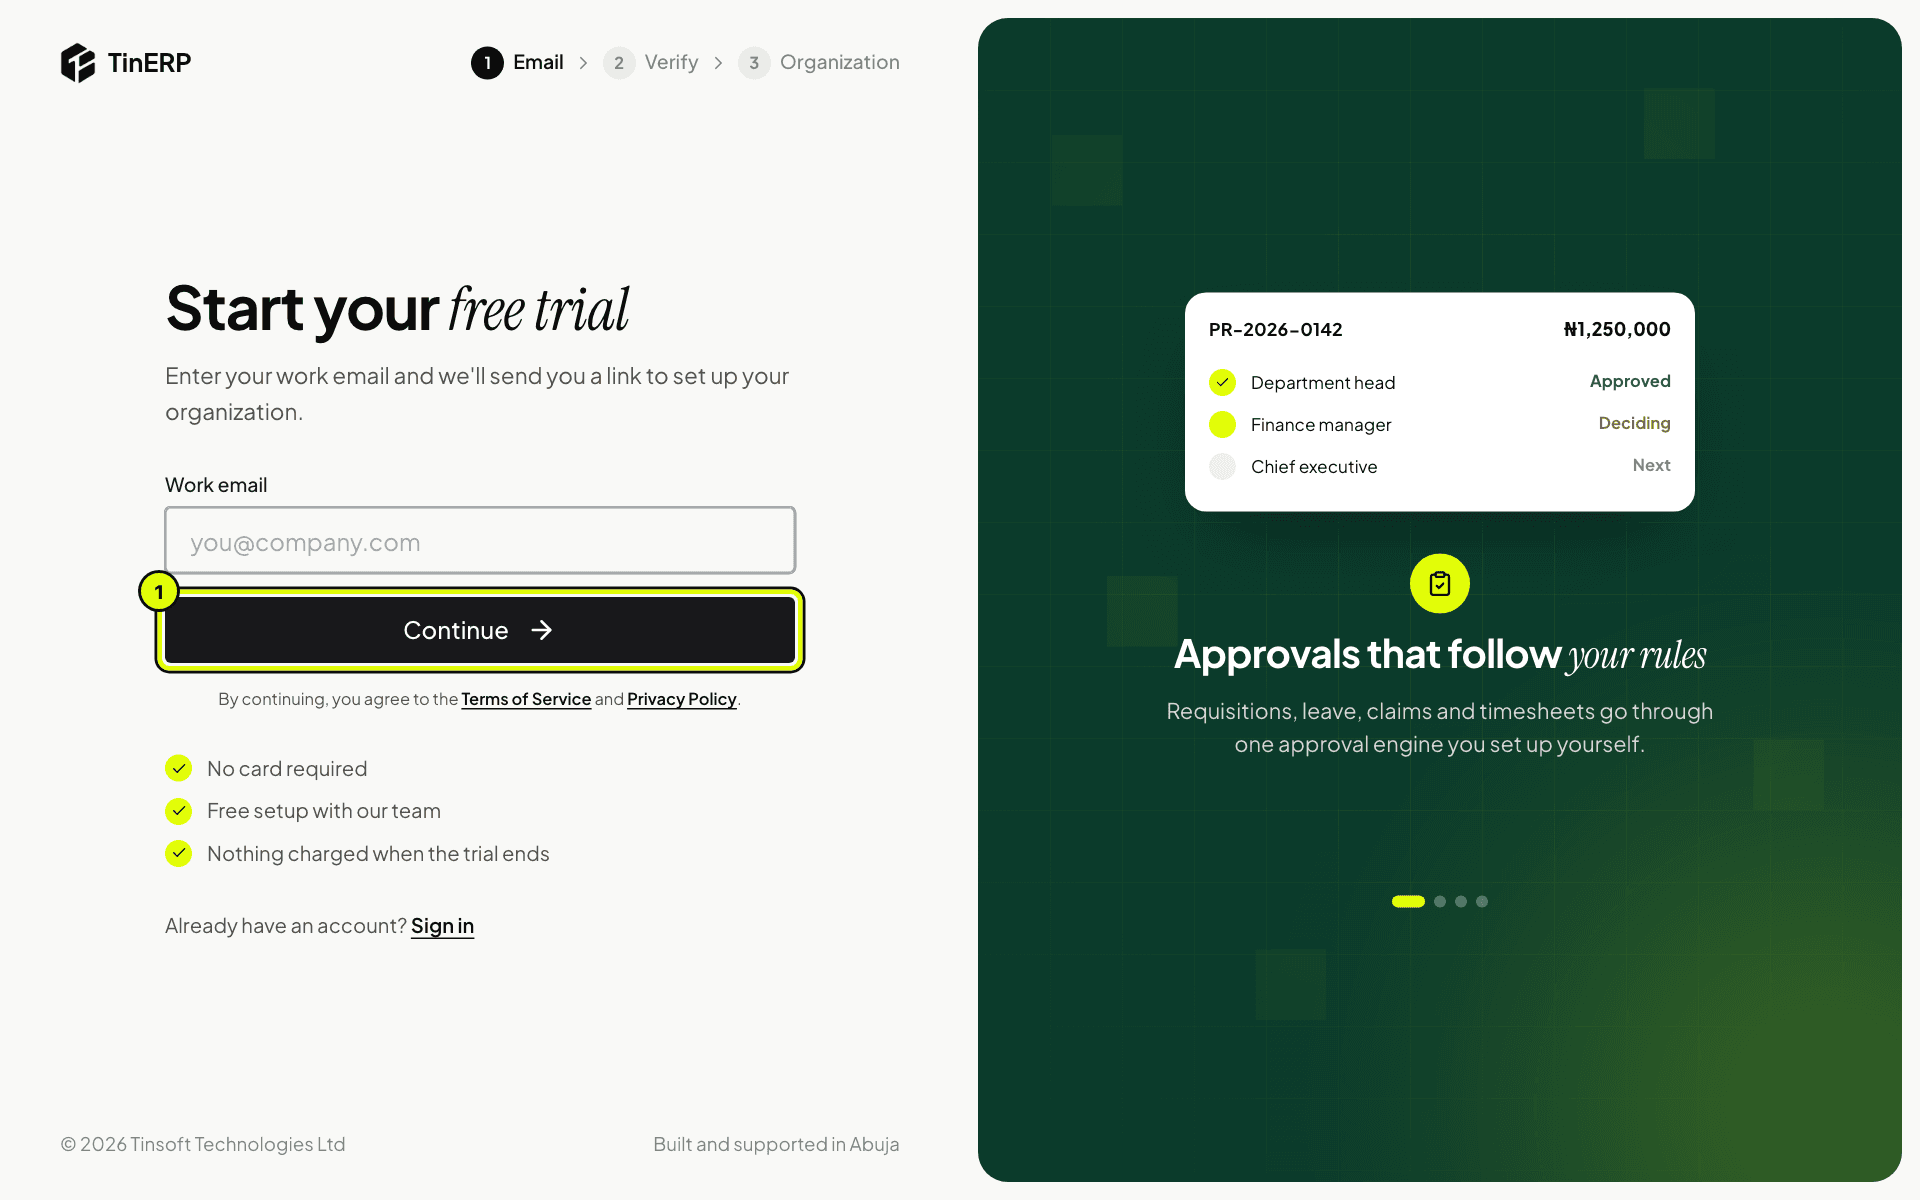
Go to the TinERP website and choose Start free trial. Enter your work email and select Continue.
We email you a link to set up your organization. The next page shows the address it went to, with shortcuts to Gmail, Outlook and Yahoo Mail - if it's the wrong address, choose use a different email.
The link works once and expires after 24 hours. If it has expired, just enter your email again.
The Start your free trial page, with the work email field and the Continue button marked 1
Tip: Use your work email: you'll be the owner of the organization's account, and invitations and approvals are sent there.
2. Set up your organization
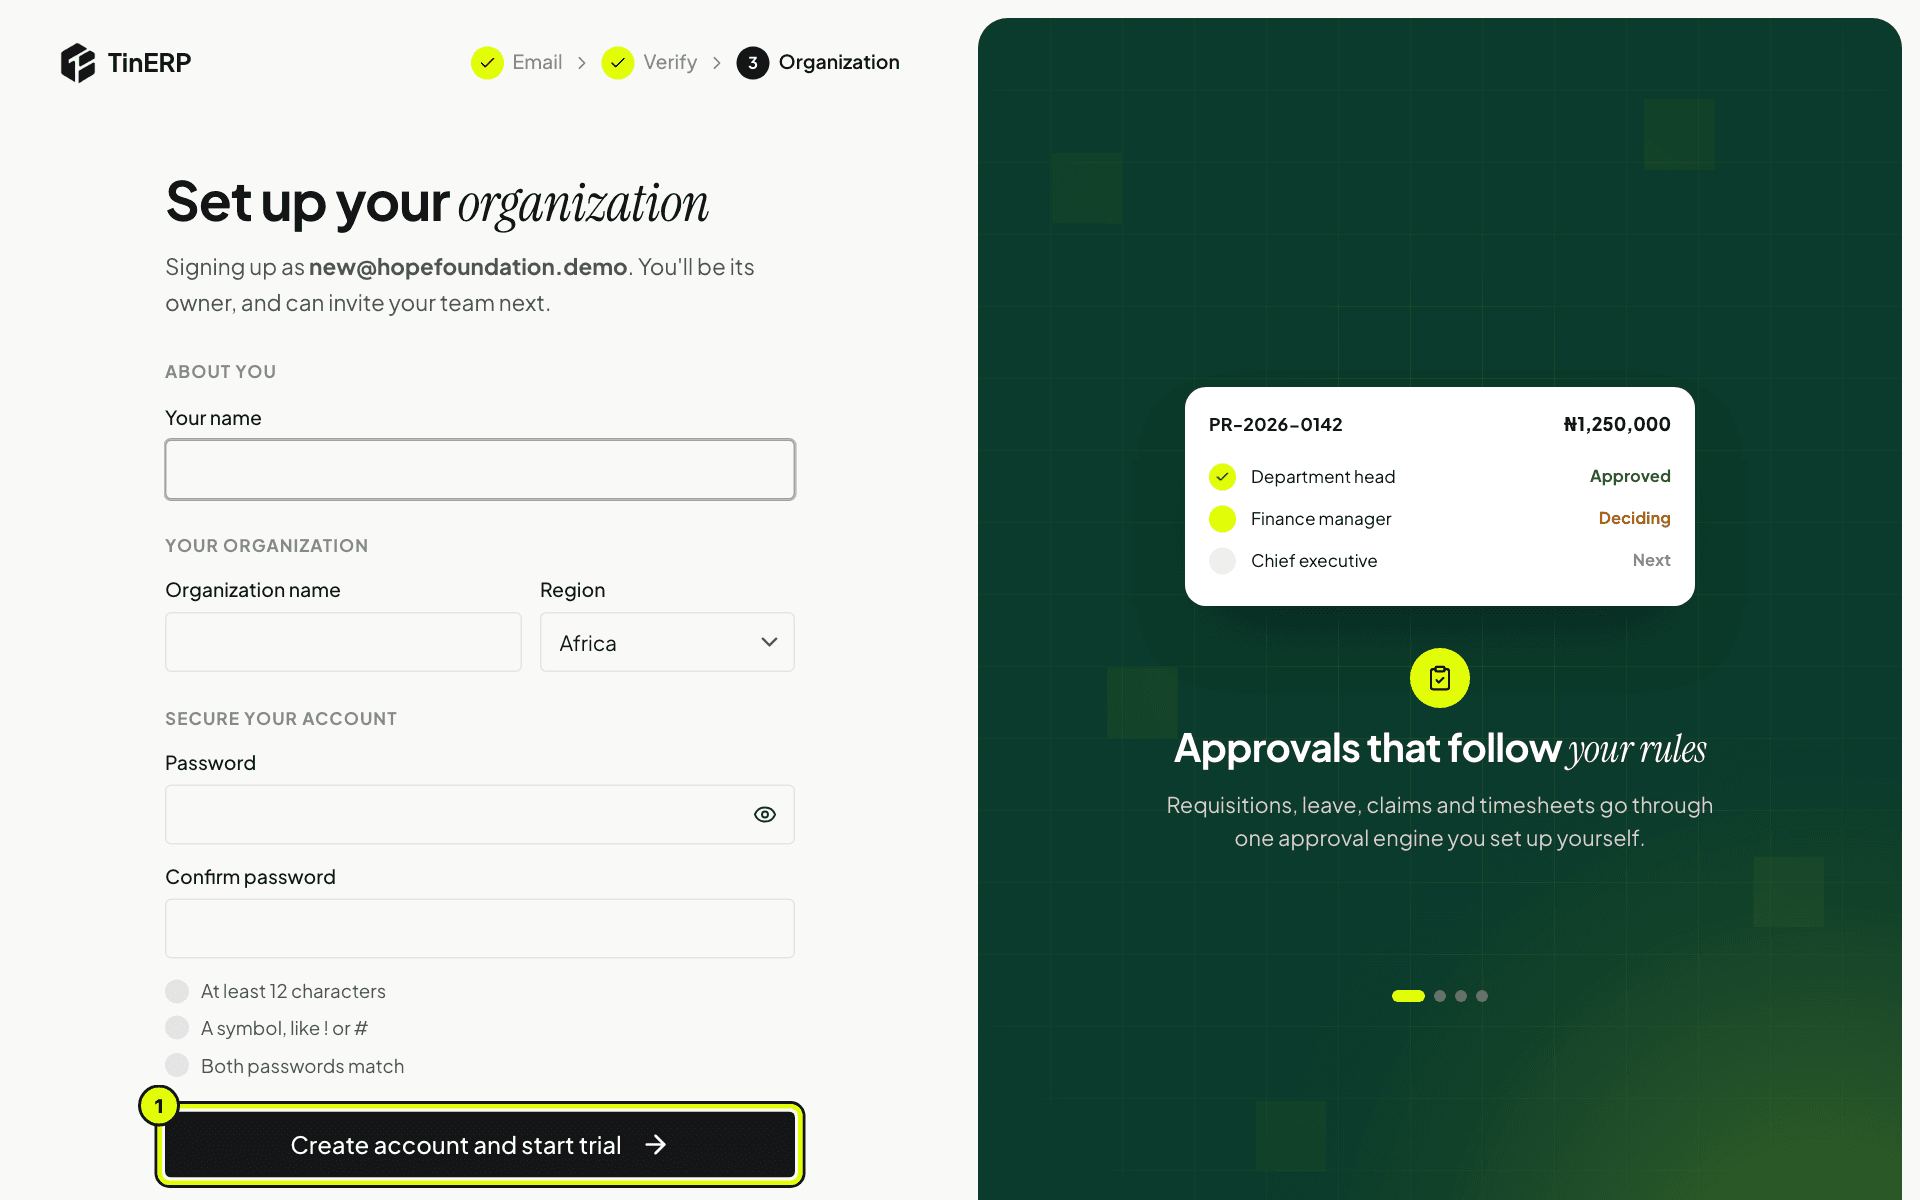
Open the link from the email. Enter your name, your organization's name and region, and choose a password - the list under it ticks off each rule (at least 12 characters, a symbol, both passwords matching) as you go. Then select Create account and start trial.
Your free trial starts straight away with everything included. No card is needed, and nothing is charged when the trial ends.
The Set up your organization form, with Create account and start trial marked 1
3. Find your way around the dashboard
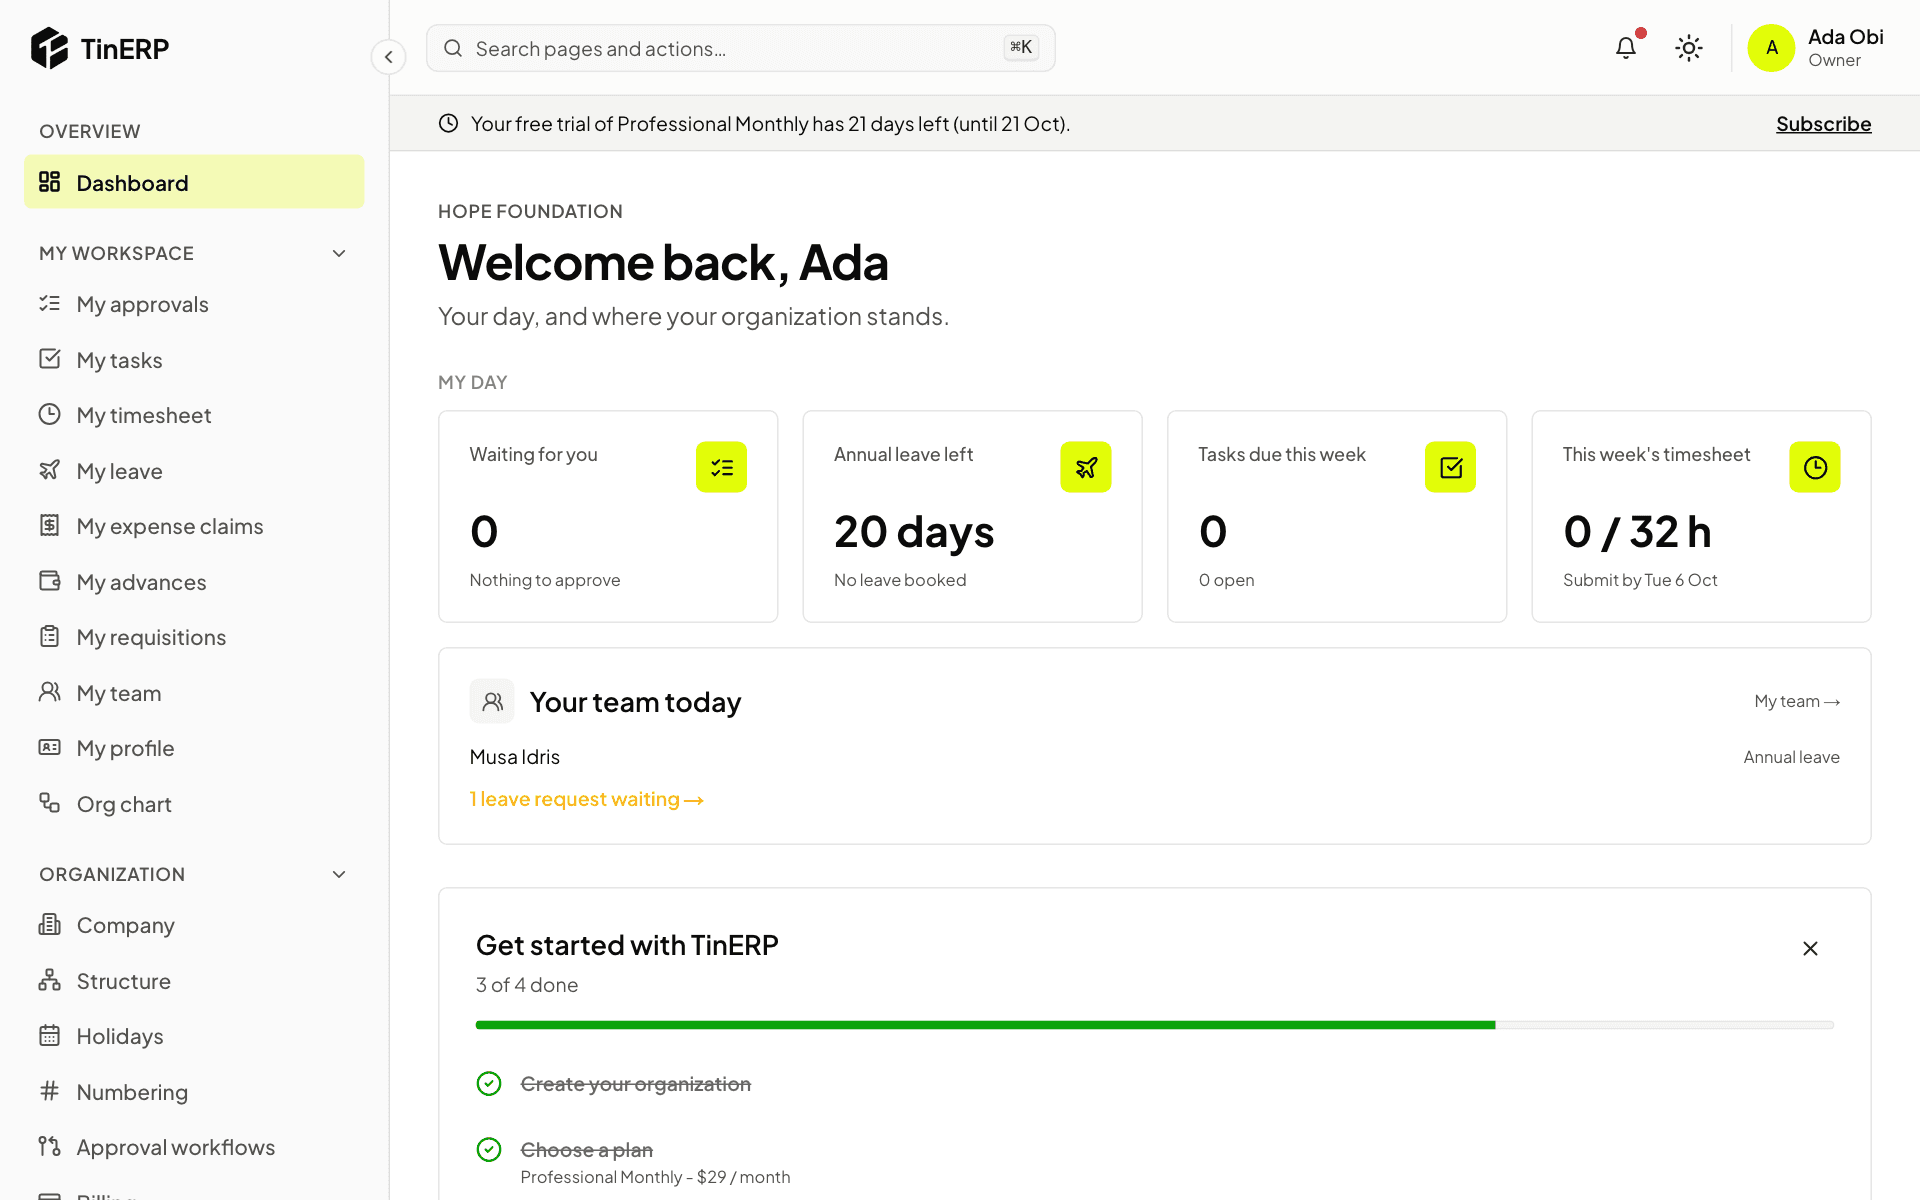
You arrive on your Dashboard. My day at the top shows what needs you today. Below it, Get started lists the setup steps and ticks them off as you finish them.
The menu on the left holds every page you can use. To jump anywhere, select the search bar at the top, or press ⌘K (Ctrl+K on Windows) and type what you're looking for.
The dashboard for an owner: My day, Your team today and the Get started checklist
4. Add your company details
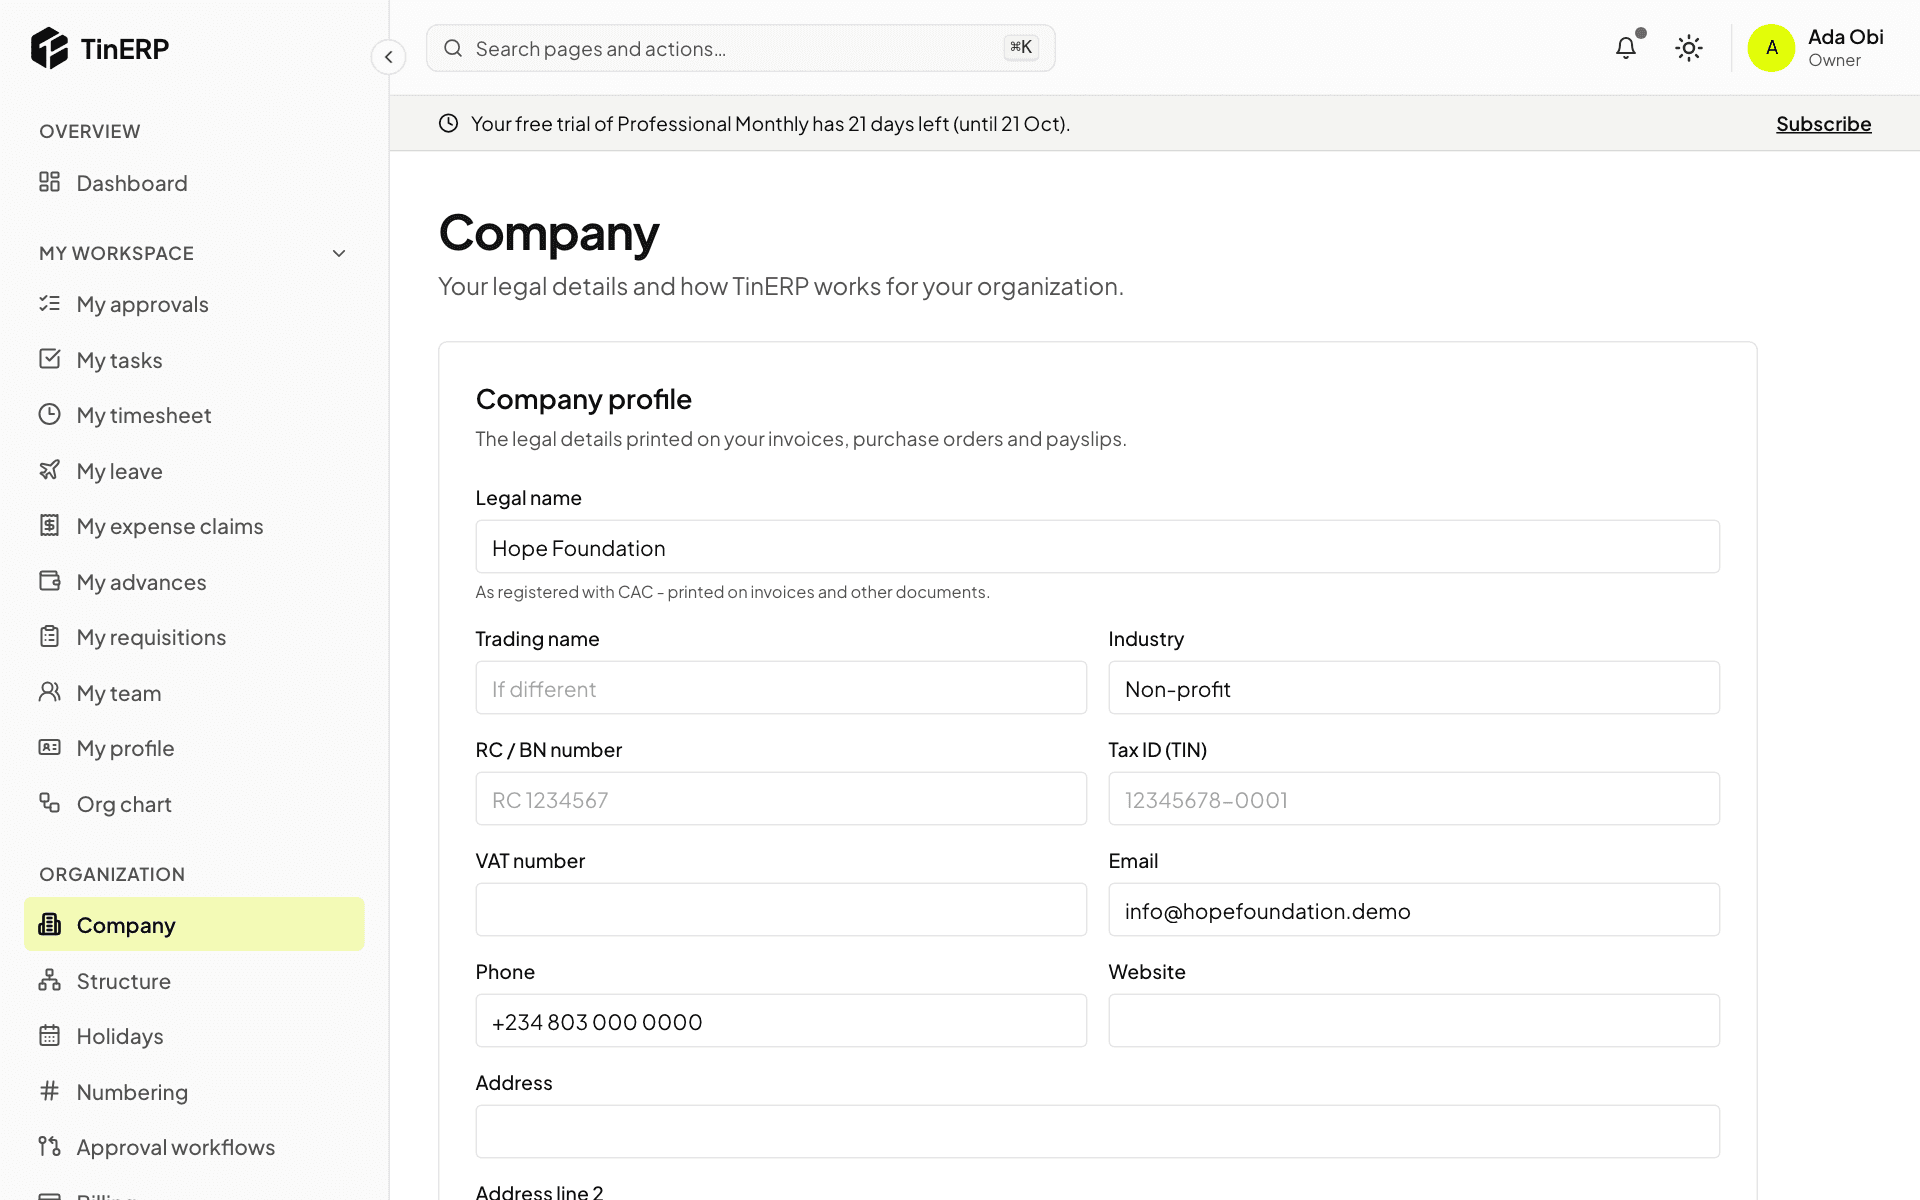
Go to Organization → Company. Enter your legal name as registered with CAC, your RC number, tax ID (TIN), VAT number, contact details and address.
These details are printed on the documents TinERP produces, such as invoices and purchase orders, so it's worth getting them right before you issue any.
The Company page with the company profile form
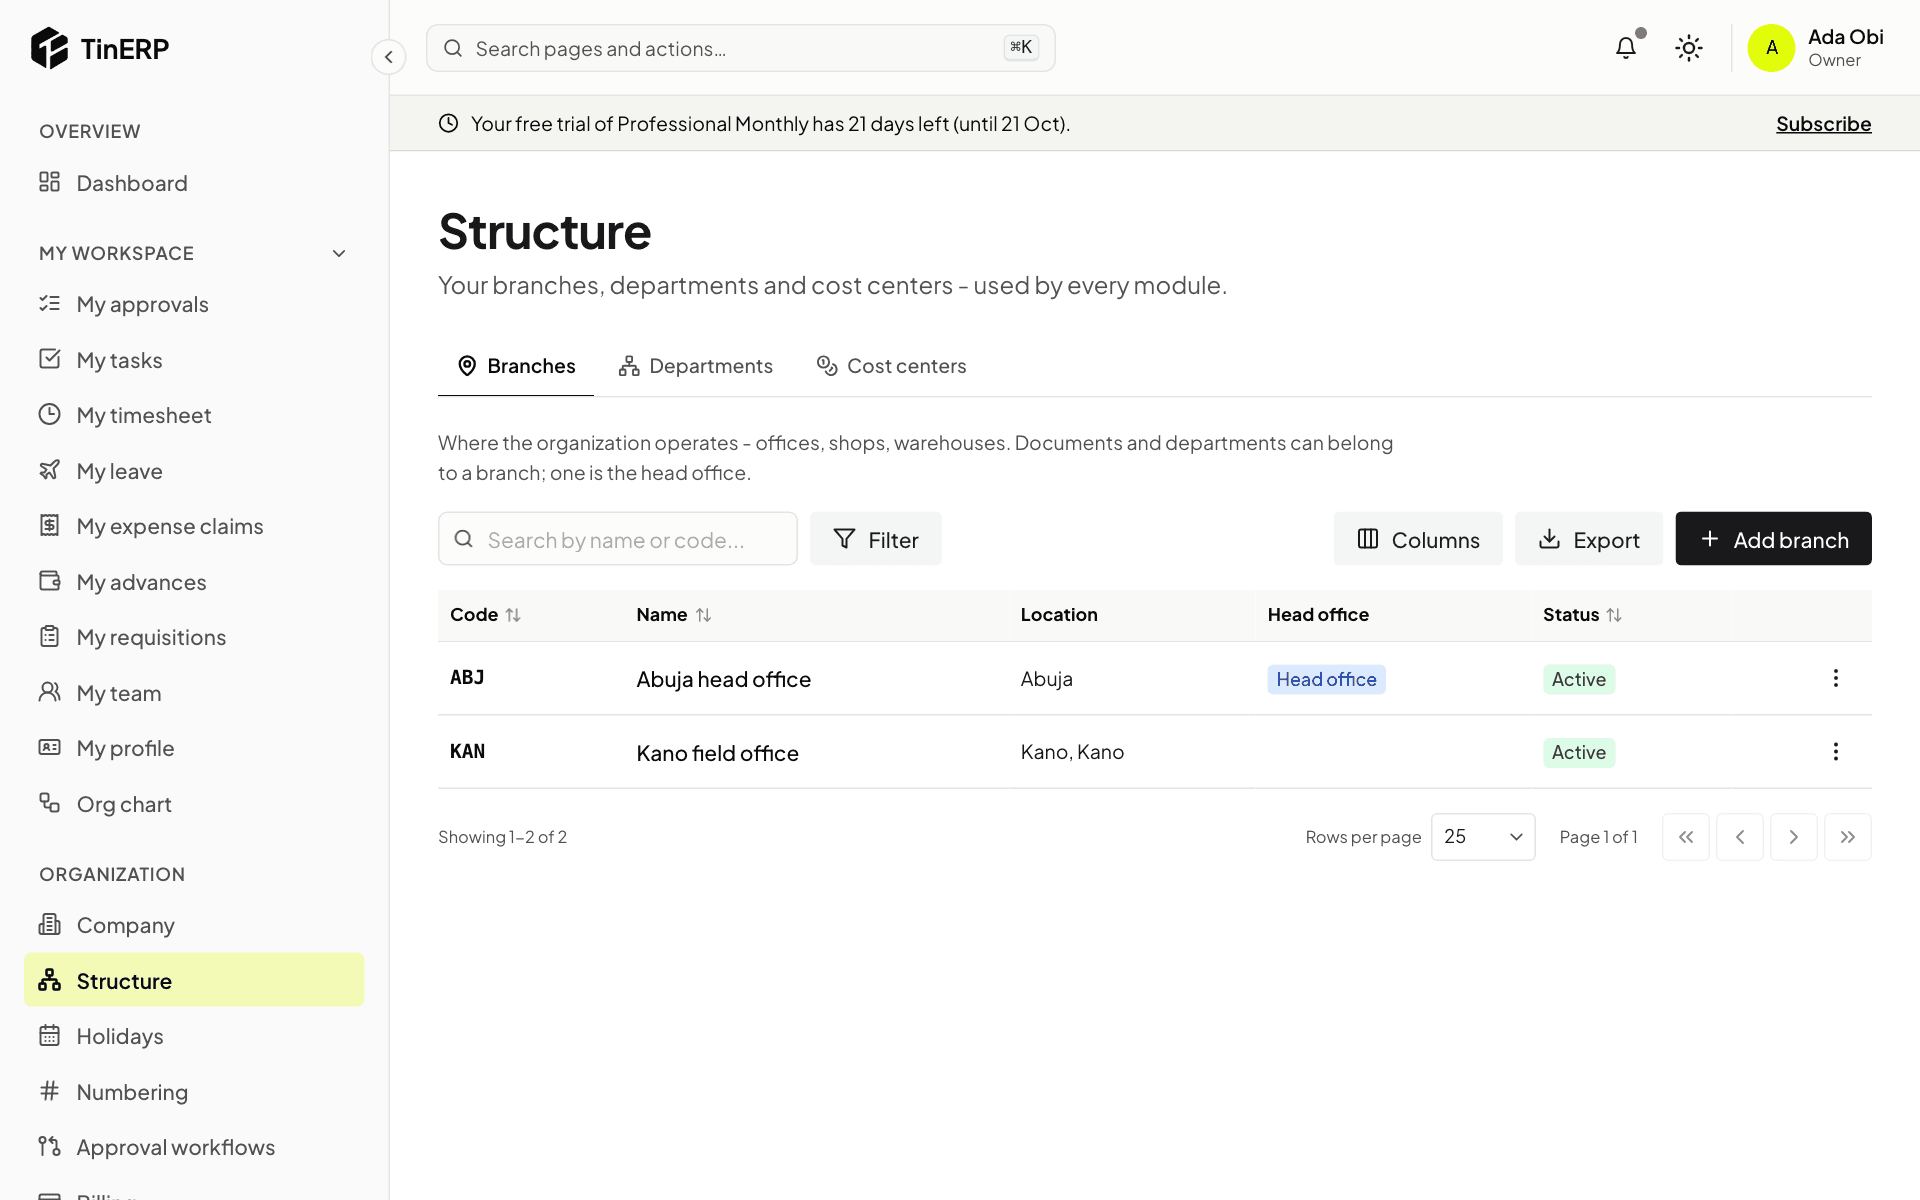
5. Set up your structure
Go to Organization → Structure. Add your branches (offices, sites or warehouses - mark one as head office), your departments and, if you use them, cost centres.
Every module uses this structure: people belong to a department, approvals can depend on it, and reports can be filtered by it.
The Structure page showing two branches, Abuja head office and Kano field office
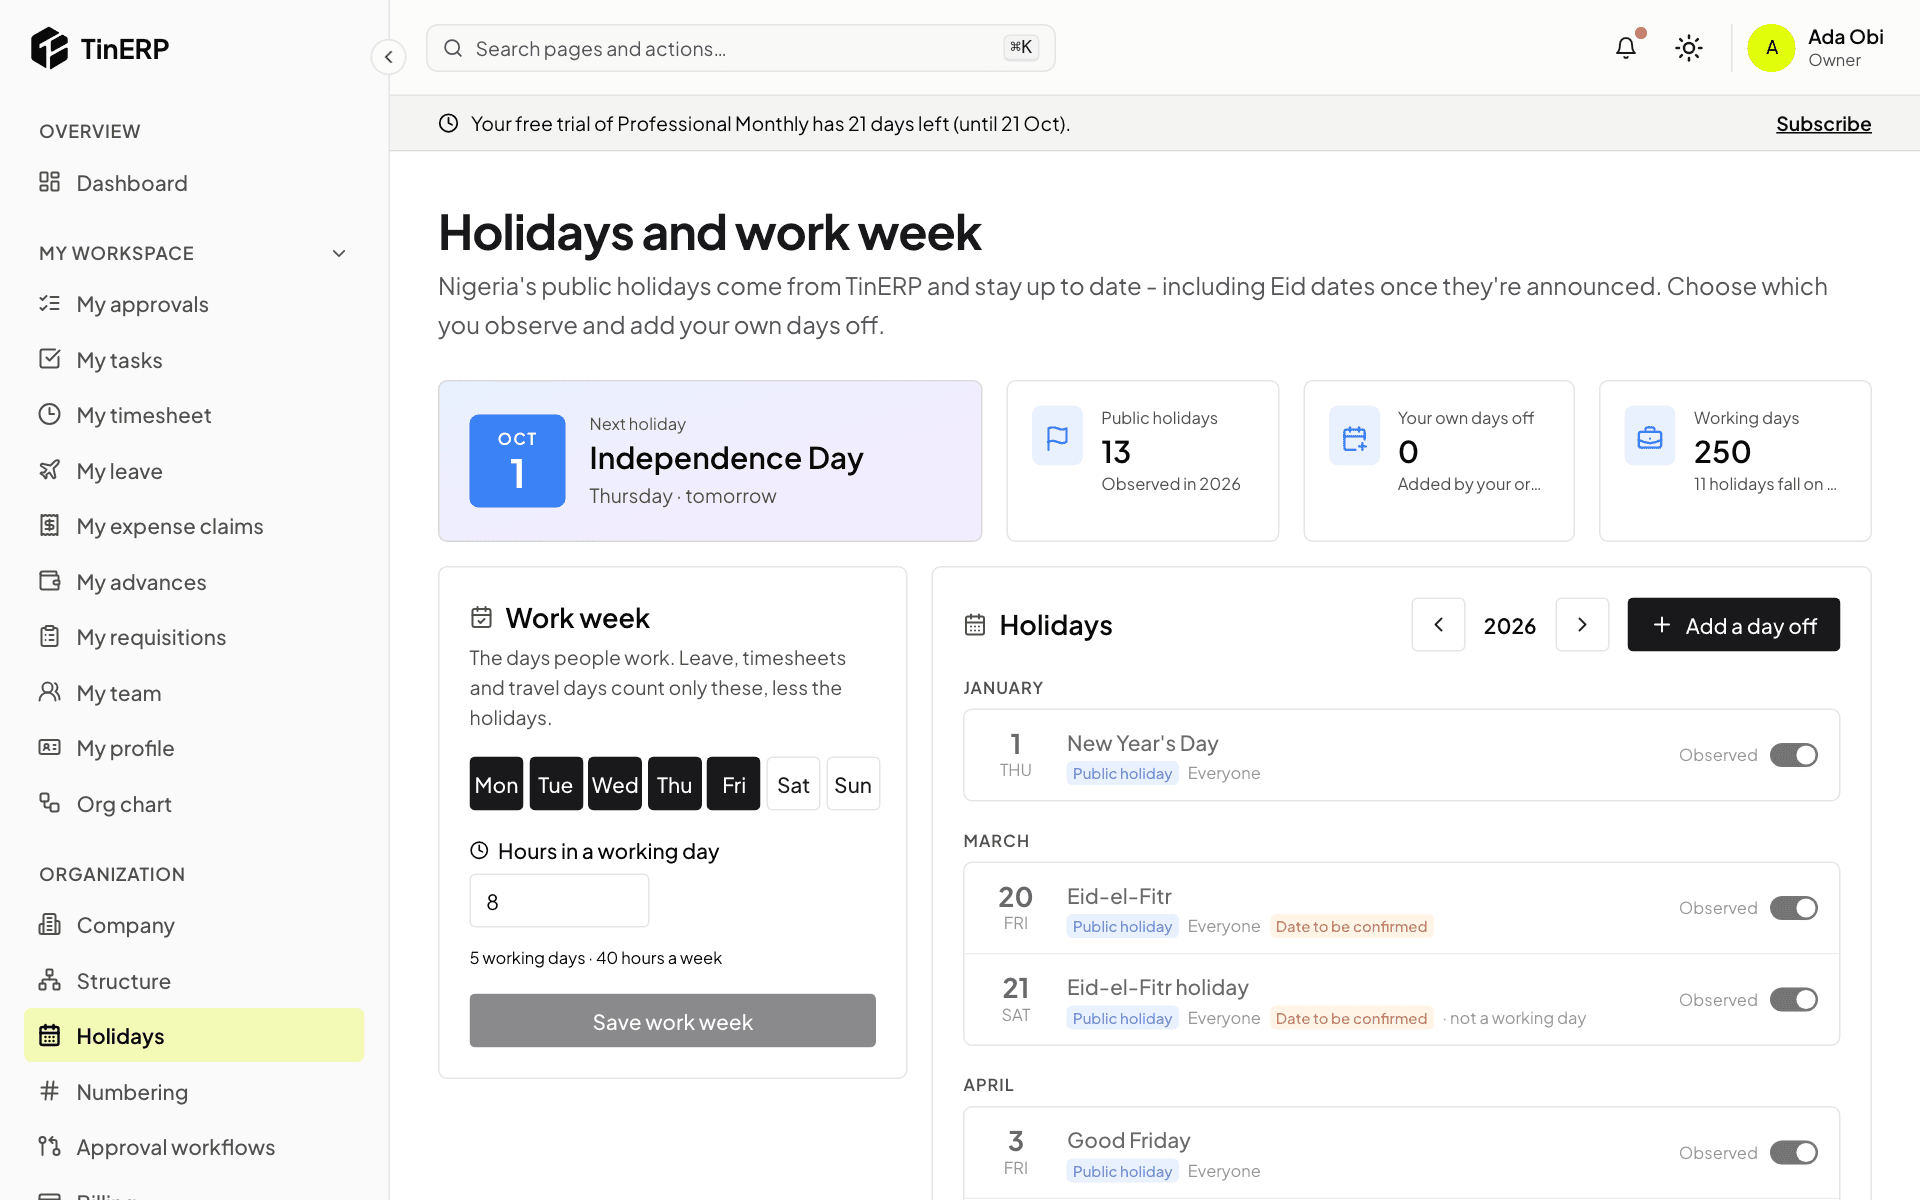
6. Check holidays and your work week
Go to Organization → Holidays. Nigeria's public holidays come from TinERP and stay up to date - including Eid dates once they're announced. Choose which ones you observe and add your organization's own days off with Add a day off.
Under Work week, choose your working days and the hours in a working day. Leave, timesheets and travel all count days using these settings.
The Holidays and work week page with the next holiday, the work week and the list of holidays
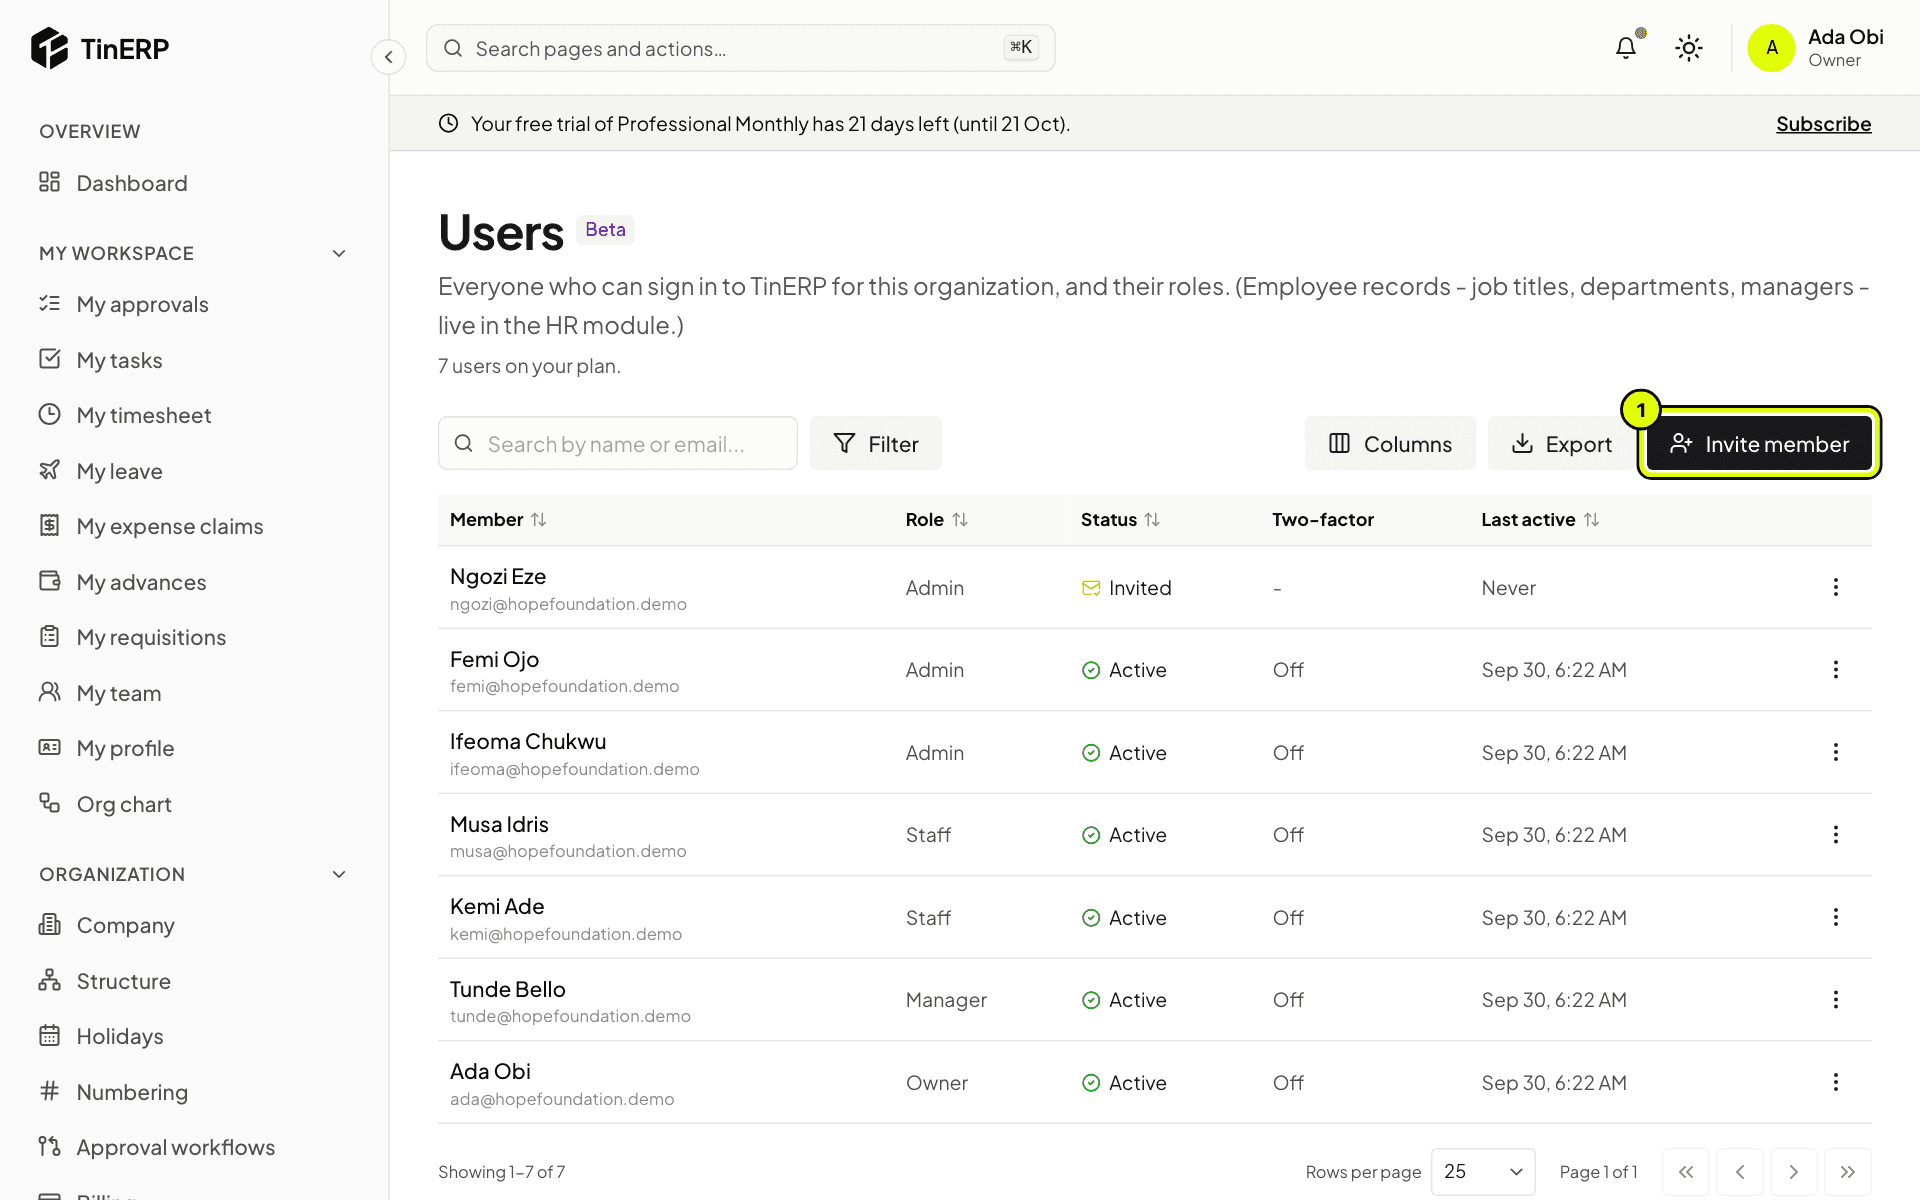
7. Invite your team
Go to Access & security → Users and select Invite member (1). Enter the person's name and email, choose their role, and select Send invite.
They get an email with a link to choose their password. The link lasts 72 hours; you can resend it from the same page. Until they join, they're listed as Invited.
The Users page with the Invite member button marked 1
Tip: You don't have to invite everyone at once. Start with the people who will set up their own modules - for example your HR or finance lead - and invite everyone else when you're ready.
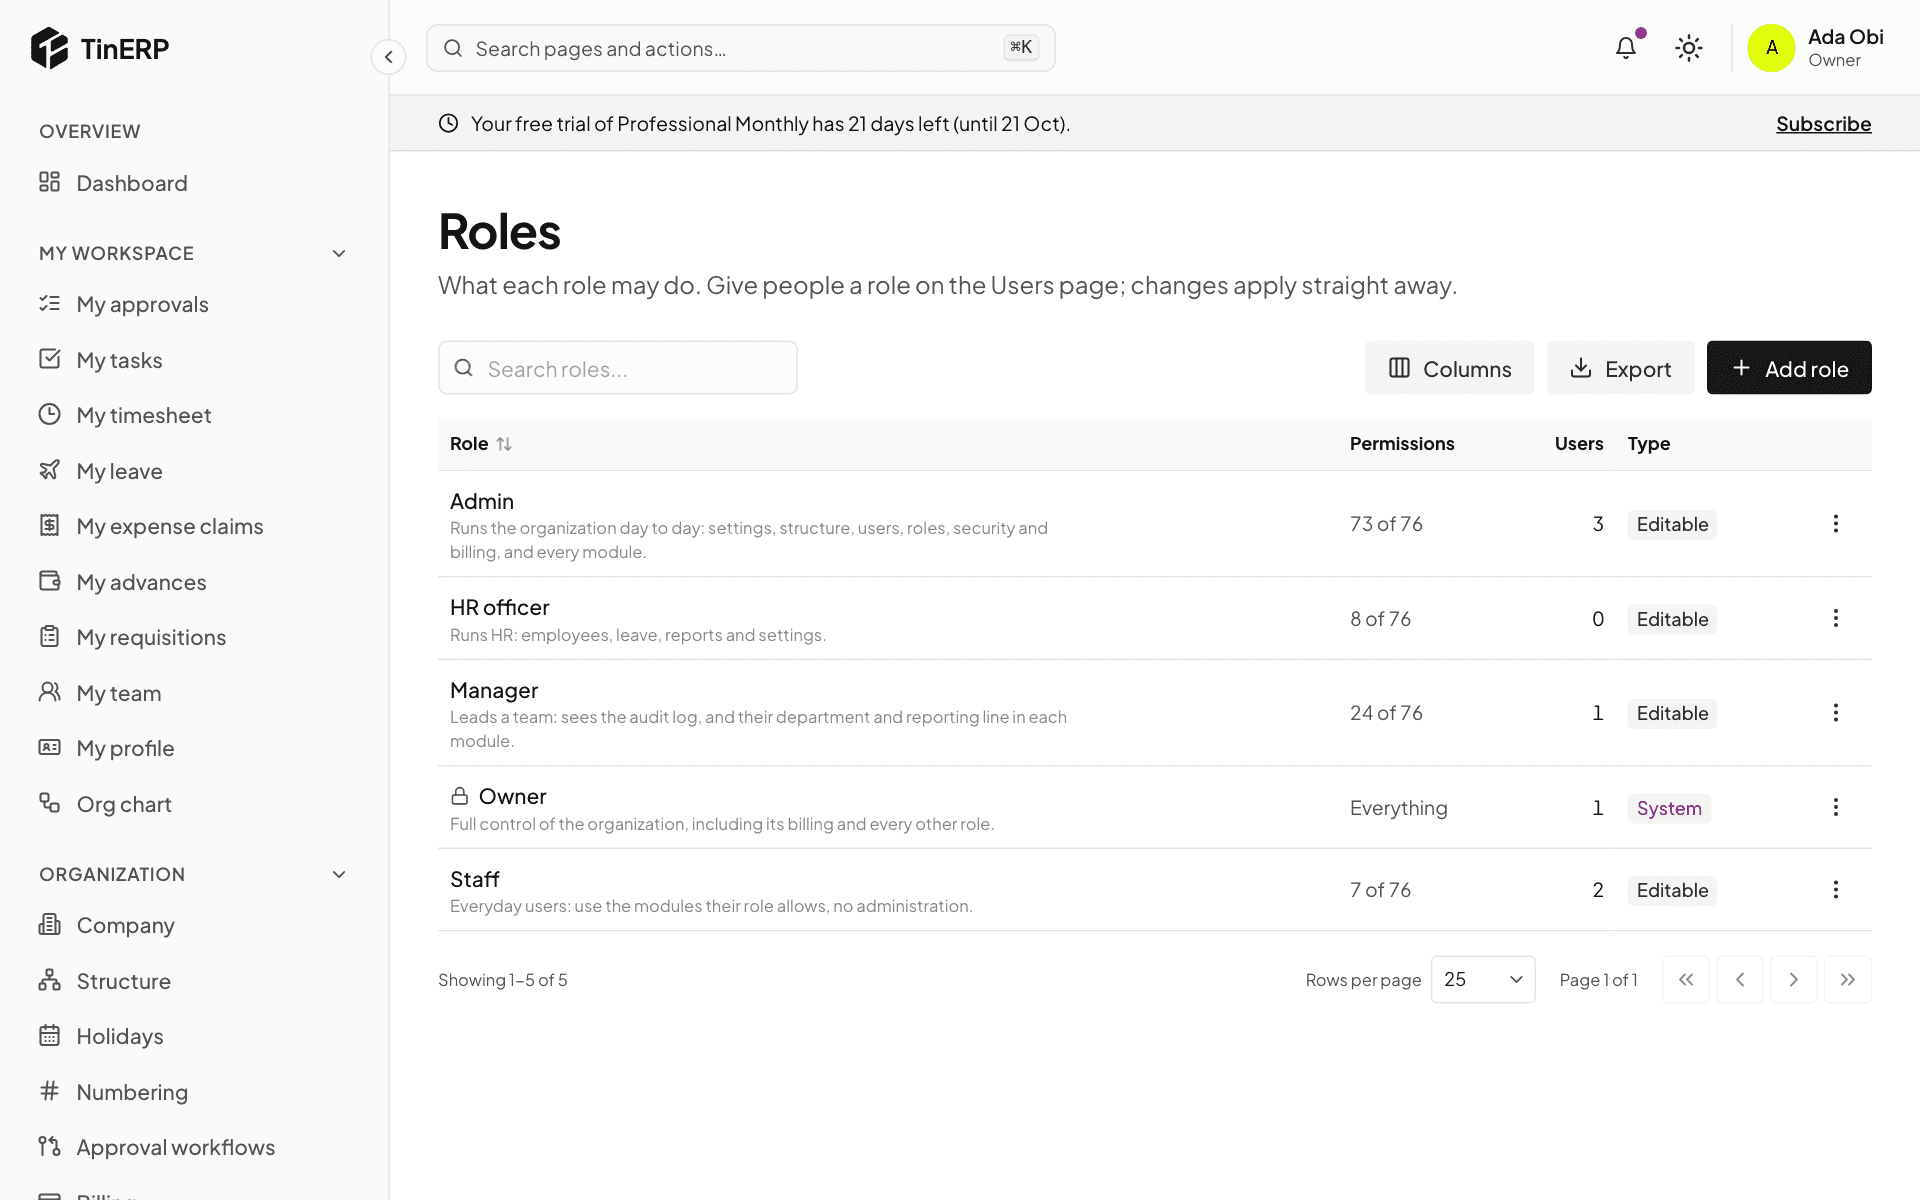
8. Choose what each role can do
Go to Access & security → Roles. TinERP starts you with four roles: Owner (everything, including billing), Admin, Manager and Staff.
Open a role to see and change its permissions, module by module - down to whether someone sees only their own records, their department's or everyone's. Select Add role for anything the four don't cover, such as a finance officer.
The Roles page listing Admin, Manager, Owner and Staff with their permission counts
9. Set your approval rules
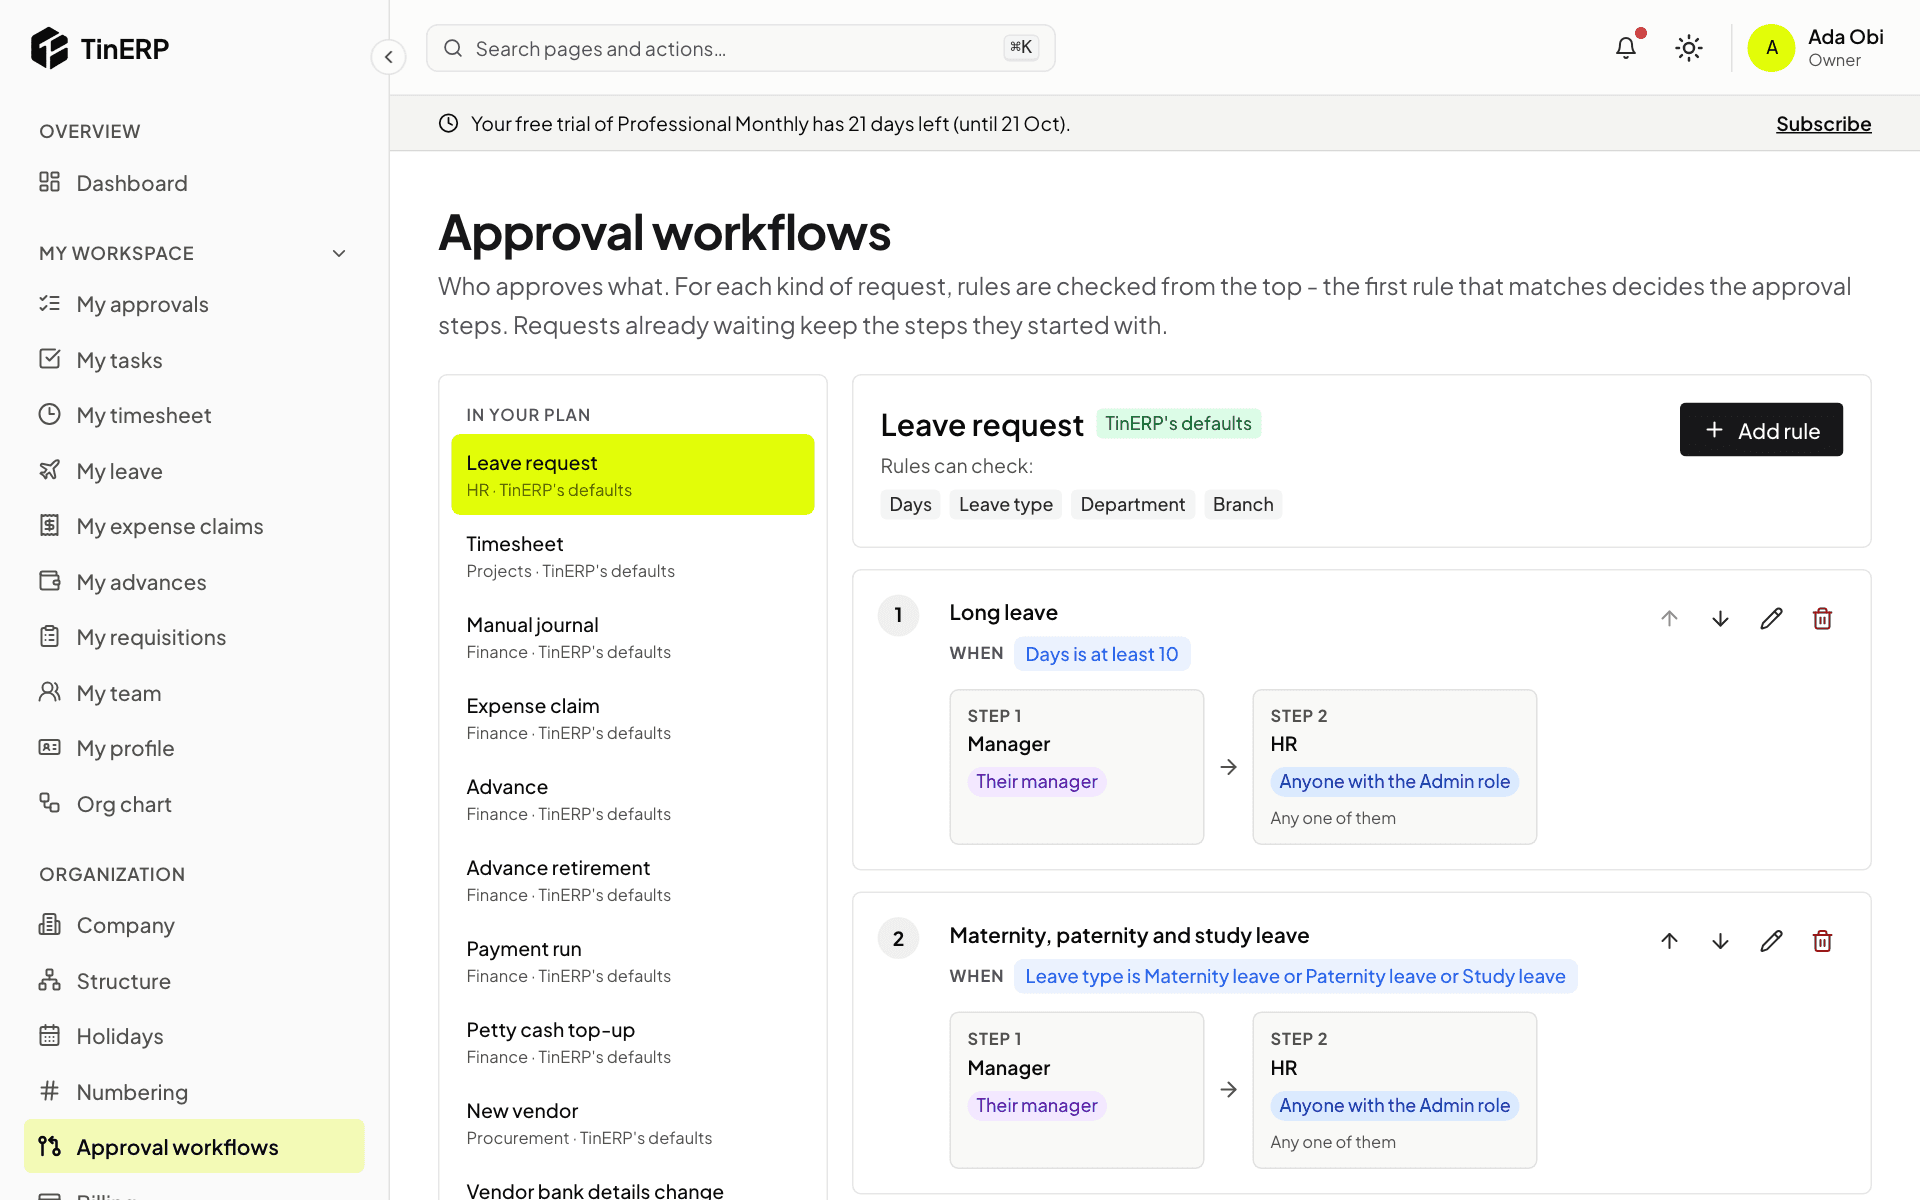
Go to Organization → Approval workflows. Each kind of request - leave, timesheets, expense claims, advances, requisitions, purchase orders and more - starts with sensible TinERP defaults, usually the person's manager.
Open a request type to change who approves it. A rule has conditions (for example Days is at least 10, or an amount over a limit) and steps in order. The first rule that matches a request decides who approves it.
The Approval workflows page for leave requests, showing a Long leave rule with manager then HR steps
10. Choose a plan
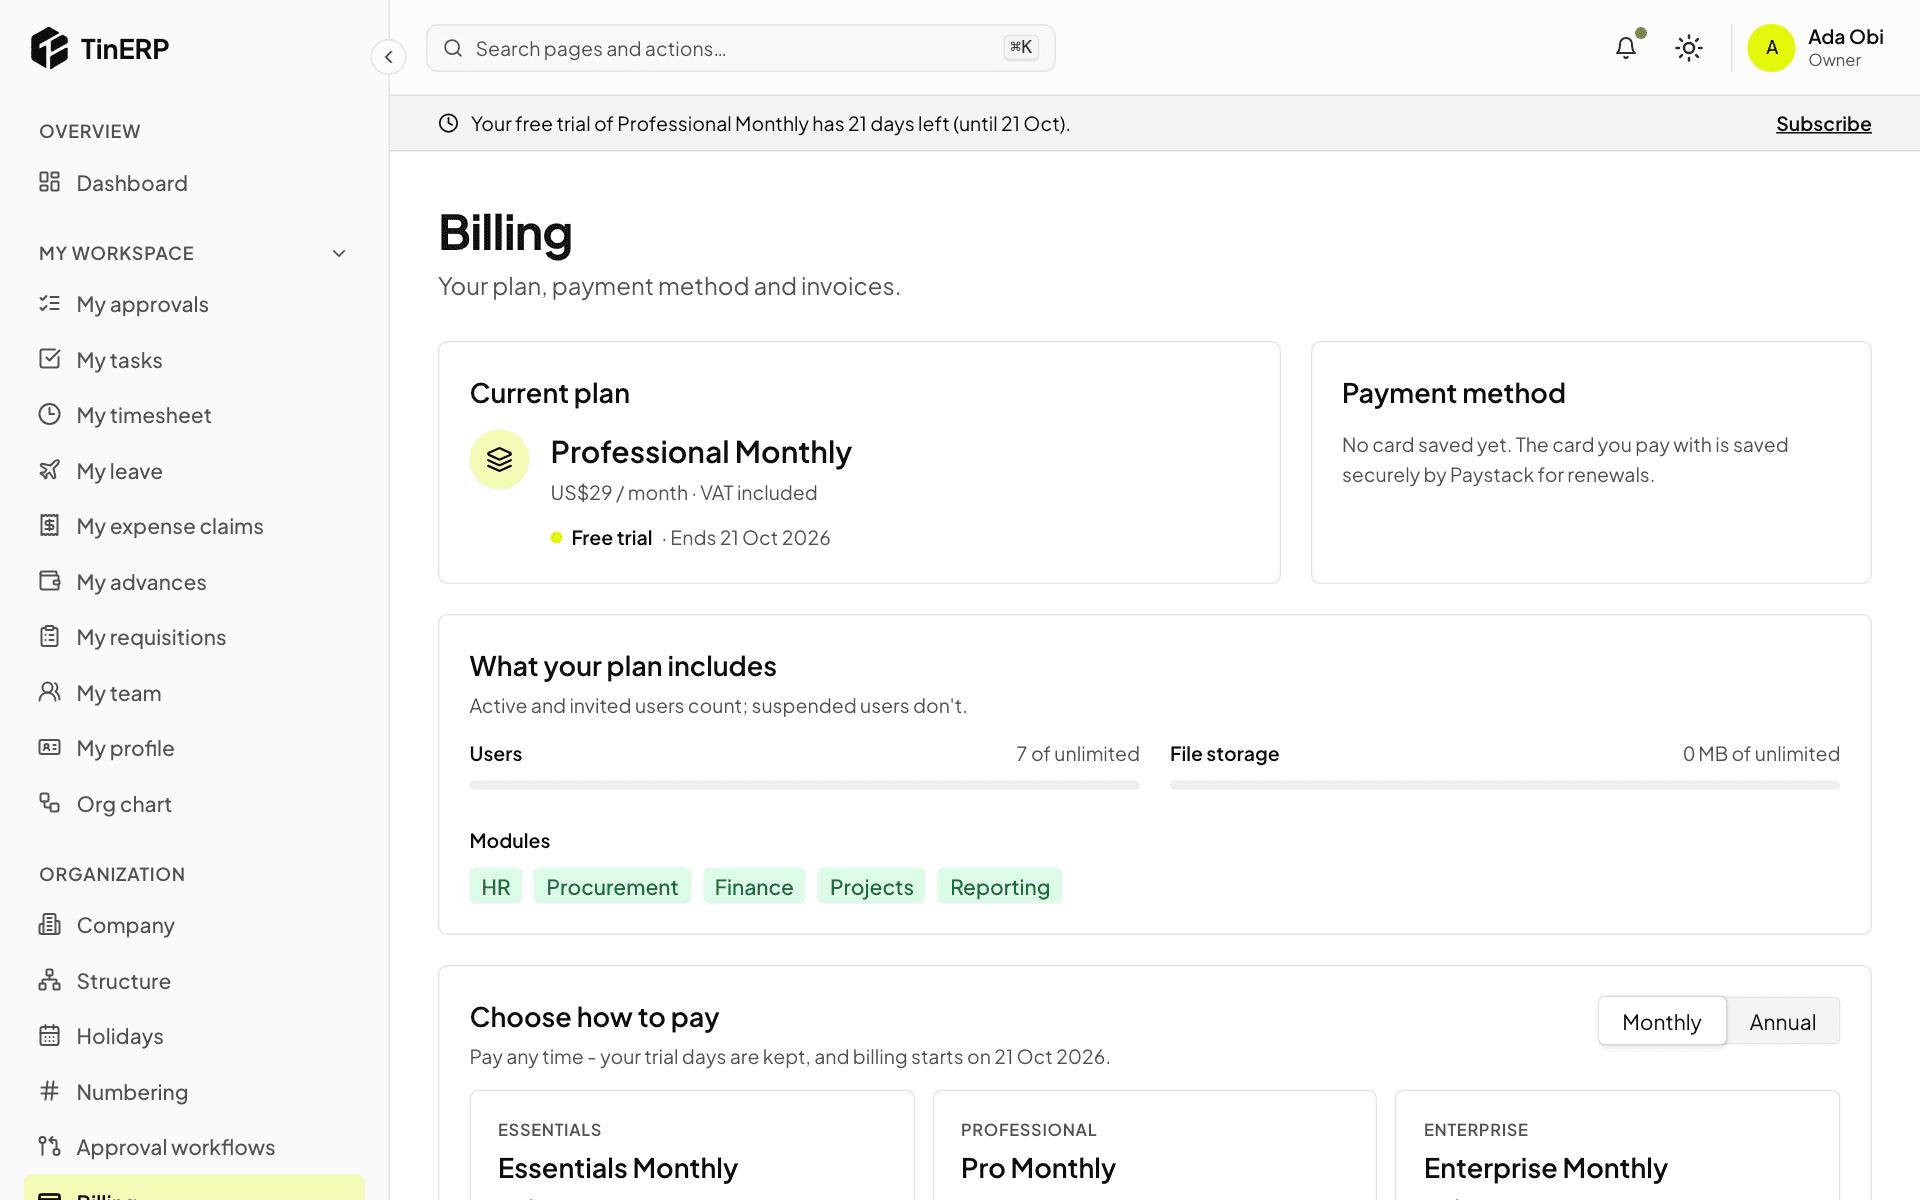
When you're ready, go to Organization → Billing. You can pay any time during your trial - the trial days you have left are kept.
Choose monthly or annual, then pay by card (securely through Paystack) or by bank transfer. Paid plans renew automatically until you cancel, and prices include VAT.
The Billing page showing the current plan, what it includes and the plans to choose from
Questions
Can someone else do the setup for me?
Yes. Invite them with the Admin role - admins can do every step here, including billing. Or ask us: setup is free, and our team can do it with you.
What happens when my trial ends?
Nothing is charged. Owners and admins can still sign in to the Billing page to choose a plan, and your data is kept.
Everyday tasks · Everyone · about 3 min
Sign in and find your way around
Your administrator invites you by email. Open the invitation, choose a password, and you're in.
1. Sign in
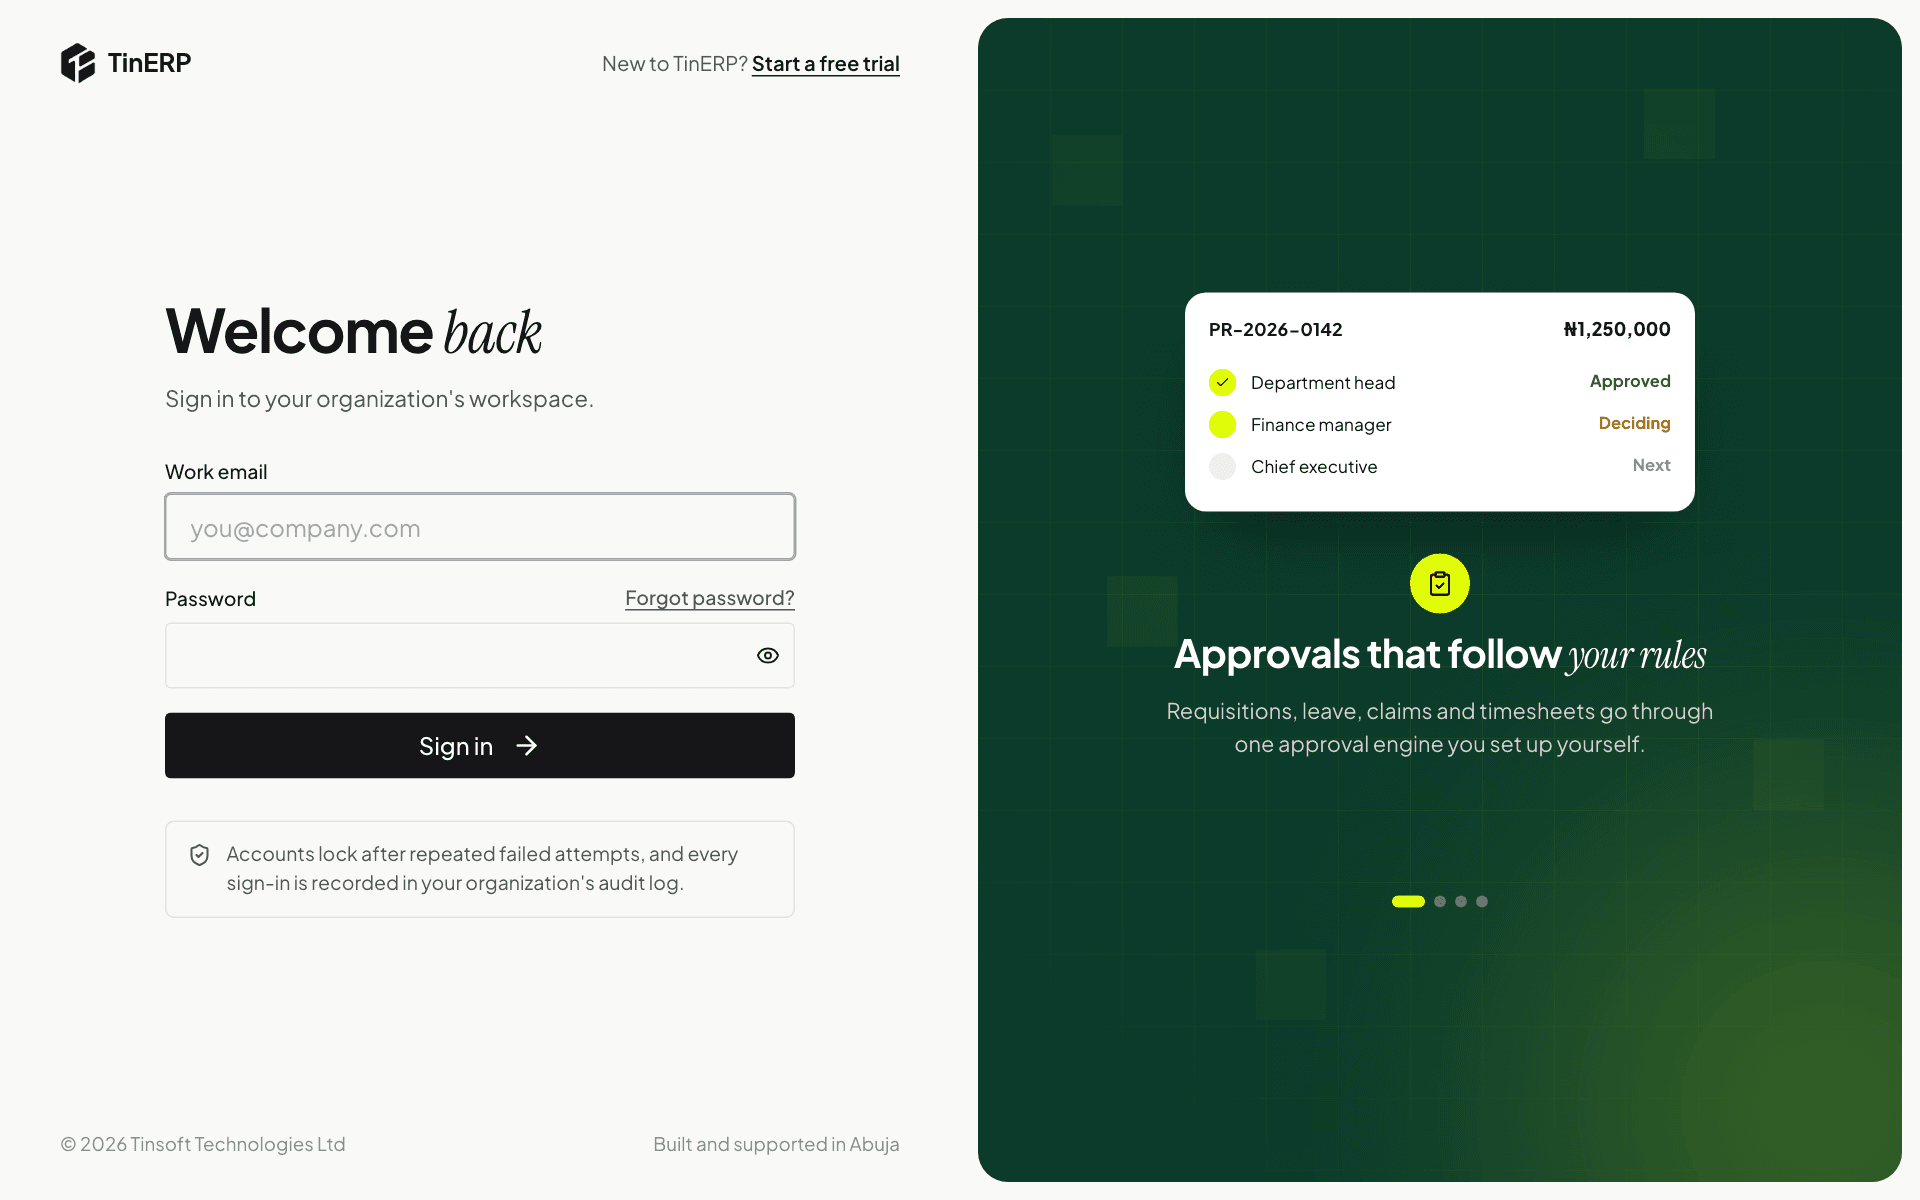
Go to your TinERP sign-in page and enter your email and password. If your organization uses two-factor sign-in, you'll also enter the 6-digit code from your authenticator app.
Forgotten your password? Select Forgot password? next to the password box and we'll email you a link to choose a new one. It works once and expires after 30 minutes.
The TinERP sign-in page
2. Find anything with search
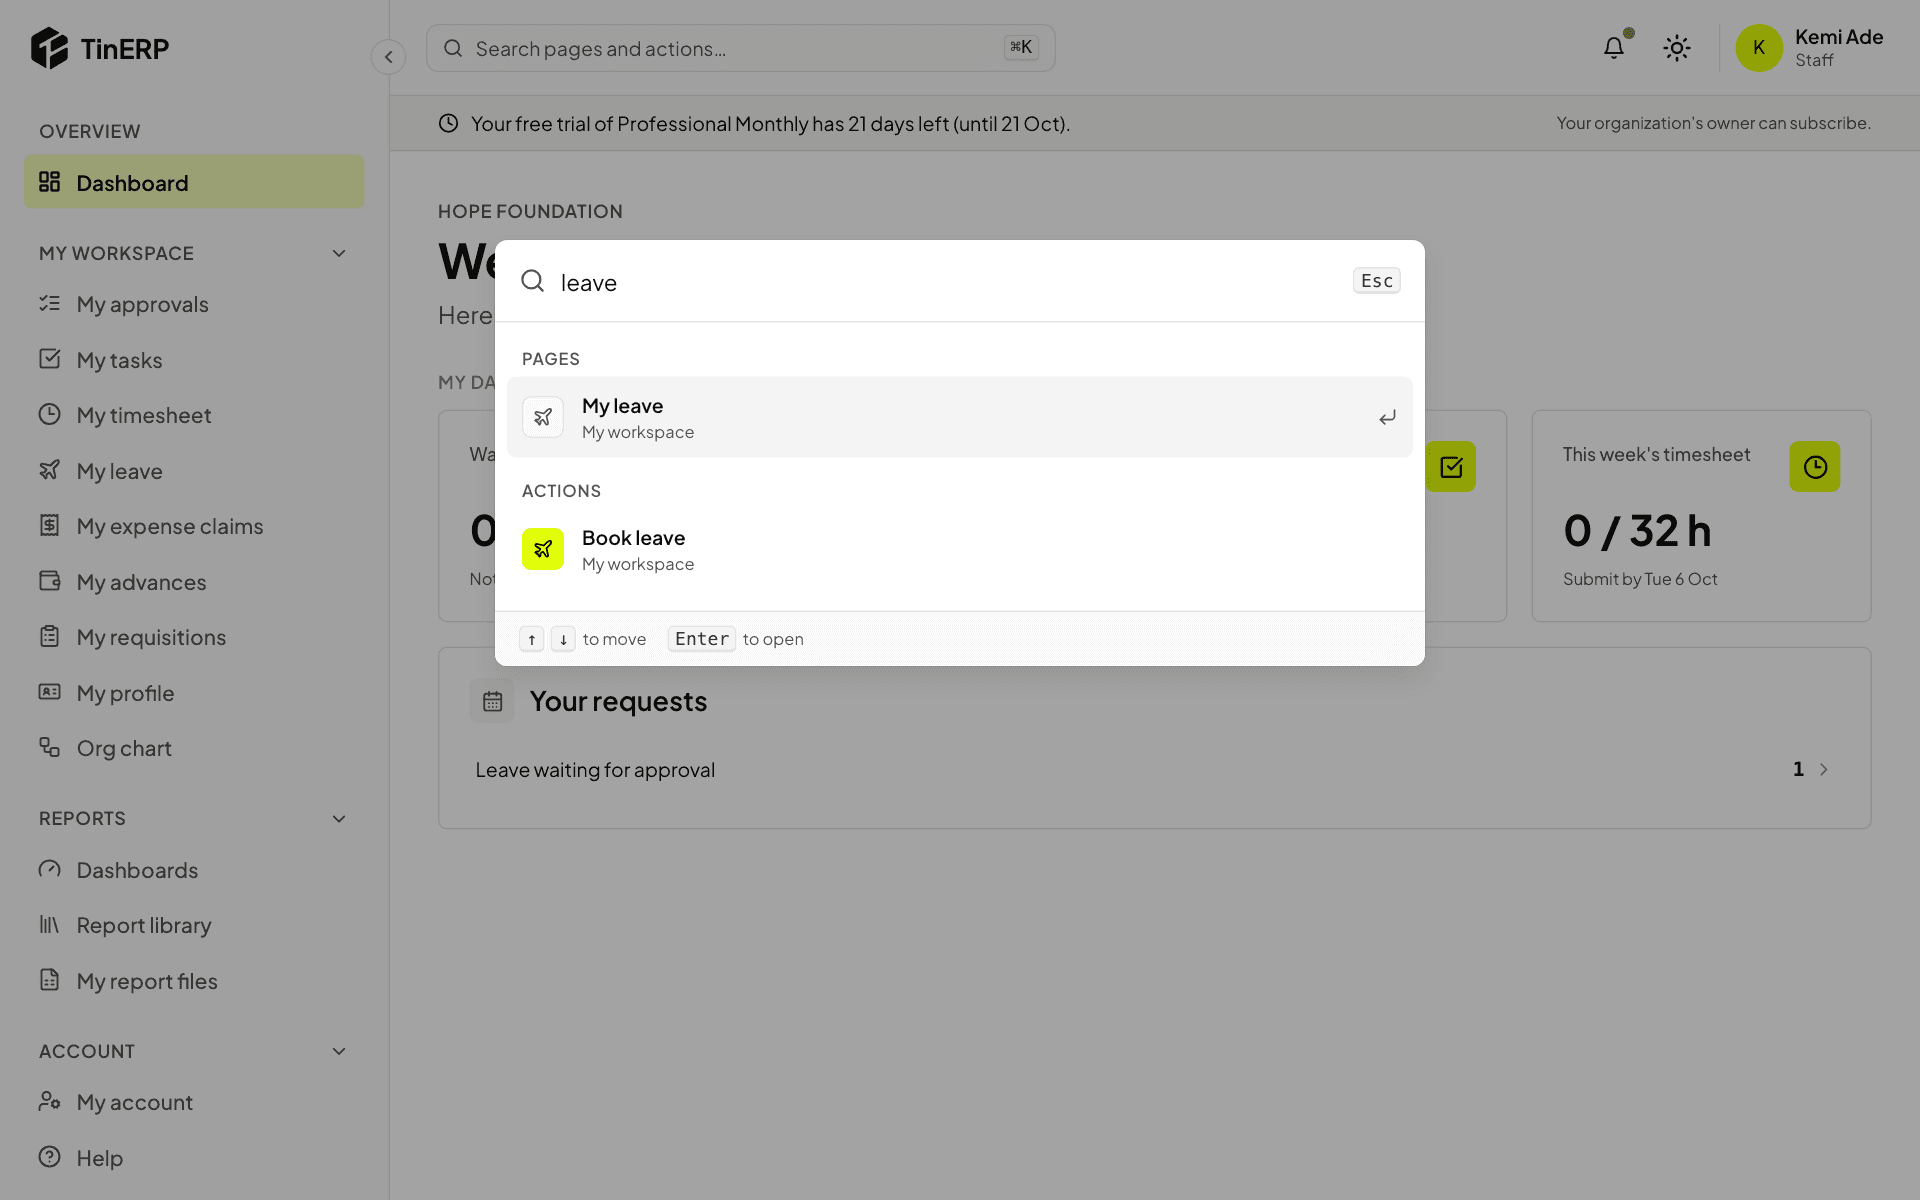
Select the search bar at the top of every page, or press ⌘K (Ctrl+K on Windows). Start typing - for example "leave" - and choose a page or an action with the arrow keys and Enter.
Search only shows what you're allowed to use, and remembers what you opened recently.
The search window with 'leave' typed, showing My leave and Book leave
Everyday tasks · Everyone · about 2 min
Your day at a glance
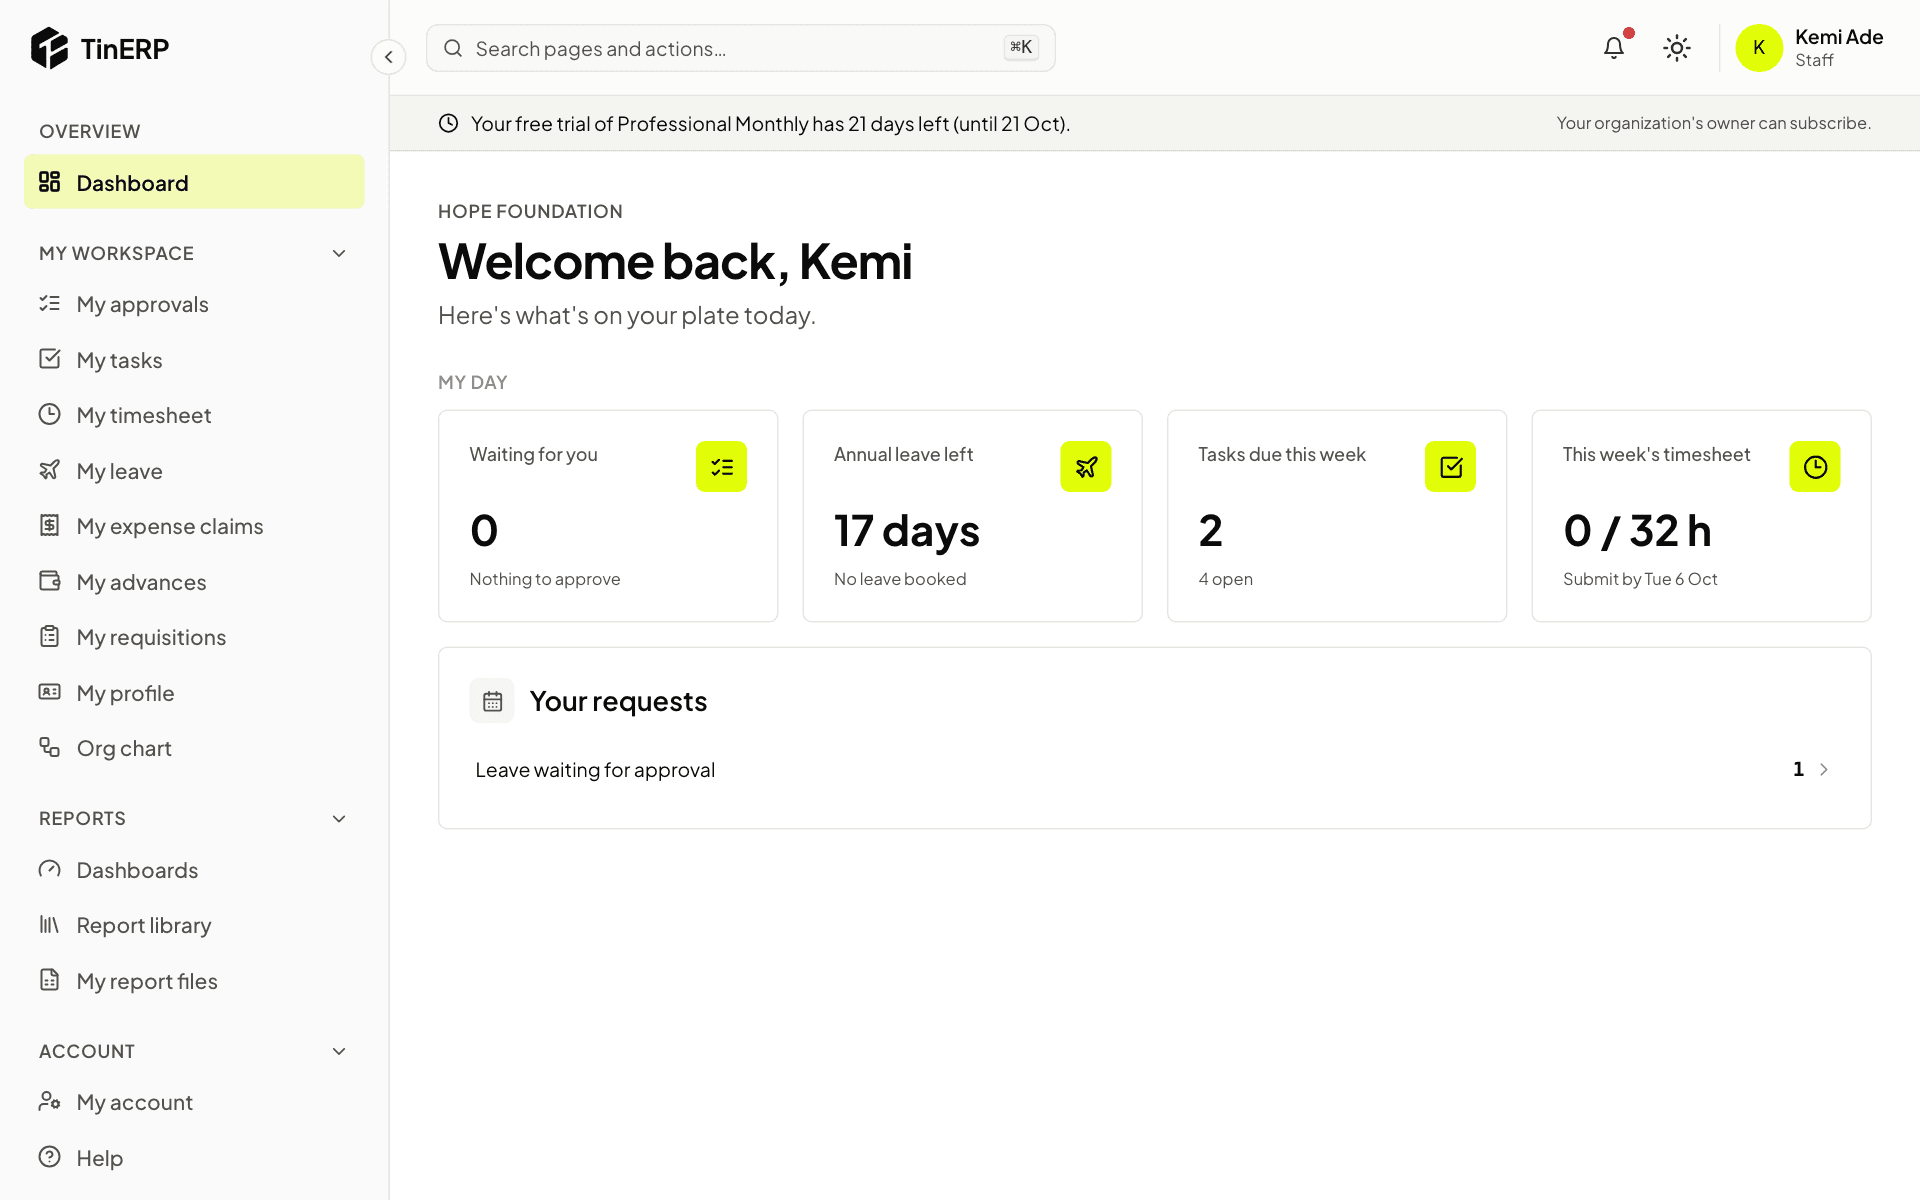
Your Dashboard is built around you: what's waiting for you, your leave, your tasks and your timesheet. Managers also see their team.
1. Read My day
Waiting for you counts approvals only you can decide. Leave left, Tasks due this week and This week's timesheet keep you on track.
Select any tile to go straight to it. Your requests lists what you've asked for that's still waiting, such as leave or an expense claim.
Kemi's dashboard: waiting for you, annual leave left, tasks due and this week's timesheet
Everyday tasks · Everyone · about 3 min
Book leave
Leave requests go to your manager (or whoever your organization's rules say). You're notified when they decide.
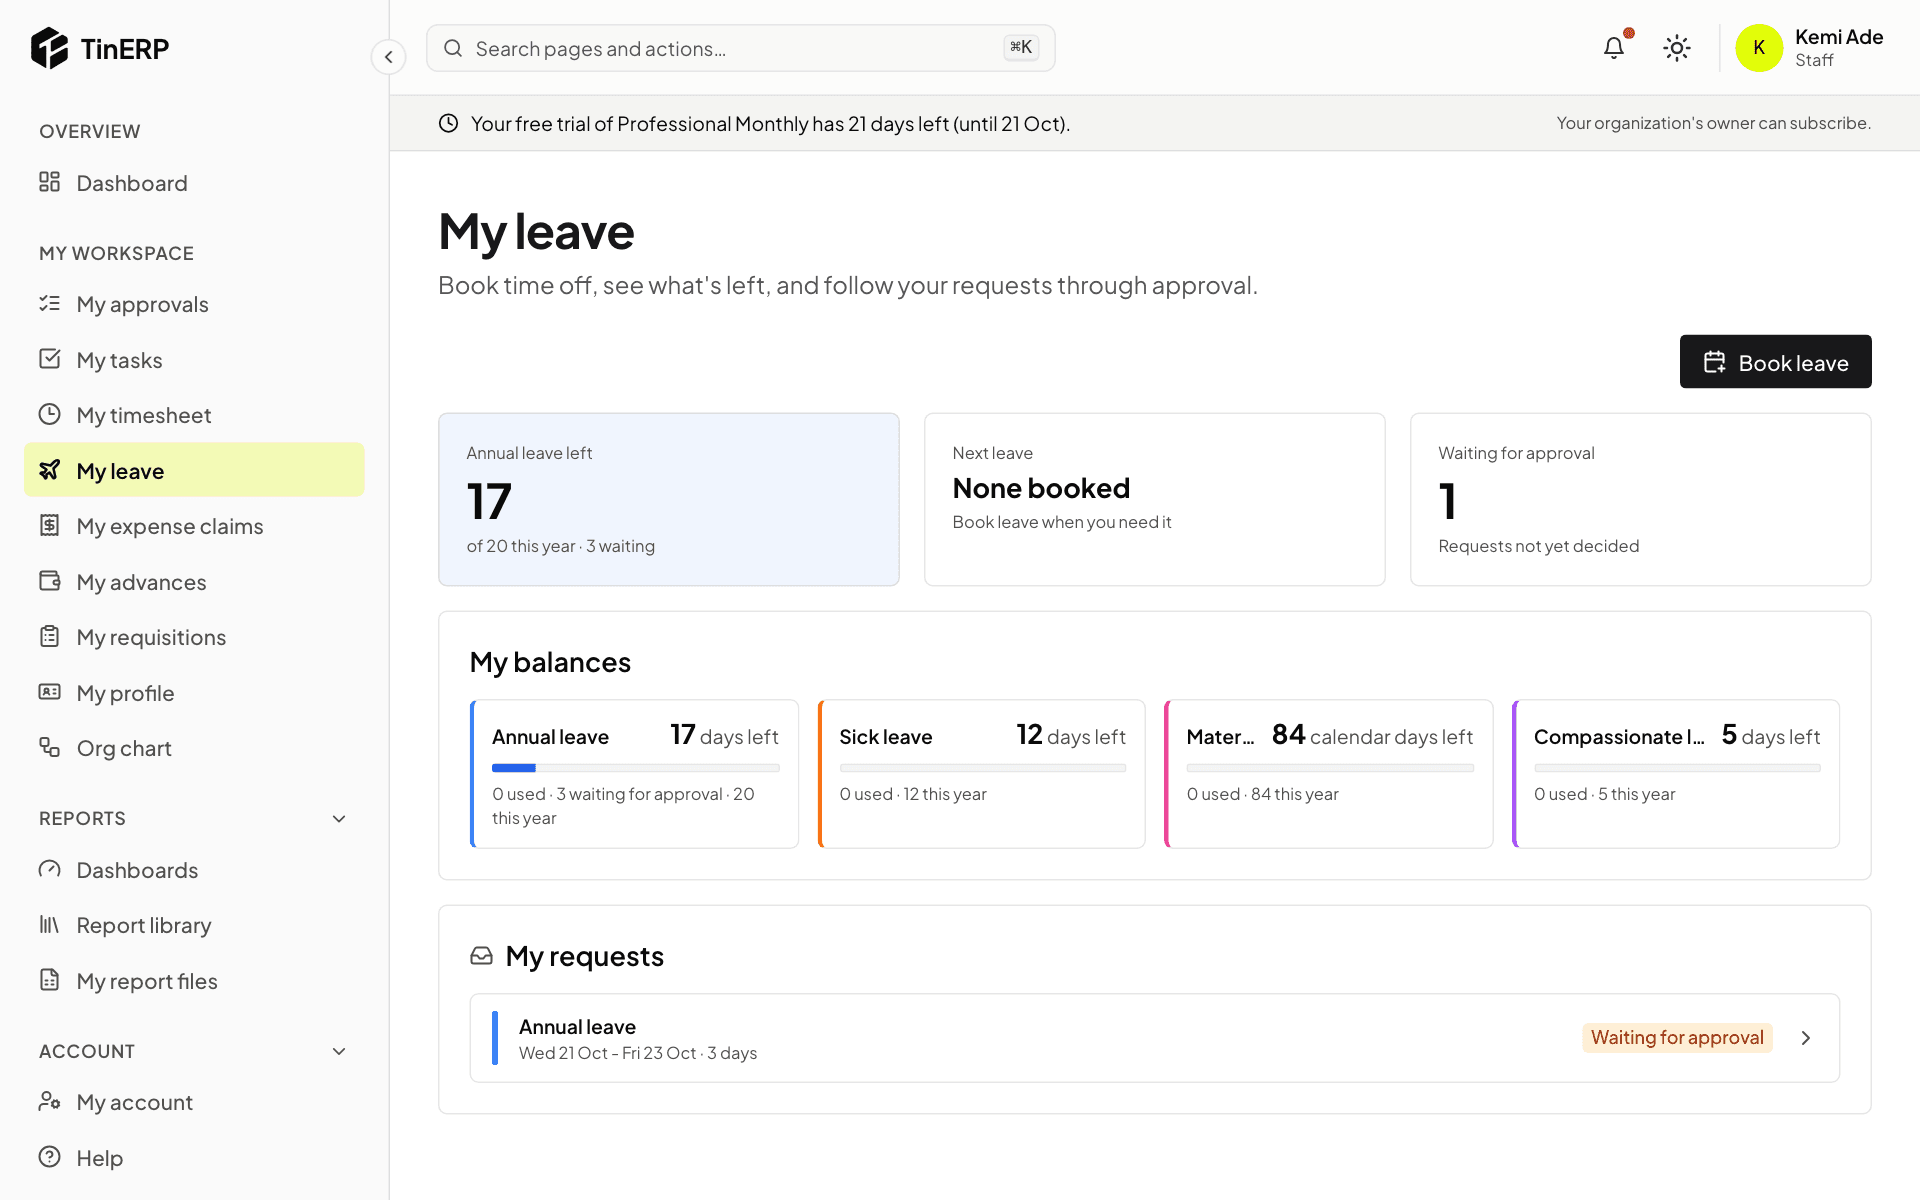
1. Check your balances
Go to My workspace → My leave. You'll see how many days you have left of each type, your next booked leave, and your requests.
My leave: annual leave left, balances by type and a request waiting for approval
2. Ask for leave
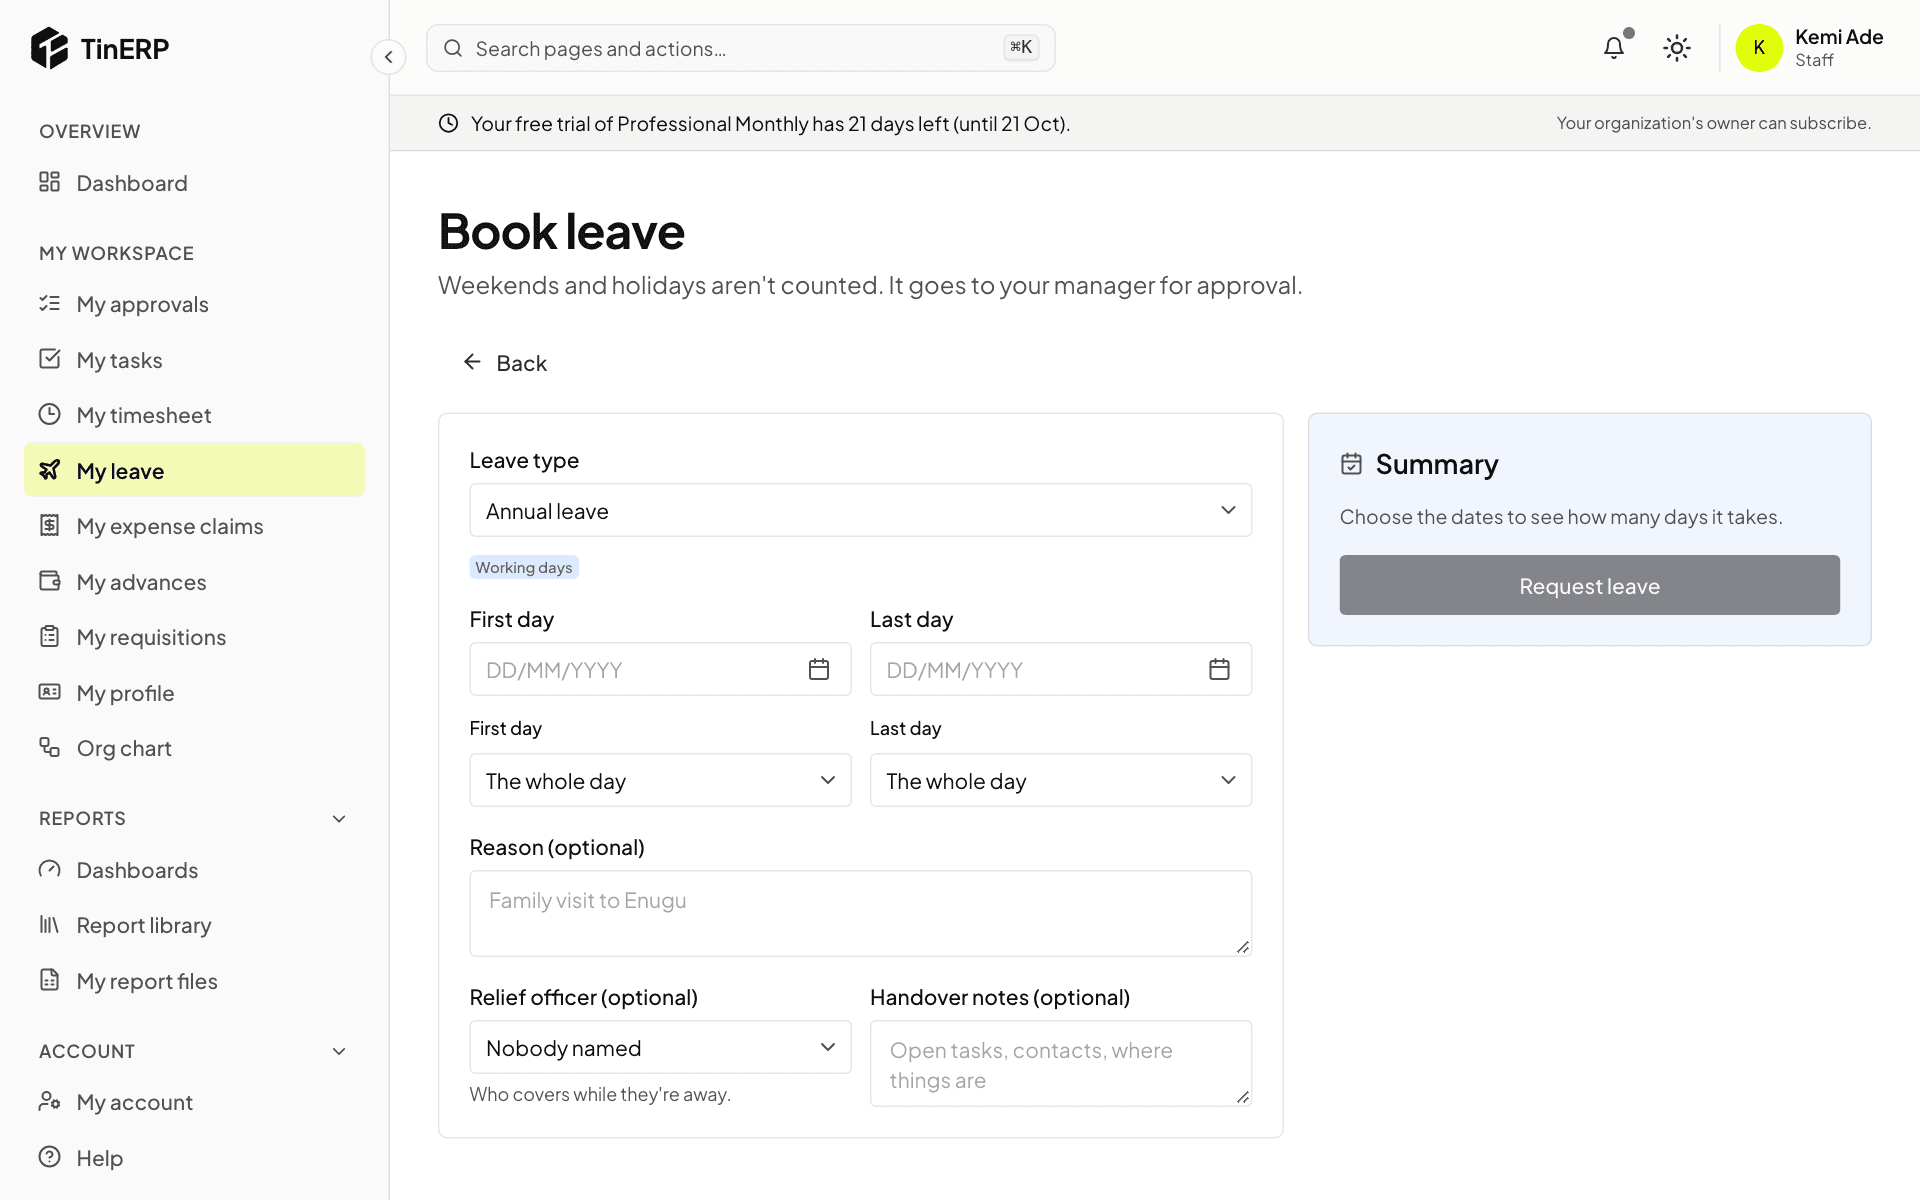
Select Book leave. Choose the leave type, your first and last day, and whether either is a half day. Add a reason, and - if your organization uses them - a relief officer and handover notes.
The Summary shows how many days it takes. Weekends and public holidays aren't counted. Select Request leave to send it.
The Book leave form with leave type, dates, reason, relief officer and the summary
Tip: Changed your plans? Open the request from My leave to cancel it - before it's approved, or ask to cancel it afterwards.
Everyday tasks · Managers and approvers · about 2 min
Approve requests
Everything waiting for your decision is in one place, oldest first - whatever kind of request it is.
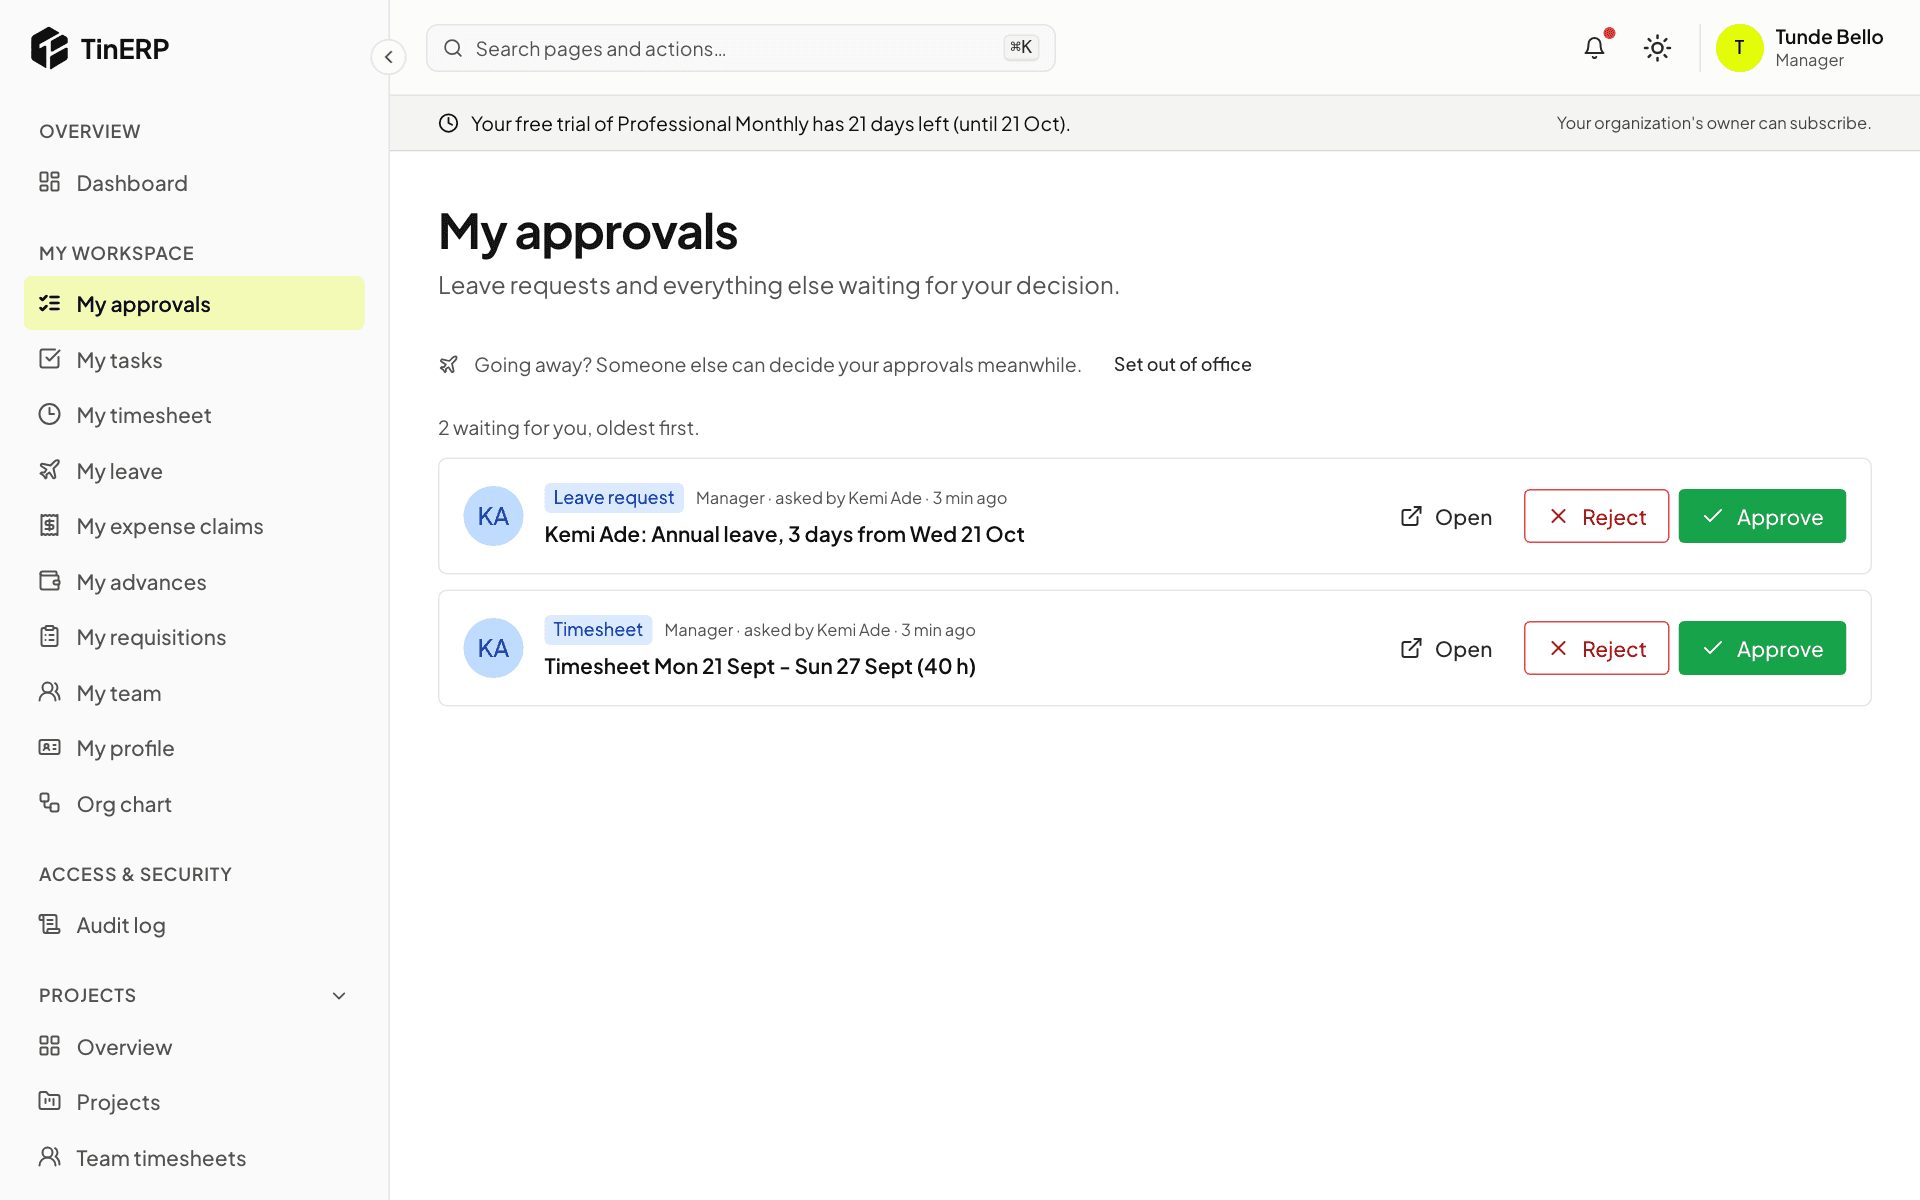
1. Approve or reject
Go to My workspace → My approvals. Each request shows who asked and what for. Select Open for the details, or decide straight away with Approve or Reject - you'll be asked for a reason when you reject.
The person is notified, and if the request needs another step, it moves on to the next approver.
My approvals with Kemi's leave request and the Approve and Reject buttons
2. Going away? Hand over your approvals
Select Set out of office and choose someone to decide for you while you're away. Requests go to them until you're back, and the record shows they decided on your behalf.
Everyday tasks · Everyone on a project · about 3 min
Your tasks
My tasks gathers every task assigned to you, across all your projects.
1. See what's due
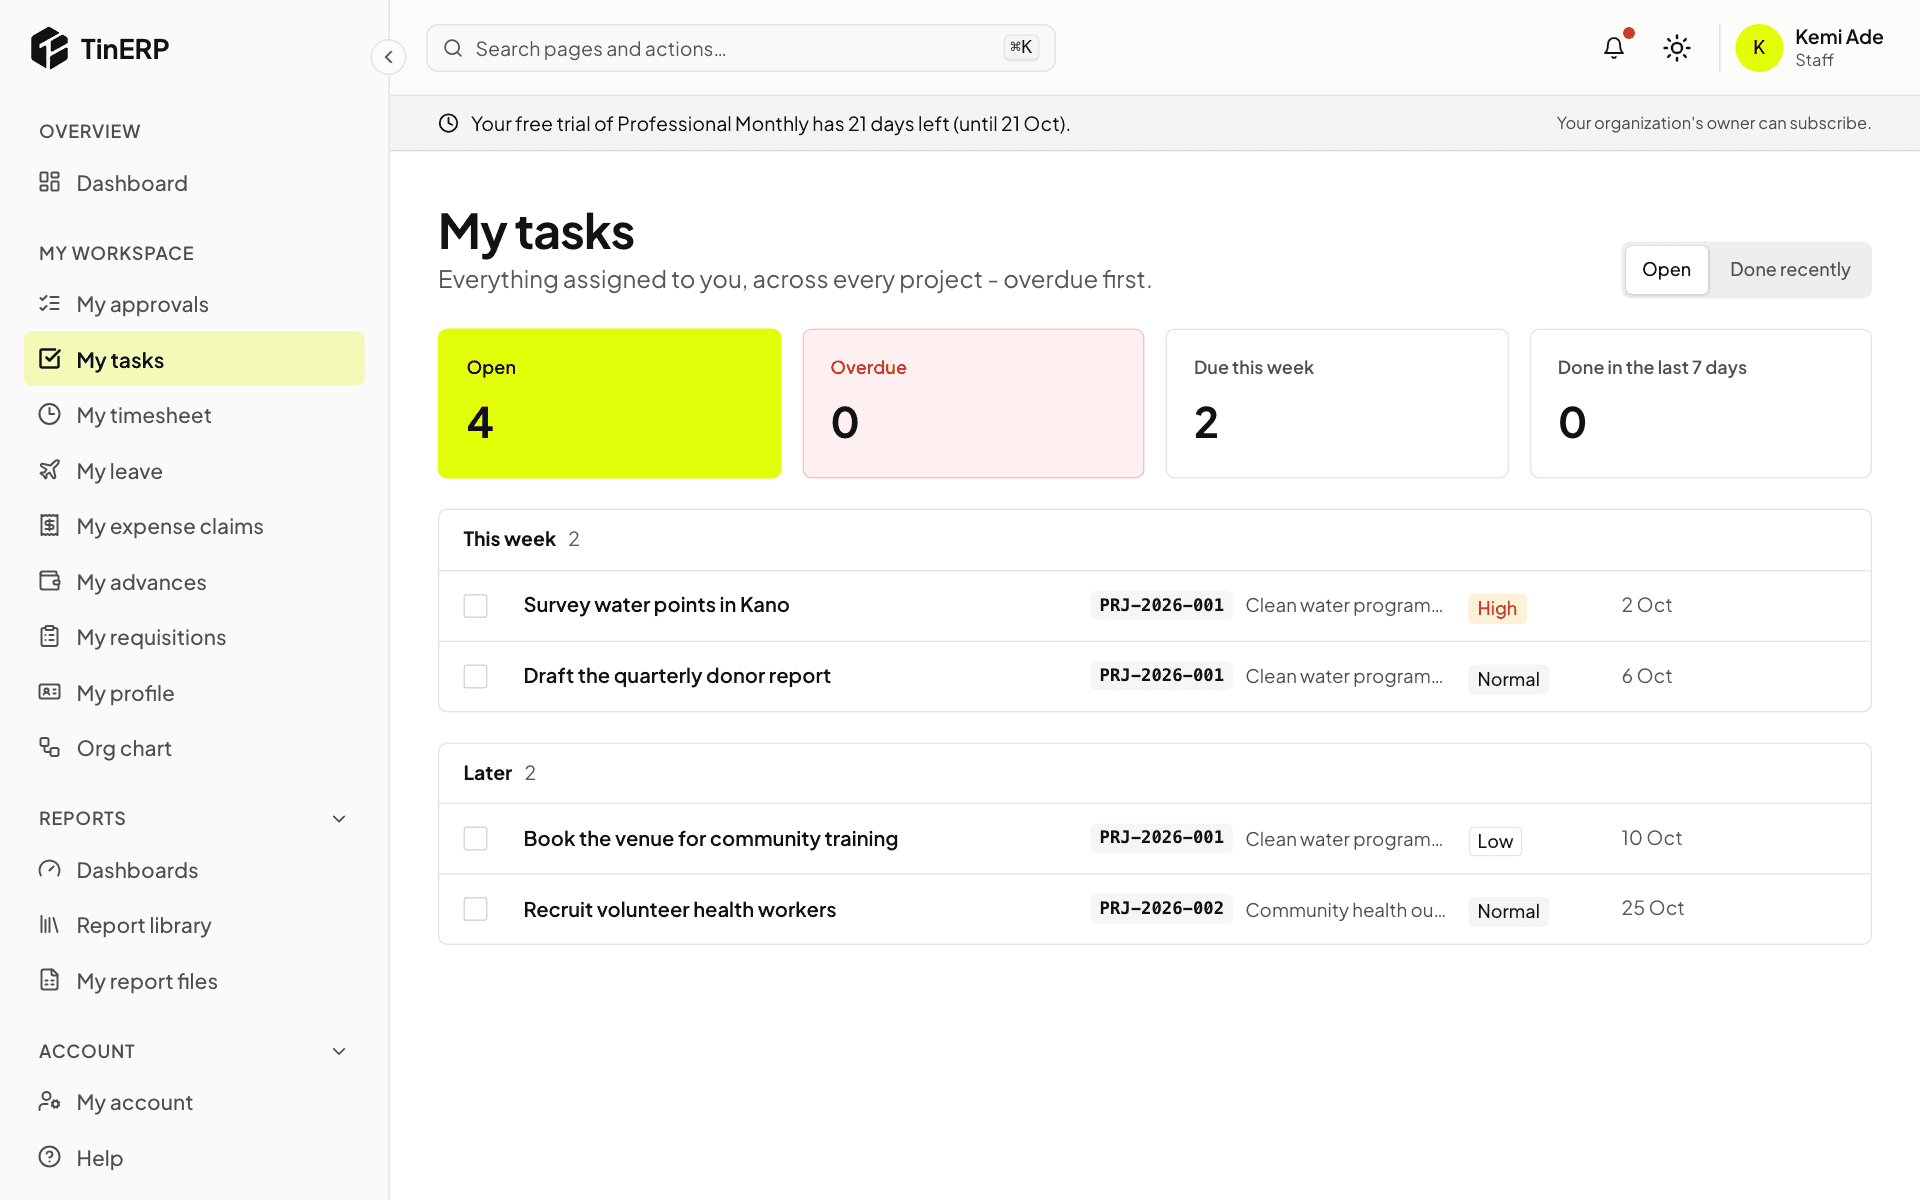
Go to My workspace → My tasks. Tasks are grouped by when they're due. Select a task to open it.
My tasks: open, overdue and due this week, with tasks grouped by week
2. Update a task
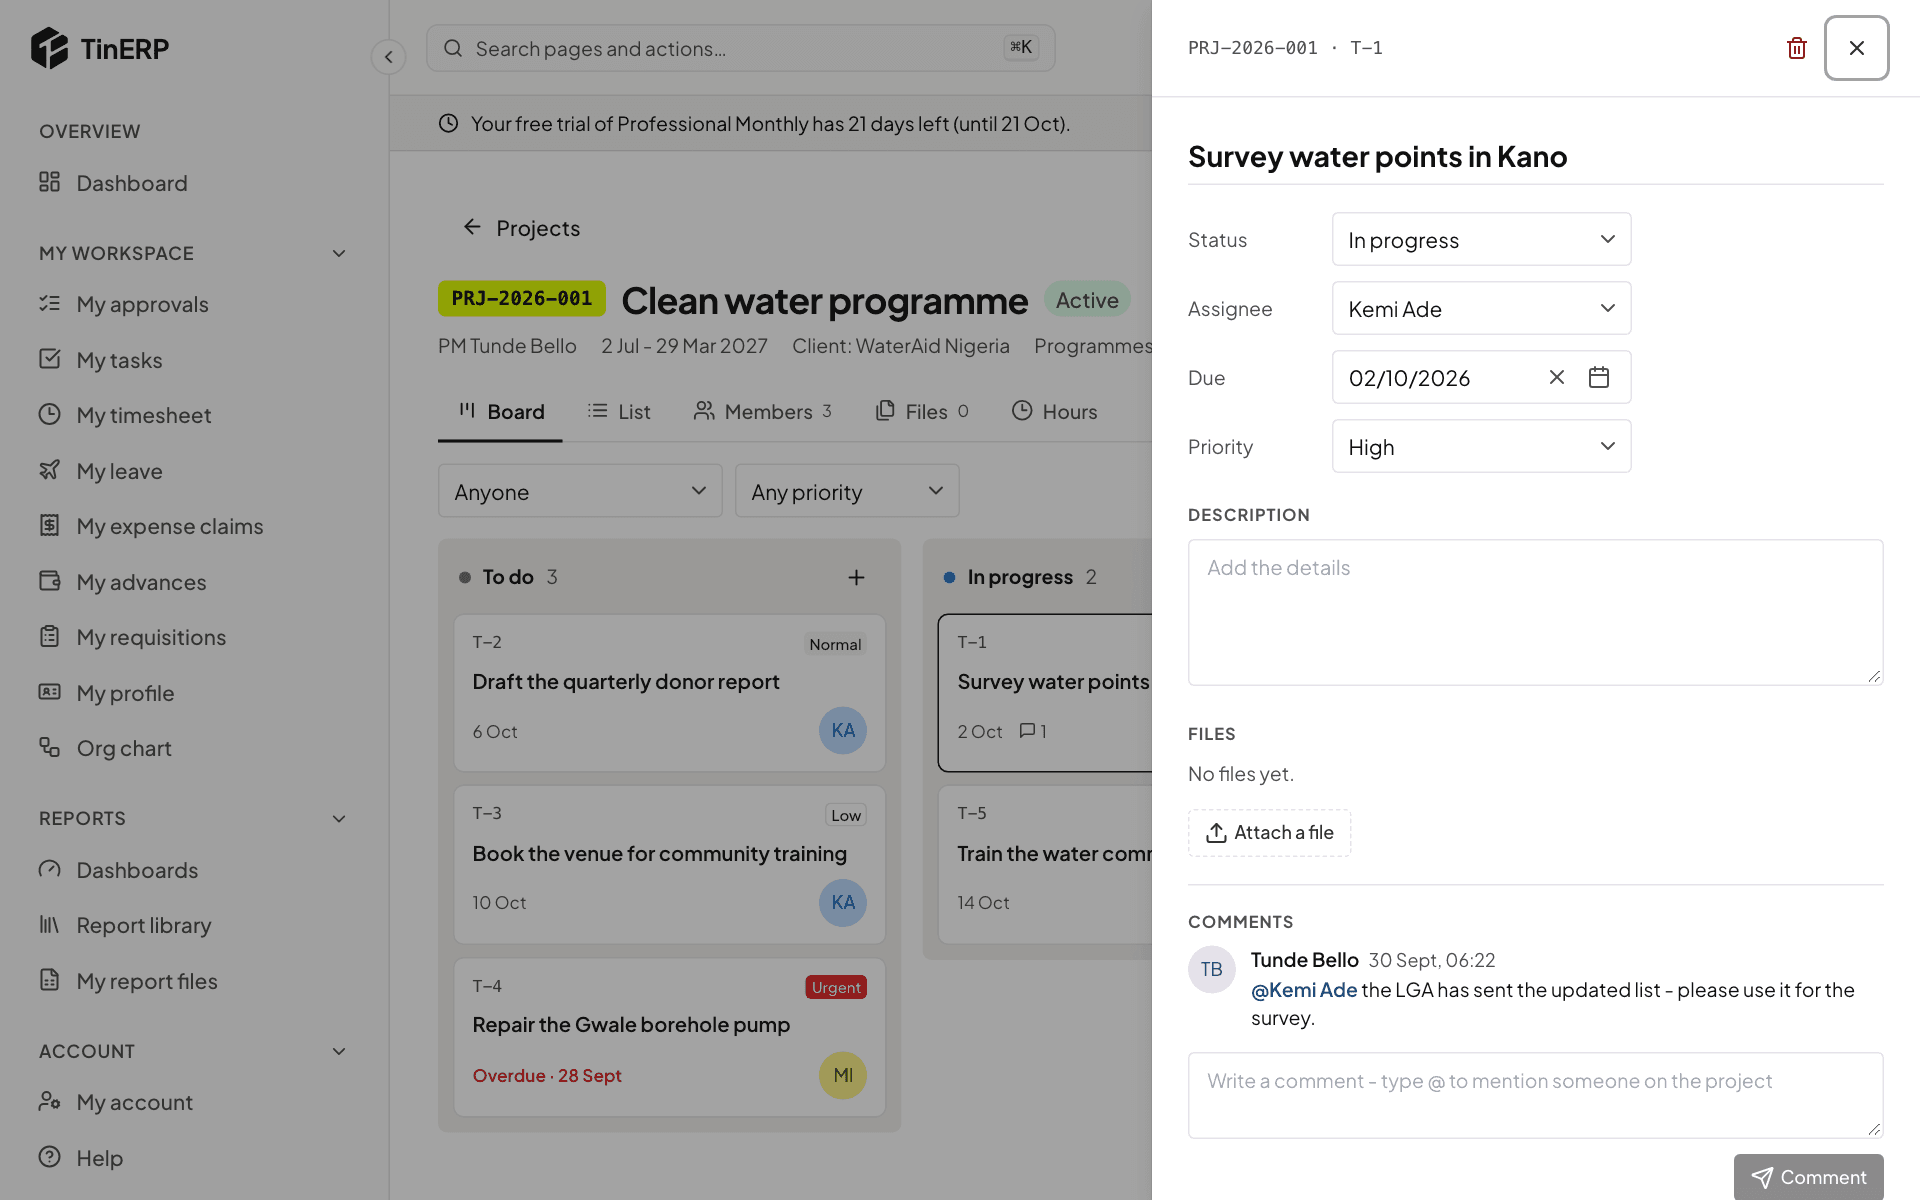
In the task panel, change its status as you work (to do, in progress, done), its due date or priority. Changes save as you make them.
Add files, and write a comment - type @ to mention someone on the project; they're notified.
A task open in its panel: status, assignee, due date, priority, files and comments
Everyday tasks · Everyone who logs time · about 3 min
Fill in your timesheet
Your timesheet covers a period your organization chooses - usually a week. Leave, holidays and weekends are already filled in.
1. Enter your hours
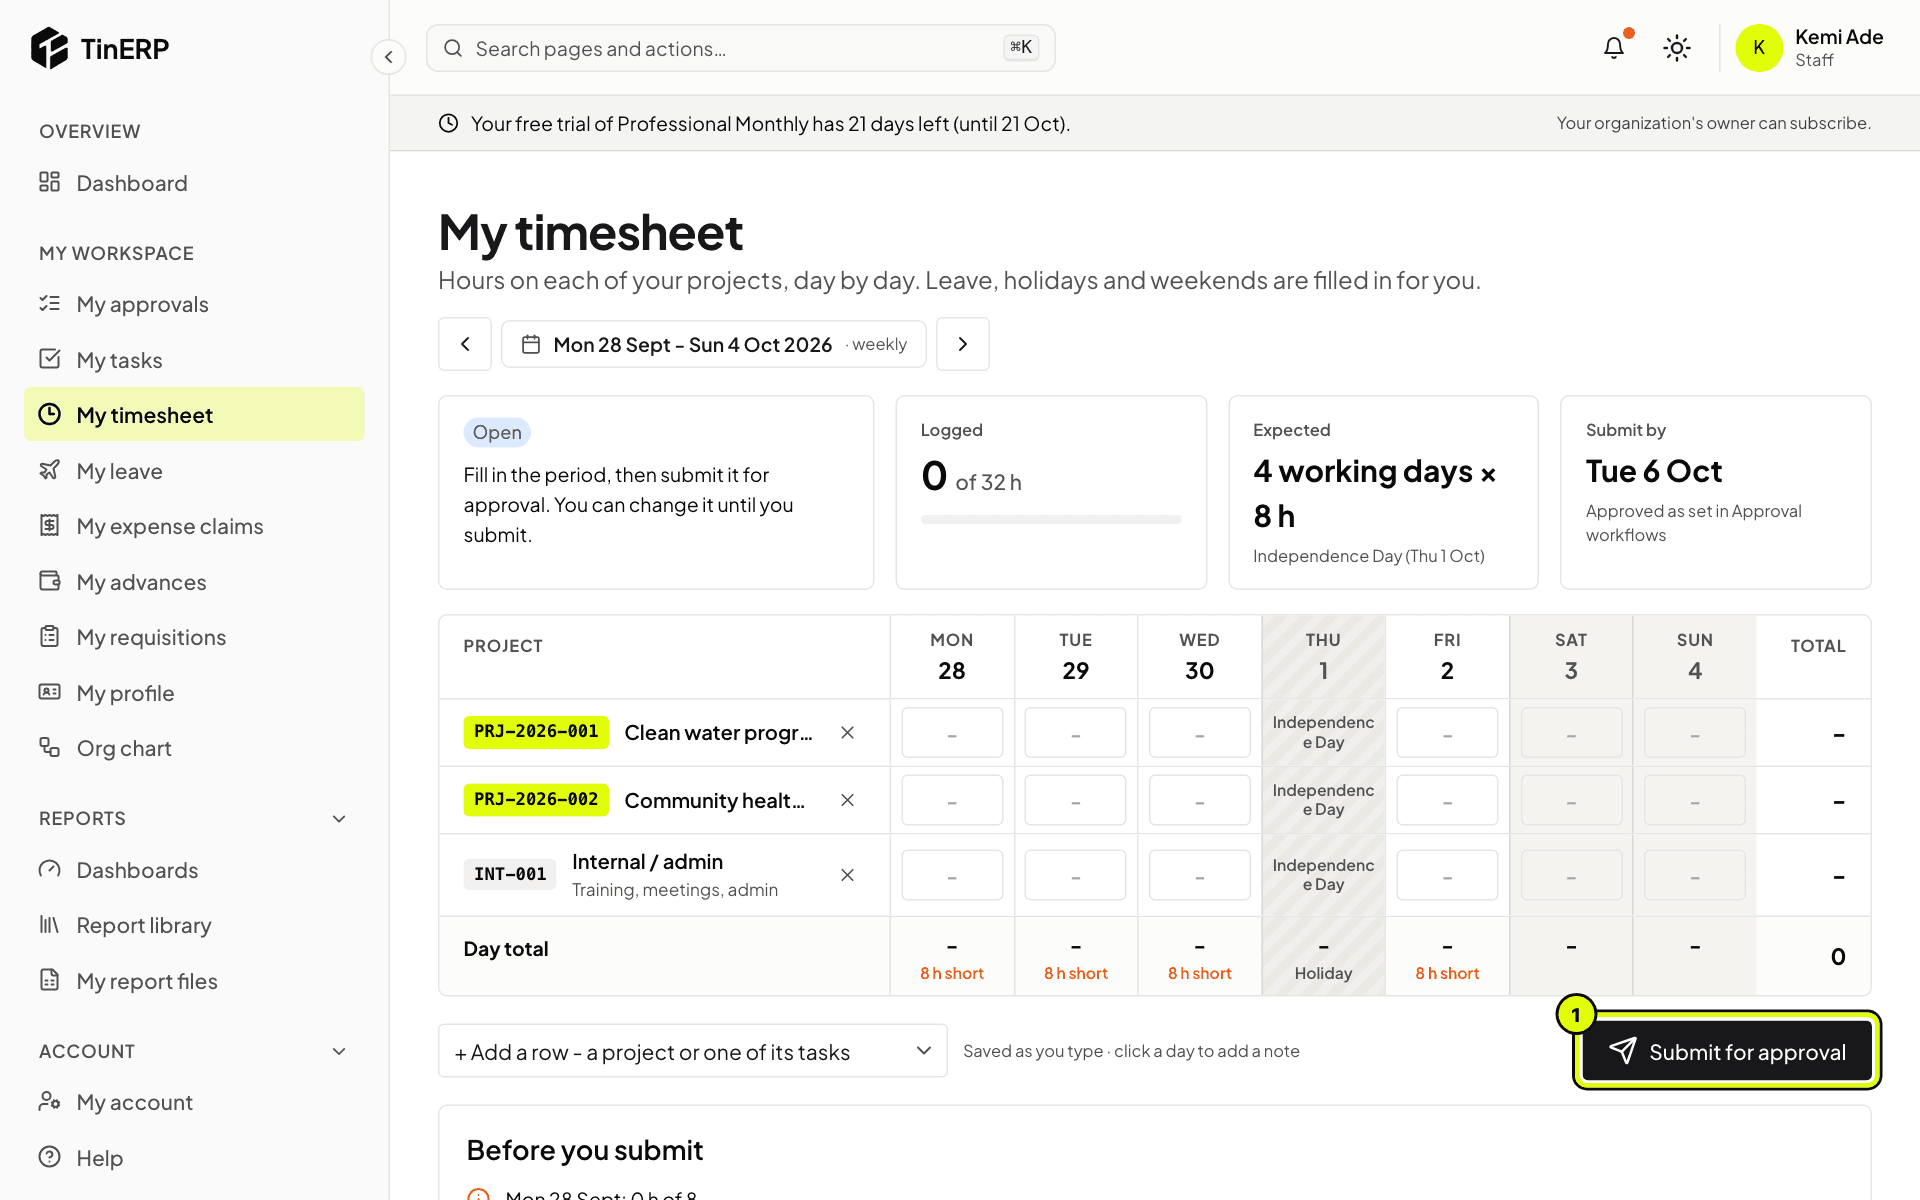
Go to My workspace → My timesheet. Your projects are listed as rows; type the hours for each day. Use Add a row for another project or one of its tasks.
It saves as you type. The totals show how you compare with the expected hours, and Before you submit points out anything to check.
My timesheet for the week, with Independence Day filled in and Submit for approval marked 1
2. Submit it
When the period is done, select Submit for approval (1). It's locked while it waits; if it's sent back, change it and submit again.
Tip: The deadline is shown under Submit by. Late timesheets are marked late.
Everyday tasks · Everyone · about 4 min
Claim expenses and request advances
Both go for approval and then to your finance team to pay. You'll find your claims under My expense claims and your advances under My advances.
1. Claim expenses
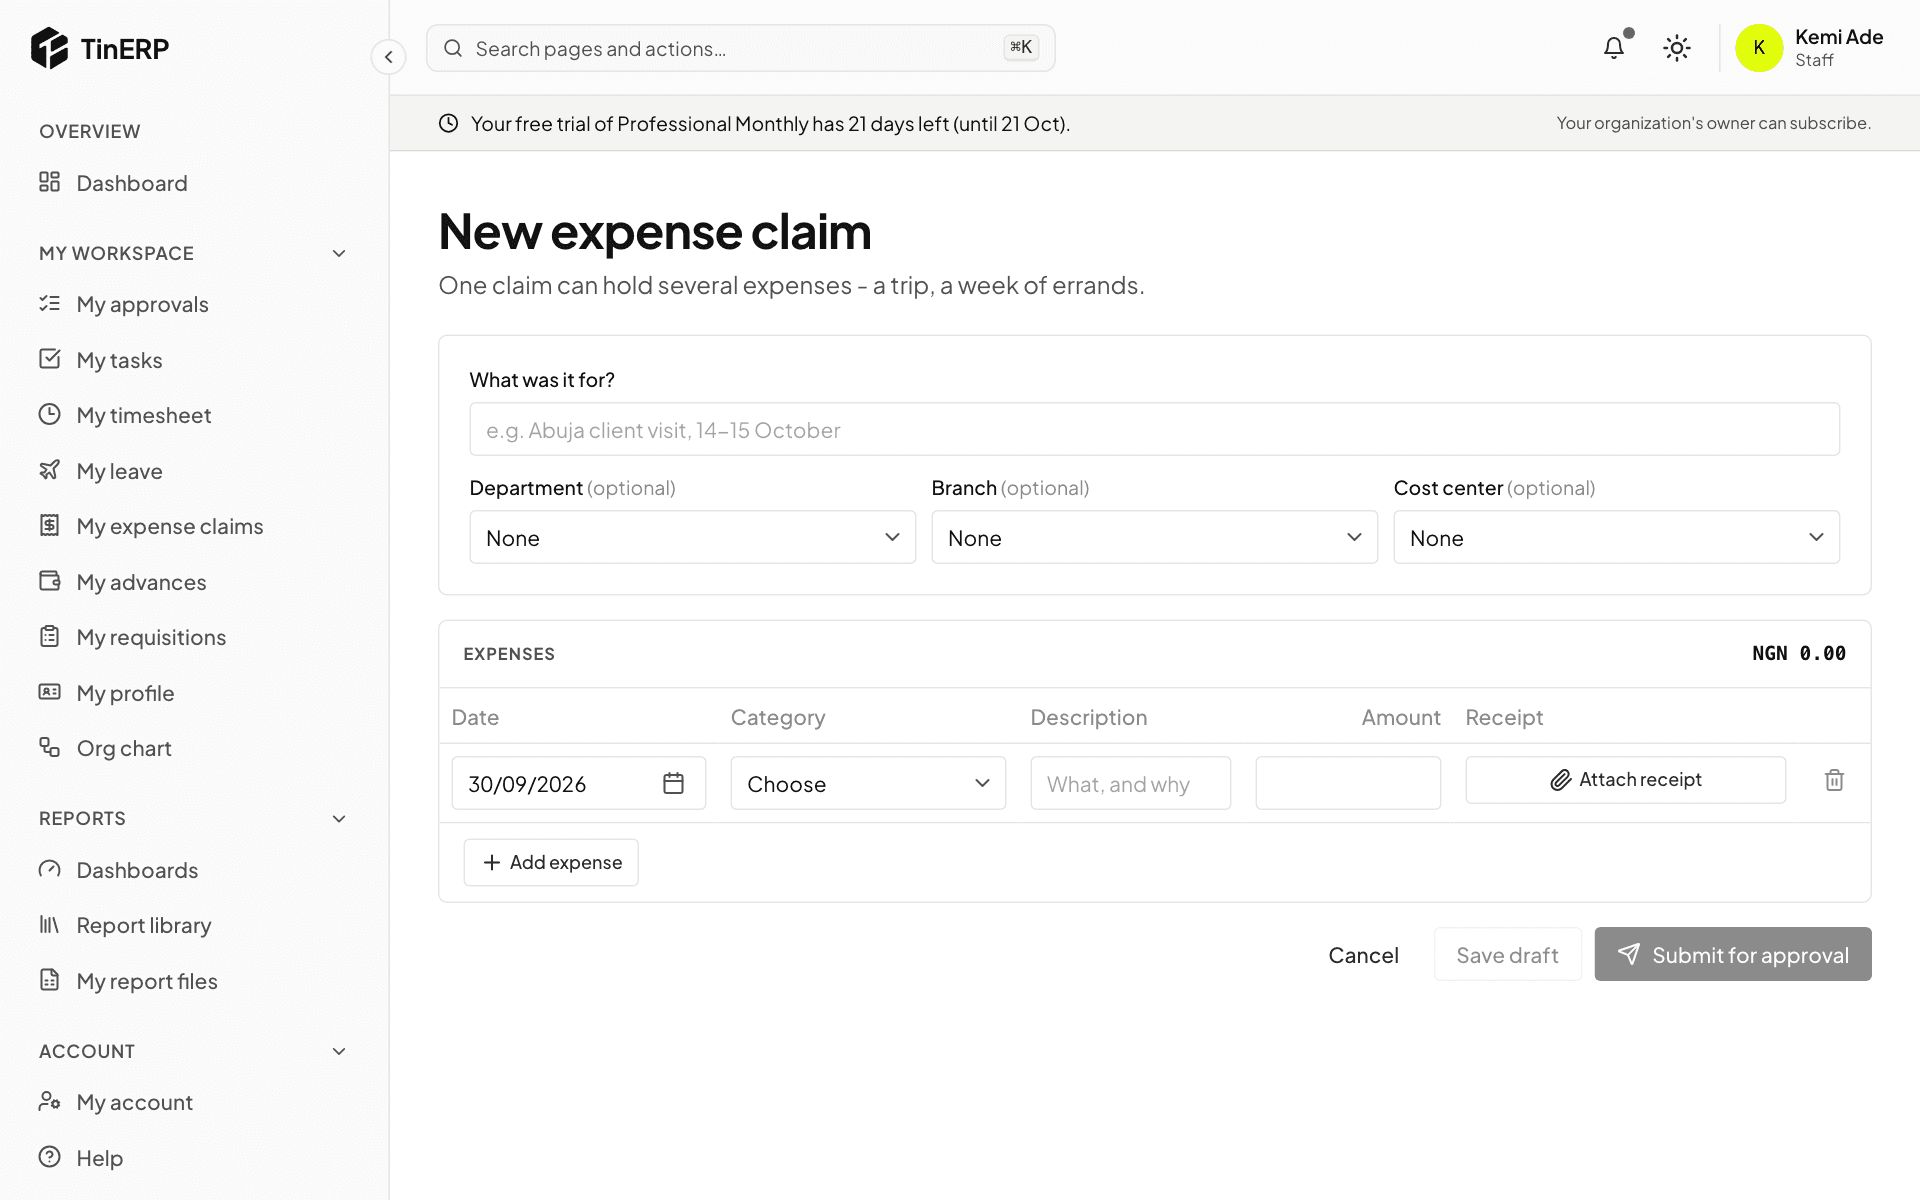
Go to My expense claims and start a new claim. Say what it was for, then add each expense: date, category, description and amount. Attach a photo or scan of the receipt with Attach receipt.
Select Submit for approval, or Save draft to finish later.
The New expense claim form with the expenses table and Attach receipt
2. Request an advance
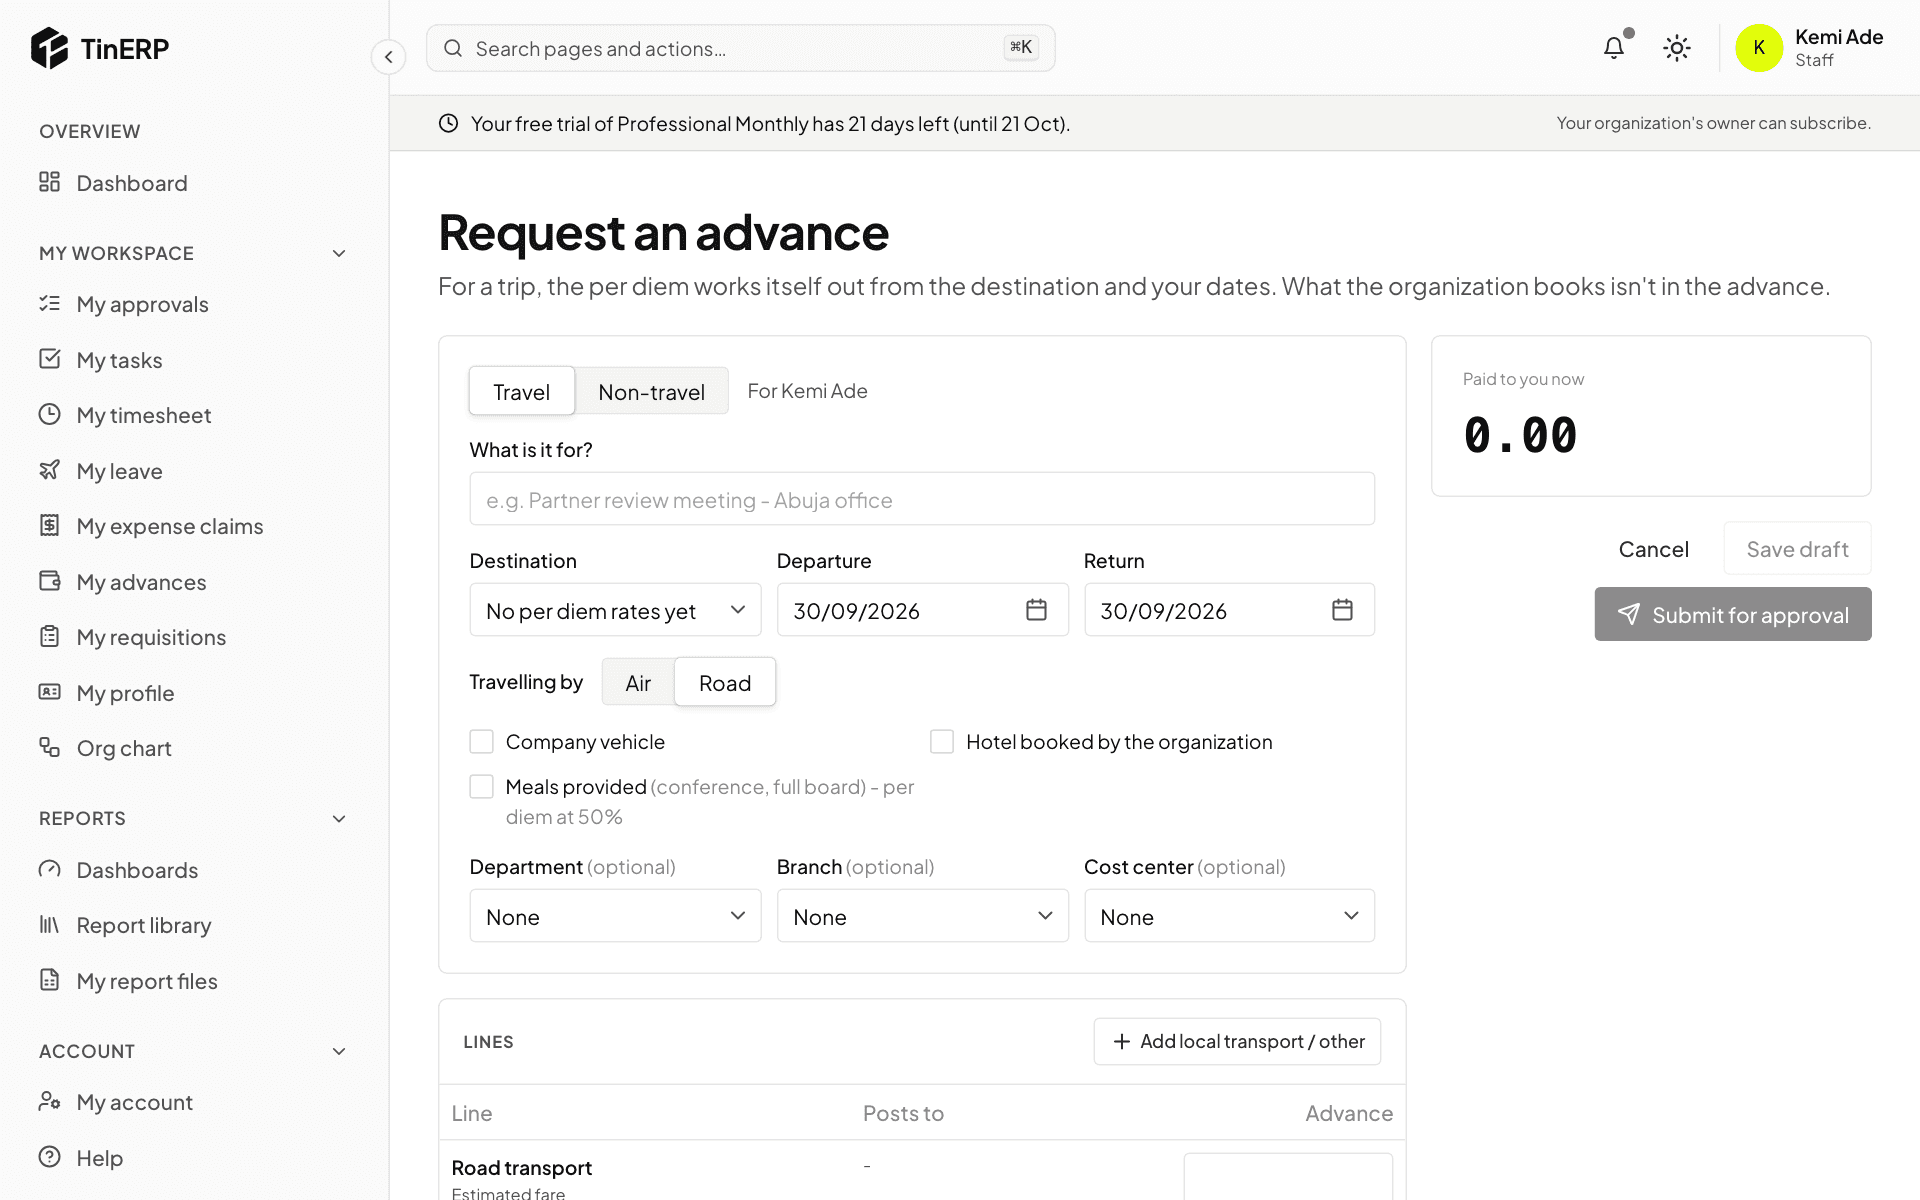
Go to My advances and start a new request. For a trip, choose Travel and fill in the itinerary: each leg's date, where it's from and to, and how you travel. A simple trip is one leg out and one back; Add a stop for a trip through several cities. Tick Hotel booked by the organization for each place it books. The per diem is worked out for you, each place at its own rate. For anything else, choose Non-travel and add the lines.
Save it, then attach supporting documents - the invitation, agenda or memo - on the advance's page before you submit it. Your organization may require one above an amount.
After the trip, retire the advance: show what you spent, with receipts, add proof of travel (boarding passes, tickets, hotel bills), and return anything left over.
The Request an advance form with Travel selected, destination and dates
Everyday tasks · Everyone · about 3 min
Ask for something to be bought
A requisition is a request to buy. Once approved, your procurement team gets quotes and orders it.
1. Raise a requisition
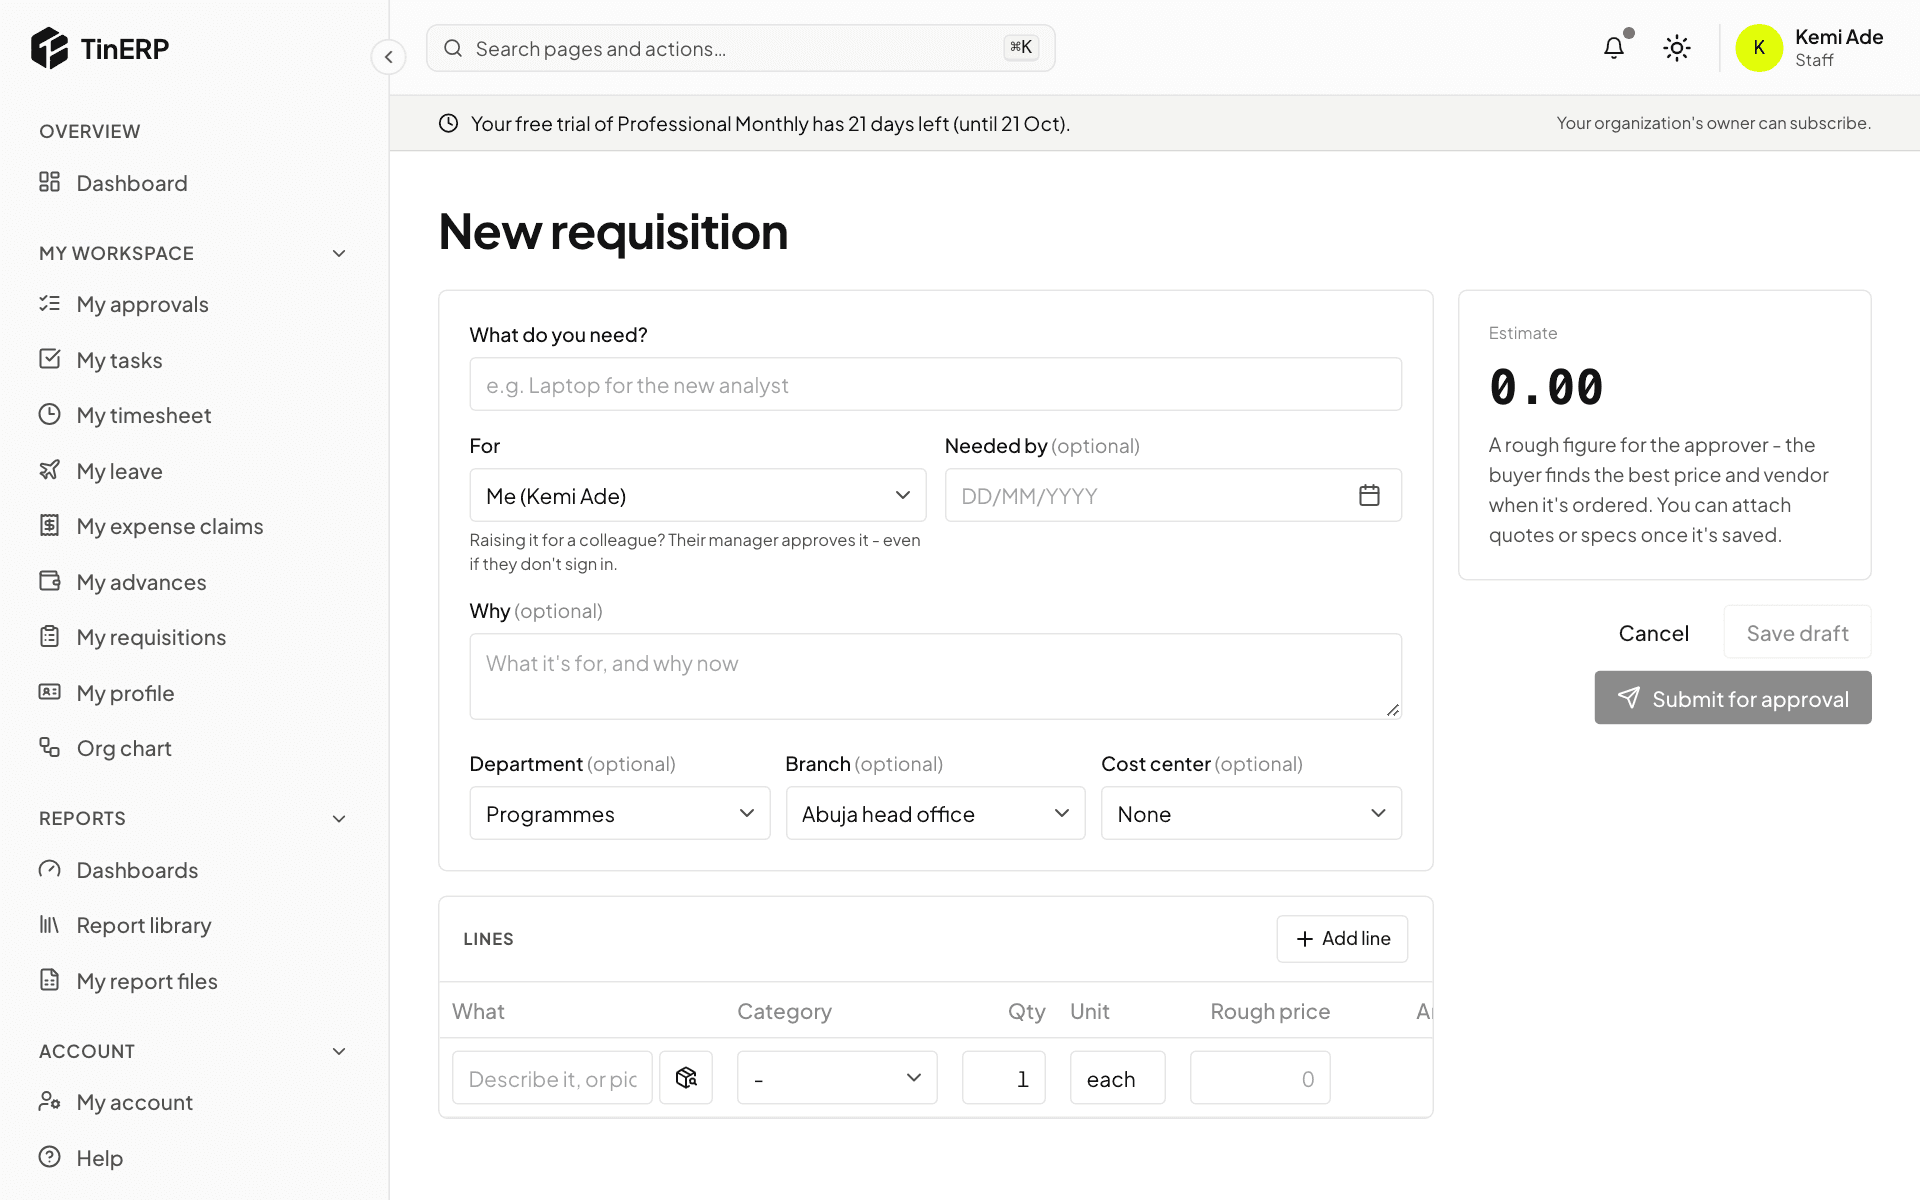
Go to My requisitions and start a new one. Say what you need and why, when it's needed by, and add a line for each item with a quantity and a rough price.
You can raise it for a colleague by choosing them under For. Select Submit for approval - the estimate helps the approver, and the buyer finds the best price.
The New requisition form with the estimate, lines and Submit for approval
Everyday tasks · Everyone · about 1 min
Notifications
The bell at the top shows a dot when something new arrives.
1. Read and act
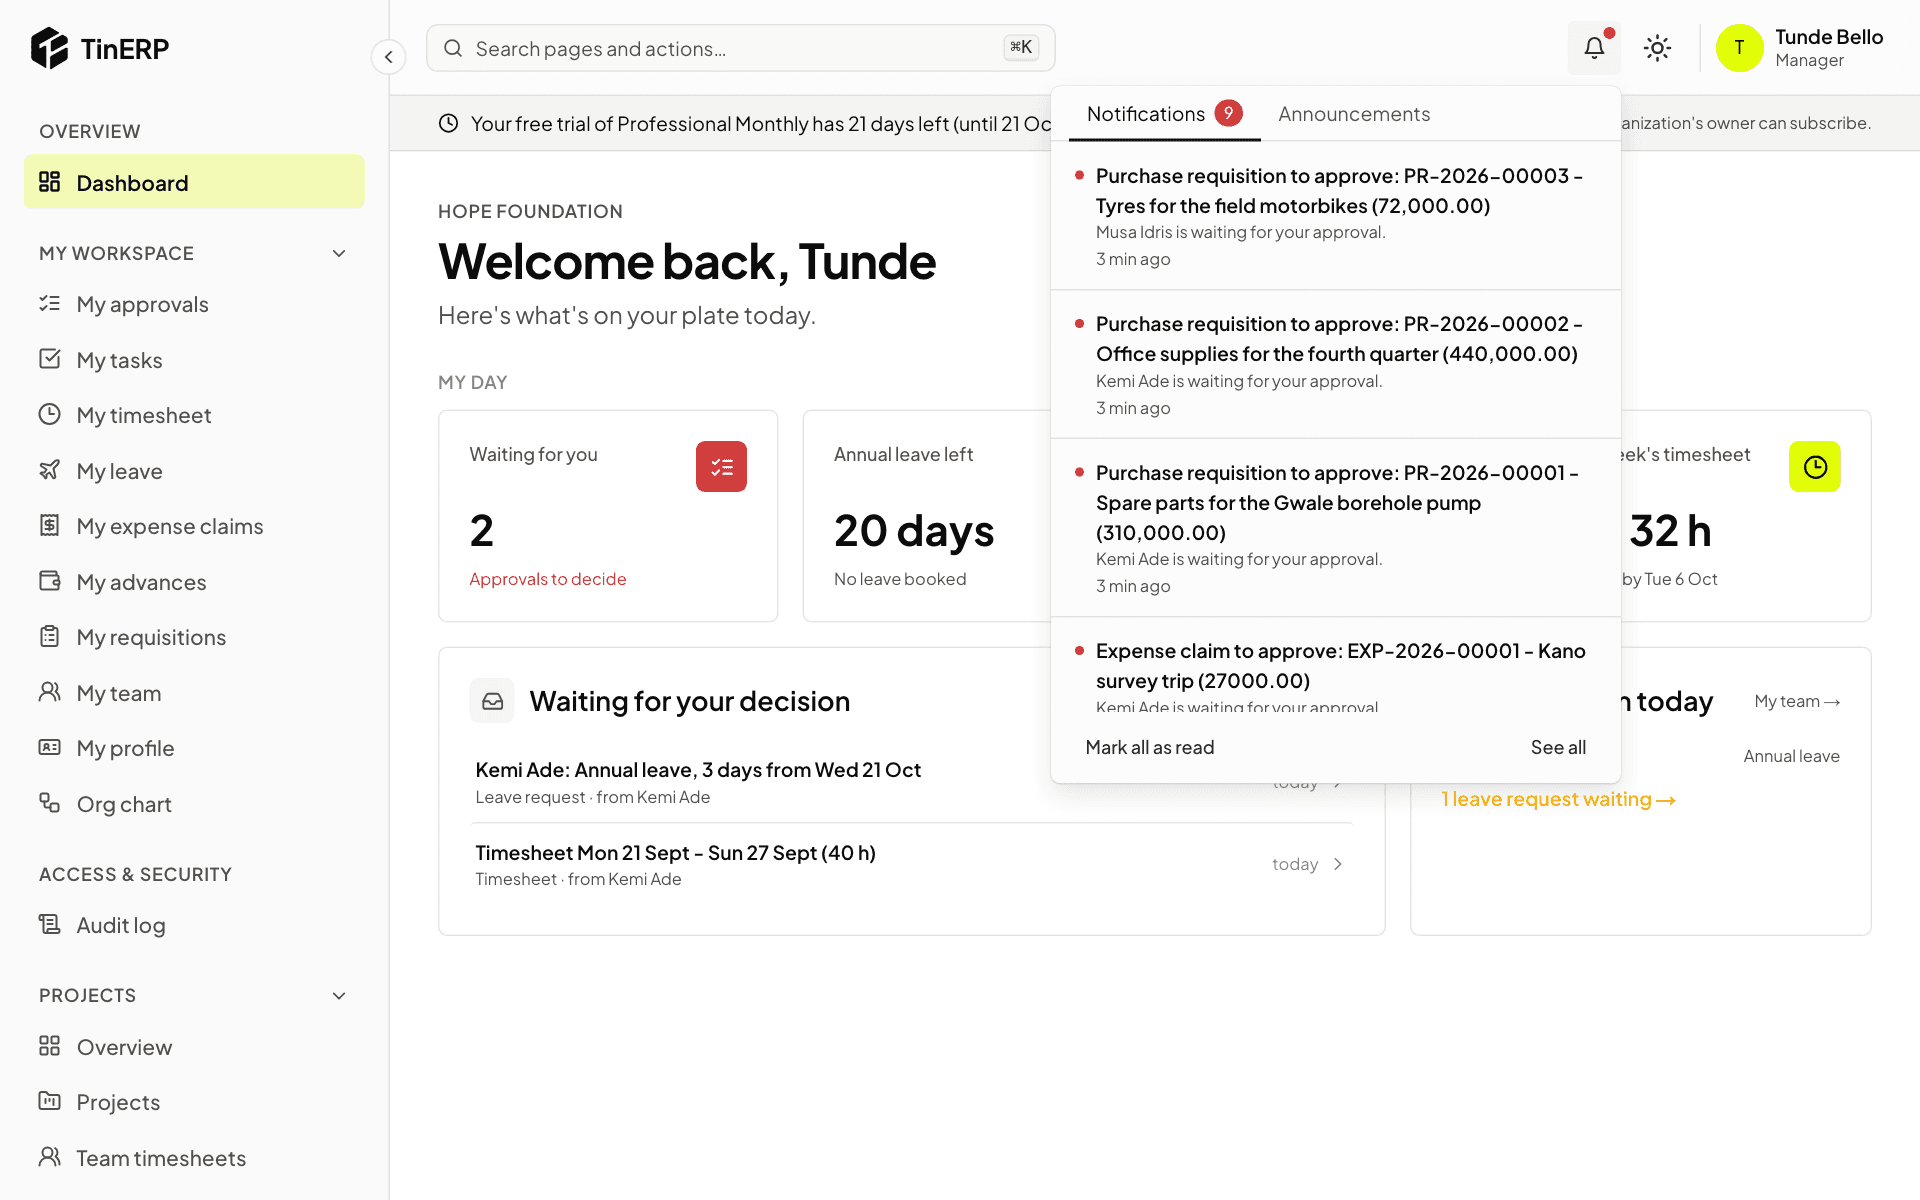
Select the bell. Notifications lists what's happened for you - select one to open it. Announcements are news from TinERP.
Select Mark all as read to clear the dot. You choose which notifications also come by email in My account.
The notifications panel open, with a leave request waiting for approval
Everyday tasks · Everyone · about 3 min
Your profile and account
My profile is your record as HR keeps it. My account is how you sign in.
1. Check your profile
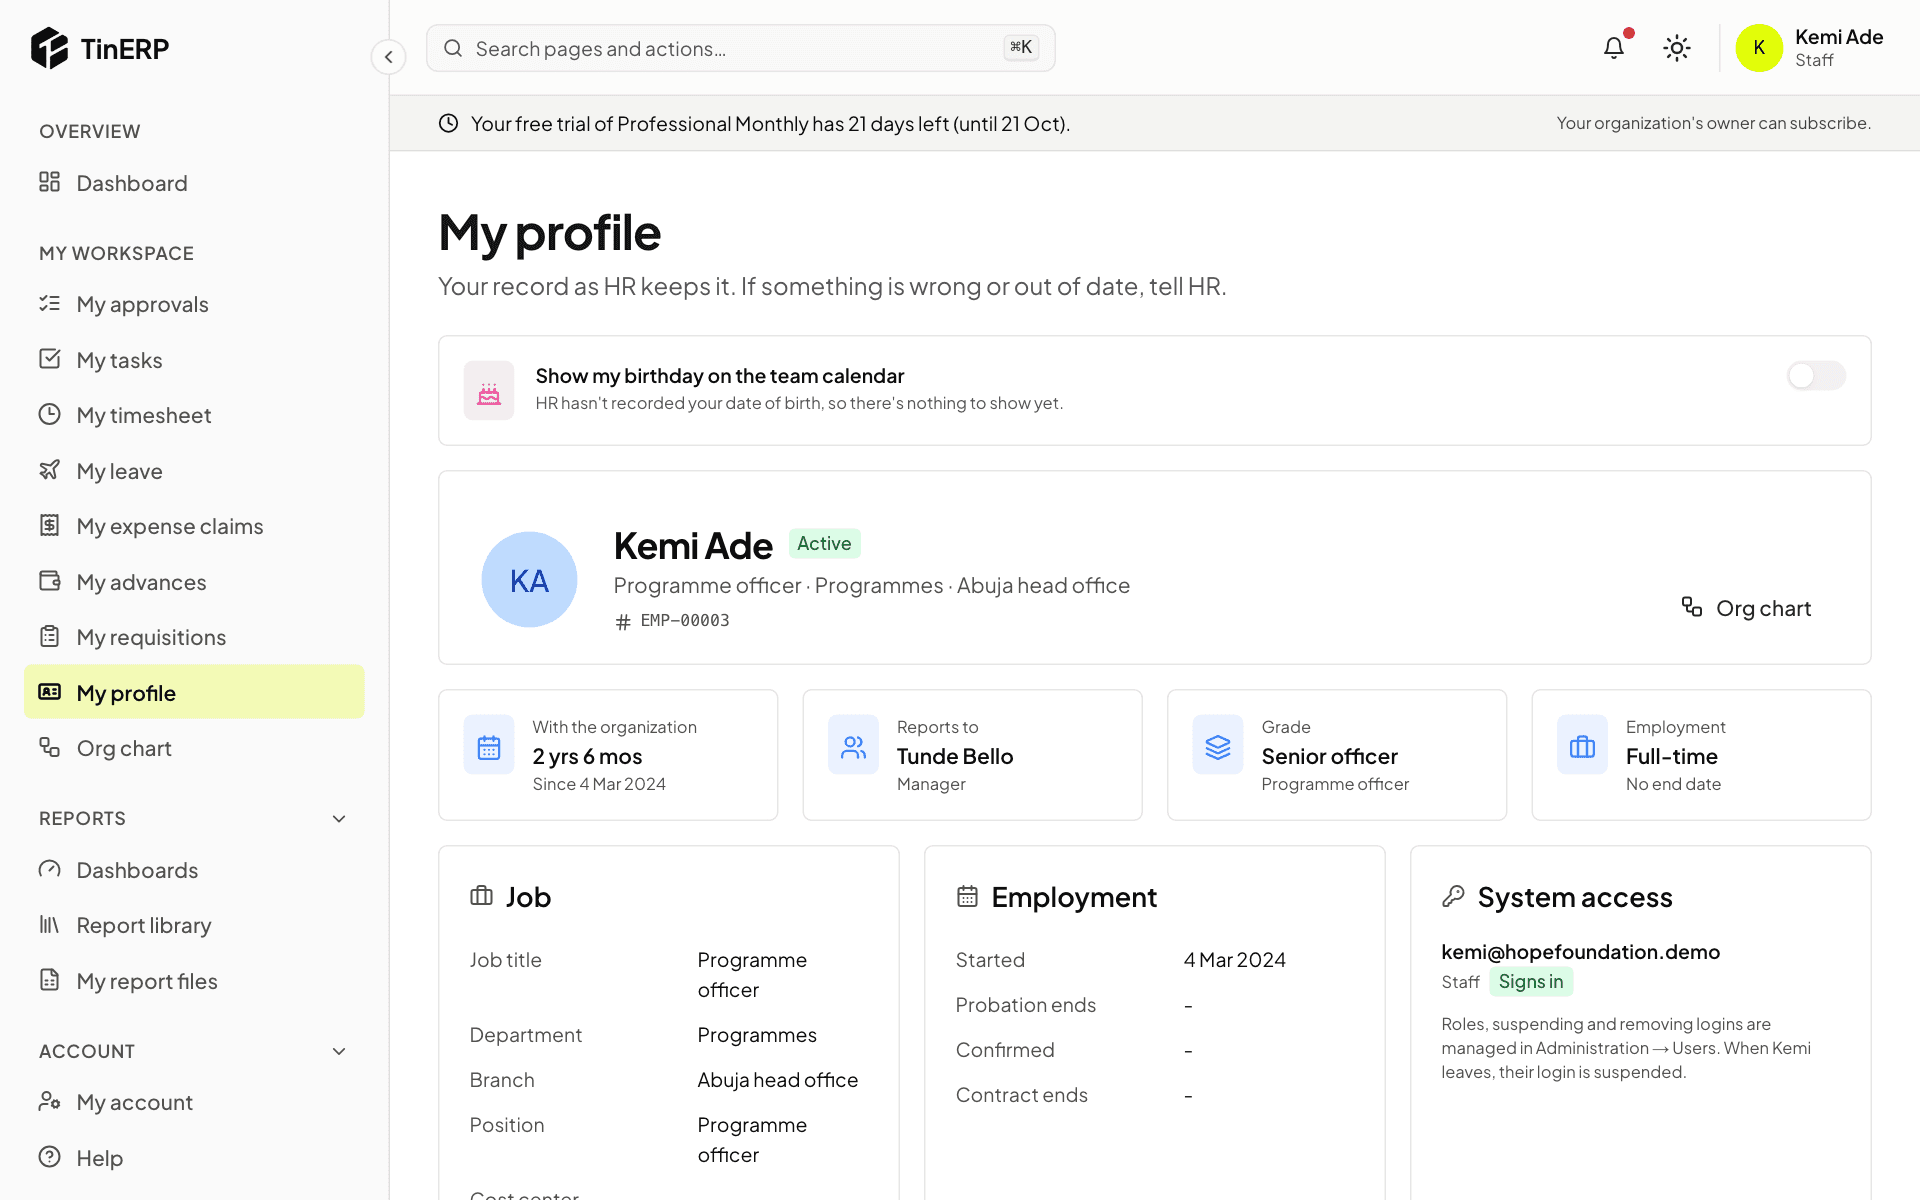
Go to My workspace → My profile to see your job, department, manager and employment details. If something is wrong or out of date, tell HR - they keep the record.
My profile: Kemi's job, reporting line and employment details
2. Secure your account
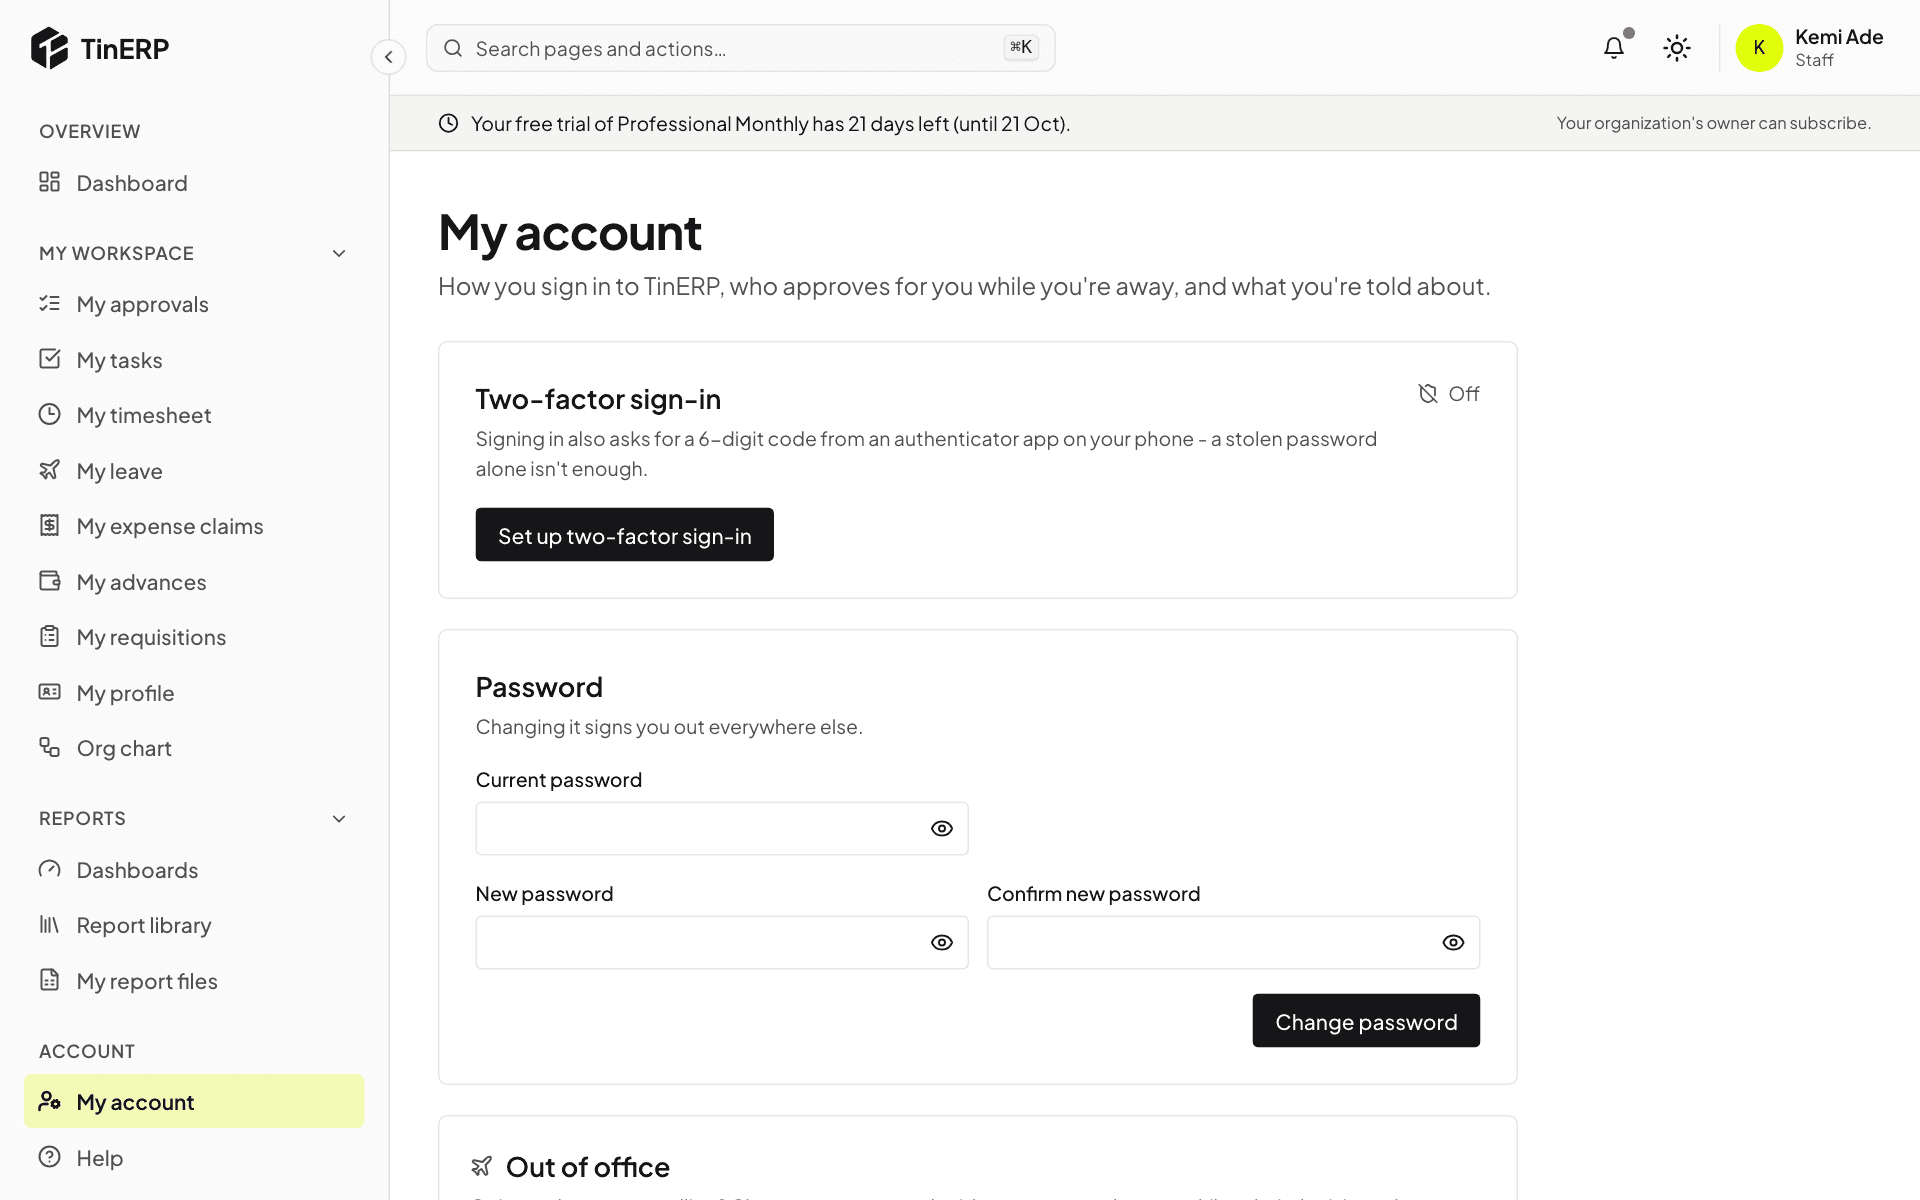
Go to My account. Select Set up two-factor sign-in and scan the code with an authenticator app on your phone - then signing in also asks for a 6-digit code, so a stolen password alone isn't enough.
You can change your password here too; changing it signs you out everywhere else.
My account with two-factor sign-in, password and out of office
Managers · Managers · about 4 min
Your team's leave
If people report to you, you have My team in My workspace. It covers your department and everyone in your reporting line - HR keeps who reports to whom on each employee's record.
1. Start from your dashboard
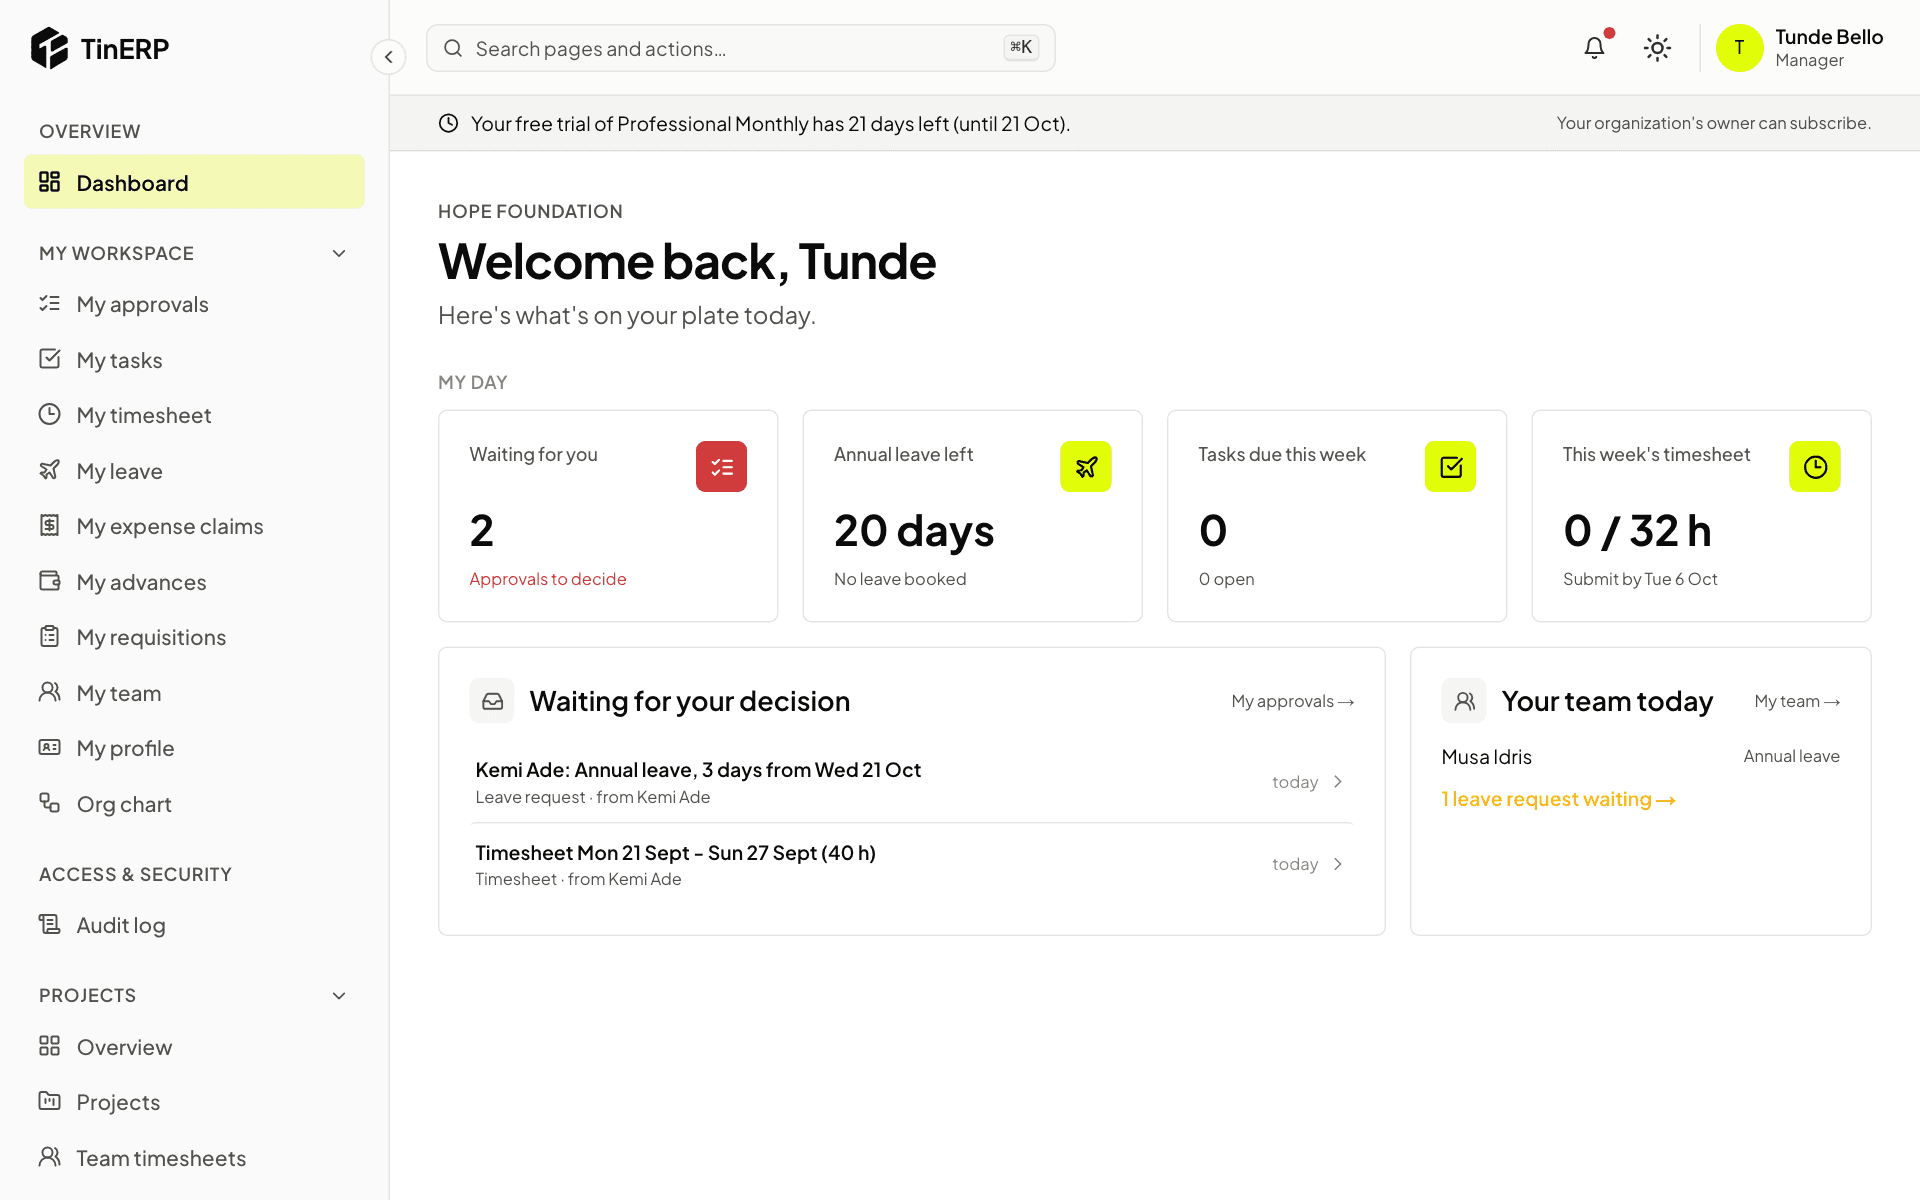
Your team today on your dashboard shows who is off today, and how many of your team's leave requests are waiting - select it to see them. Waiting for your decision lists everything that needs you, leave and timesheets included.
Tunde's dashboard: Your team today, with Musa on leave and Kemi's request waiting
2. See balances and requests
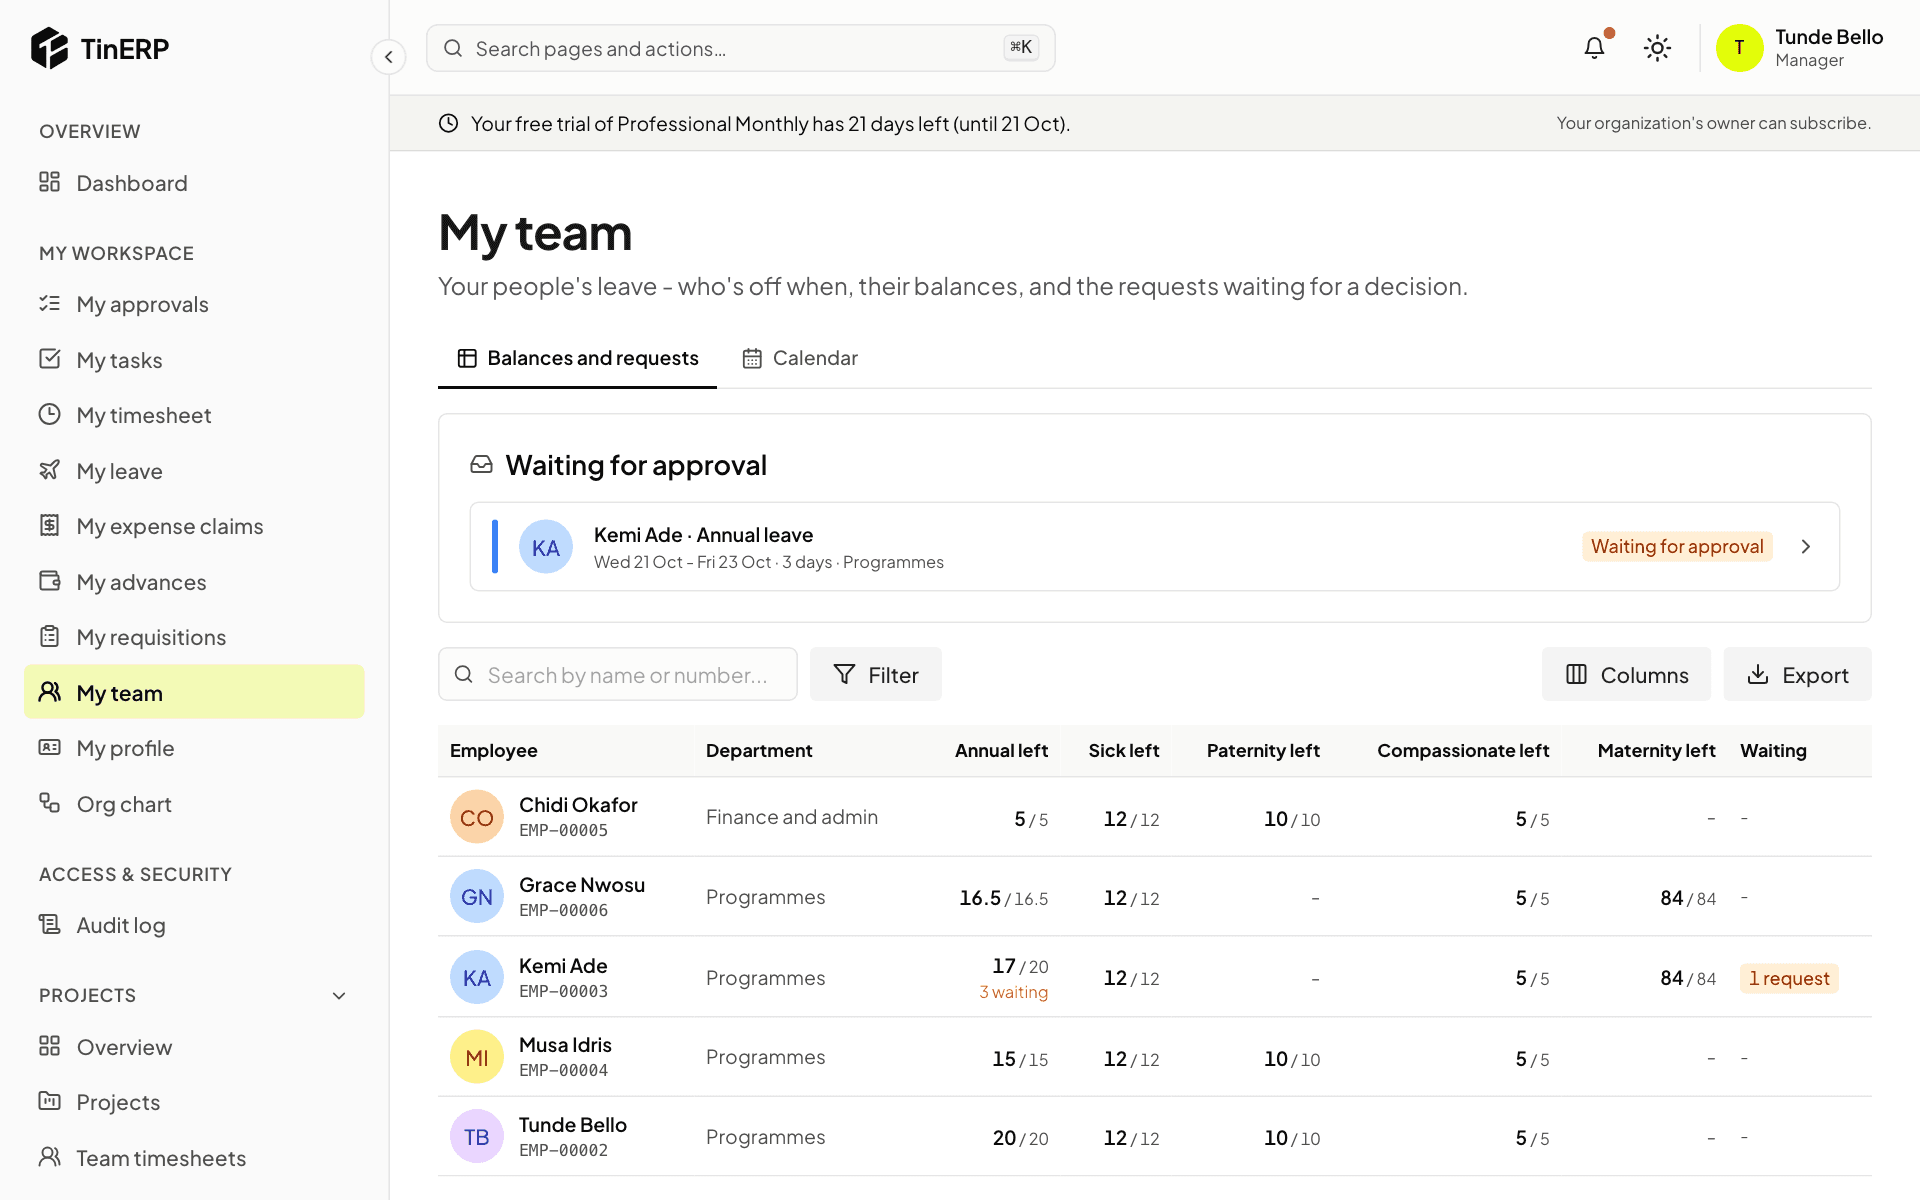
Go to My workspace → My team. Waiting for approval lists your team's leave requests that haven't been decided. Below it, the table shows how many days each person has left of every leave type, and what they have waiting.
Search for someone, filter by department, or Export the table.
My team: Kemi's annual leave waiting for approval, and everyone's balances by leave type
3. Check the calendar
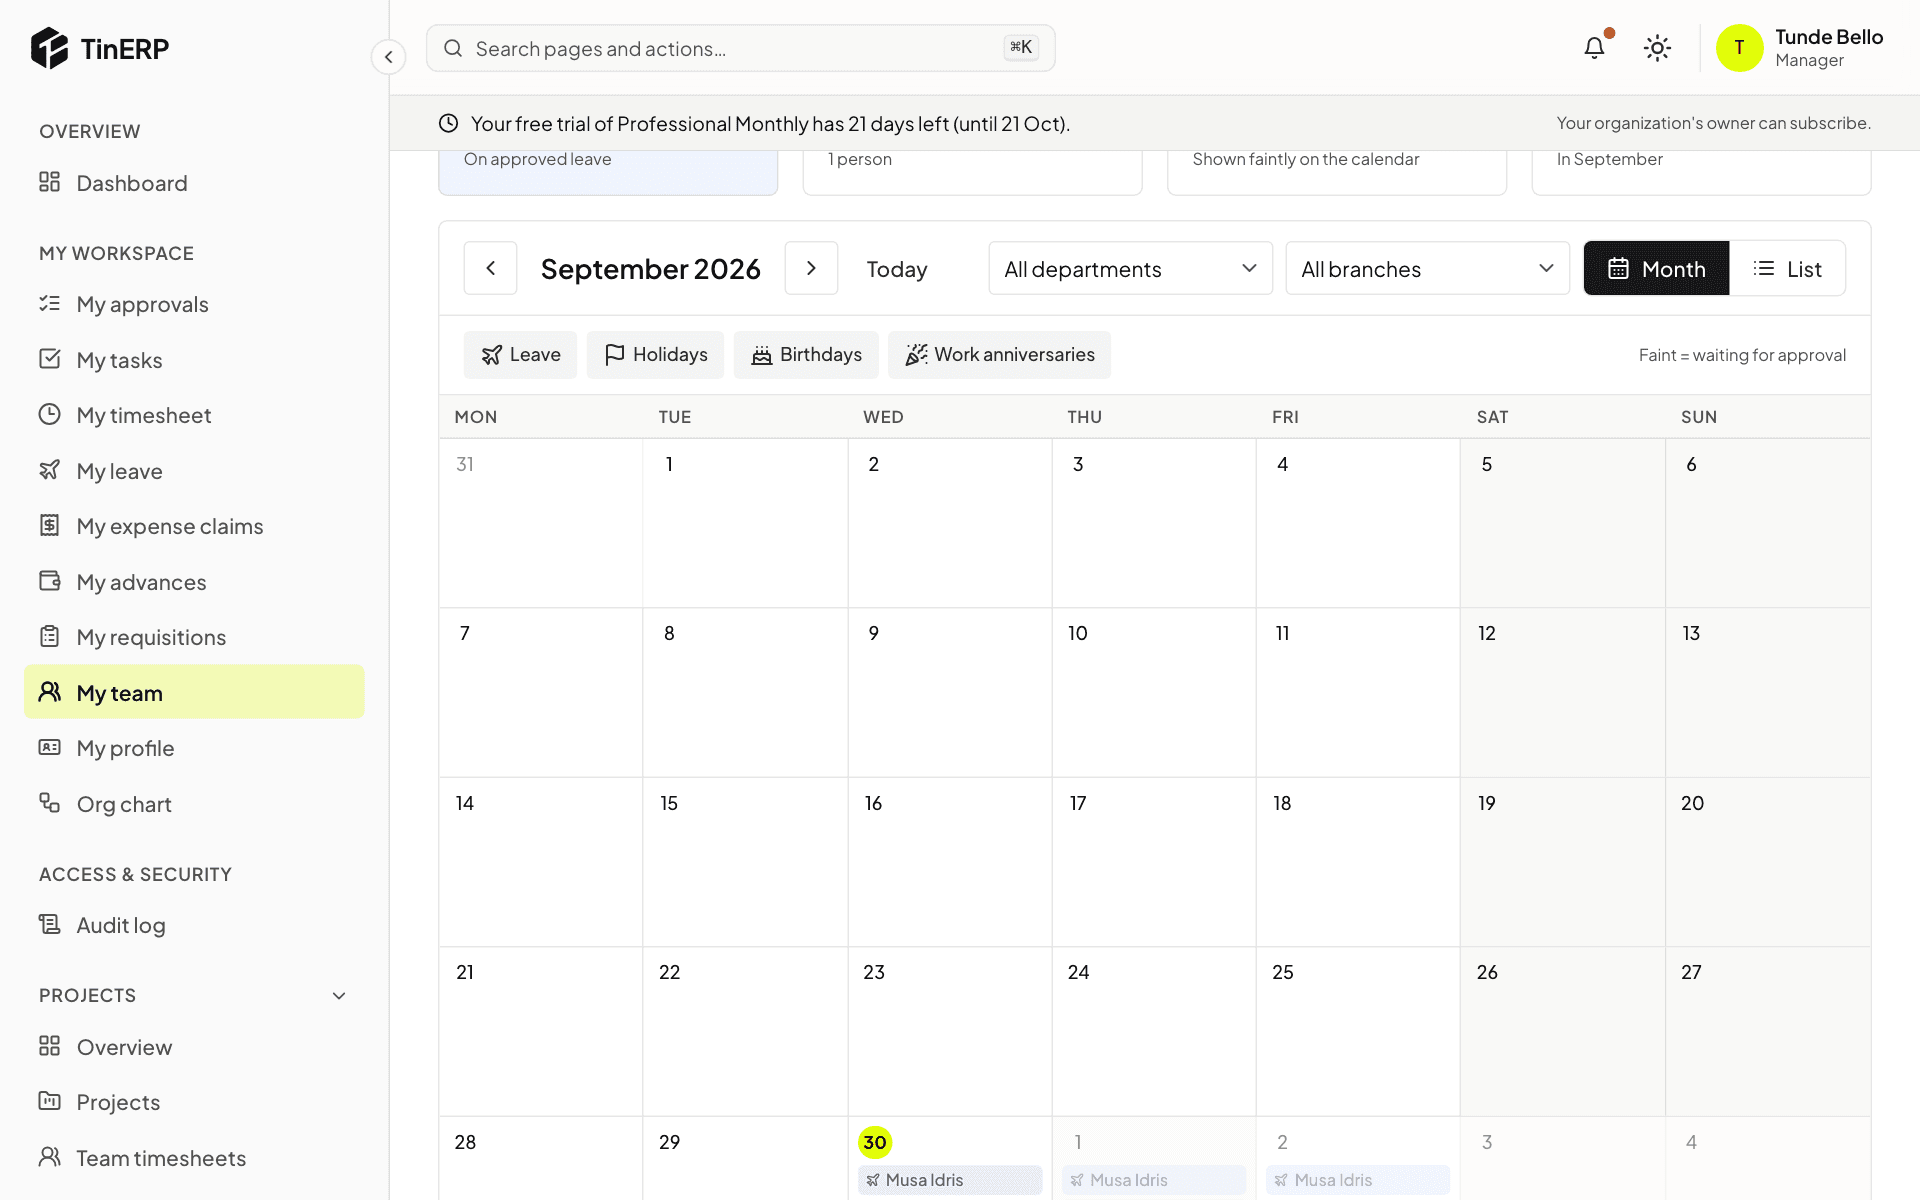
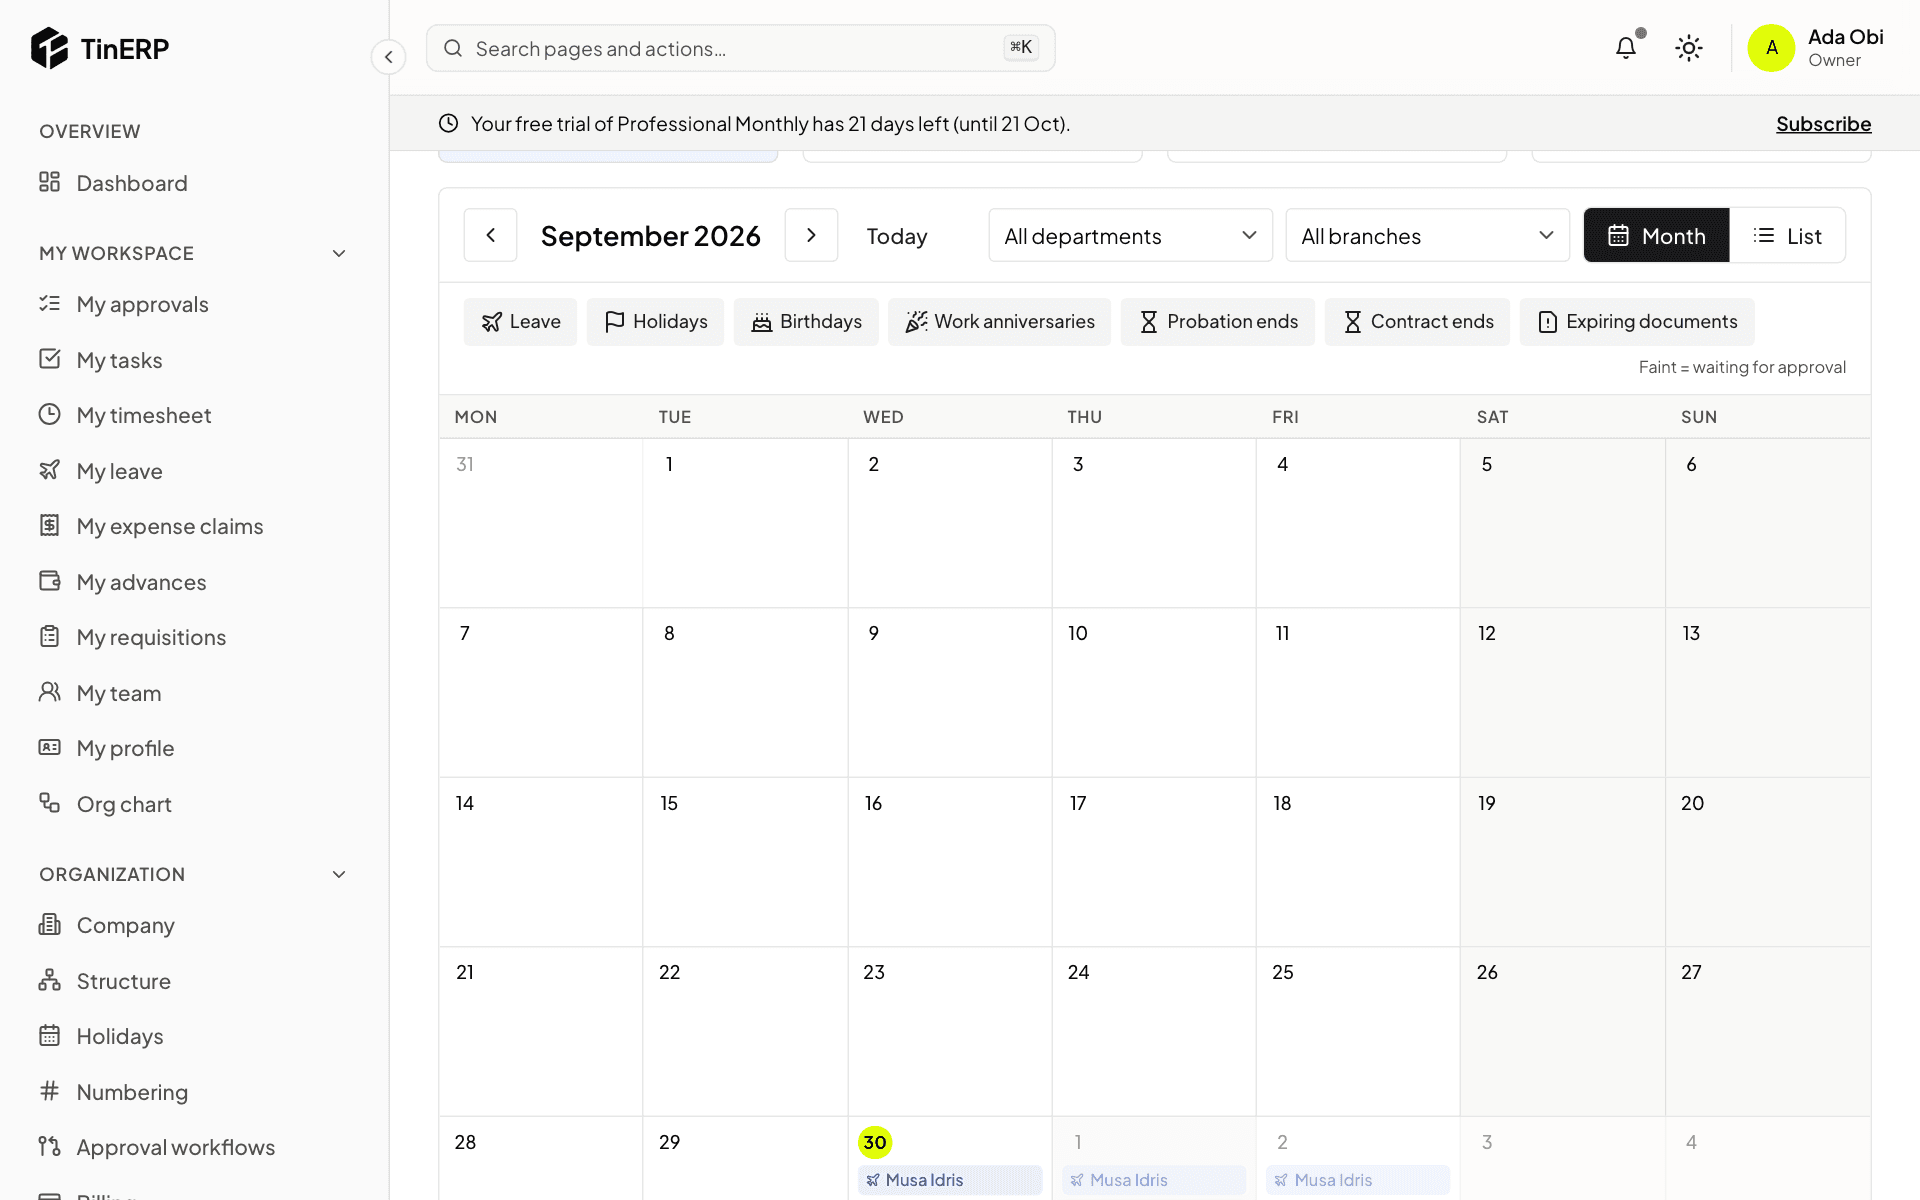
Select Calendar for the month at a glance: approved leave, requests still waiting (shown faintly), public holidays, and the birthdays of people who chose to share them.
Move between months with the arrows, switch to List, filter by department or branch, and select the kinds of event at the top to show or hide them.
The team calendar for the month, with leave, holidays and the event types at the top
4. Decide a request
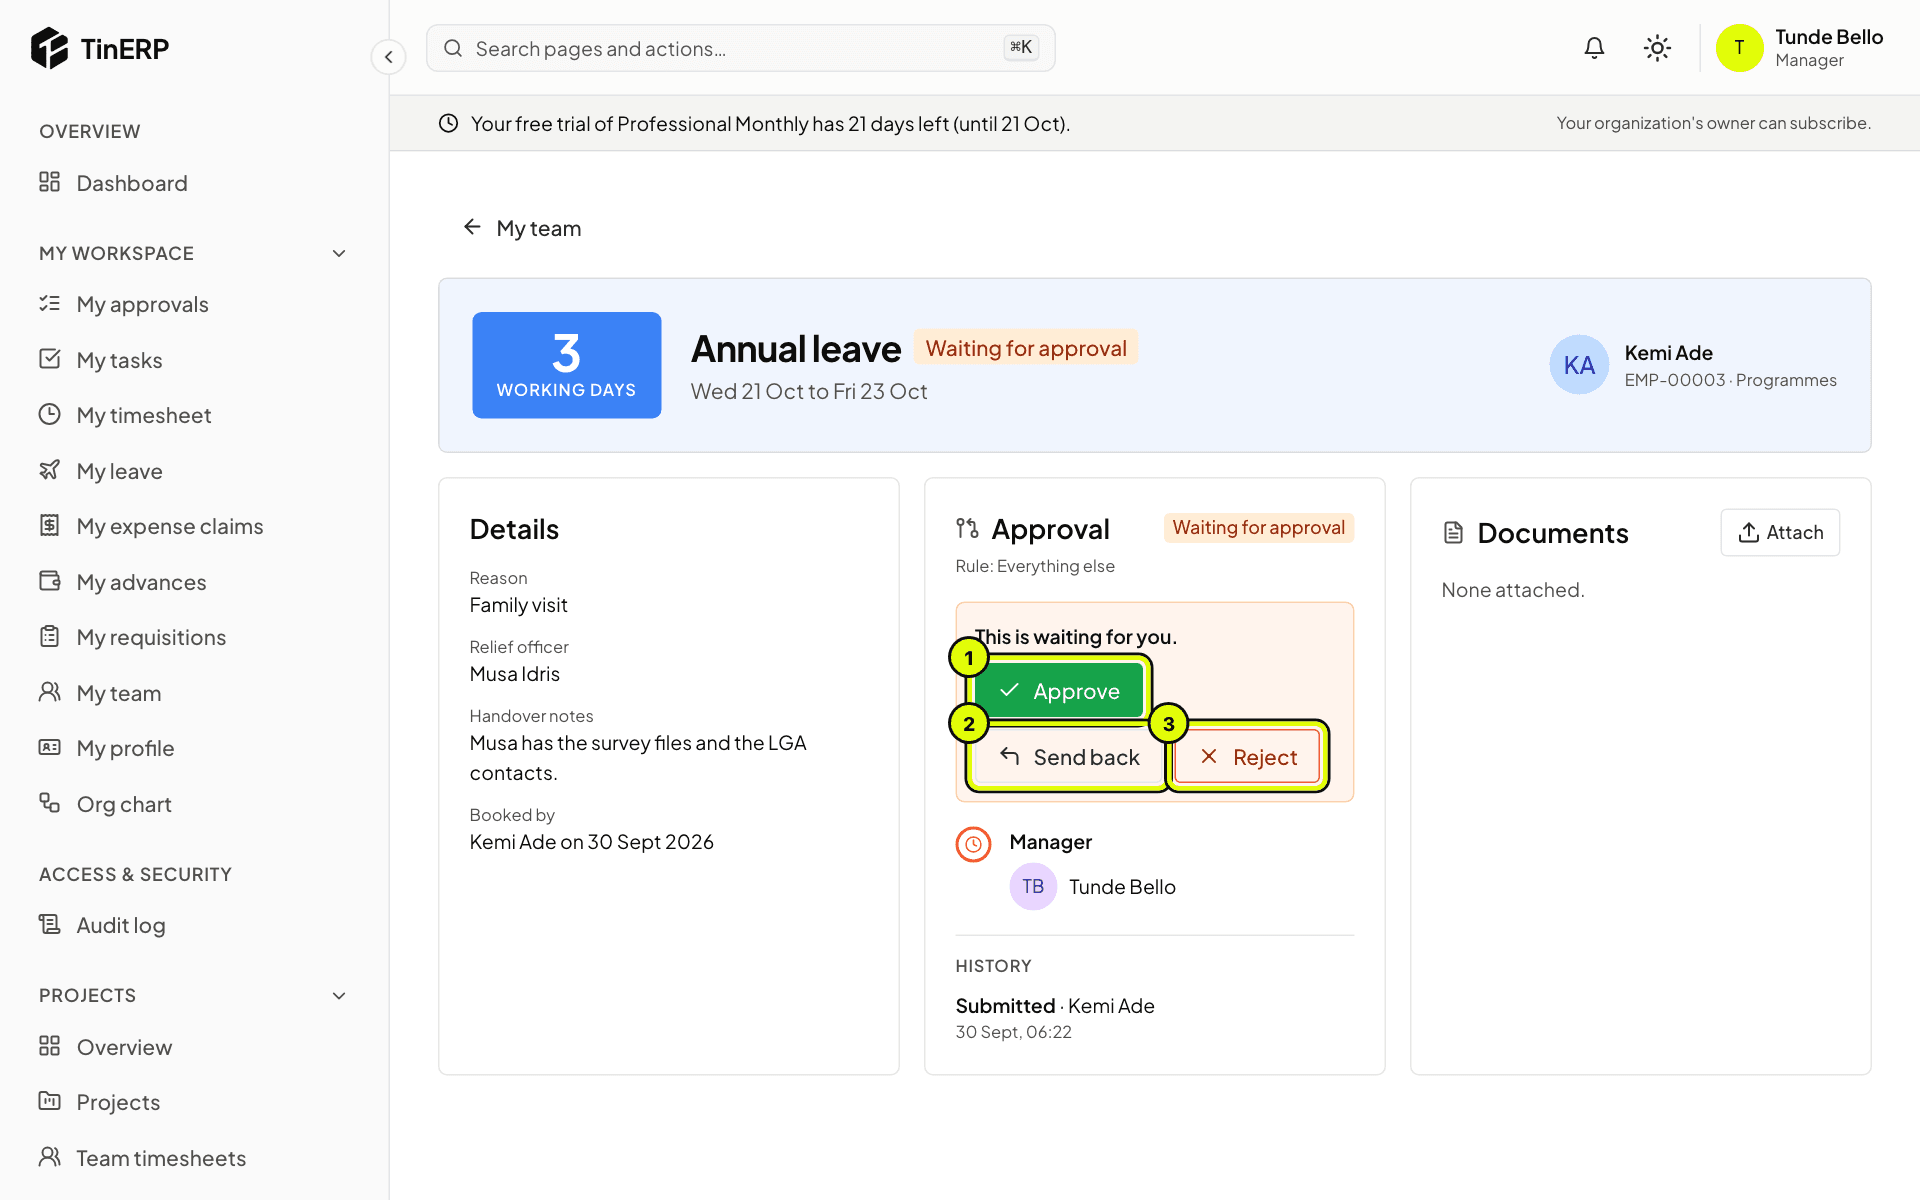
Open a request to see the dates, the days it takes, the reason, the relief officer and the handover notes.
Choose Approve (1), Send back (2) if something needs changing, or Reject (3). When you send back or reject, say why - they see your note. Approved days come off their balance straight away.
Kemi's leave request with the Approve, Send back and Reject buttons marked 1 to 3
Tip: You can also decide from My workspace → My approvals, together with everything else waiting for you.
Questions
Someone is missing from My team - why?
My team follows the reporting lines on employee records. Ask HR to check the person's manager and department.
Can I book leave for someone in my team?
No - people book their own in My leave. HR books leave for people who don't sign in to TinERP, such as drivers.
Managers · Managers · about 3 min
Approve your team's timesheets
Timesheets go to each person's line manager, unless your organization's approval rules say otherwise. You're notified when one is submitted, and it waits for you in My approvals.
1. See who has submitted
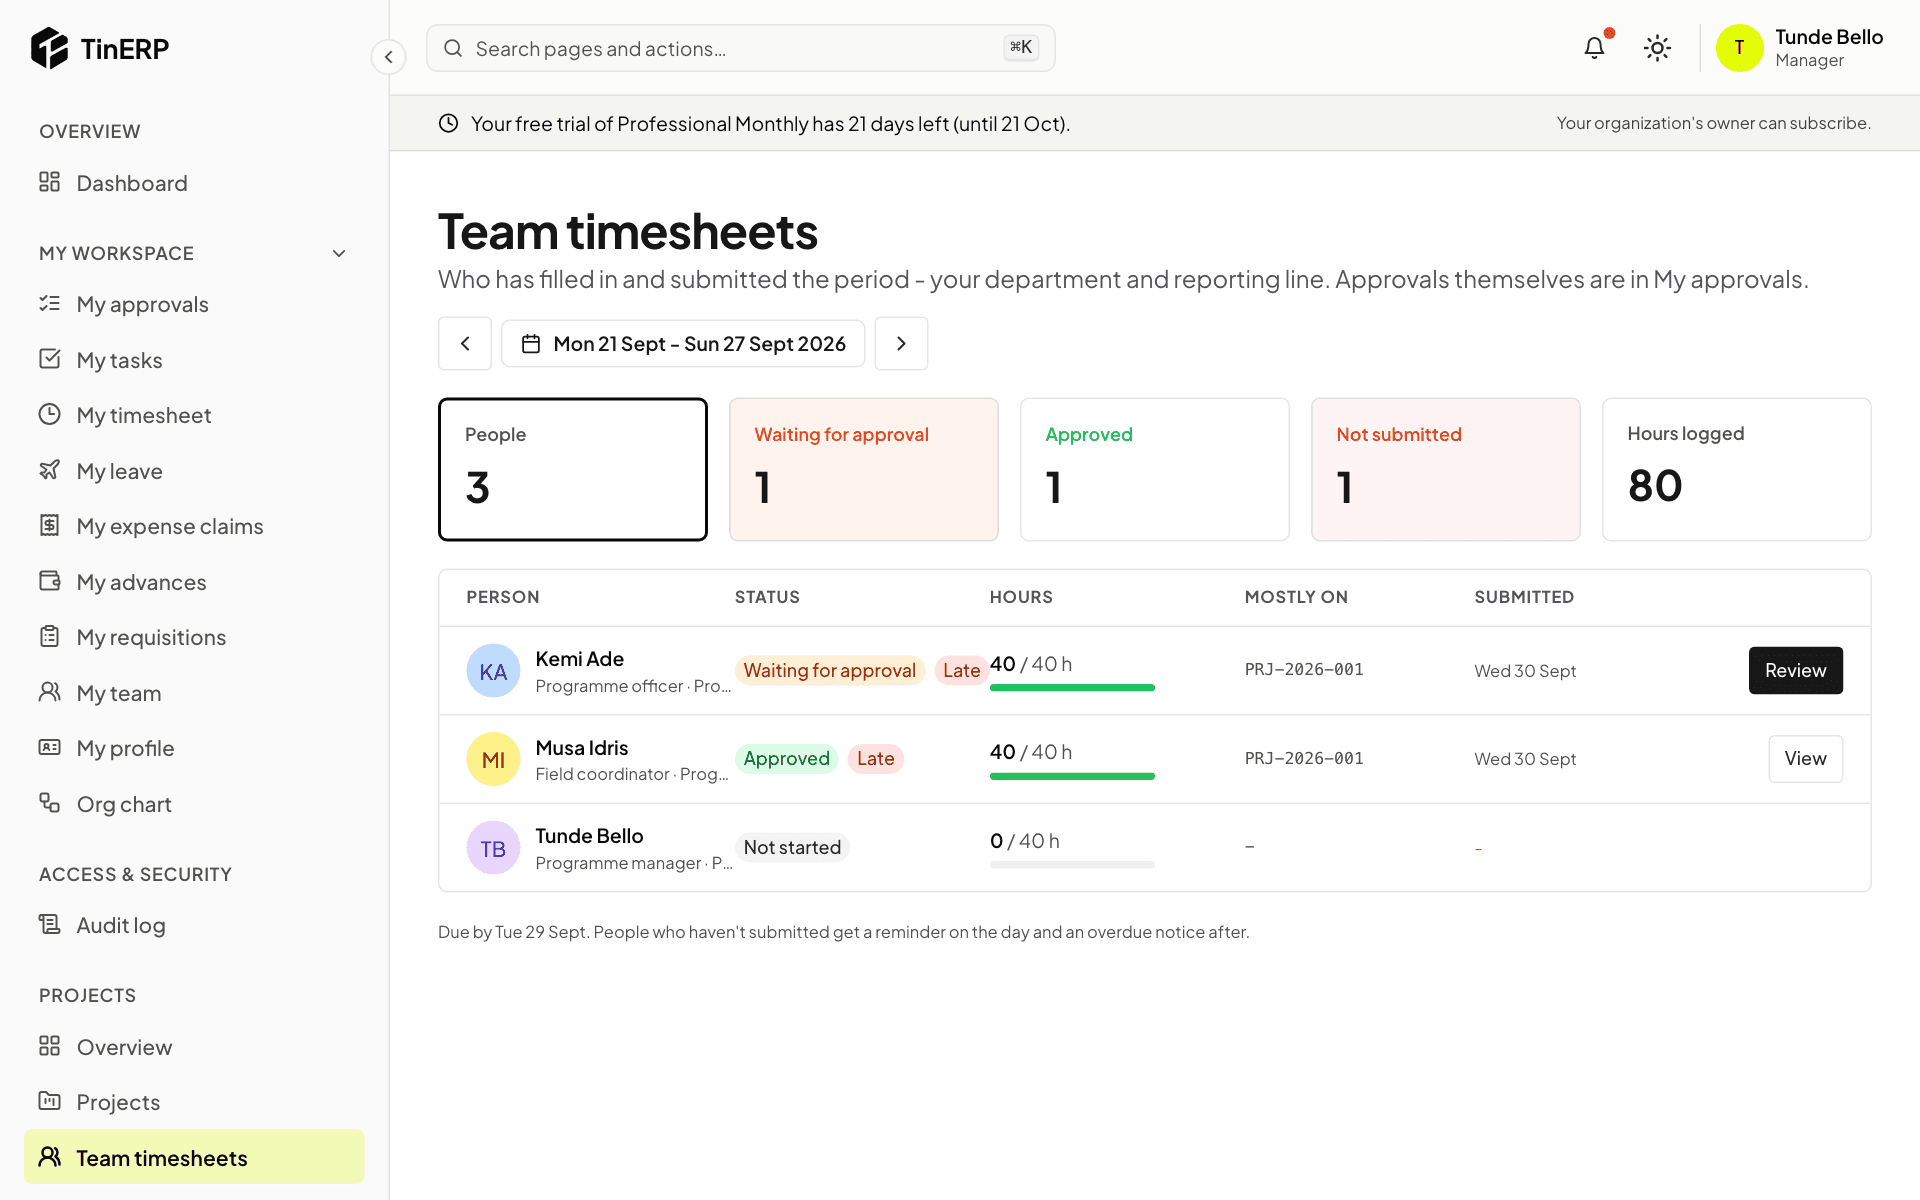
Go to Projects → Team timesheets. For each person you see the status of their timesheet, their hours against the hours expected of them, the projects they worked on most, and when they submitted. Late ones are marked.
Expected hours already allow for each person's approved leave and the holidays at their branch. Use the arrows to move between periods.
Team timesheets for last week: Kemi's waiting for approval and Musa's approved
2. Check it and decide
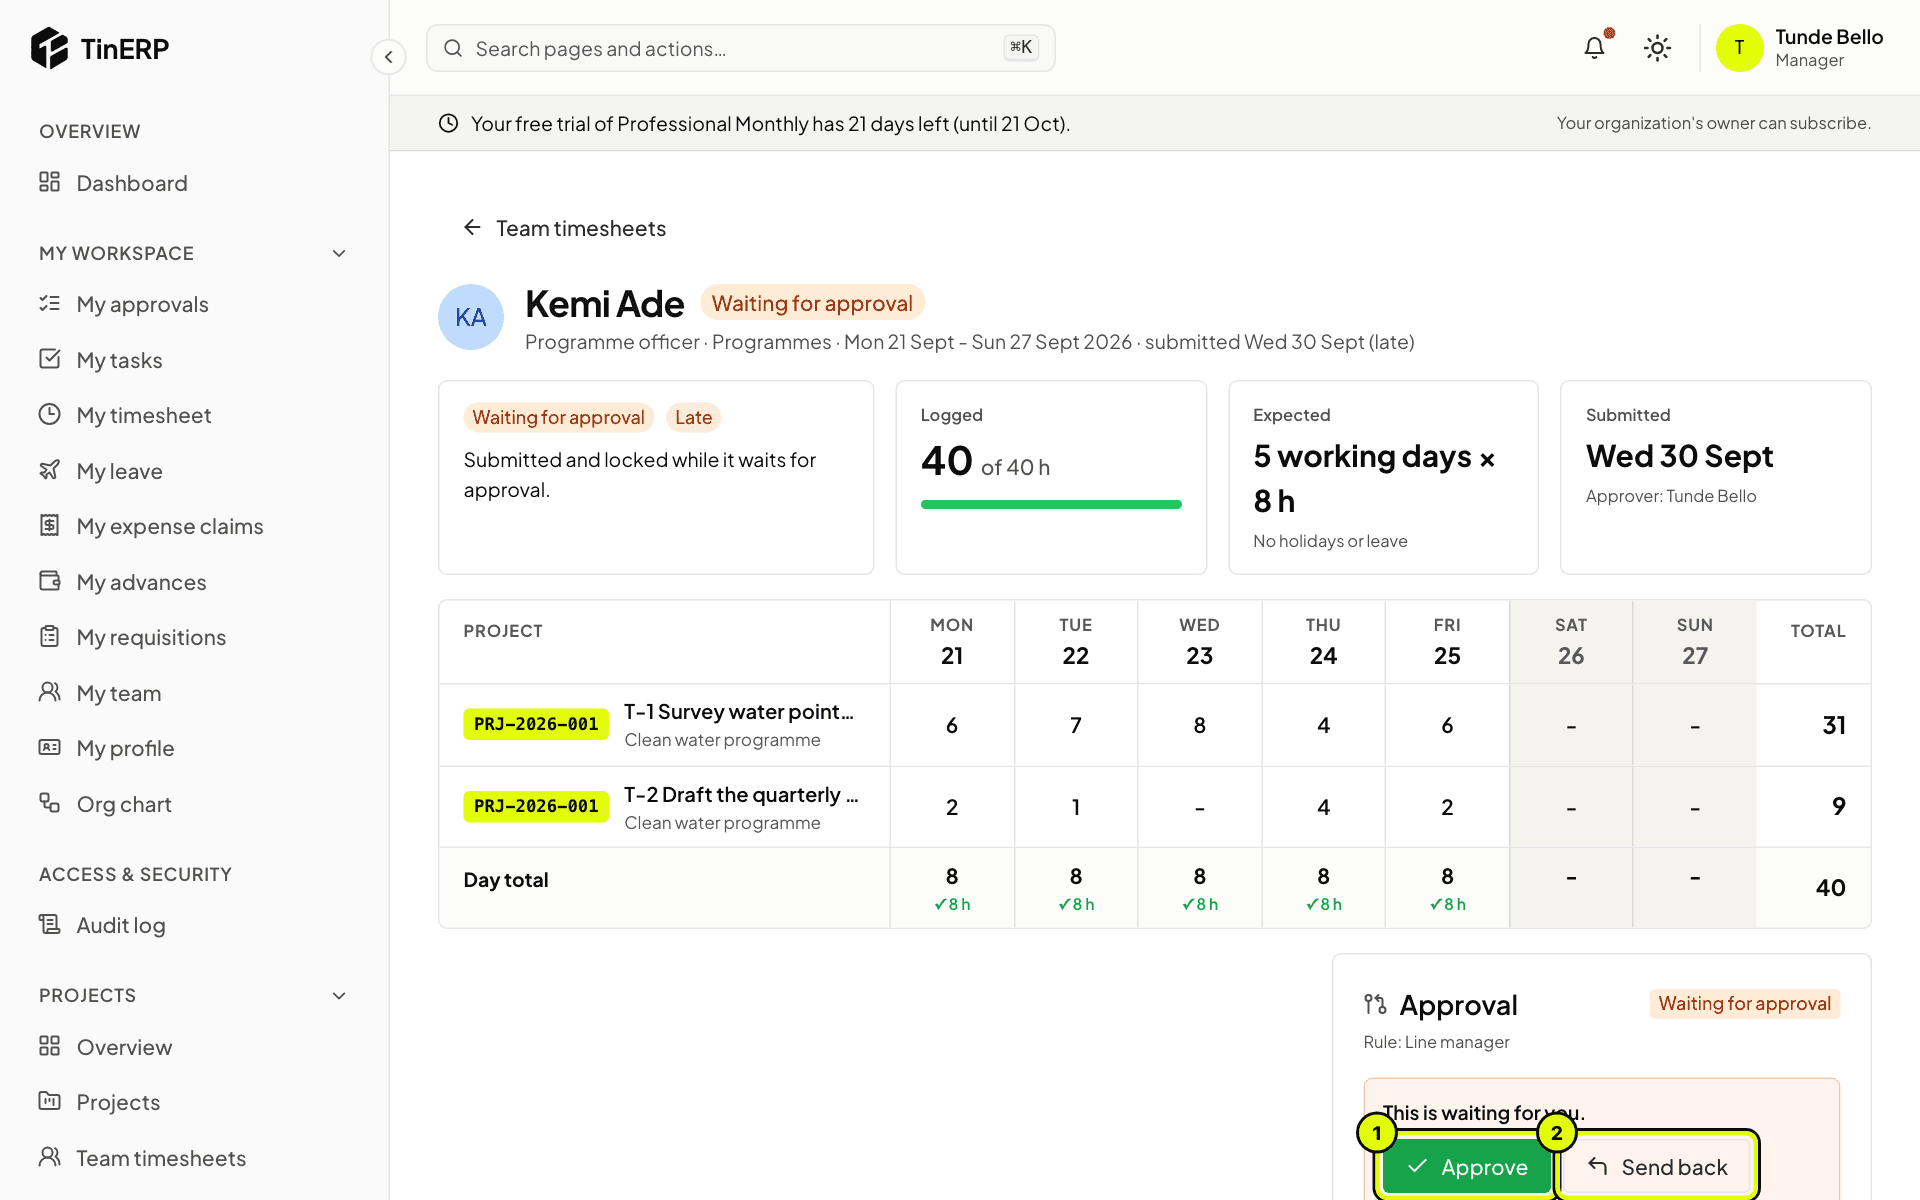
Select Review next to a timesheet waiting for you (or View for any other) to open it: hours by project (or task) and day, the day totals, and the hours expected.
At the bottom, choose Approve (1), or Send back (2) and say what to change - the timesheet opens again for them to correct and submit. Approved timesheets are locked.
Kemi's timesheet with 40 of 40 hours and the Approve and Send back buttons marked 1 and 2
Tip: You don't need to chase people: everyone who hasn't submitted gets a reminder on the day it's due and an overdue notice after.
Administrators · Owners and admins · about 4 min
Manage users
A user is someone who can sign in to TinERP. That isn't the same as an employee record in HR: a driver can be an employee who never signs in, and an outside accountant can sign in without being an employee. To invite someone, see Set up your organization.
1. See who can sign in
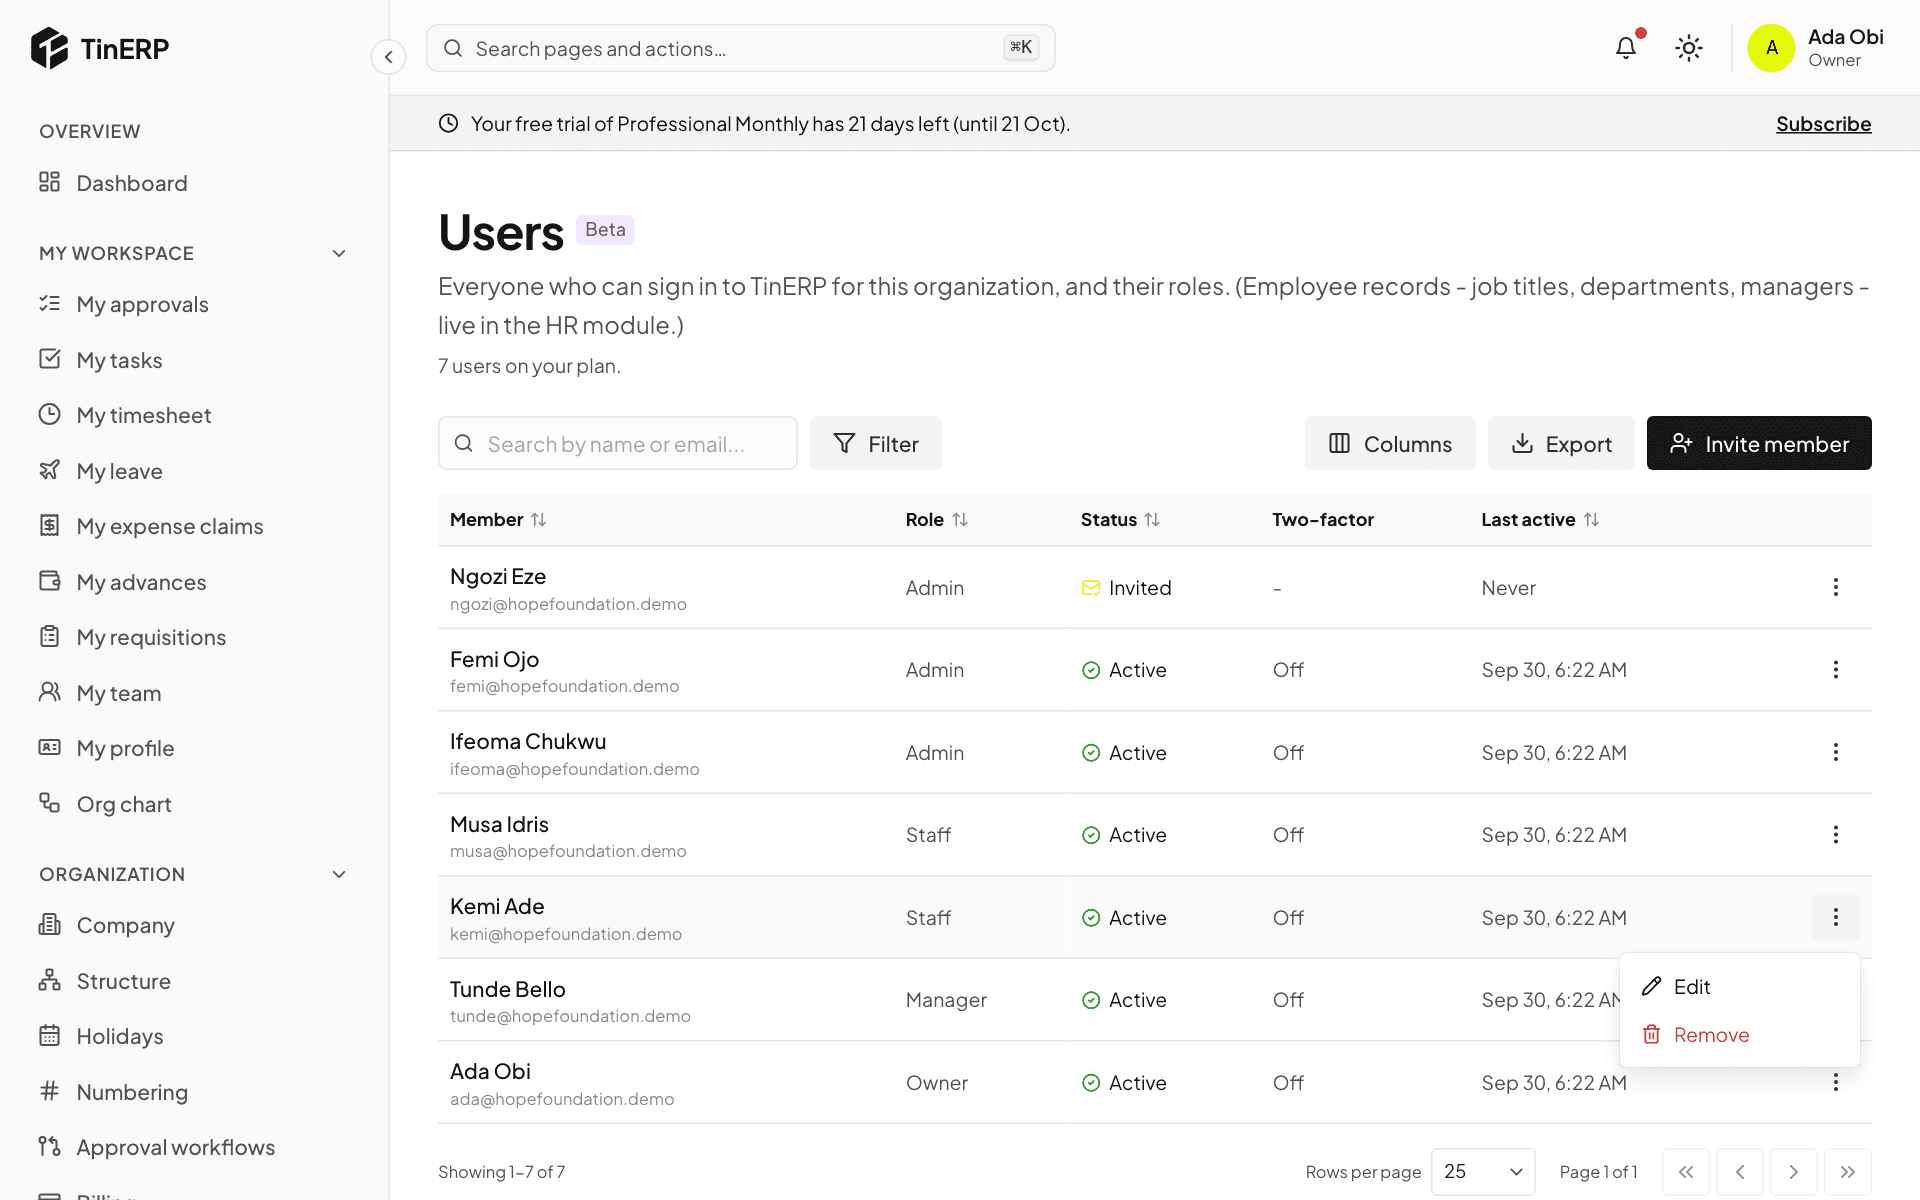
Go to Access & security → Users. The table shows each person's role, their status (Active, Invited or Suspended), whether they use two-factor sign-in, and when they were last active. The line under the title shows how many users your plan includes.
Open the menu at the end of a row for what you can do: Edit and Remove for everyone; Resend invite for someone who hasn't joined yet; Reset two-factor for someone who uses it.
The Users page with the menu open on Kemi's row, showing Edit and Remove
2. Change a role, or suspend someone
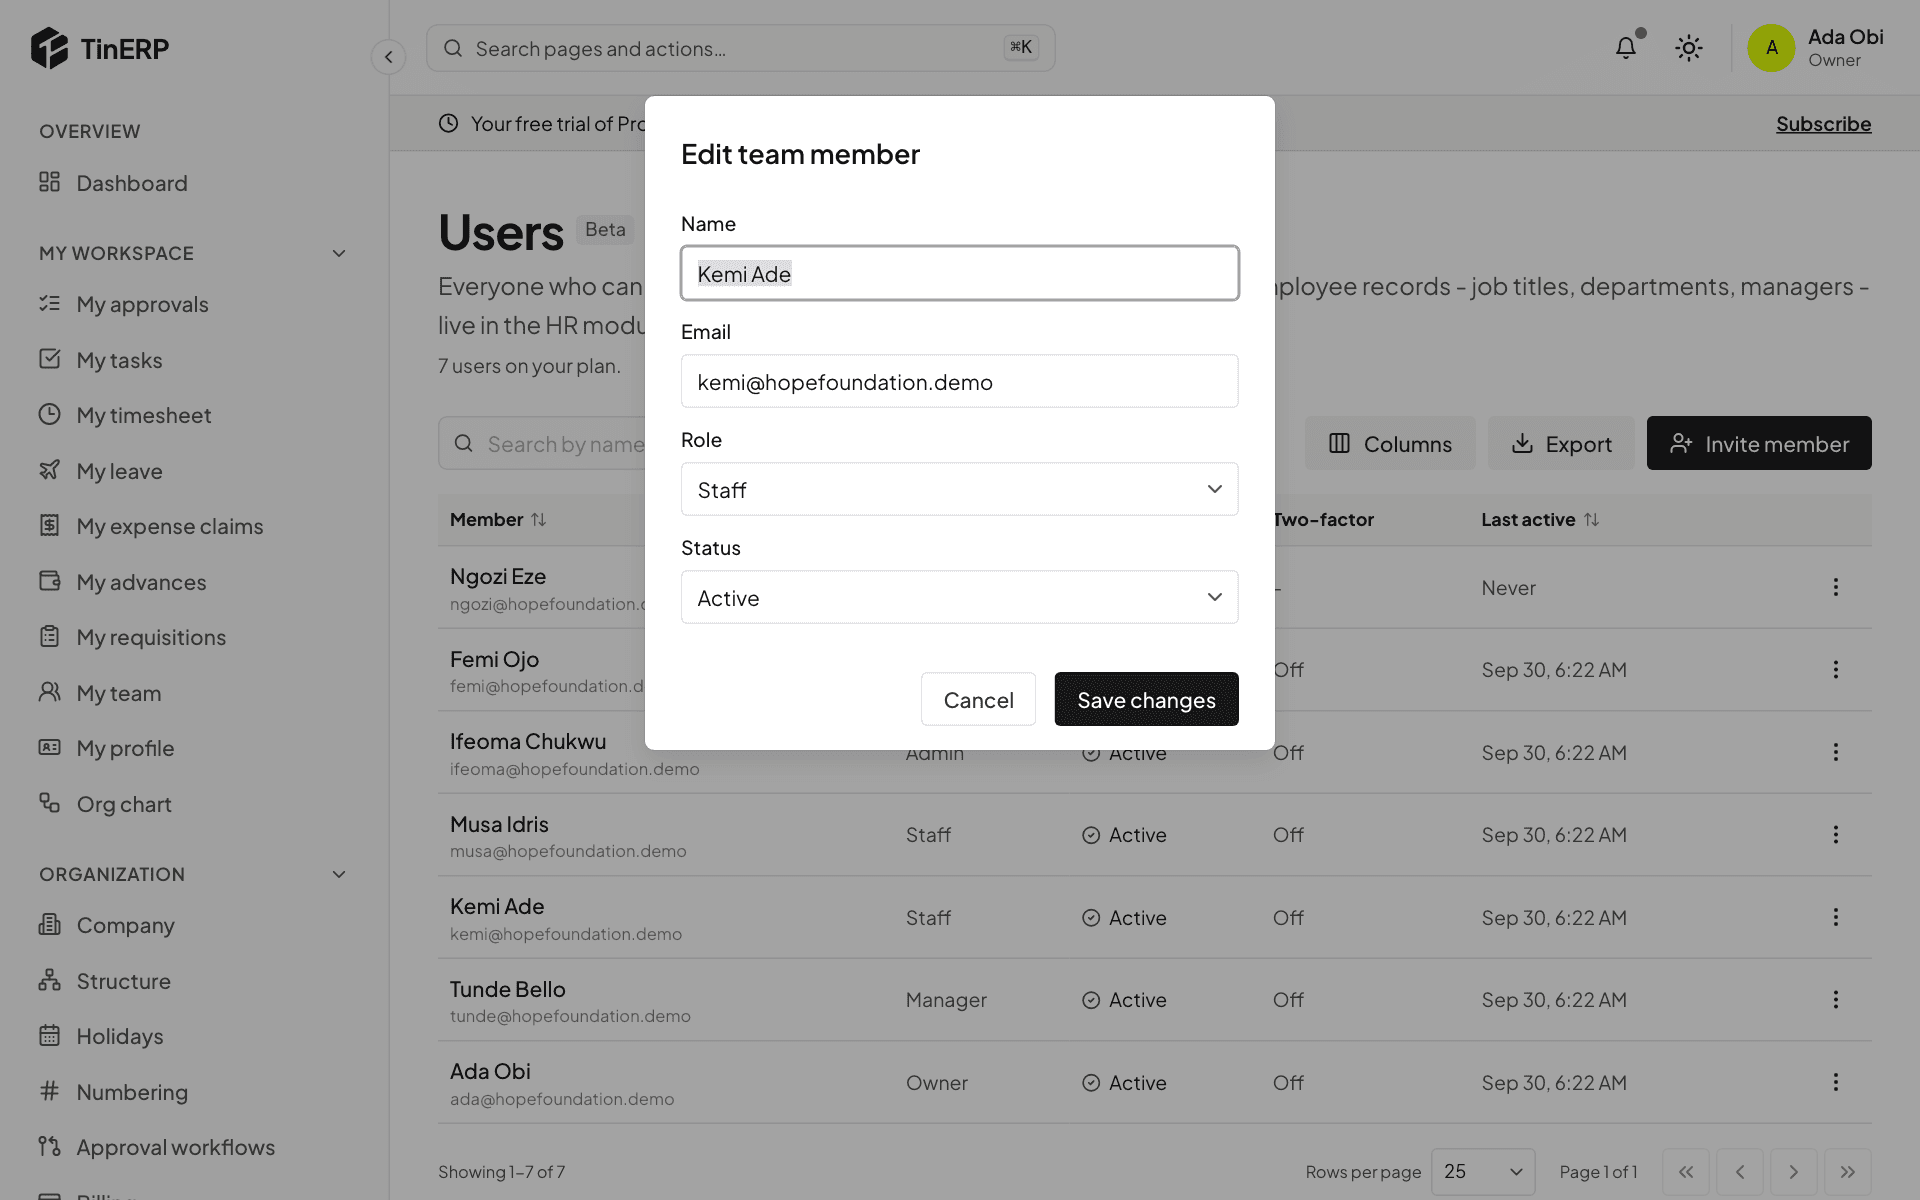
Choose Edit. Pick their new Role - it applies straight away, and they're told.
To stop someone signing in without removing them, set Status to Suspended; set it back to Active to let them in again. Select Save changes.
The Edit team member window with name, email, role and status
3. Help someone who lost their phone
If someone can't sign in because they've lost the phone with their authenticator app, choose Reset two-factor. It turns their two-factor sign-in off and signs them out. They then sign in with their password and set it up again on their new phone - straight away, if your organization requires it.
You can't reset your own, and only an owner can reset another owner's.
4. Remove someone
Choose Remove to take away their access for good. The audit log keeps what they did. If they might come back, suspend them instead.
Questions
Do I need to remove people who leave?
Not if HR records their exit: on their last day, their login is suspended and they're signed out everywhere.
Why can't I give someone a particular role?
Nobody can give more than they have. You can only give roles whose permissions you have yourself.
Administrators · Owners and admins · about 5 min
Roles and permissions
Everyone has one role. TinERP starts you with Owner, Admin, Manager and Staff. You can change all of them except Owner, and add your own - an HR officer or a finance officer, for example.
1. See your roles
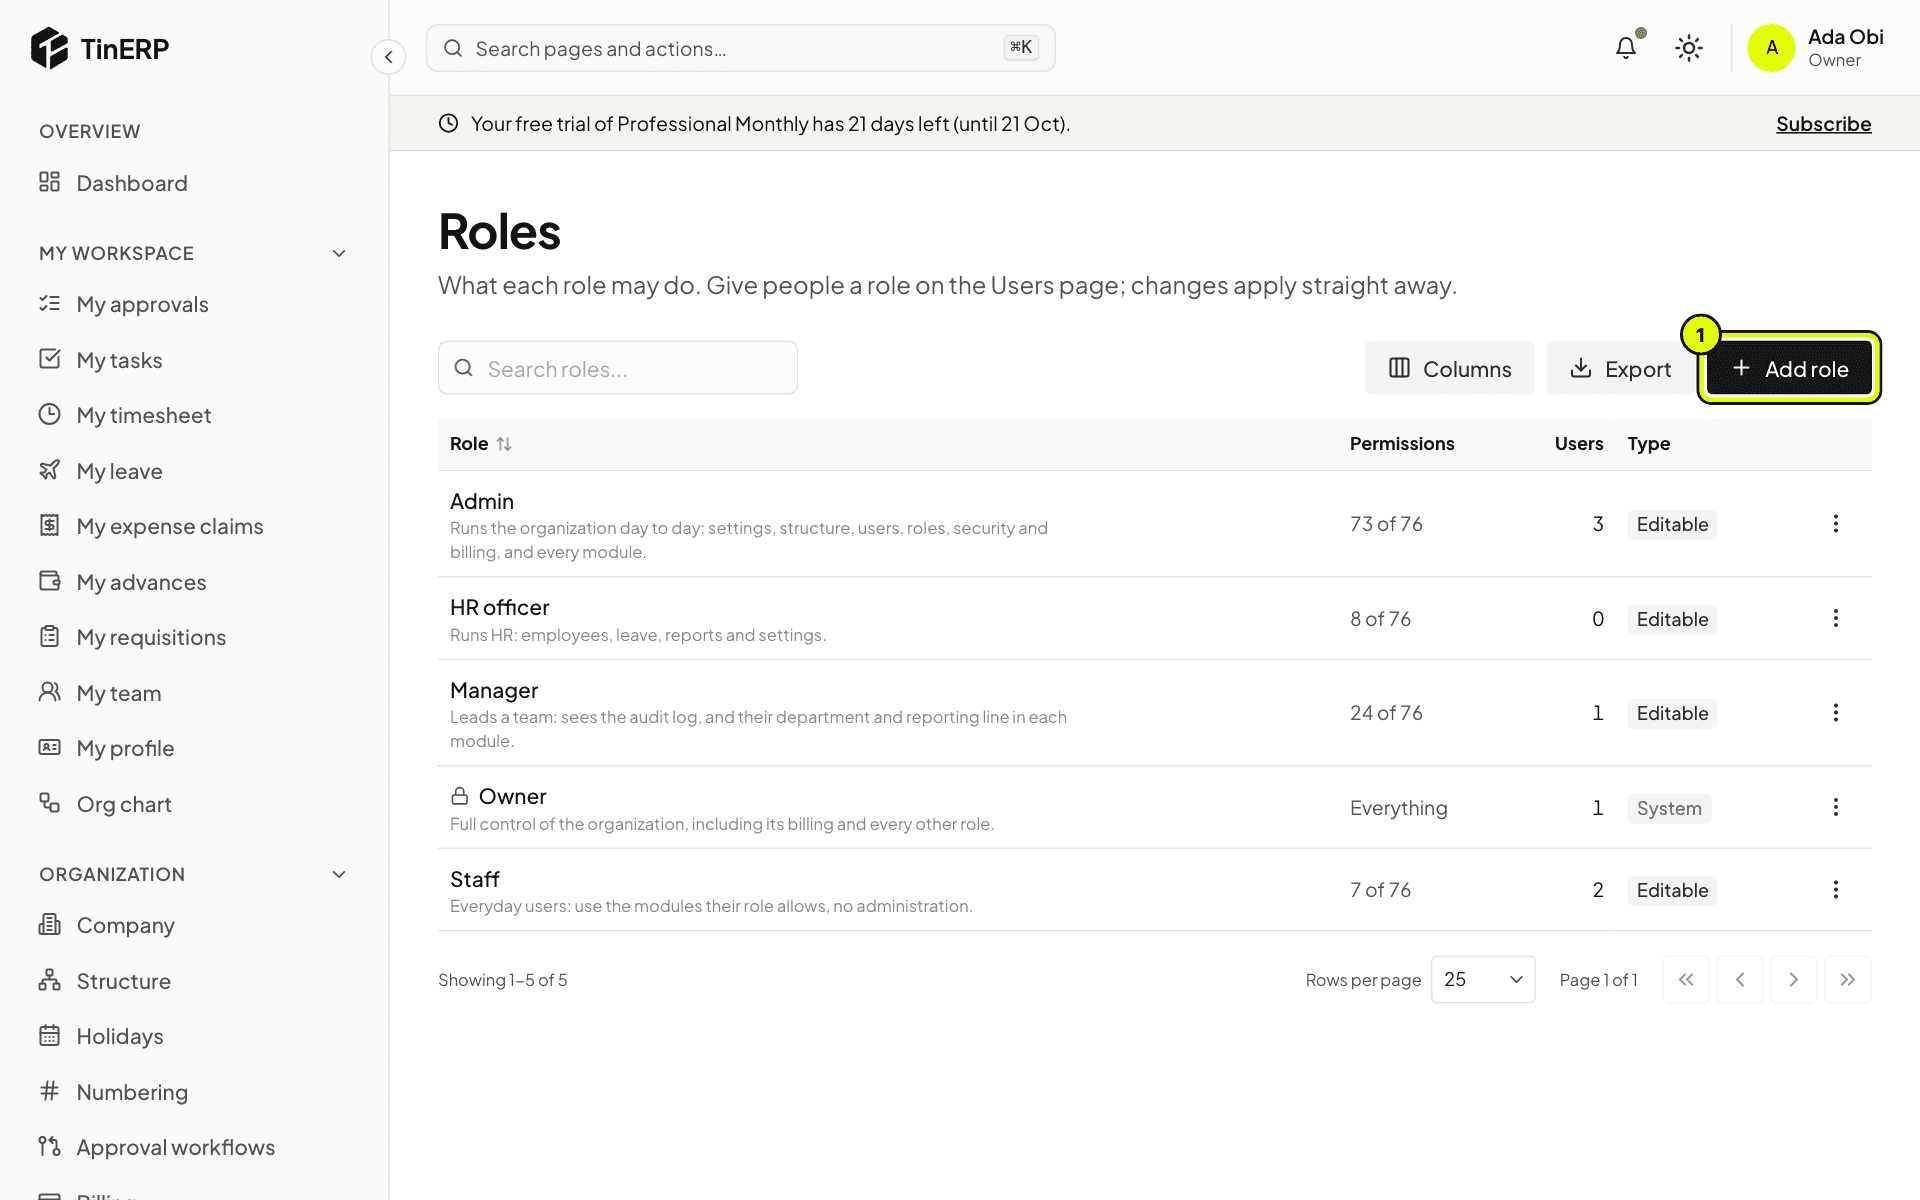
Go to Access & security → Roles. Each role shows what it's for, how many permissions it has and how many users.
Owner always has everything - including what comes with new modules - and can't be changed. Admin runs the organization day to day. Manager leads a team: they see their department and reporting line in each module. Staff use TinERP for themselves.
The Roles page listing Admin, HR officer, Manager, Owner and Staff, with Add role marked 1
2. Add or change a role
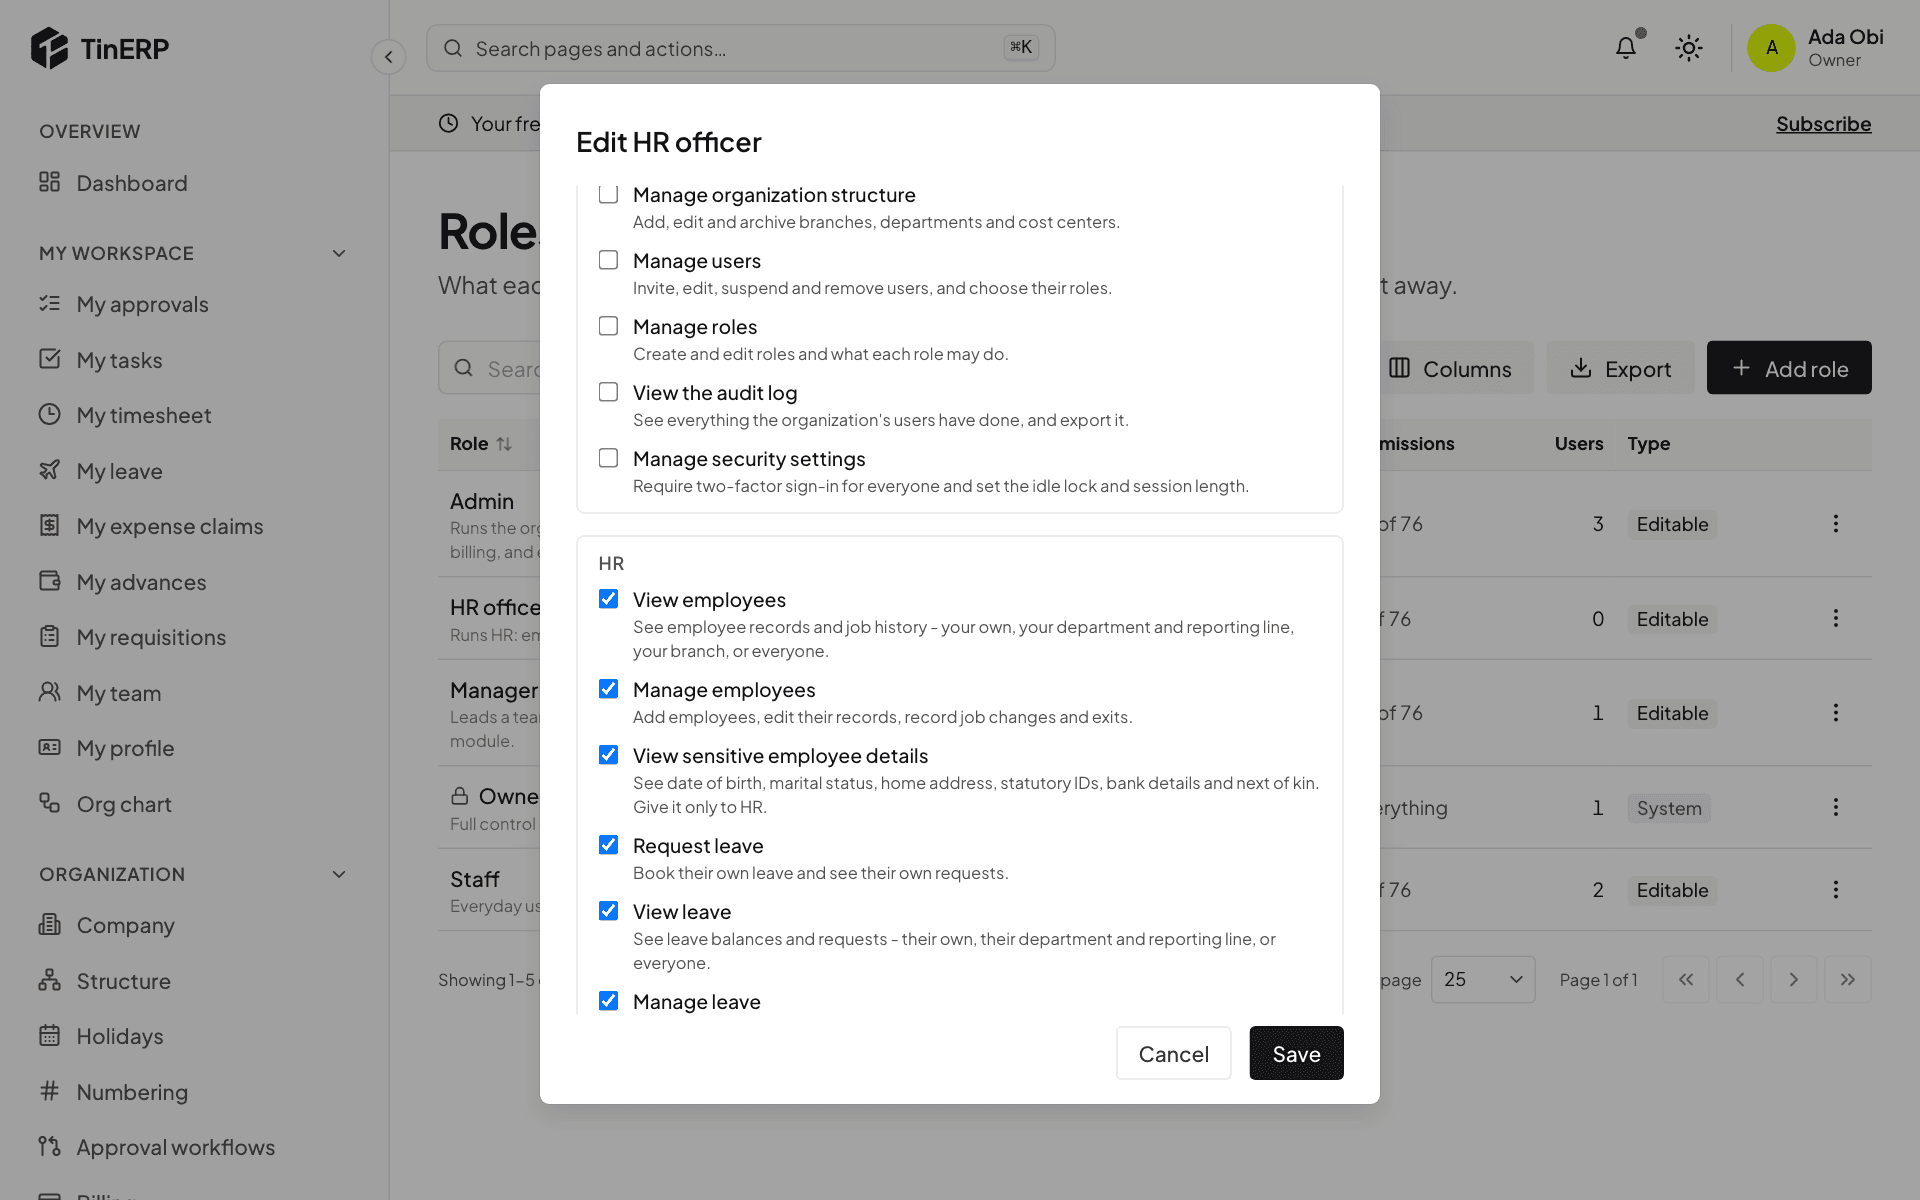
Select Add role (1), or open a role's menu and choose Edit. Give it a name and a line about what people with it do, then tick its permissions - they're grouped by module, each with a line saying what it allows. Select Save.
Editing the HR officer role: the HR permissions ticked
Tip: Sensitive employee details - date of birth, home address, ID numbers, next of kin, bank details and documents - have their own permission that no starting role has. Give it only to your HR role.
3. Give people the role
Go to Users, open the person's menu, choose Edit and pick the role. Changes to a role apply at once to everyone who has it.
Questions
Does someone need a permission to approve things?
No. Who approves is decided by your approval rules - see Set who approves what - not by roles.
Can I delete a role?
Yes, from its menu - once you've given everyone who has it another role. Owner can't be deleted.
Administrators · Owners and admins · about 6 min
Set who approves what
Every kind of request - leave, timesheets, expense claims, advances, purchases, payments and more - has its own approval rules. TinERP's defaults work from day one; change them when your policy is different.
1. Choose a kind of request
Go to Organization → Approval workflows and pick a kind of request on the left. Kinds that belong to modules outside your plan are listed separately.
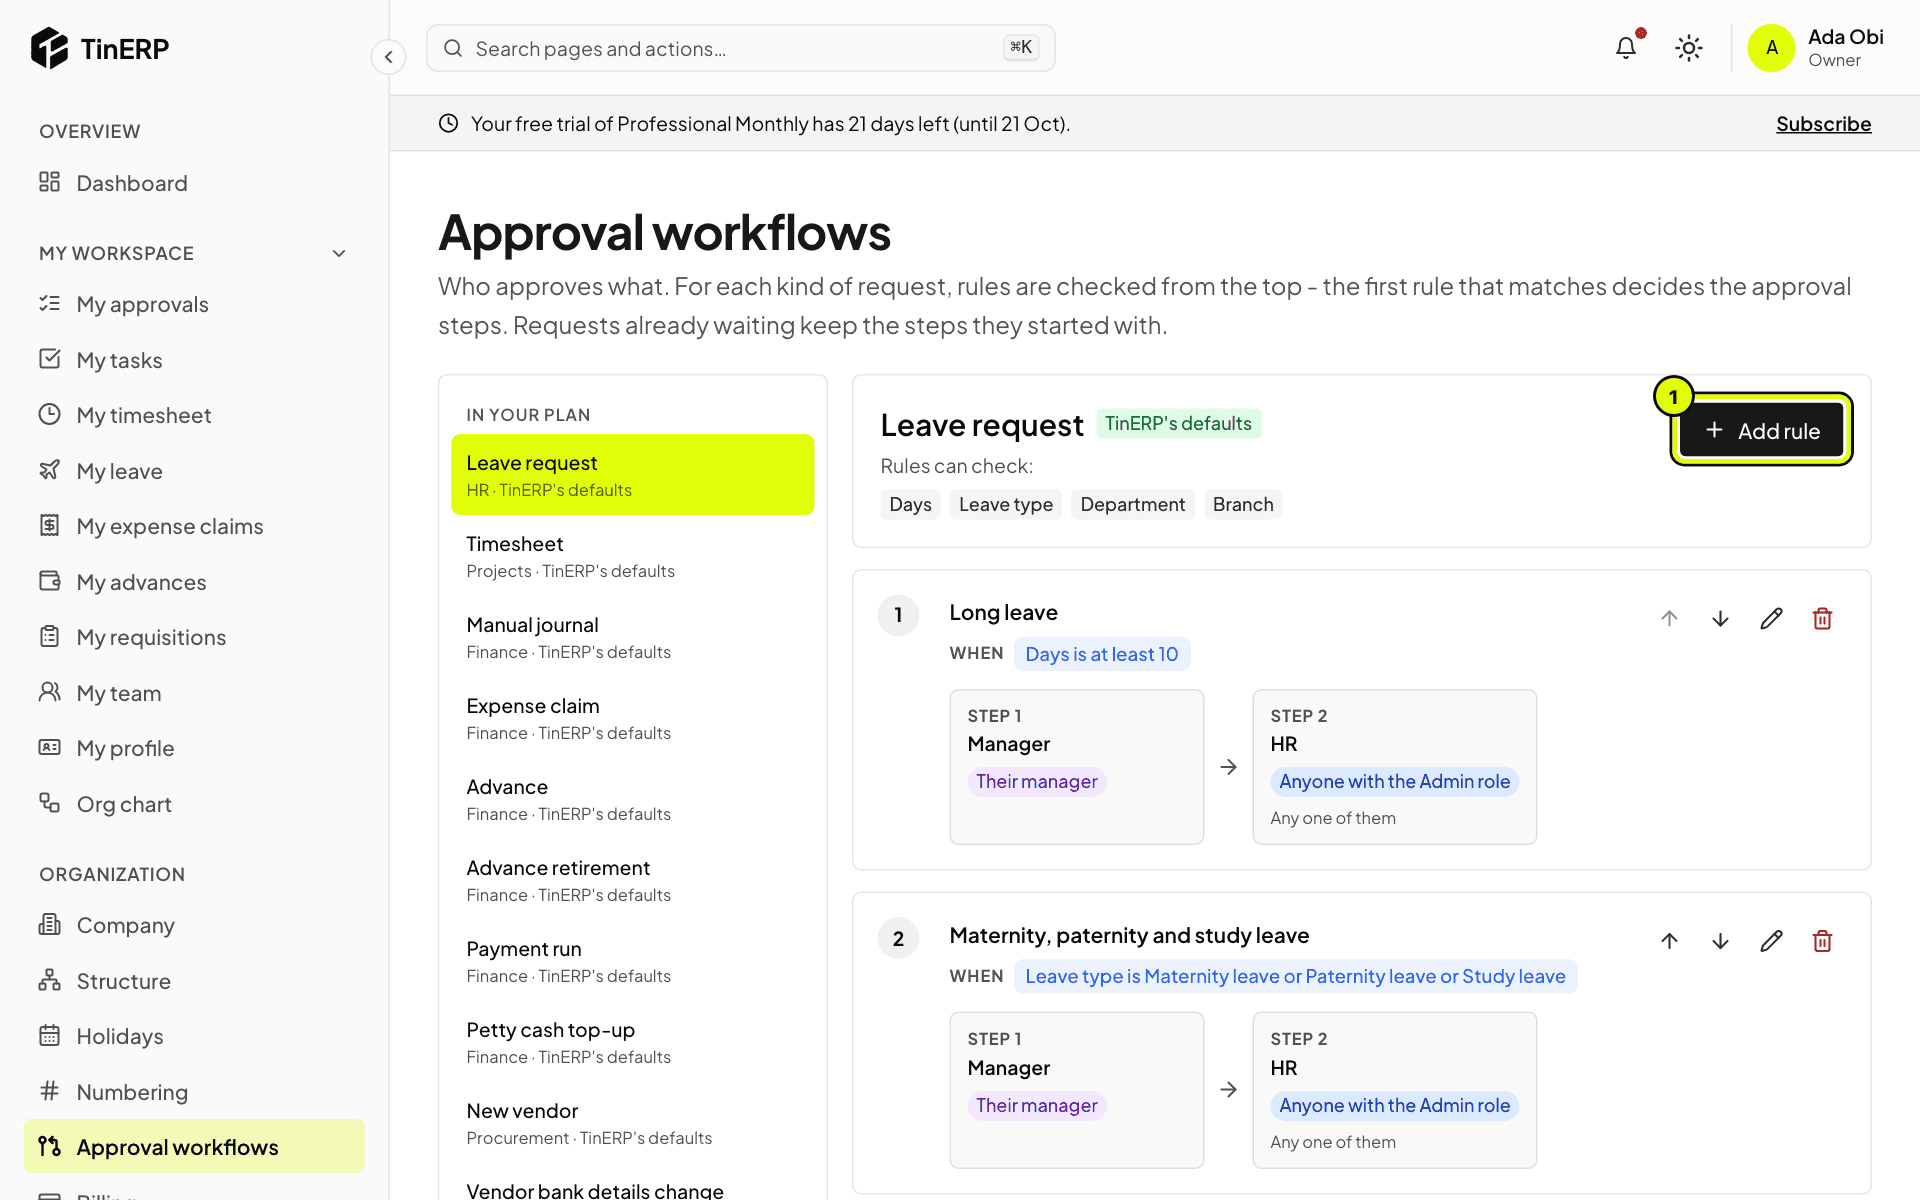
Rules are checked from the top: the first rule whose conditions match a request decides who approves it. The chips under the title show what rules can check - for leave, the days, the leave type, the department and the branch; for money, the amount.
Approval workflows for leave requests: the Long leave and Maternity, paternity and study leave rules, with Add rule marked 1
2. Add or change a rule
Select Add rule (1), or the pencil on a rule. Give it a name, then set:
When - the conditions, which must all be true, such as Days is at least 10. No conditions means every request.
Then approved by, in order - the steps. Each step's approvers can be the requester's manager (or their manager's manager), the head of their department, anyone with a role, or named people, and the step needs Any one or All of them. Select Save rule.
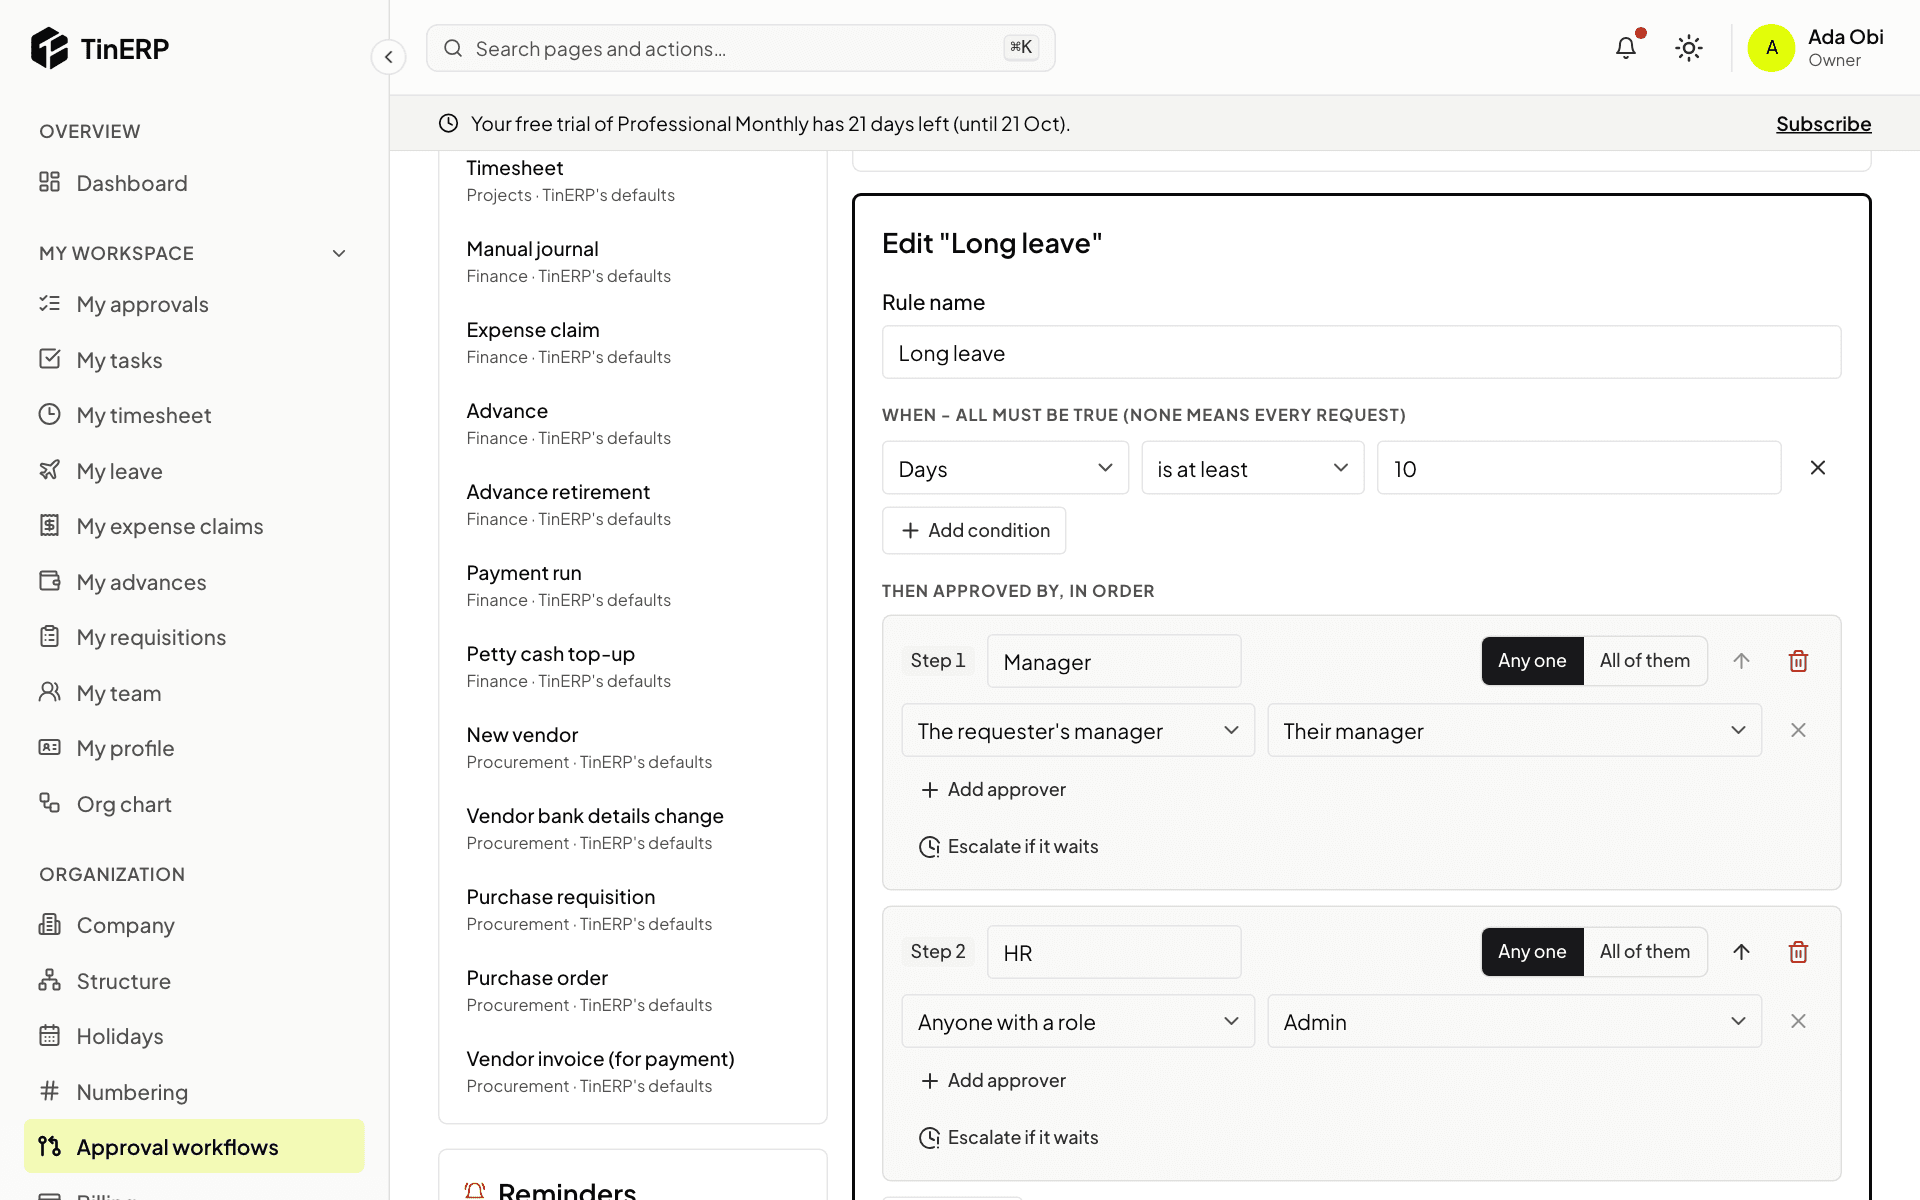
Editing the Long leave rule: Days is at least 10, then the manager, then anyone with the Admin role
Tip: A rule with no steps approves requests automatically - for example expense claims under a small amount.
3. Keep approvals moving
Under a step, Escalate if it waits adds more people if nobody decides within a number of working days - usually the manager's manager. Any one of them can then decide.
Reminders, on the left, apply to every kind of request: whoever hasn't decided is reminded every few working days, from 8am.
4. Try it before you rely on it
Scroll to Who would approve this?. Choose who is asking and fill in the request's details. TinERP shows which rule matches and the real people each step would go to. Nothing is saved.
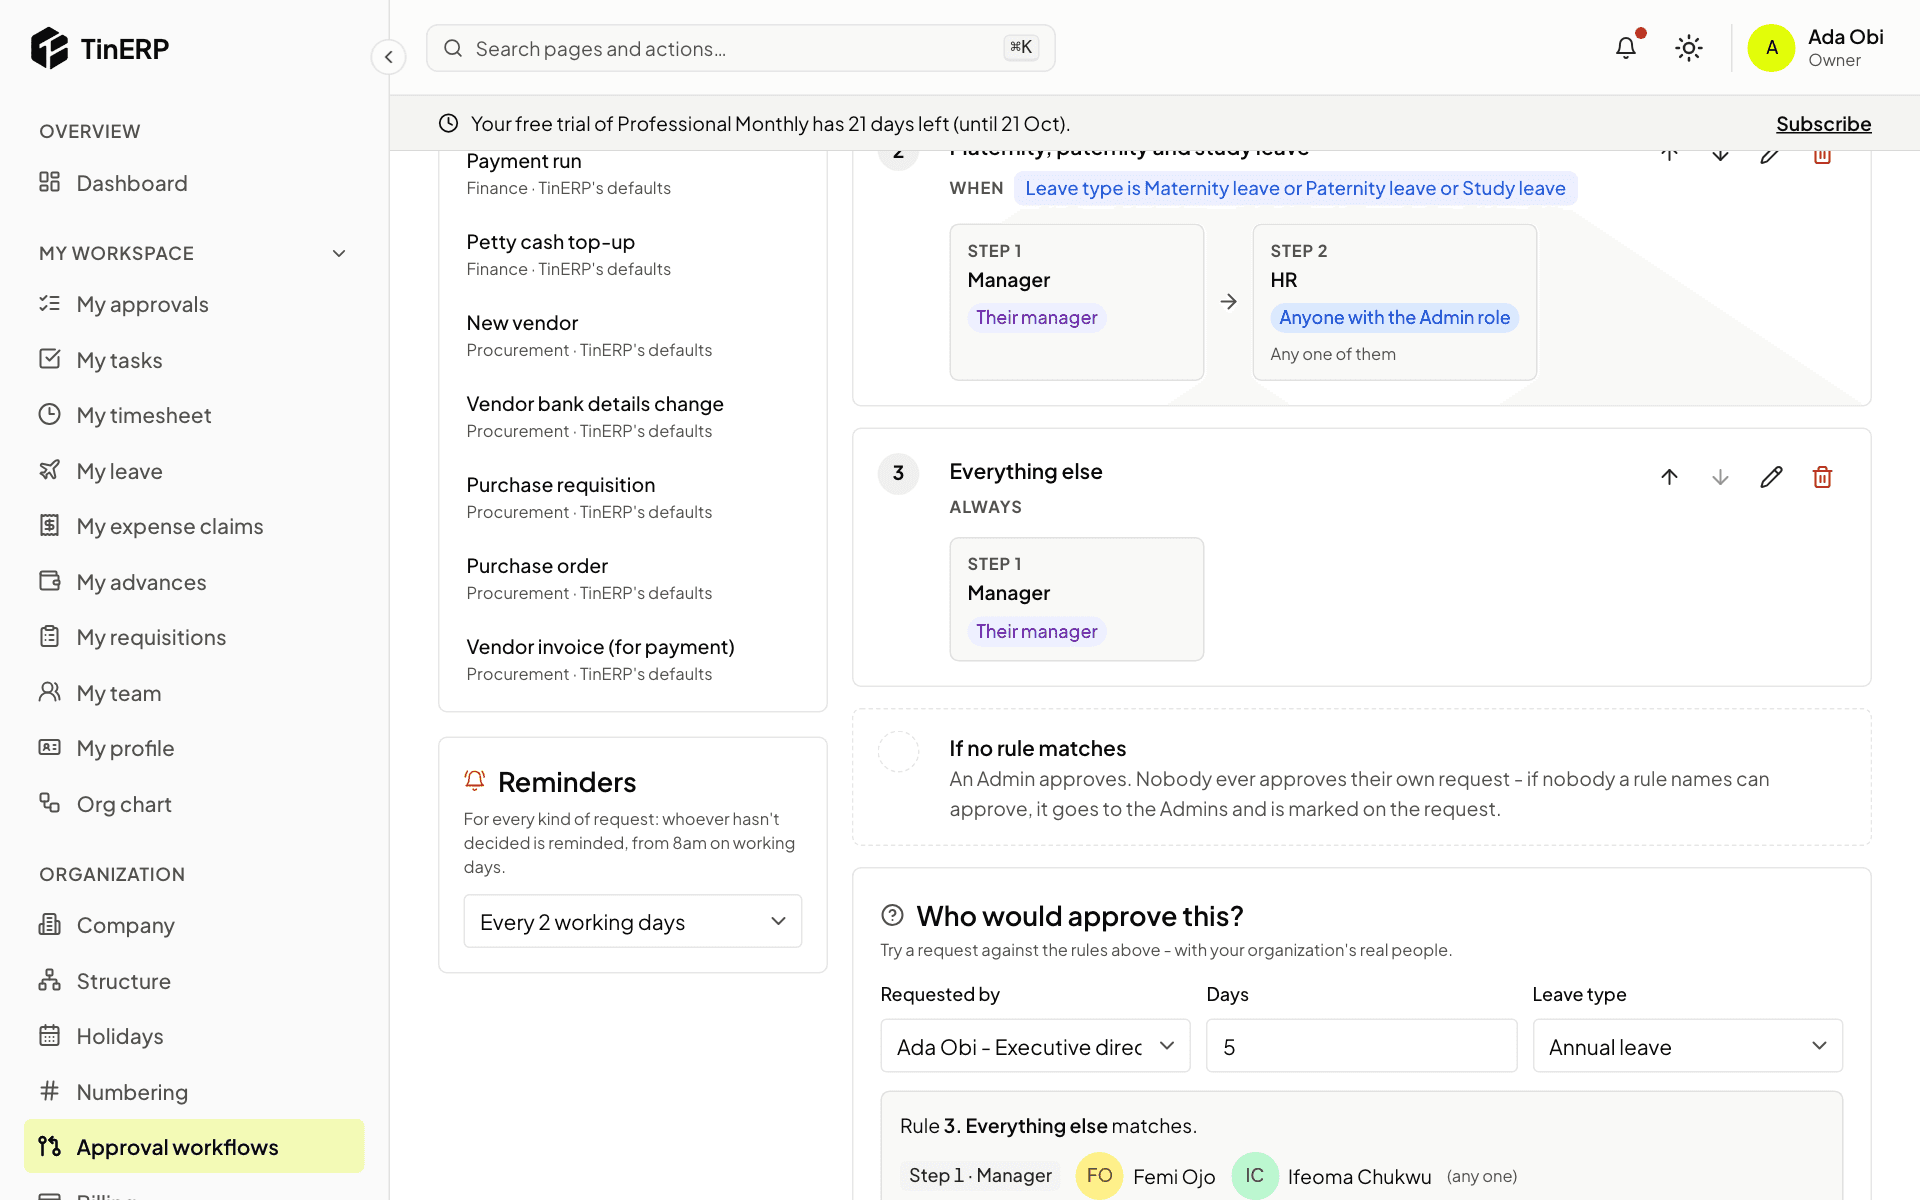
The rest of the leave rules, the Reminders setting and Who would approve this?
Questions
Do my changes affect requests already waiting?
No. A request keeps the steps it started with; new requests use the new rules.
Can someone approve their own request?
Never. If a rule would send a request to the person who asked, they're left out. If nobody is left, it goes to the Admins and is marked on the request.
What happens when an approver is away?
They set Out of office in My account and choose someone to decide for them. You can also add escalation to a step.
How do I go back to TinERP's rules?
Select Use the defaults for that kind of request. Requests already waiting keep their steps.
Administrators · Owners and admins · about 3 min
Security settings
These settings apply to everyone in your organization. They can make TinERP stricter than its own limits, never looser.
1. Require two-factor sign-in
Go to Access & security → Security and turn on Require two-factor sign-in. Everyone then signs in with their password and a 6-digit code from an authenticator app. People who haven't set it up are asked to before they can continue.
Set it up on your own account first (My account). The page shows how many active users haven't set it up yet.
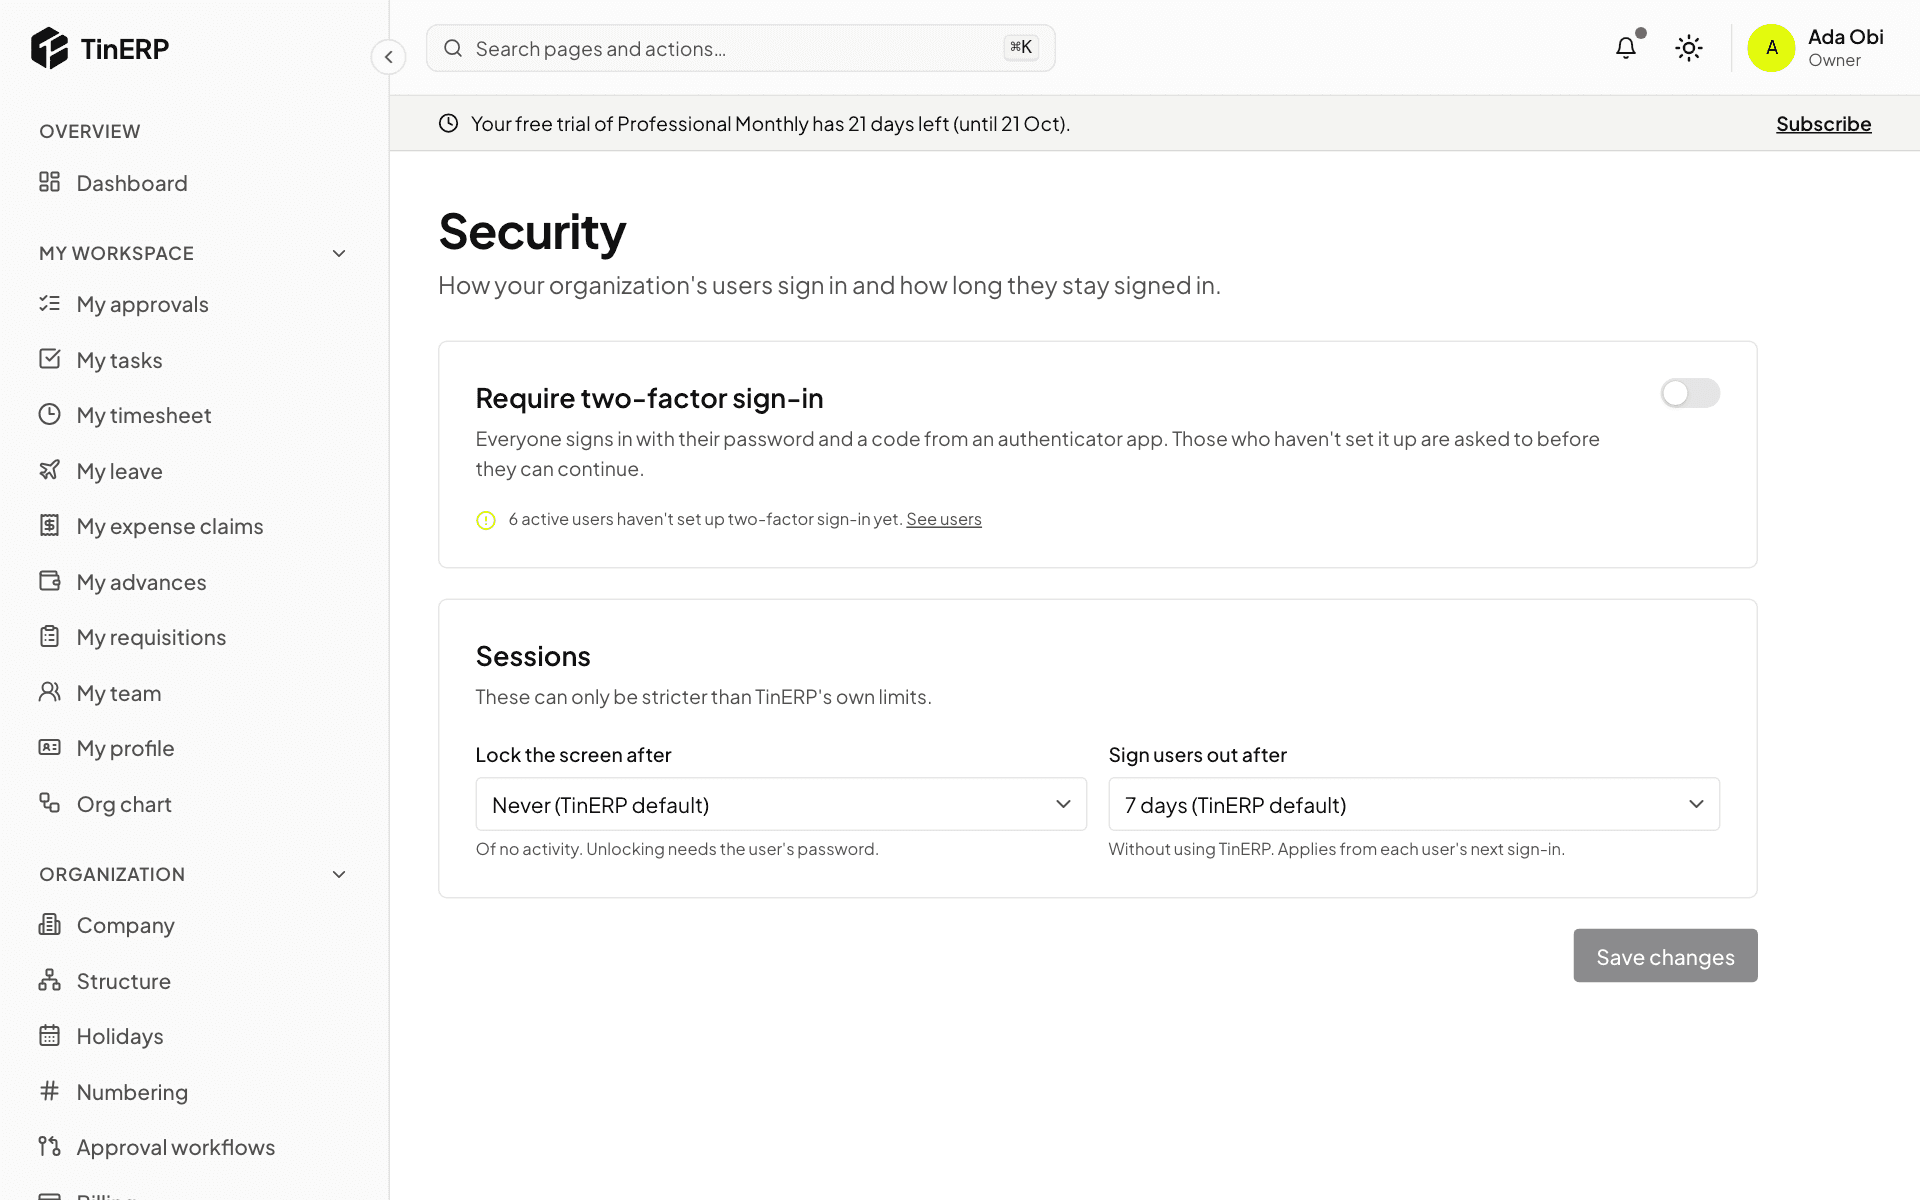
The Security page: Require two-factor sign-in, and the session settings
2. Choose session limits
Lock the screen after - a time with no activity, after which the screen locks until the person enters their password.
Sign users out after - a time without using TinERP. It applies from each person's next sign-in. Select Save changes.
Administrators · Owners, admins and managers · about 2 min
The audit log
TinERP records what your team does: sign-ins, changes with their old and new values, approvals and billing actions. Nobody can edit or delete the record.
1. Find what happened
Go to Access & security → Audit log. Search for a person, an action or a record, filter by category or severity, and choose a period. Changes shows each field that changed, old → new.
Export (1) downloads what you've filtered as a CSV file - for your auditors, for example.
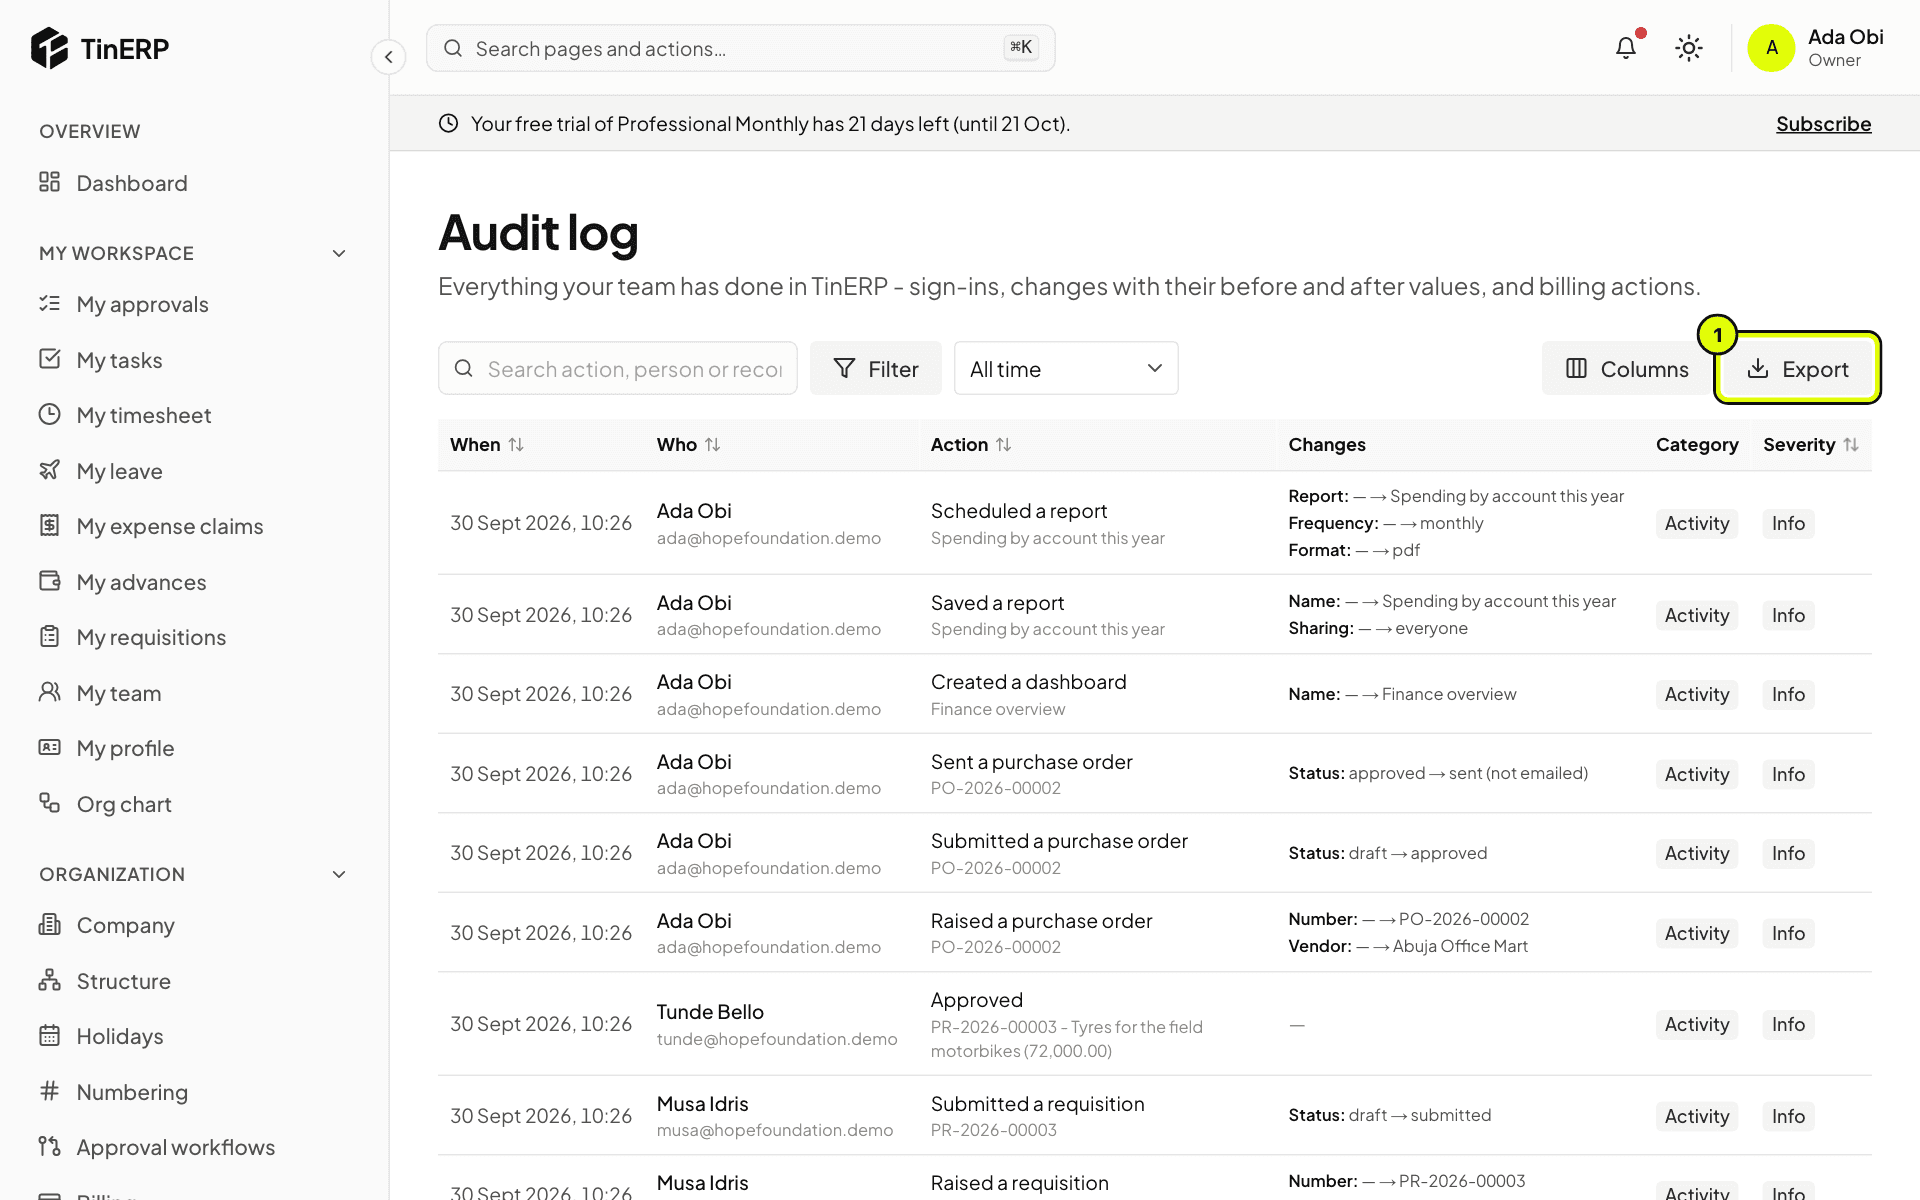
The Audit log with recent activity, the changes column and Export marked 1
Tip: Sensitive values - ID numbers, bank details, dates of birth - are recorded as changed, never shown.
Administrators · Owners and admins · about 3 min
Document numbers
Every numbered document has a format - employees, leave requests, projects, requisitions, purchase orders, invoices, journals and more. Set yours before you issue your first documents.
1. Change a format
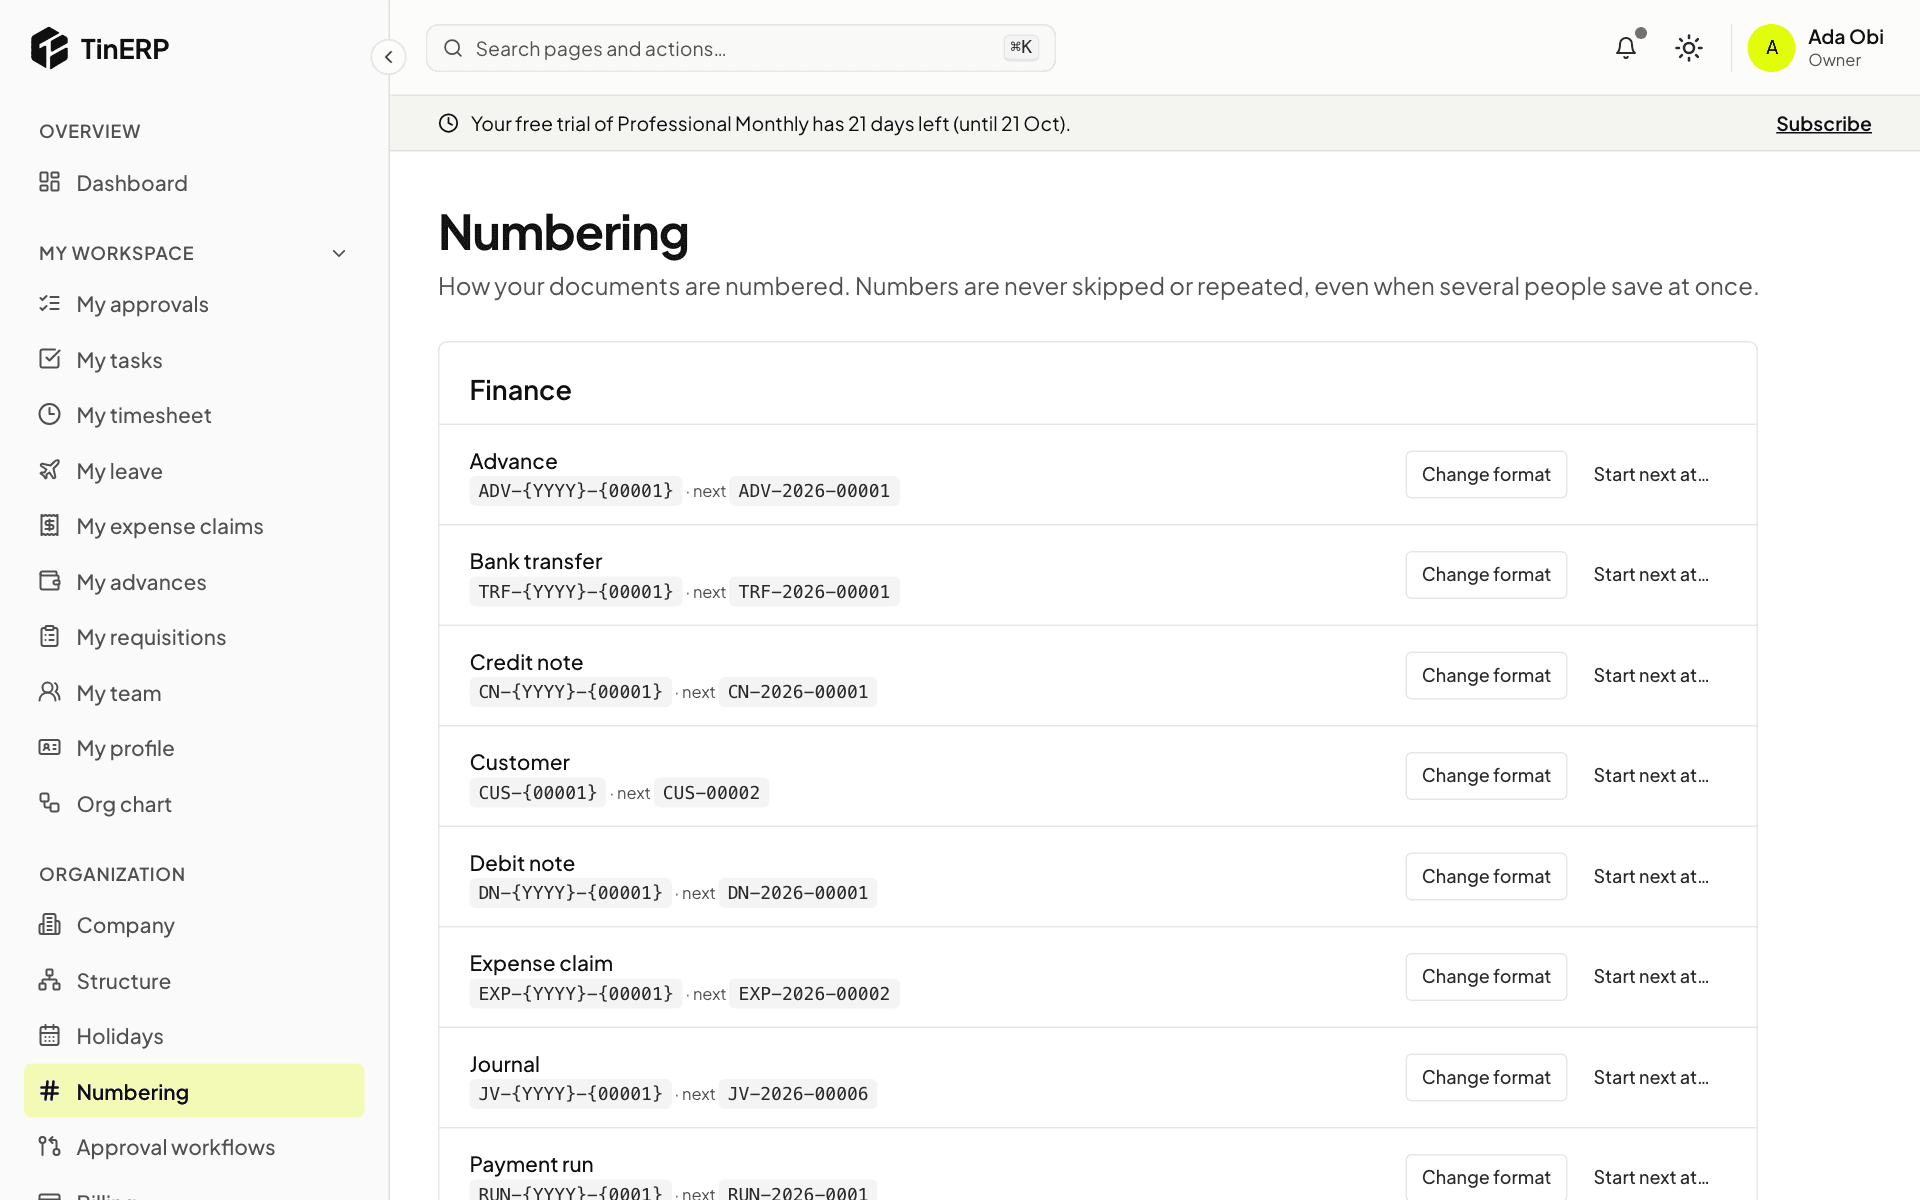
Go to Organization → Numbering. Each kind of document shows its format and the next number. Select Change format and build it from your own text and these parts: {YYYY} or {YY} for the year, {MM} the month, {FY} the financial year, {BRANCH} the branch code, and one counter such as {00001}. A preview shows the next number.
The counter starts again each year when the format includes the year, and counts separately for each branch when it includes {BRANCH}.
The Numbering page with each document's format, its next number, Change format and Start next at
2. Carry on from your old system
Select Start next at… and enter the next number - for example 1043 if your last invoice was 1042. You can only move forward, so a number is never given twice.
HR · HR teams · about 4 min
How HR works
HR keeps your organization's employees - their jobs, reporting lines, records and leave. The rest of TinERP relies on it: leave and timesheets go to the right manager, and managers see their own team.
1. Employees and logins are different
An employee is someone you employ; a user is someone who signs in. Most people are both, linked together. A driver or cleaner can be an employee with no login - HR books their leave for them. An outside accountant can have a login and no employee record.
The link matters: it's how approvals find a person's manager, and how managers see their team.
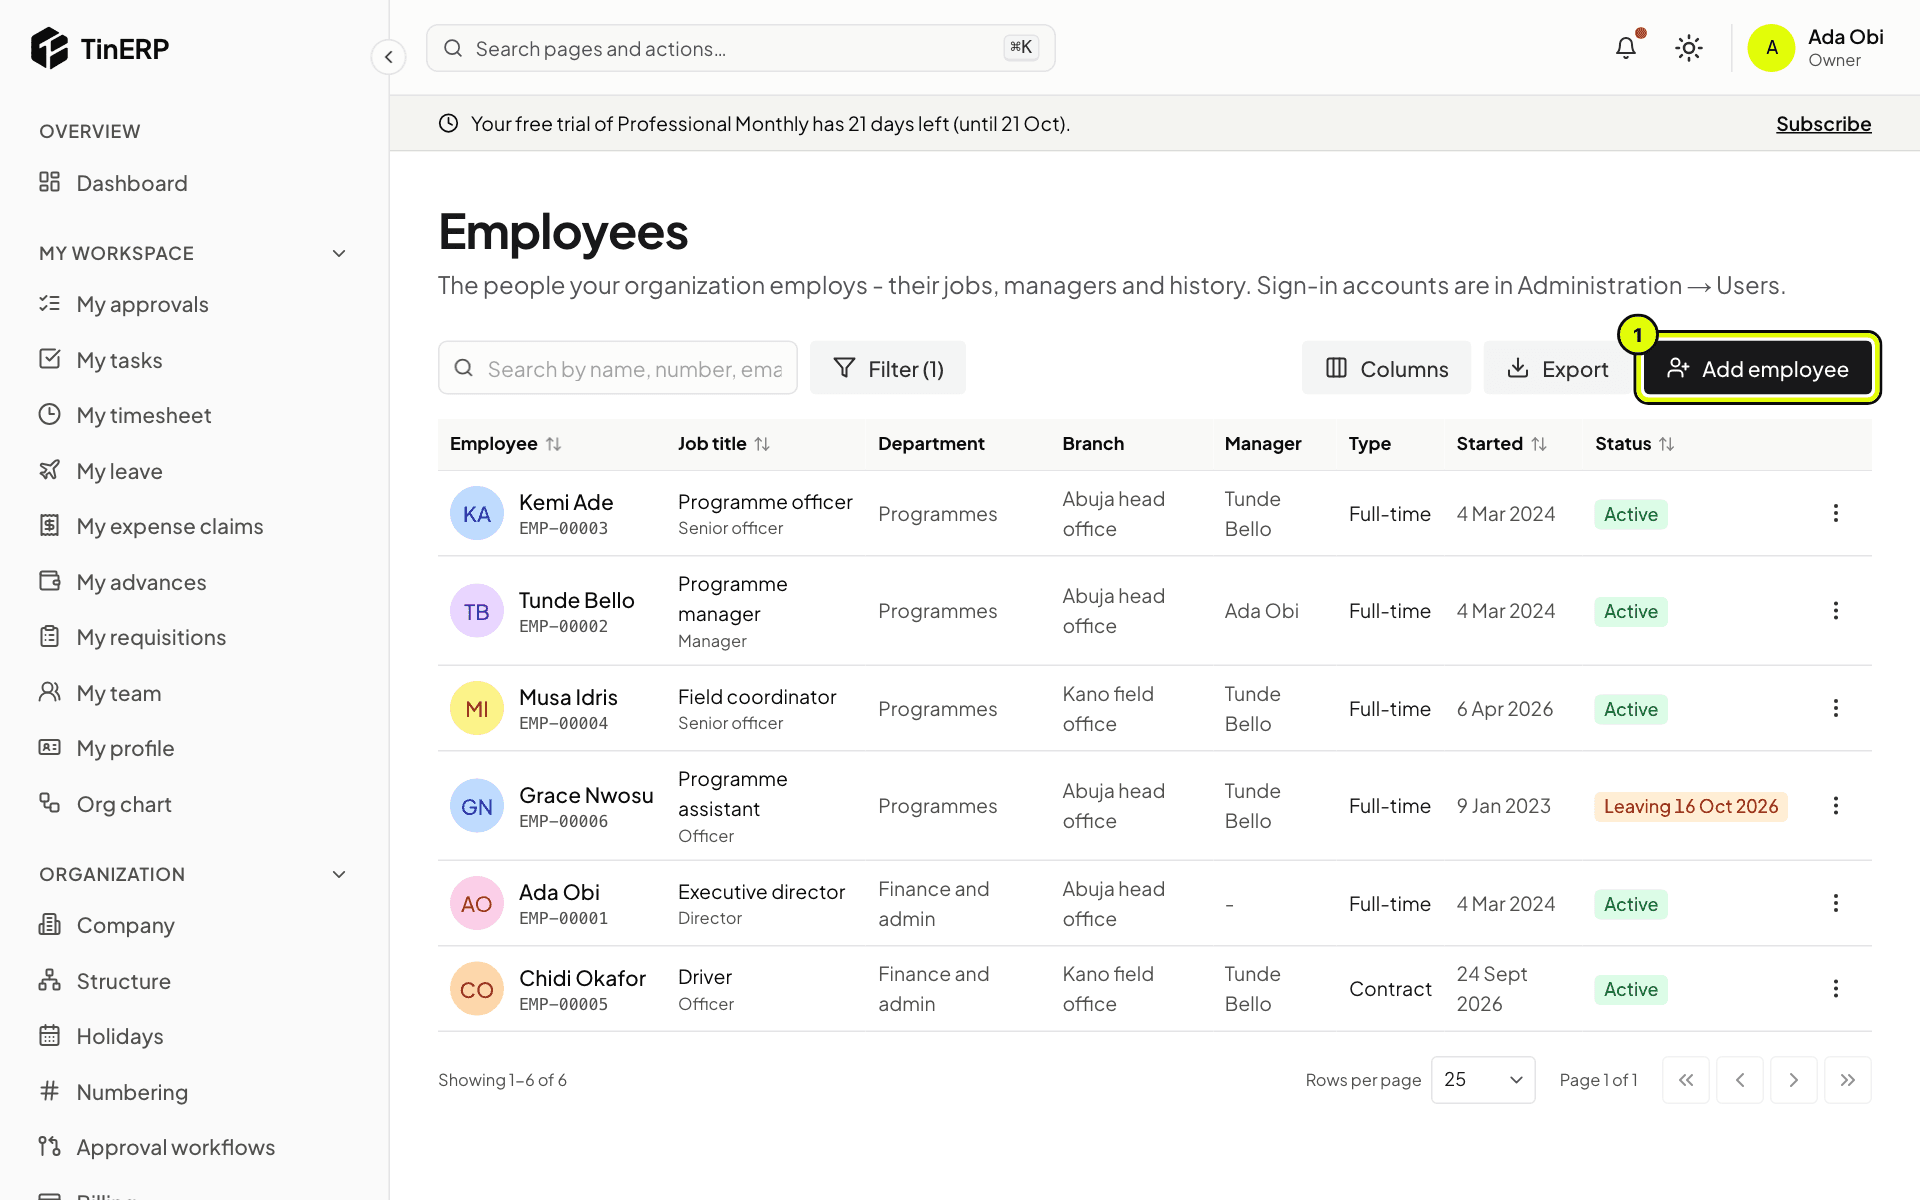
HR → Employees: everyone's job title, department, branch, manager, type, start date and status
2. Who sees what
Everyone sees their own record in My profile, their leave in My leave, and the Org chart. Managers see their team in My team and HR reports for their people.
HR - anyone whose role manages employees, leave or HR settings, or sees every employee - gets the HR menu: Employees, Leave, Joiners & leavers, HR reports and HR settings.
3. Give your HR team a role
The Admin role has every HR permission but one: seeing sensitive details (date of birth, home address, ID numbers, next of kin, bank details and documents). Add an HR officer role with the HR permissions - including sensitive details - and give it to your HR team. See Roles and permissions.
4. Set up in this order
1. Grades, positions and checklists. 2. Leave types and policies. 3. Add your employees, with their managers. 4. Give logins to those who'll sign in. The guides that follow take each in turn.
HR · HR teams · about 5 min
Set up grades, positions and checklists
Do this before adding employees: their records use grades and positions, and new joiners get the onboarding checklist.
1. Add your grades
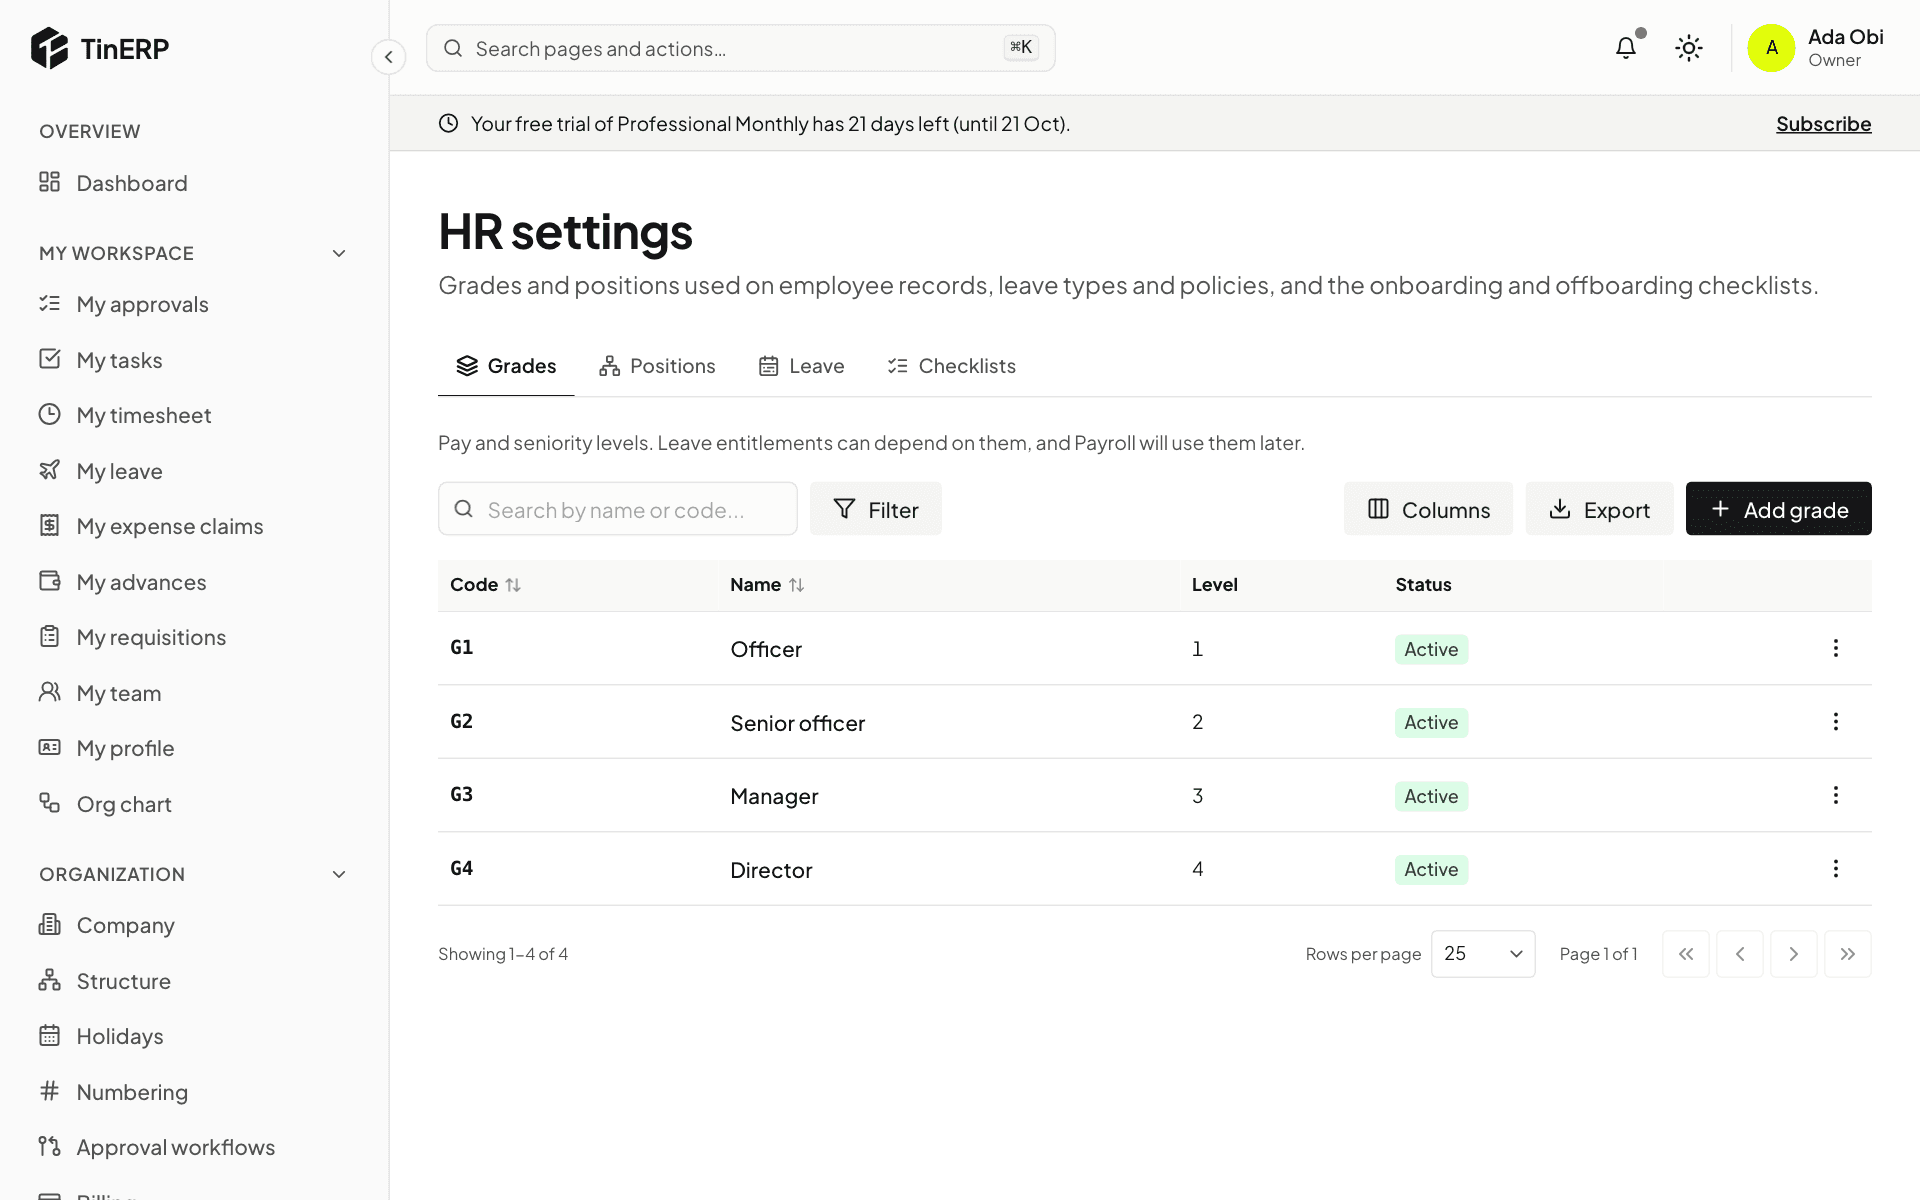
Go to HR → HR settings. Under Grades, select Add grade and give it a code, a name and a level. Leave allowances can depend on grade - for example more annual leave for managers.
HR settings → Grades: Officer, Senior officer, Manager and Director
2. Add positions (optional)
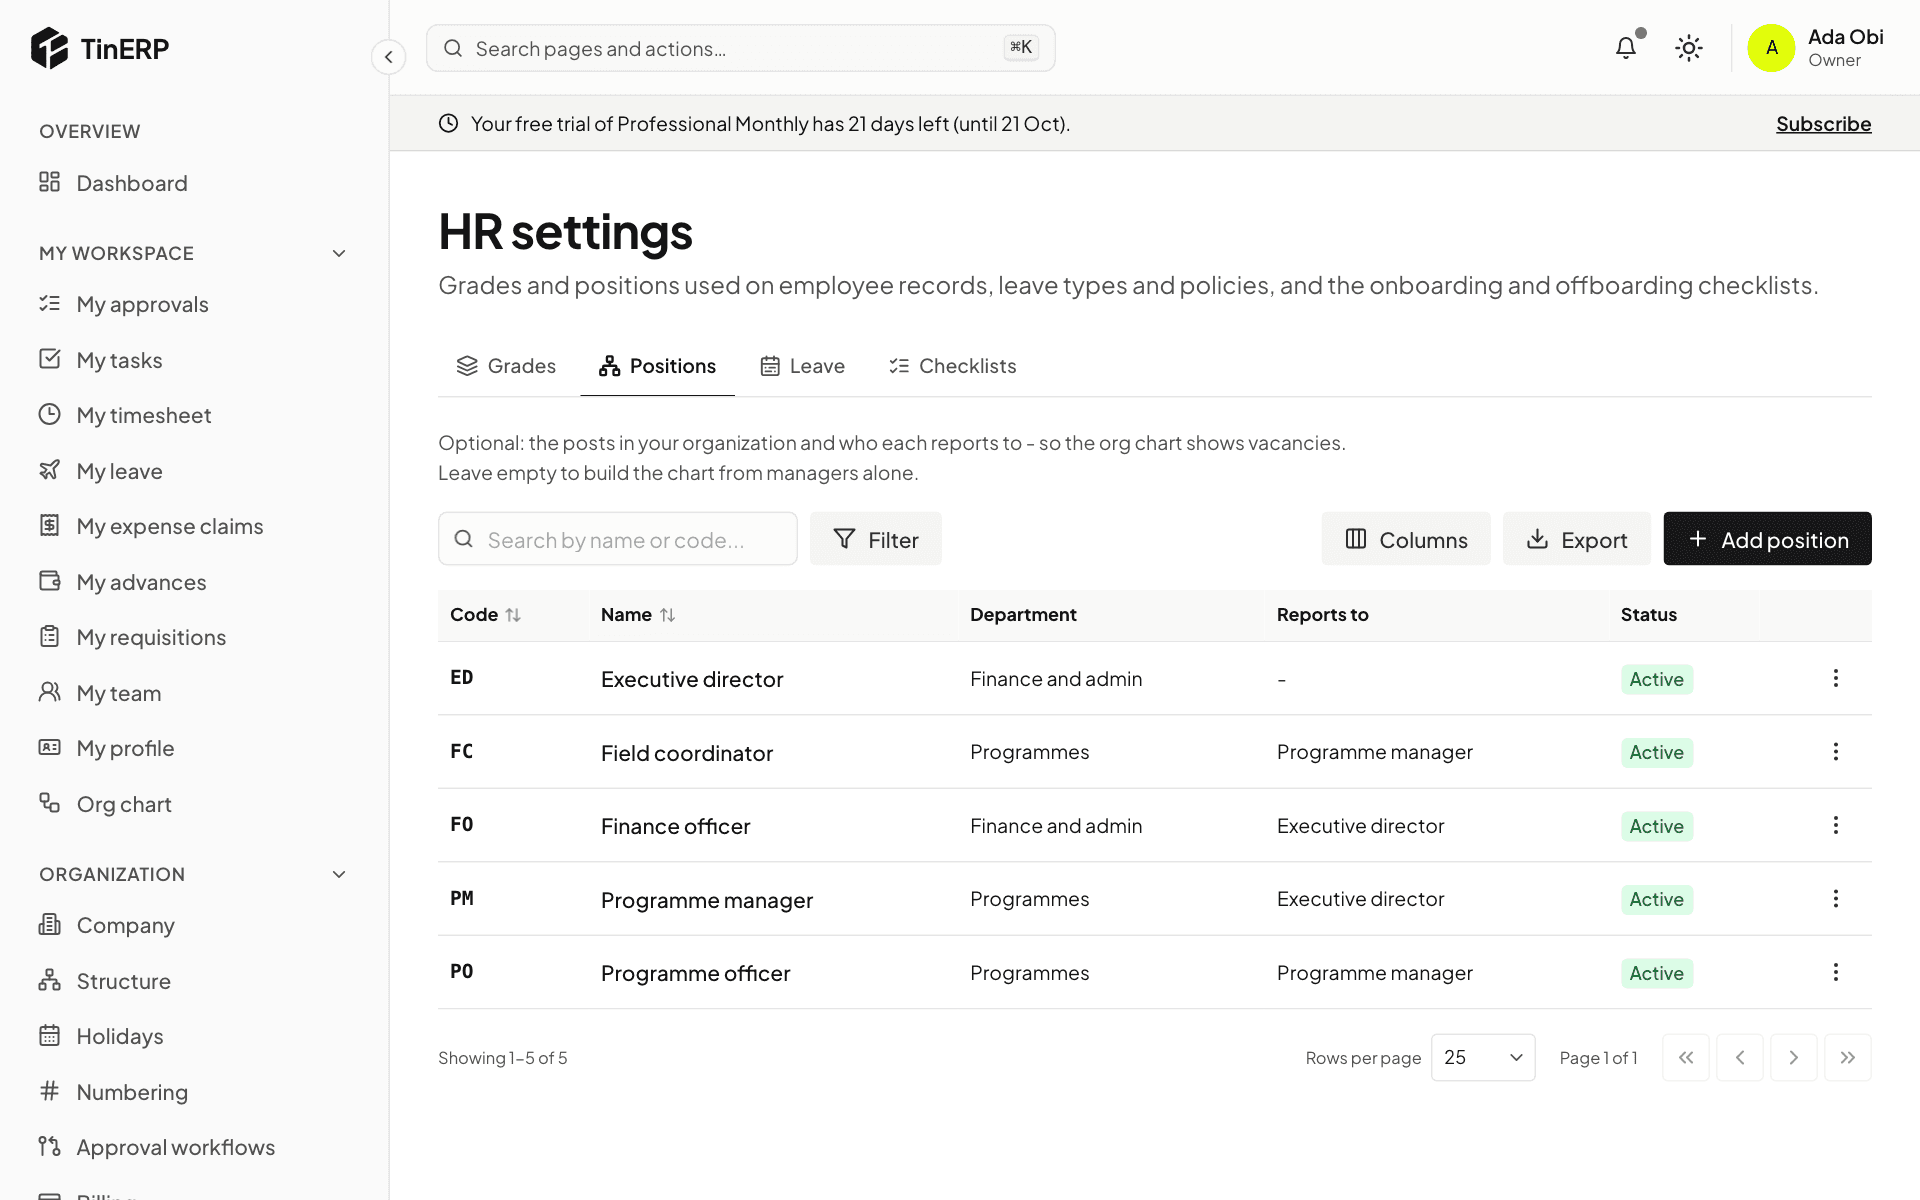
Under Positions, select Add position for each post in your organization, with its department and the post it reports to. Posts nobody holds show on the org chart as vacancies.
Small organizations can skip this: the org chart is then built from each employee's manager.
HR settings → Positions: each post with its department and the post it reports to
3. Check your checklists
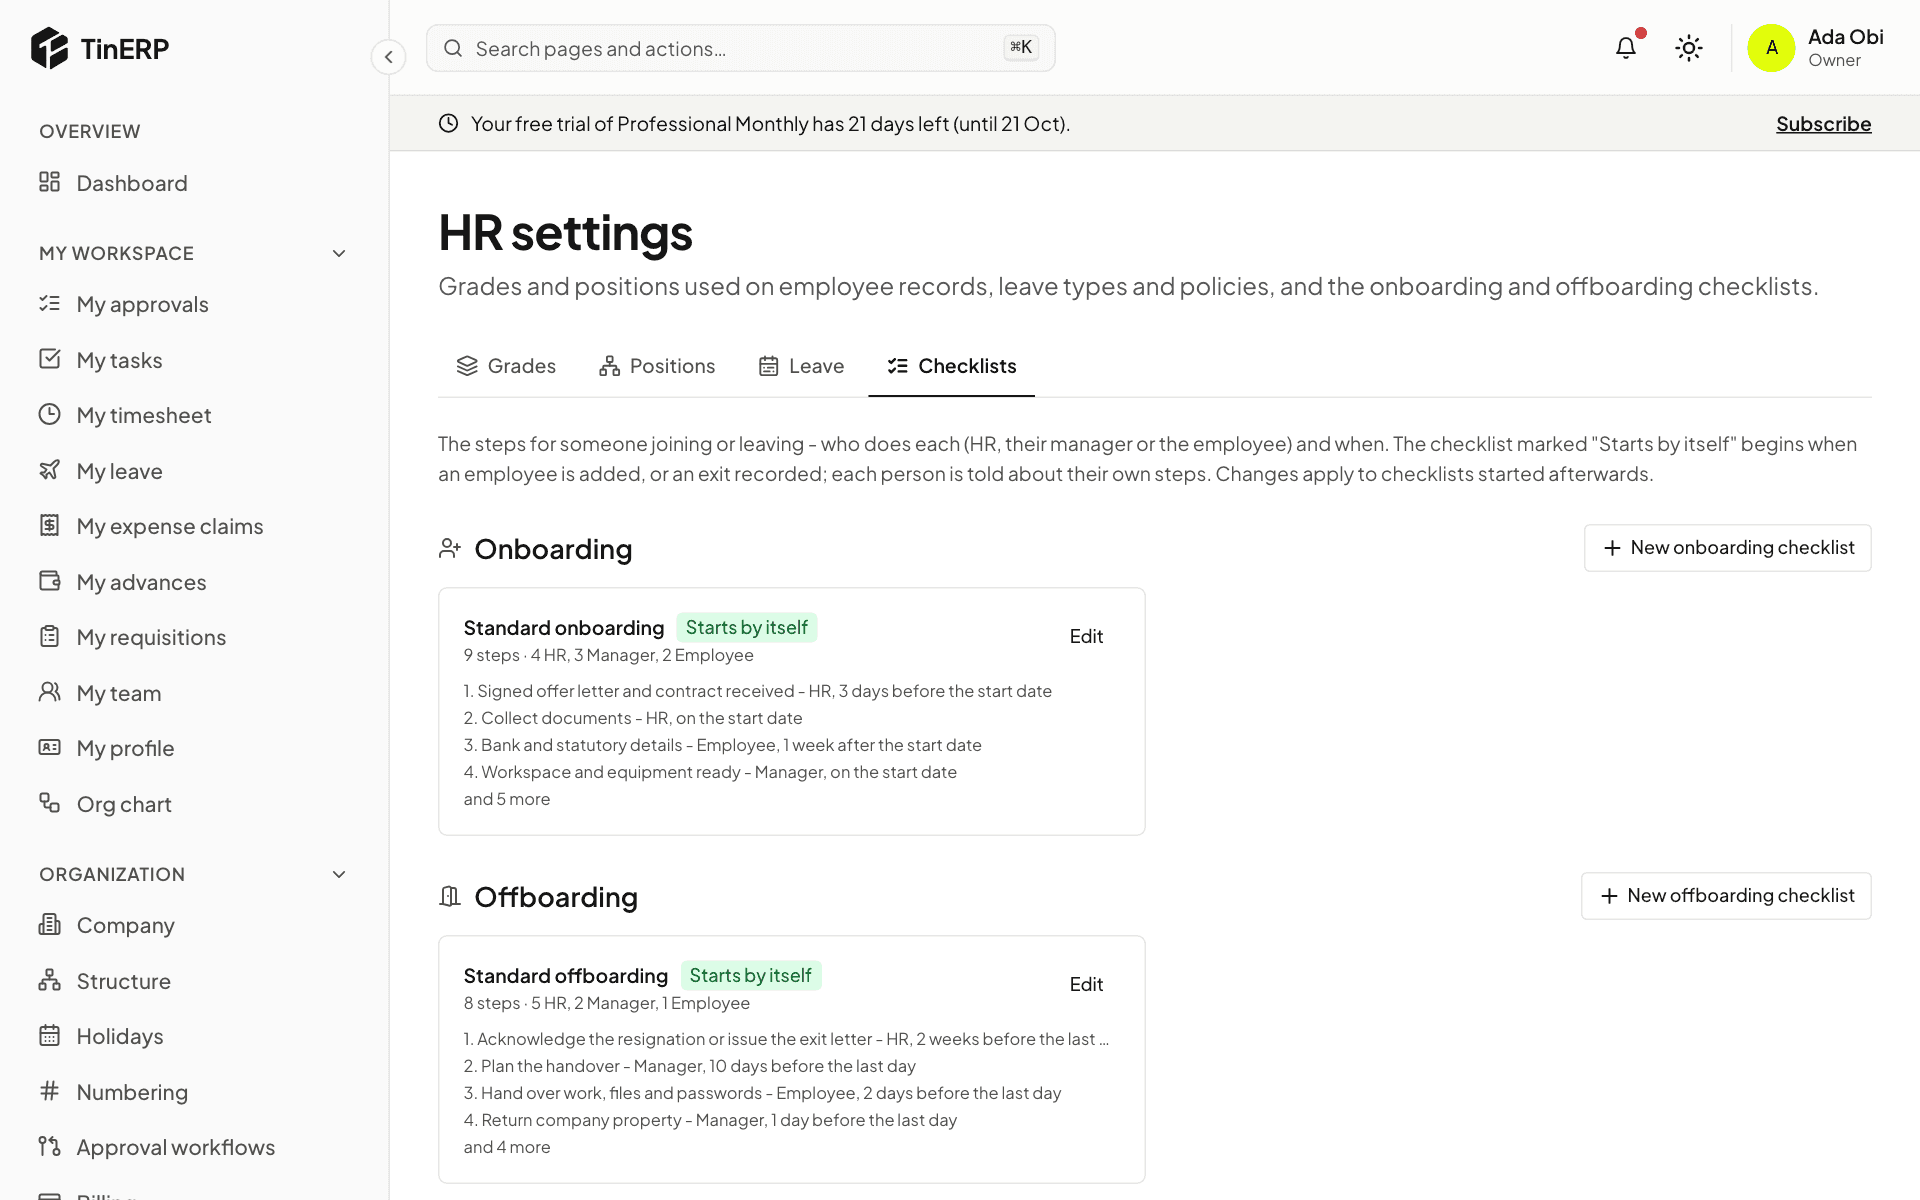
Under Checklists, TinERP starts you with a Standard onboarding and a Standard offboarding. Each step says who does it - HR, the person's manager or the employee - and when, counted from their start date or last day.
Select Edit to change the steps, or add your own checklists. The one marked Starts by itself begins when you add an employee or record an exit.
HR settings → Checklists: Standard onboarding and Standard offboarding, each marked Starts by itself
Tip: Changing a checklist affects checklists started afterwards. Ones already in progress keep their steps.
HR · HR teams · about 6 min
Set up leave
TinERP starts you with the usual leave types - annual, sick, maternity, paternity, compassionate, study, examination and unpaid - with allowances within the Labour Act's minimums. Check them against your own policy and change what's different.
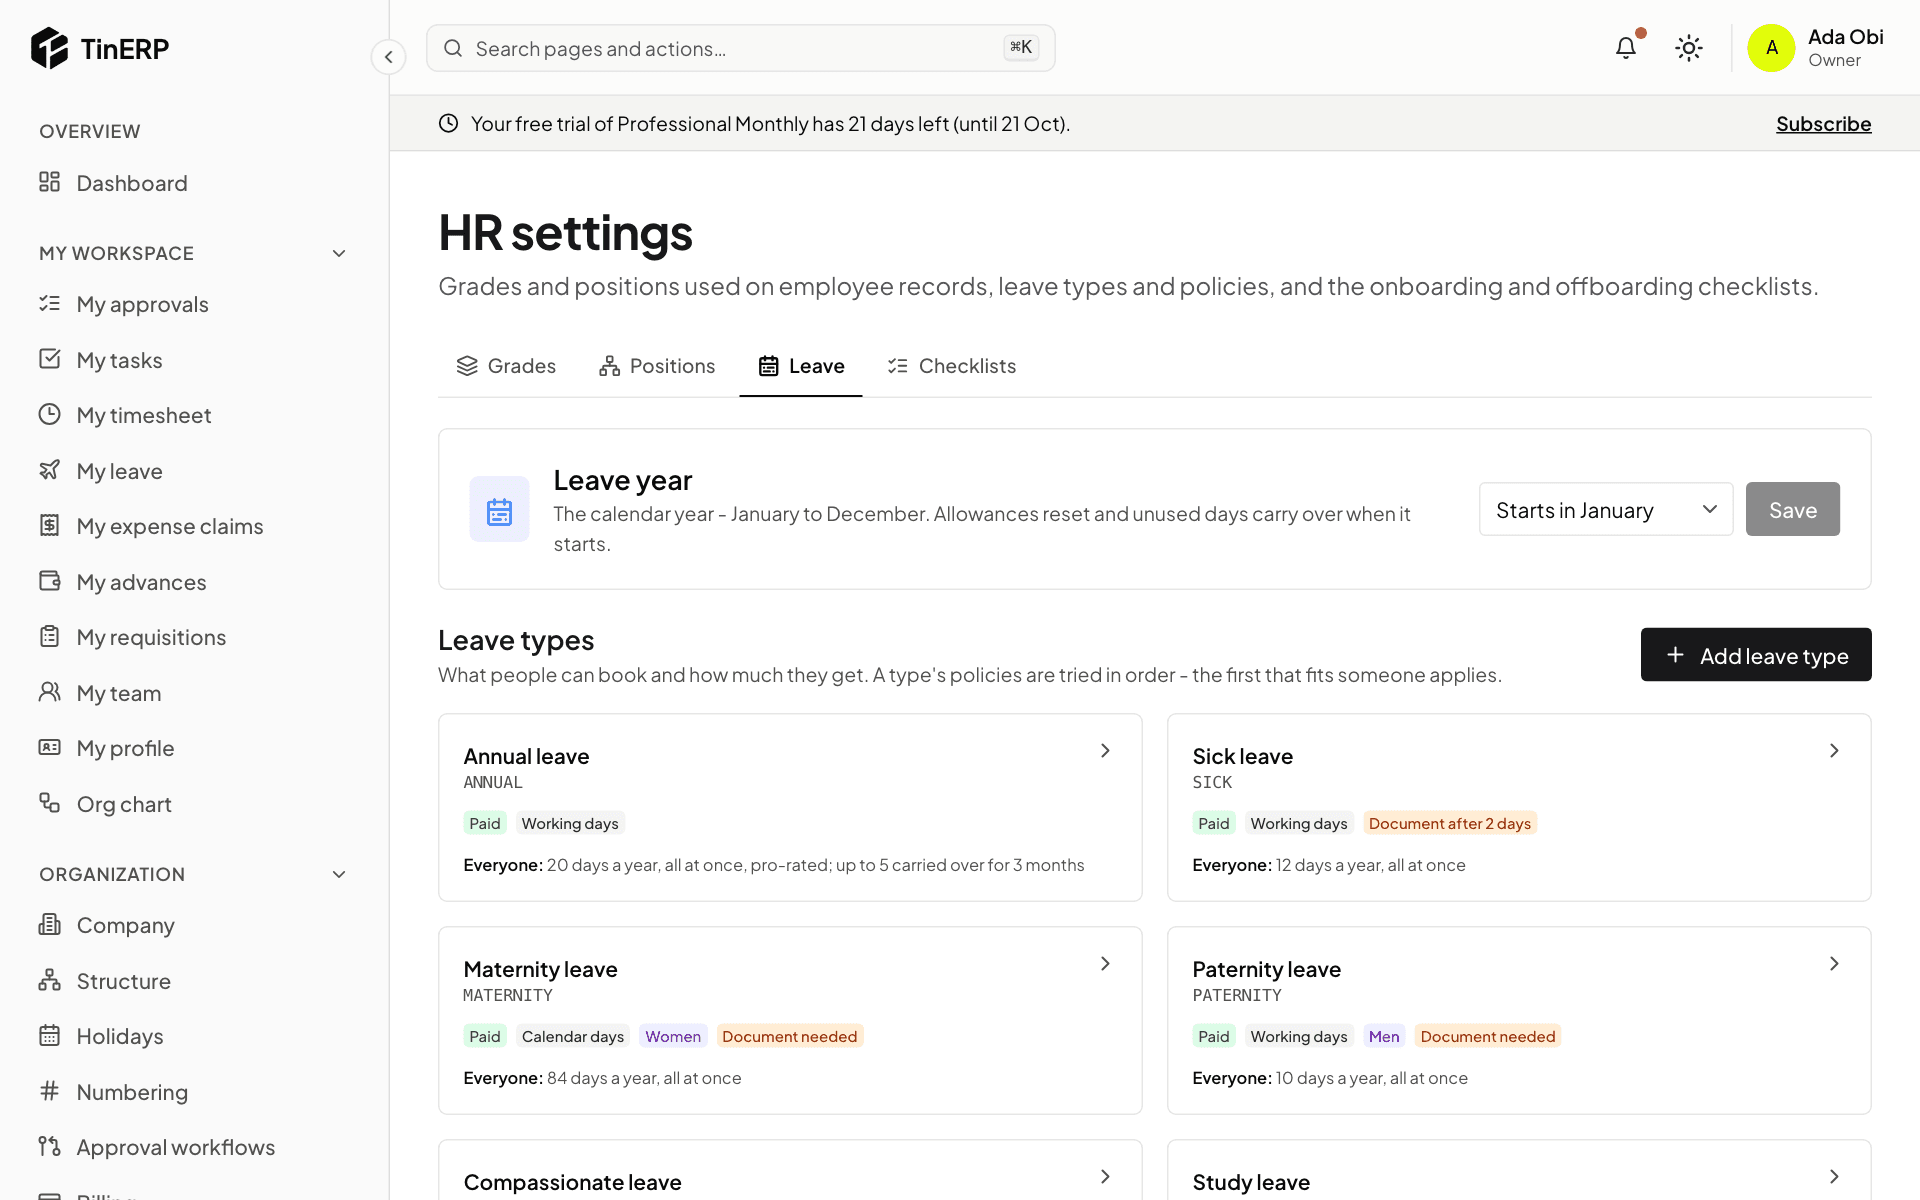
1. Choose your leave year
Go to HR → HR settings → Leave. Under Leave year, choose the month it starts - January for the calendar year - and Save. Allowances start again, and unused days carry over, when a new leave year begins.
HR settings → Leave: the leave year and the leave types as cards
2. Review your leave types
Each card shows a leave type: paid or unpaid, whether it counts working or calendar days, who it's for, whether a document is needed, and its allowance in words. Select a card to change it, or Add leave type.
Turn off Has an allowance for leave that's approved and recorded but not counted, such as study or unpaid leave.
3. Set the allowance with policies
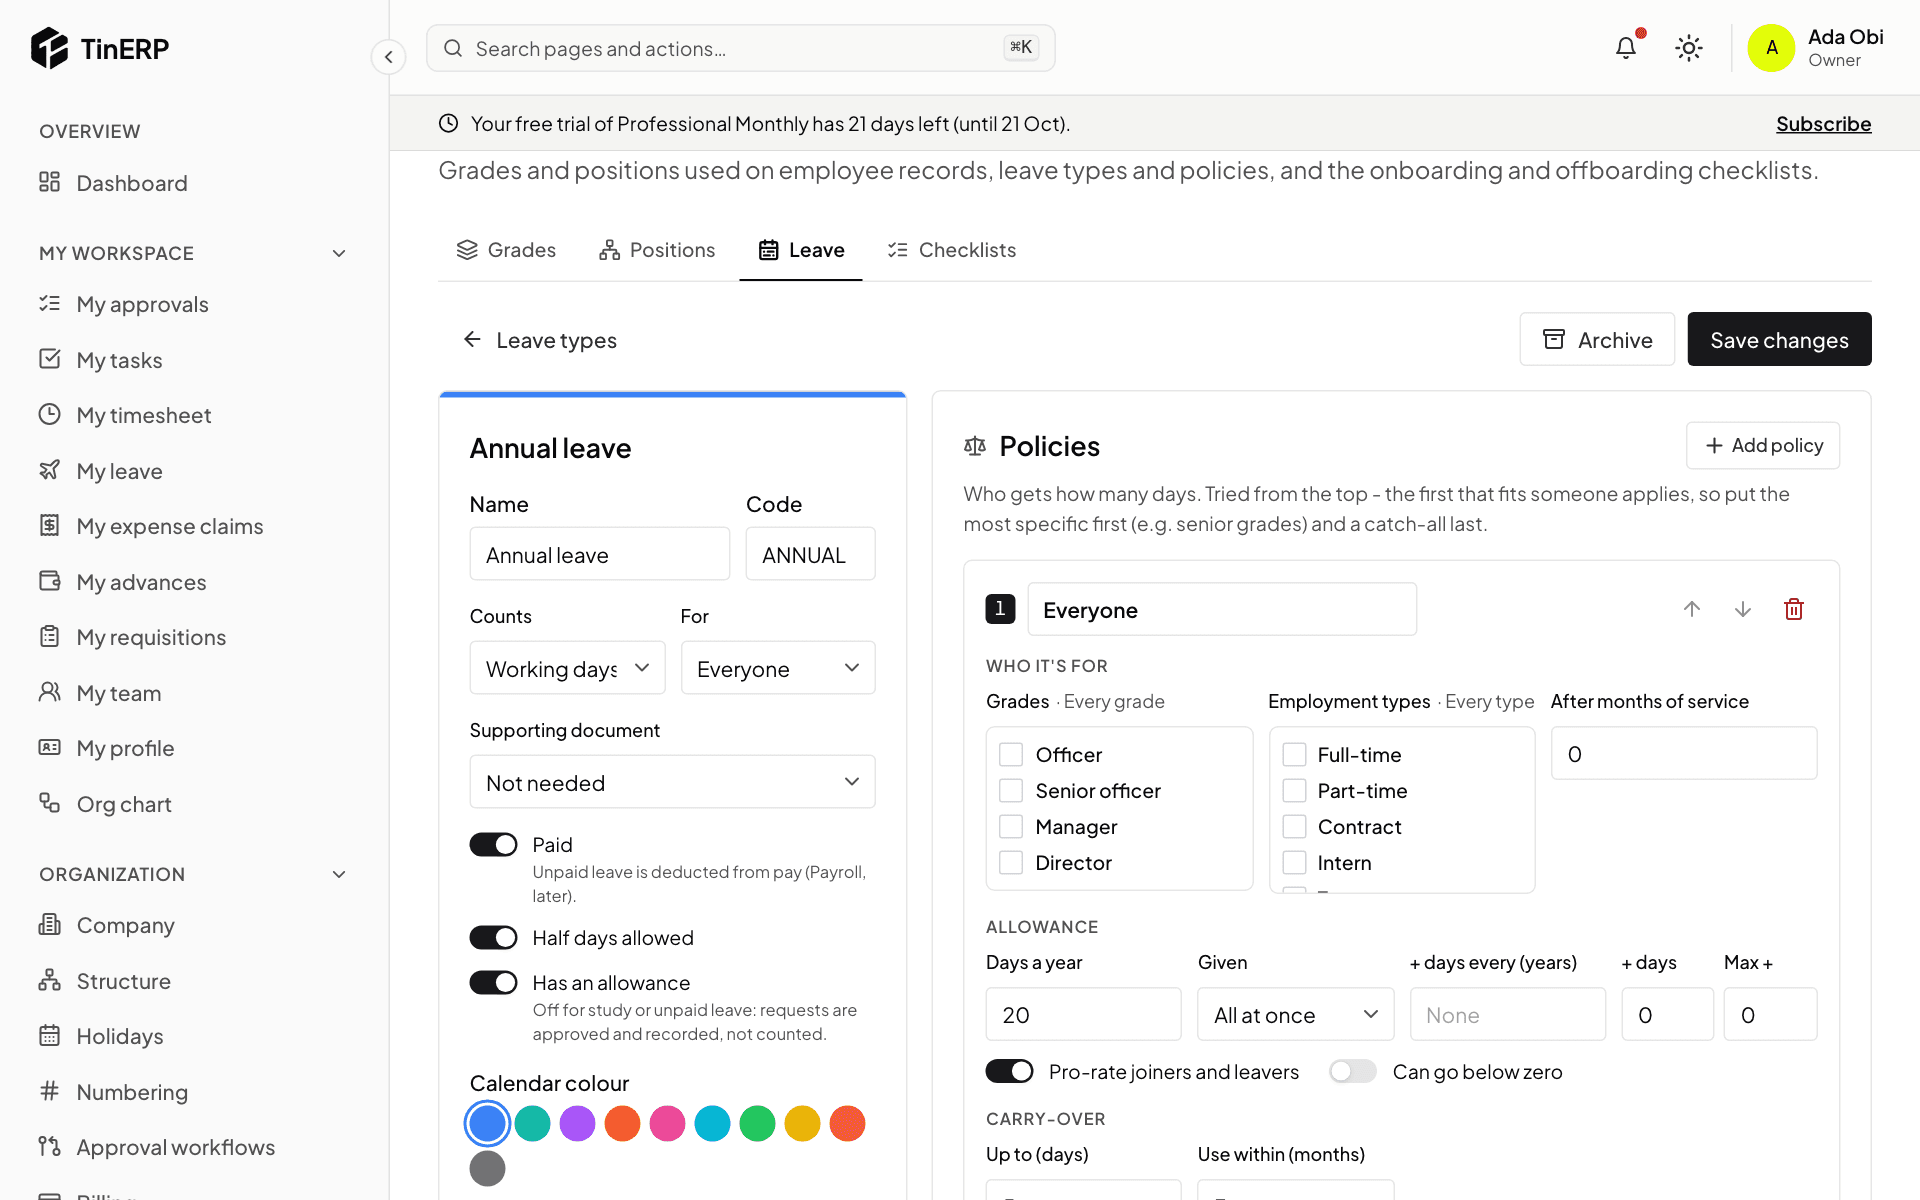
A leave type's policies decide how many days people get. Each says who it's for (grades, employment types, months of service), the days a year, whether they're given all at once or earned month by month, extra days for long service, and how many unused days carry over and for how long.
Turn on Pro-rate joiners and leavers so people who start or leave during the year get their share. Policies are tried in order and the first that fits a person applies - so put the most specific first, for example managers, then everyone. Select Save changes.
Editing Annual leave: its policy with days a year, pro-rating and carry-over
4. Enter opening balances
If people have days left from before TinERP, add them on each employee's page: in the Leave card select Adjust, add the days and give a reason such as "Opening balance".
Questions
Who approves leave?
By default the person's manager - and for 10 days or more, and for maternity, paternity and study leave, an Admin as well. Change it in Organization → Approval workflows; many organizations switch the second step to their HR role.
How do I stop a leave type being used?
Open it and select Archive. Nobody can book it any more; past leave and balances are kept, and you can restore it.
HR · HR teams · about 4 min
Add an employee
Add everyone you employ - including people who will never sign in.
1. Start a record
Go to HR → Employees and select Add employee (1).
HR → Employees with Add employee marked 1
2. Fill in their details
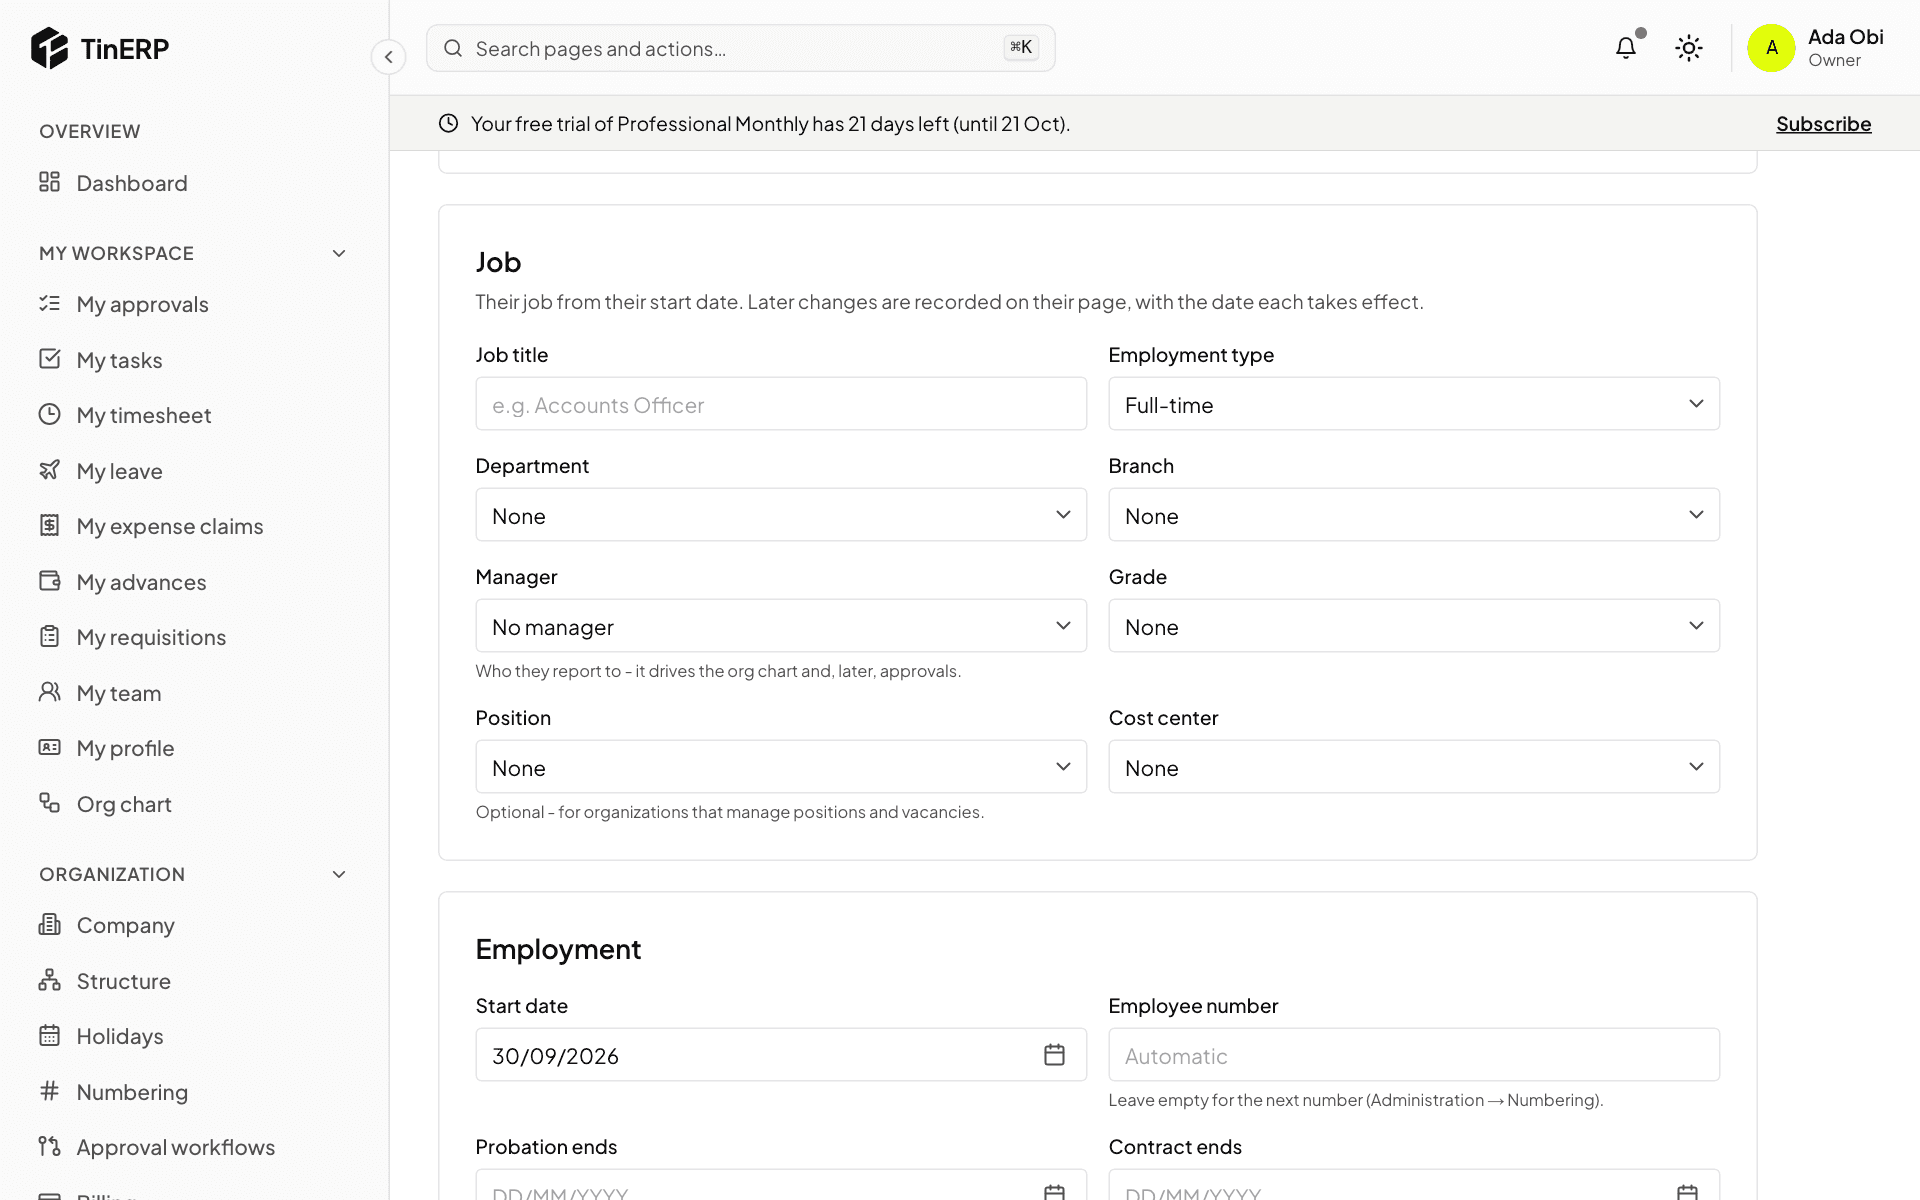
Personal details - their name, contacts, date of birth and statutory IDs: NIN, TIN, pension PIN and administrator, and NHF number.
Job - job title, employment type, department, branch, manager, grade and position. Employment - their start date, and when probation and any contract end. The employee number is given automatically, or type your own (from your old system, for example). Select Add employee.
The Job and Employment sections of the Add an employee form
3. Onboarding starts by itself
If their start date is less than 30 days ago or still to come, the default onboarding checklist starts, and everyone with a step is told. Follow it on their page and in HR → Joiners & leavers.
Tip: Loading your existing team? People who started more than 30 days ago don't get a checklist each - you can start one by hand from their page.
4. Give them a login
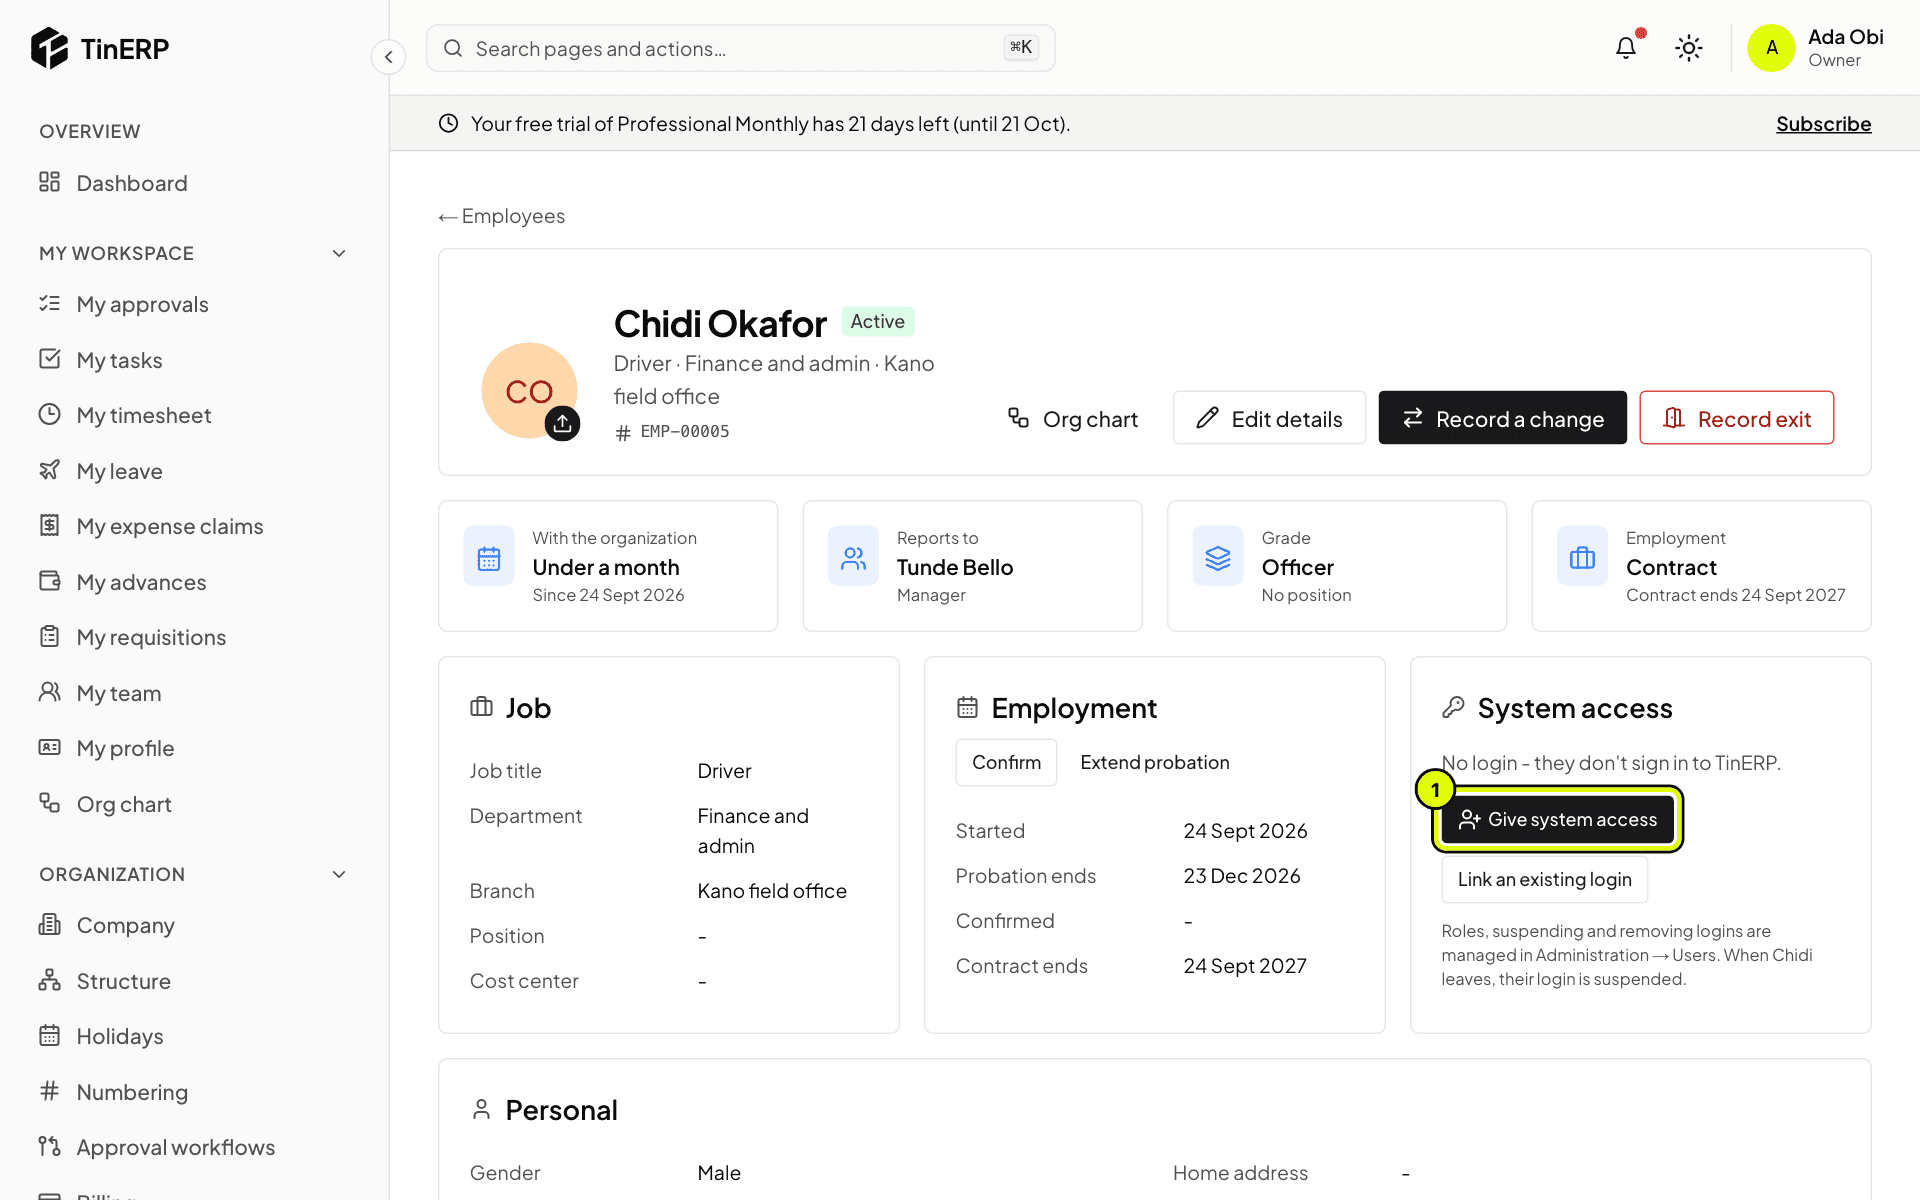
On their page, under System access, select Give system access (1) and choose their role. They get an email to set a password, and their login is linked to this record.
If they already have a login - someone you invited before adding their record - choose Link an existing login instead.
Chidi's page: no login yet, with Give system access marked 1
HR · HR teams · about 6 min
Keep employee records up to date
Everything about an employee is on their page. Changes to their job are kept as history, each with the date it took effect - nothing is overwritten.
1. Open their page
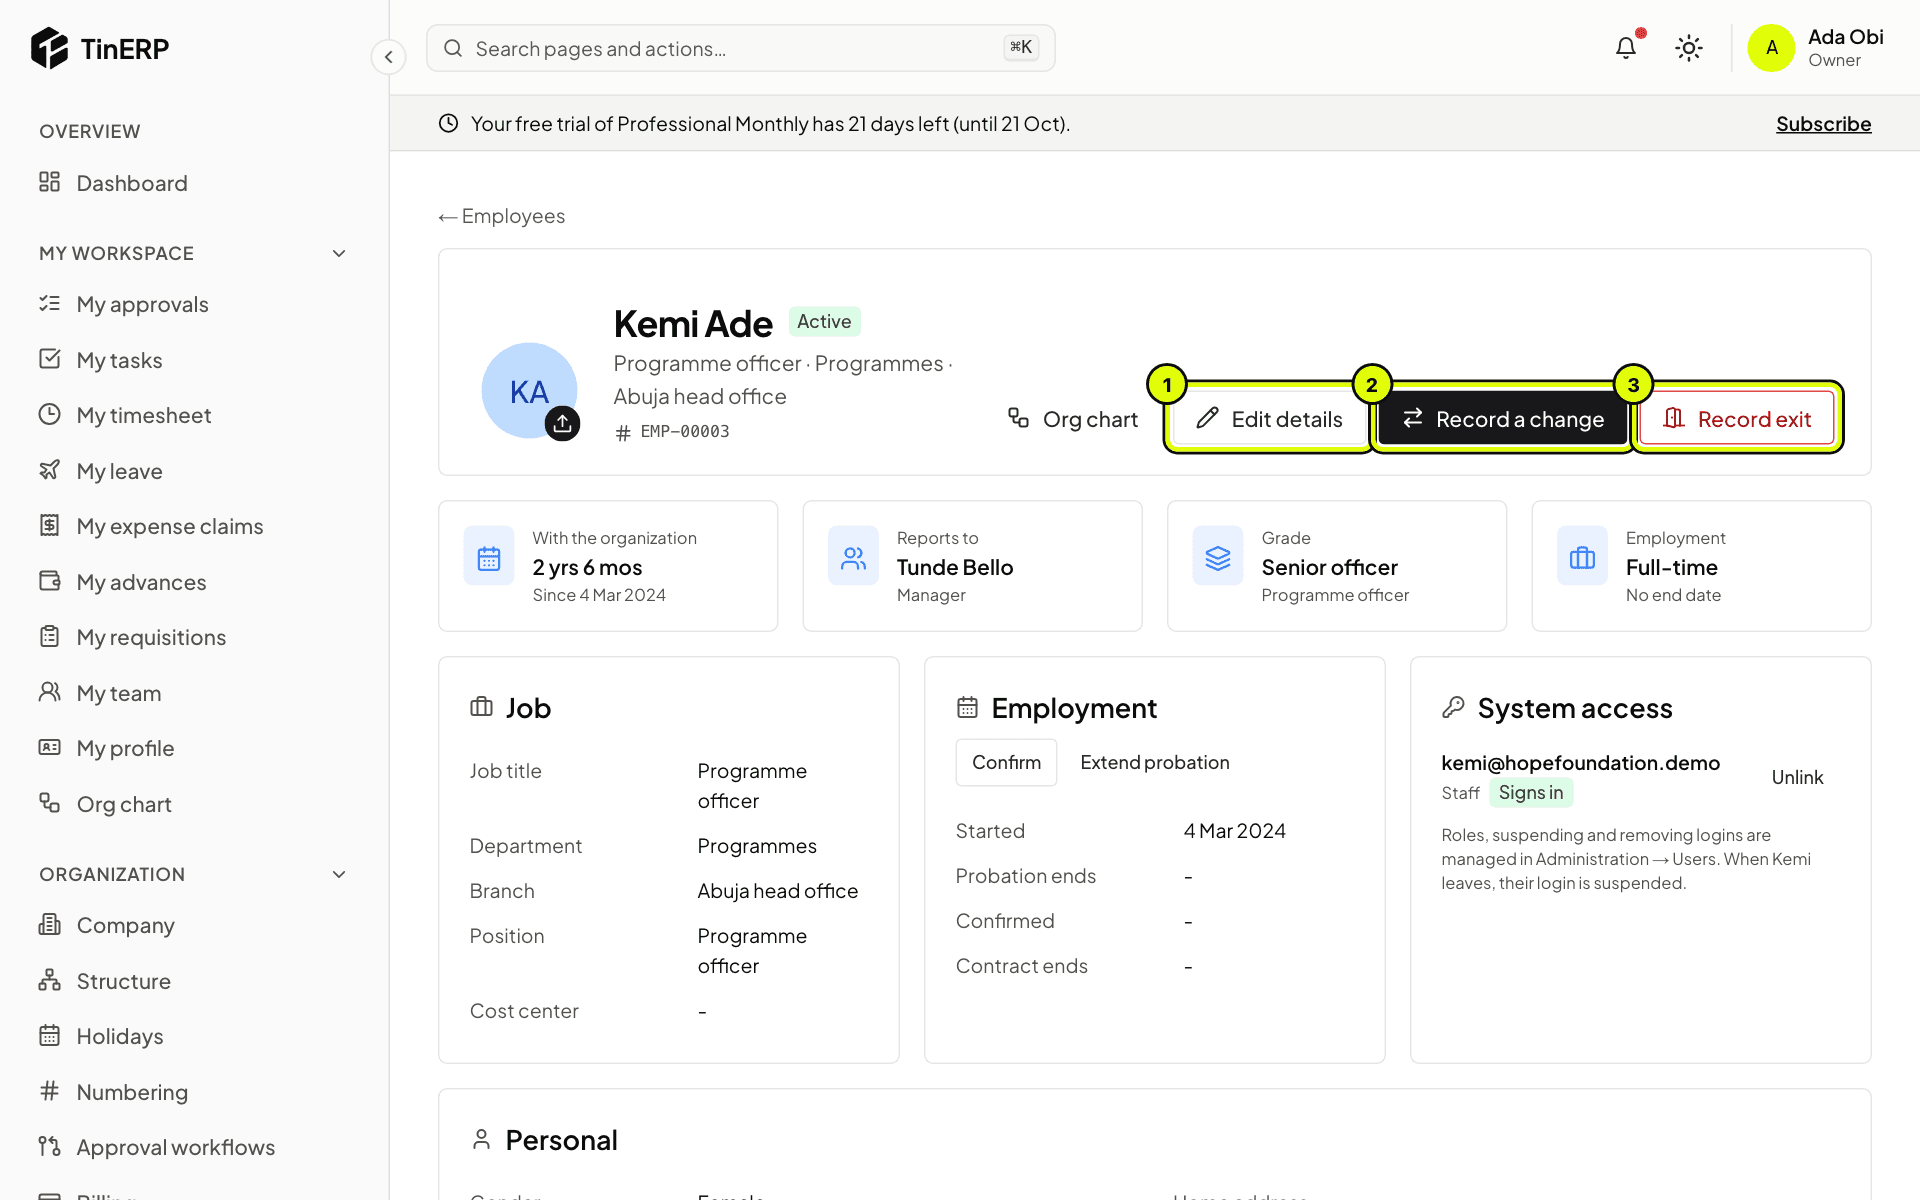
Go to HR → Employees and select the person. Their page shows their job, employment dates, login, personal details, leave, checklists and job history.
Edit details (1) corrects personal details. Record a change (2) is for their job. Record exit (3) is for when they leave.
Kemi's employee page, with Edit details, Record a change and Record exit marked 1 to 3
2. Record a promotion, transfer or new manager
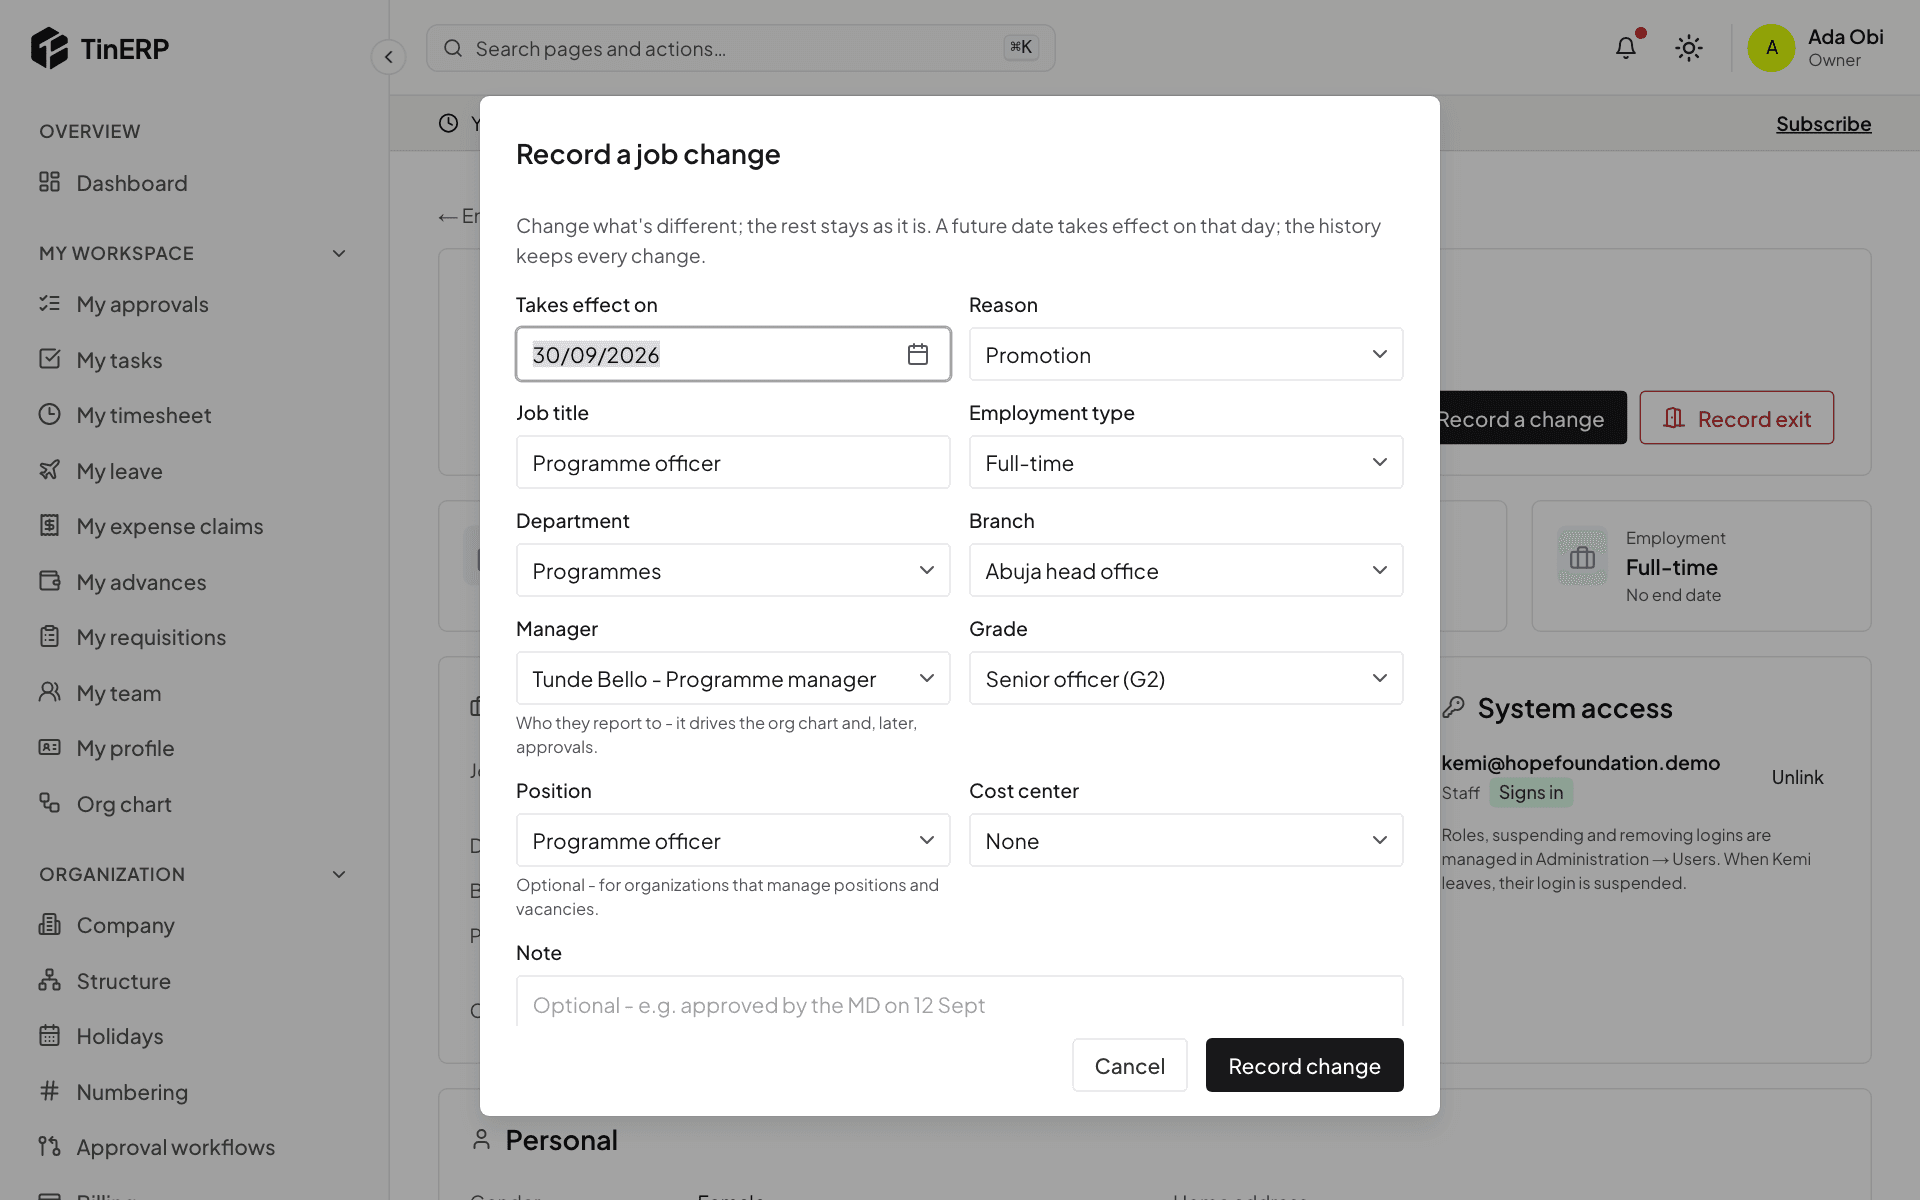
Select Record a change. Change only what's different - job title, department, branch, manager, grade, position or employment type - then choose the date it takes effect and the reason, such as a promotion or transfer.
A future date takes effect on that day. The job history keeps every change.
The Record a job change window with the job fields, the date it takes effect and the reason
3. Confirm or extend probation
Under Employment, select Confirm when someone passes probation, or Extend probation to set a later end date. HR and their manager are reminded 14 days before probation ends.
4. Contacts, bank details and documents
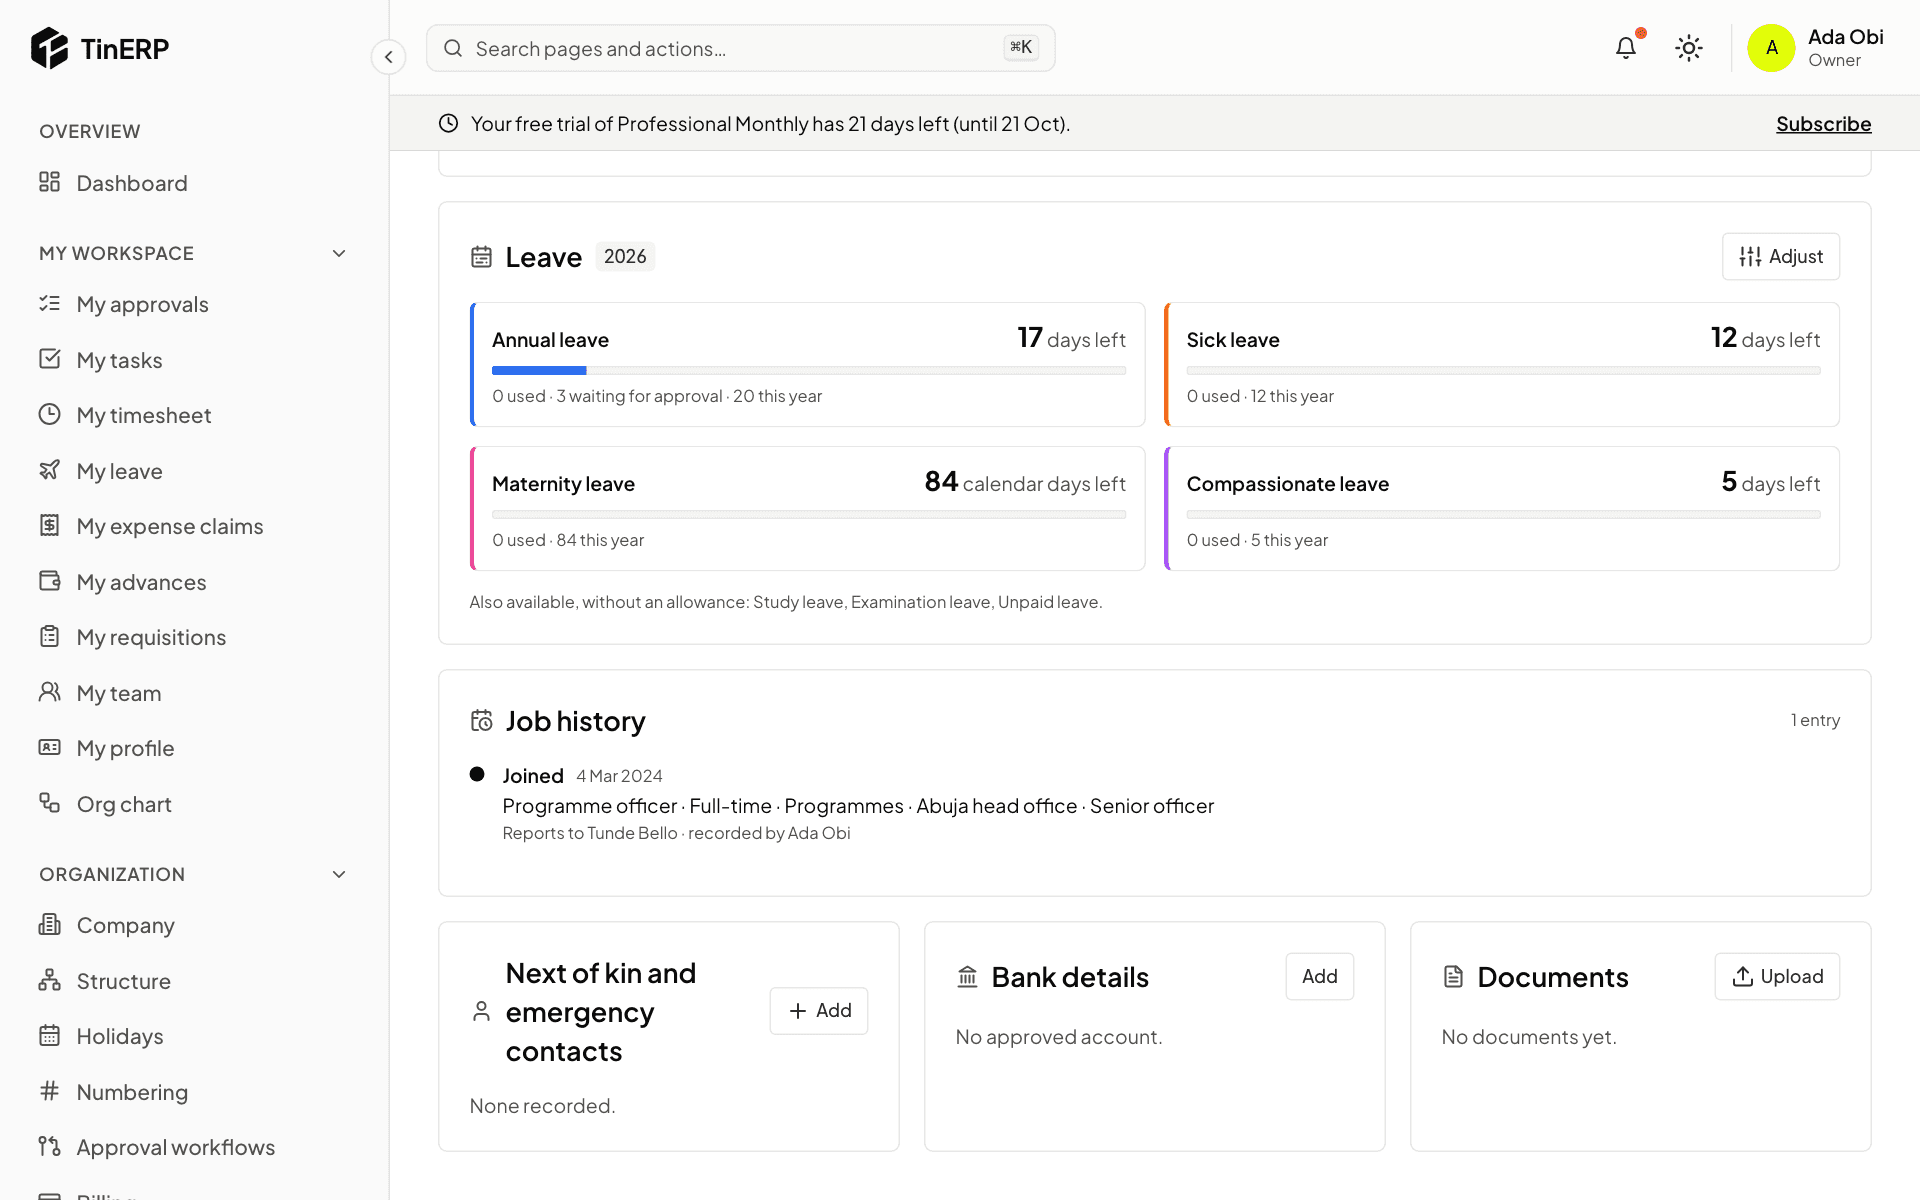
Further down are Next of kin and emergency contacts, Bank details and Documents - contracts, CVs, certificates, IDs - each with an expiry date if it has one.
A new bank account isn't used until someone other than the person who entered it approves it: a common fraud is changing an account just before pay day. These details need the sensitive-details permission.
Next of kin and emergency contacts, Bank details and Documents on an employee's page
5. Adjust a leave balance
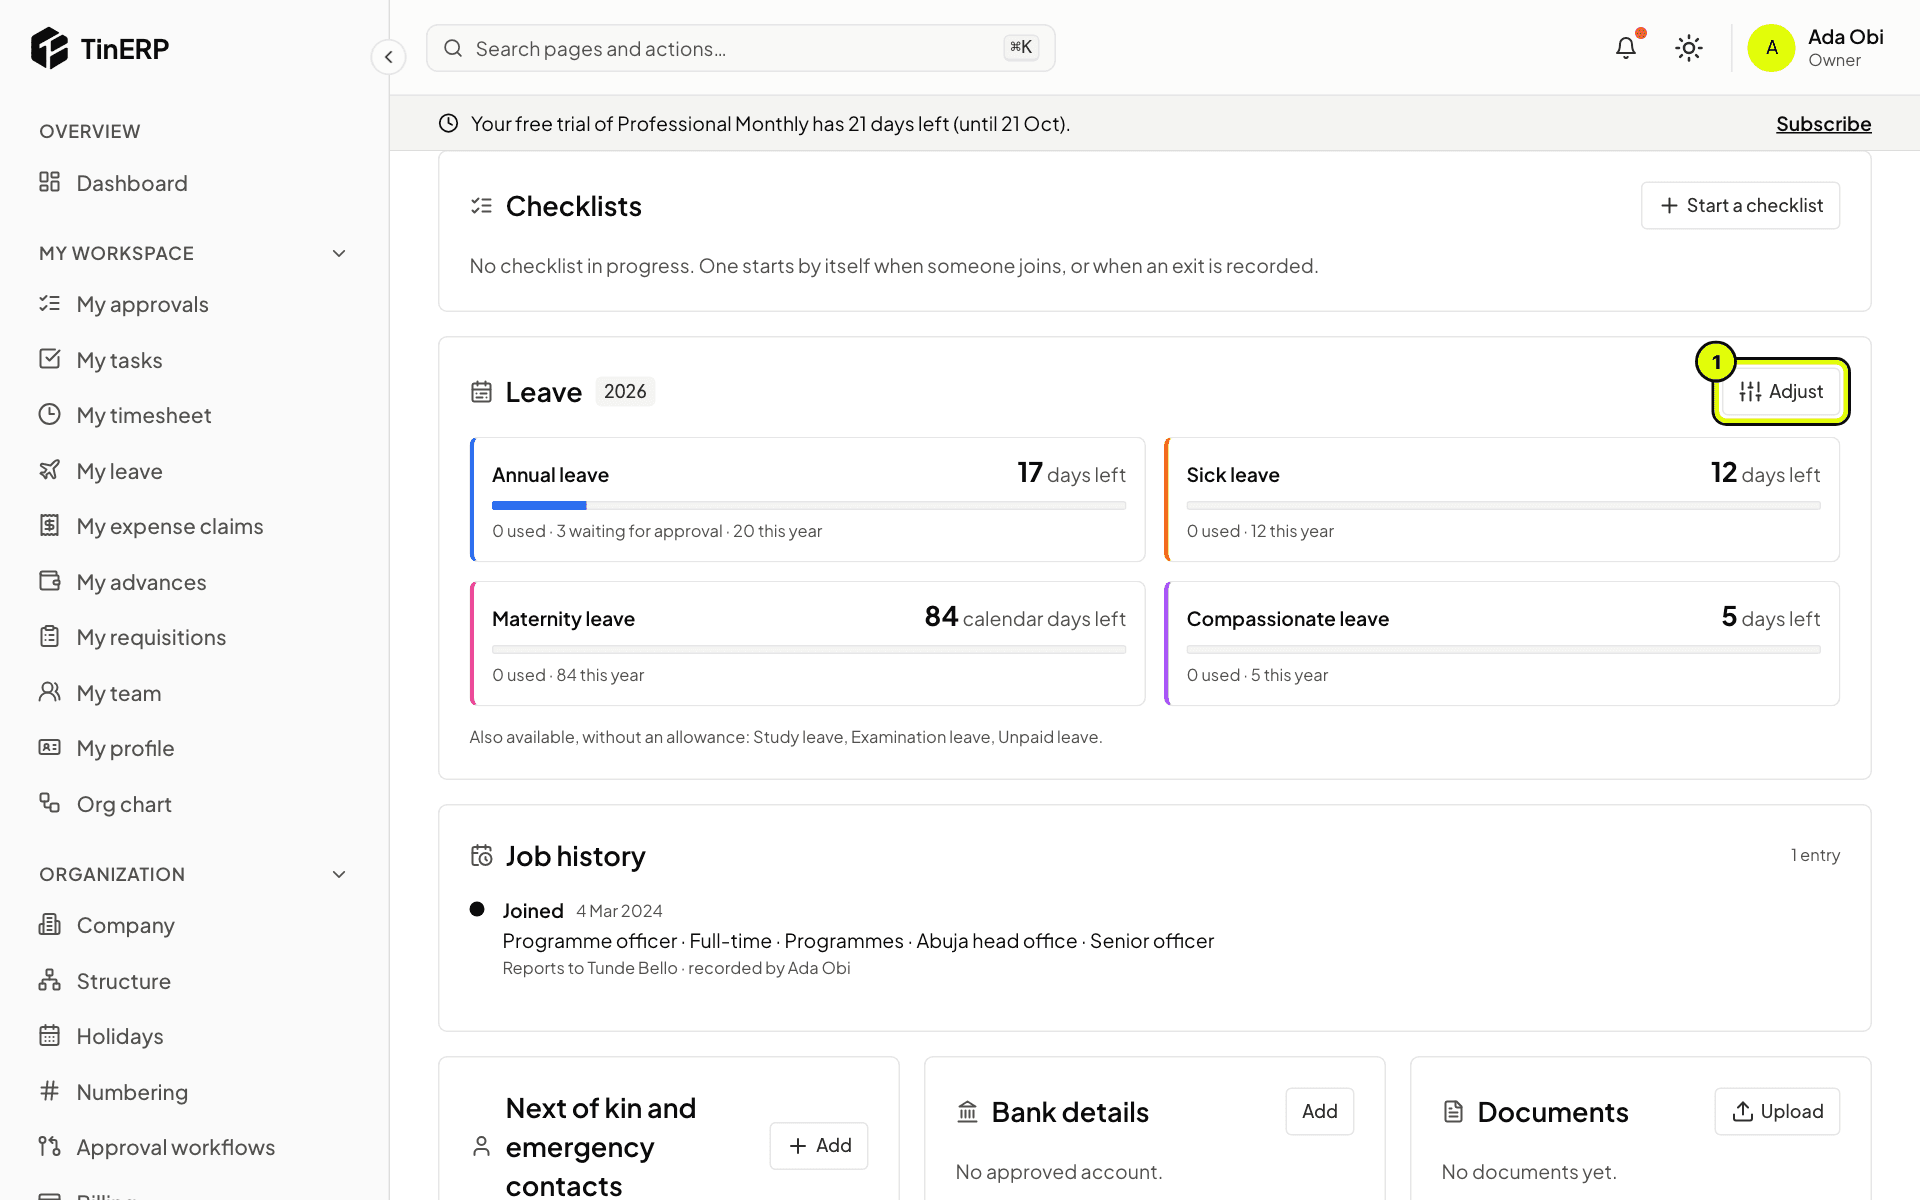
In the Leave card, select Adjust (1) to add or take away days - an opening balance, days given in lieu, or a correction - with a reason. It's kept with the balance and in the audit log.
The Leave card on Kemi's page with her balances and Adjust marked 1
HR · HR teams · about 3 min
When someone leaves
Employees are never deleted. When someone leaves, their record is kept, with the date and the reason.
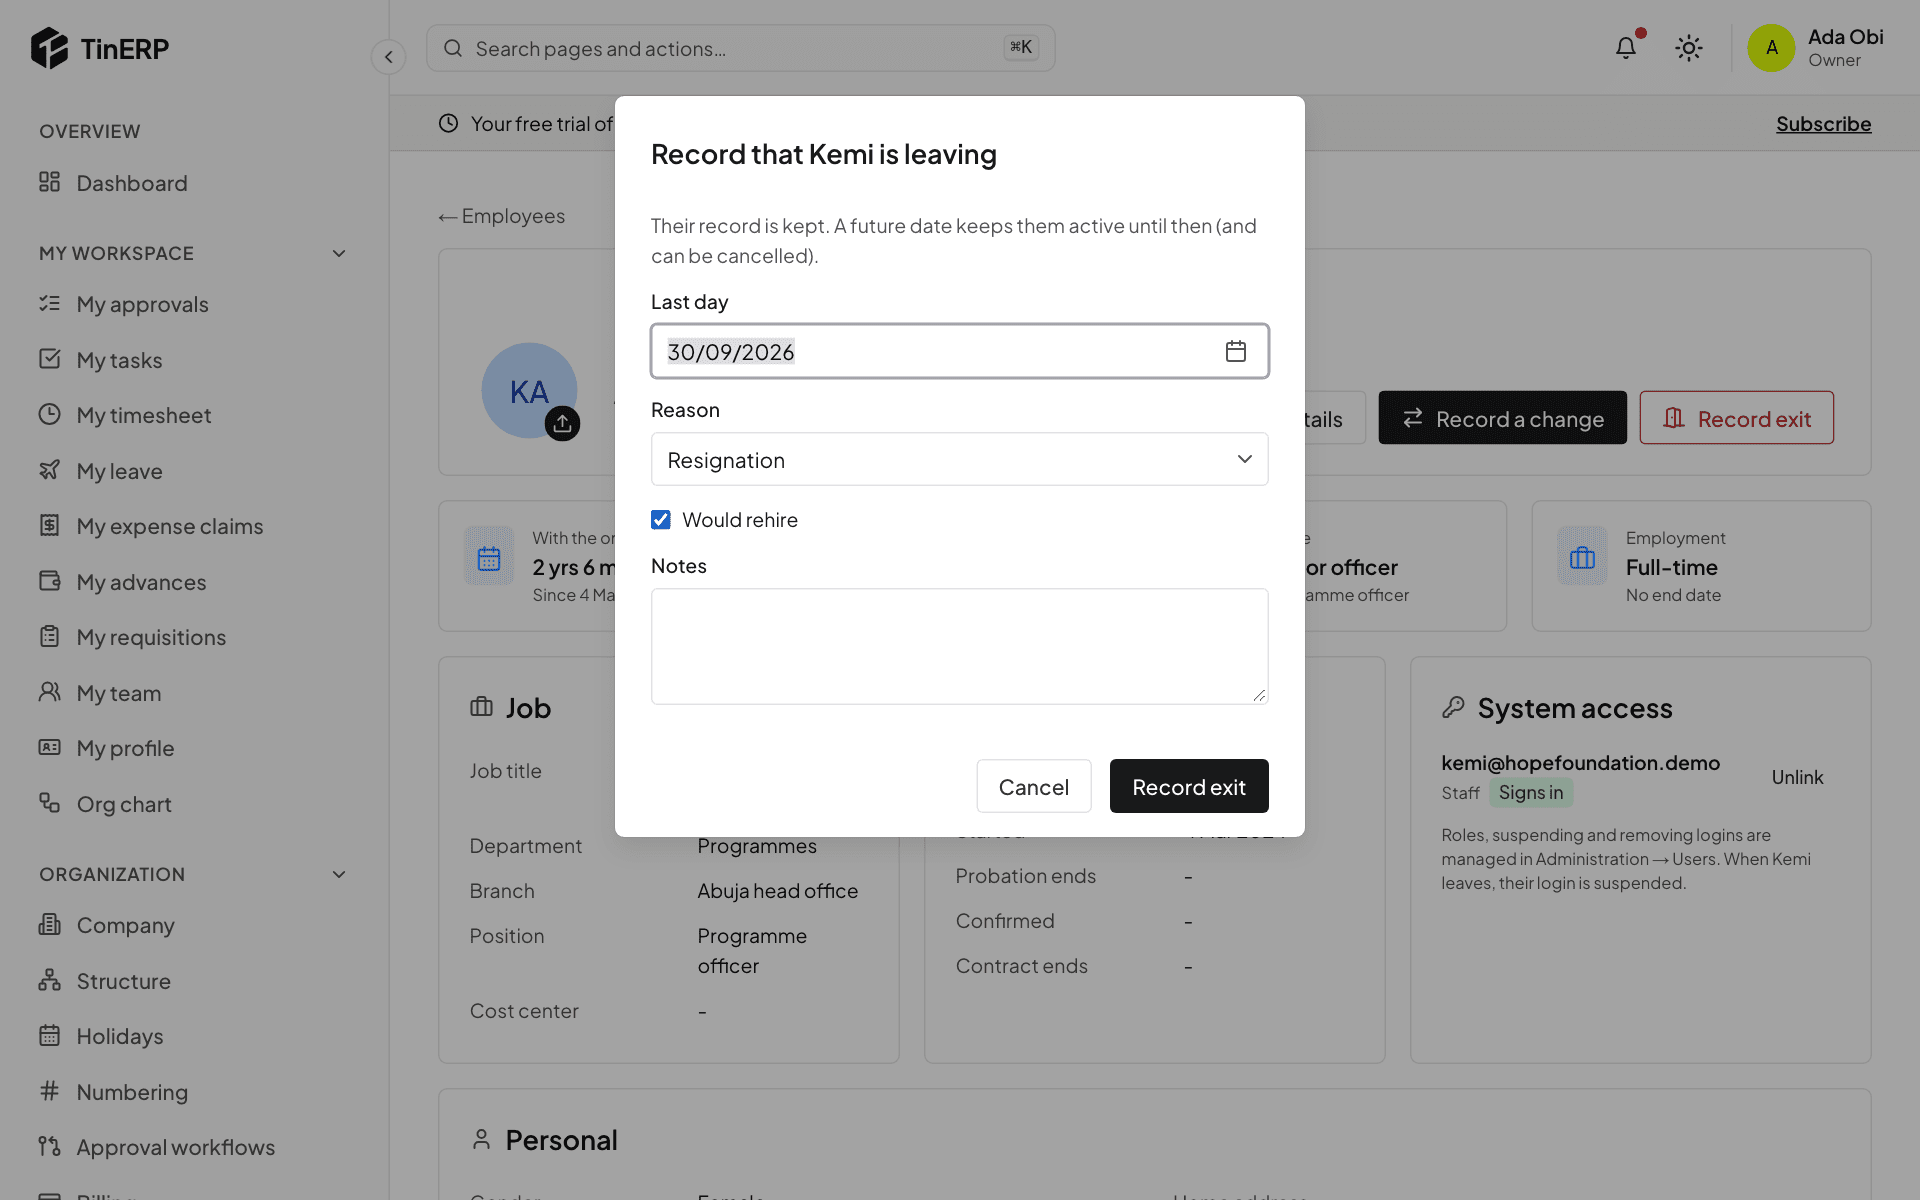
1. Record their exit
On their page, select Record exit. Enter their Last day, the reason, whether you'd rehire them, and any notes.
With a date still to come, they stay active until then. If they change their mind, select Cancel exit.
The Record exit window with the last day, reason, rehire and notes
2. Offboarding starts
The default offboarding checklist starts - handover, return of company property, clearance, exit interview - and everyone with a step is told.
3. Their access closes by itself
On their last day, their login is suspended and they're signed out everywhere. They drop out of headcount, calendars and lists of people to choose from; their record, history and leave stay.
Questions
They headed a department - what happens?
They stop heading it on their last day. Choose a new head in Organization → Structure, so approvals that go to the department head still find someone.
HR · HR teams · about 4 min
Run leave for everyone
People book their own leave in My leave, and their manager decides. HR → Leave is where HR sees everyone and steps in.
1. See everyone's leave
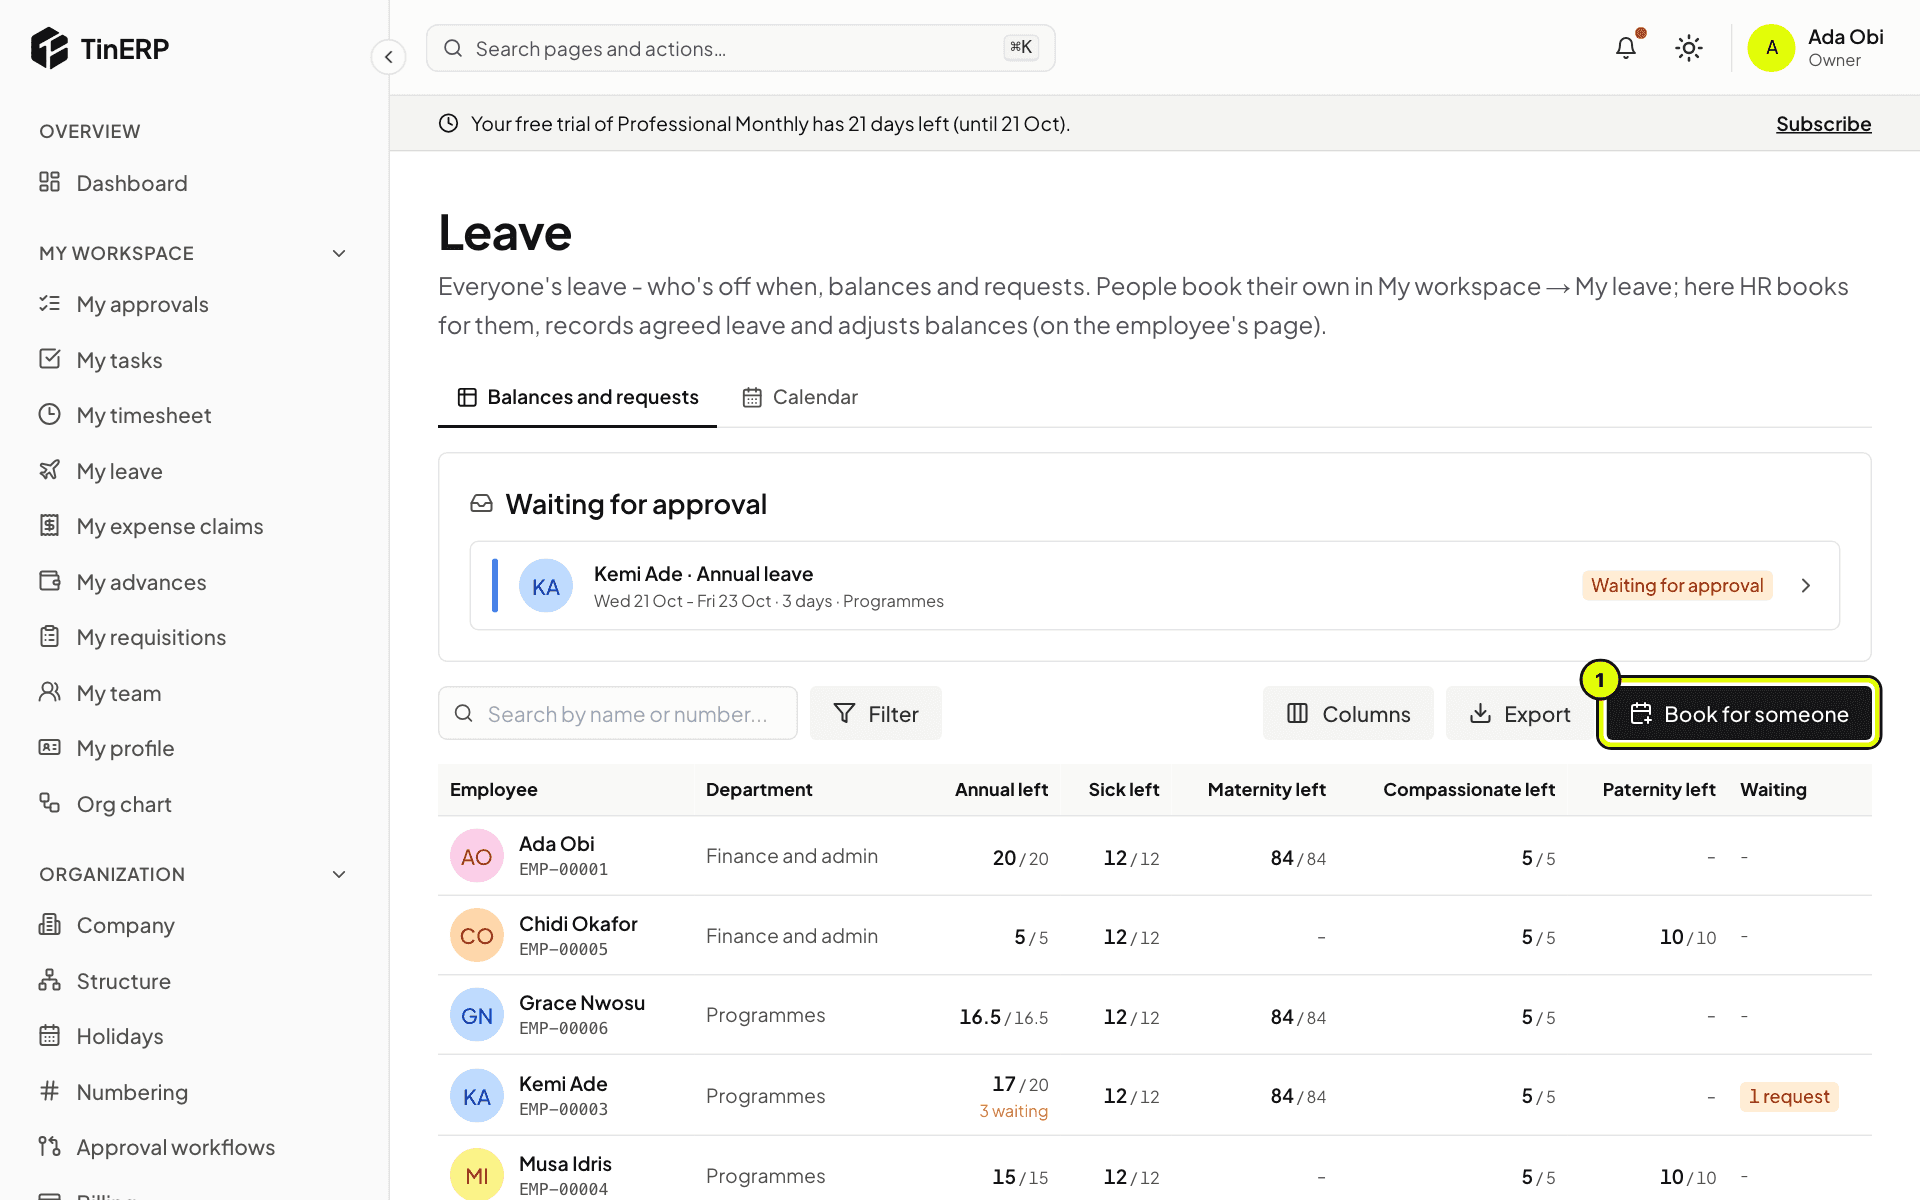
Go to HR → Leave. Waiting for approval lists the requests not yet decided. The table shows every employee's days left of each leave type and what's waiting. Search, filter by department, or Export it.
HR → Leave: the request waiting for approval, everyone's balances, and Book for someone marked 1
2. Book for someone
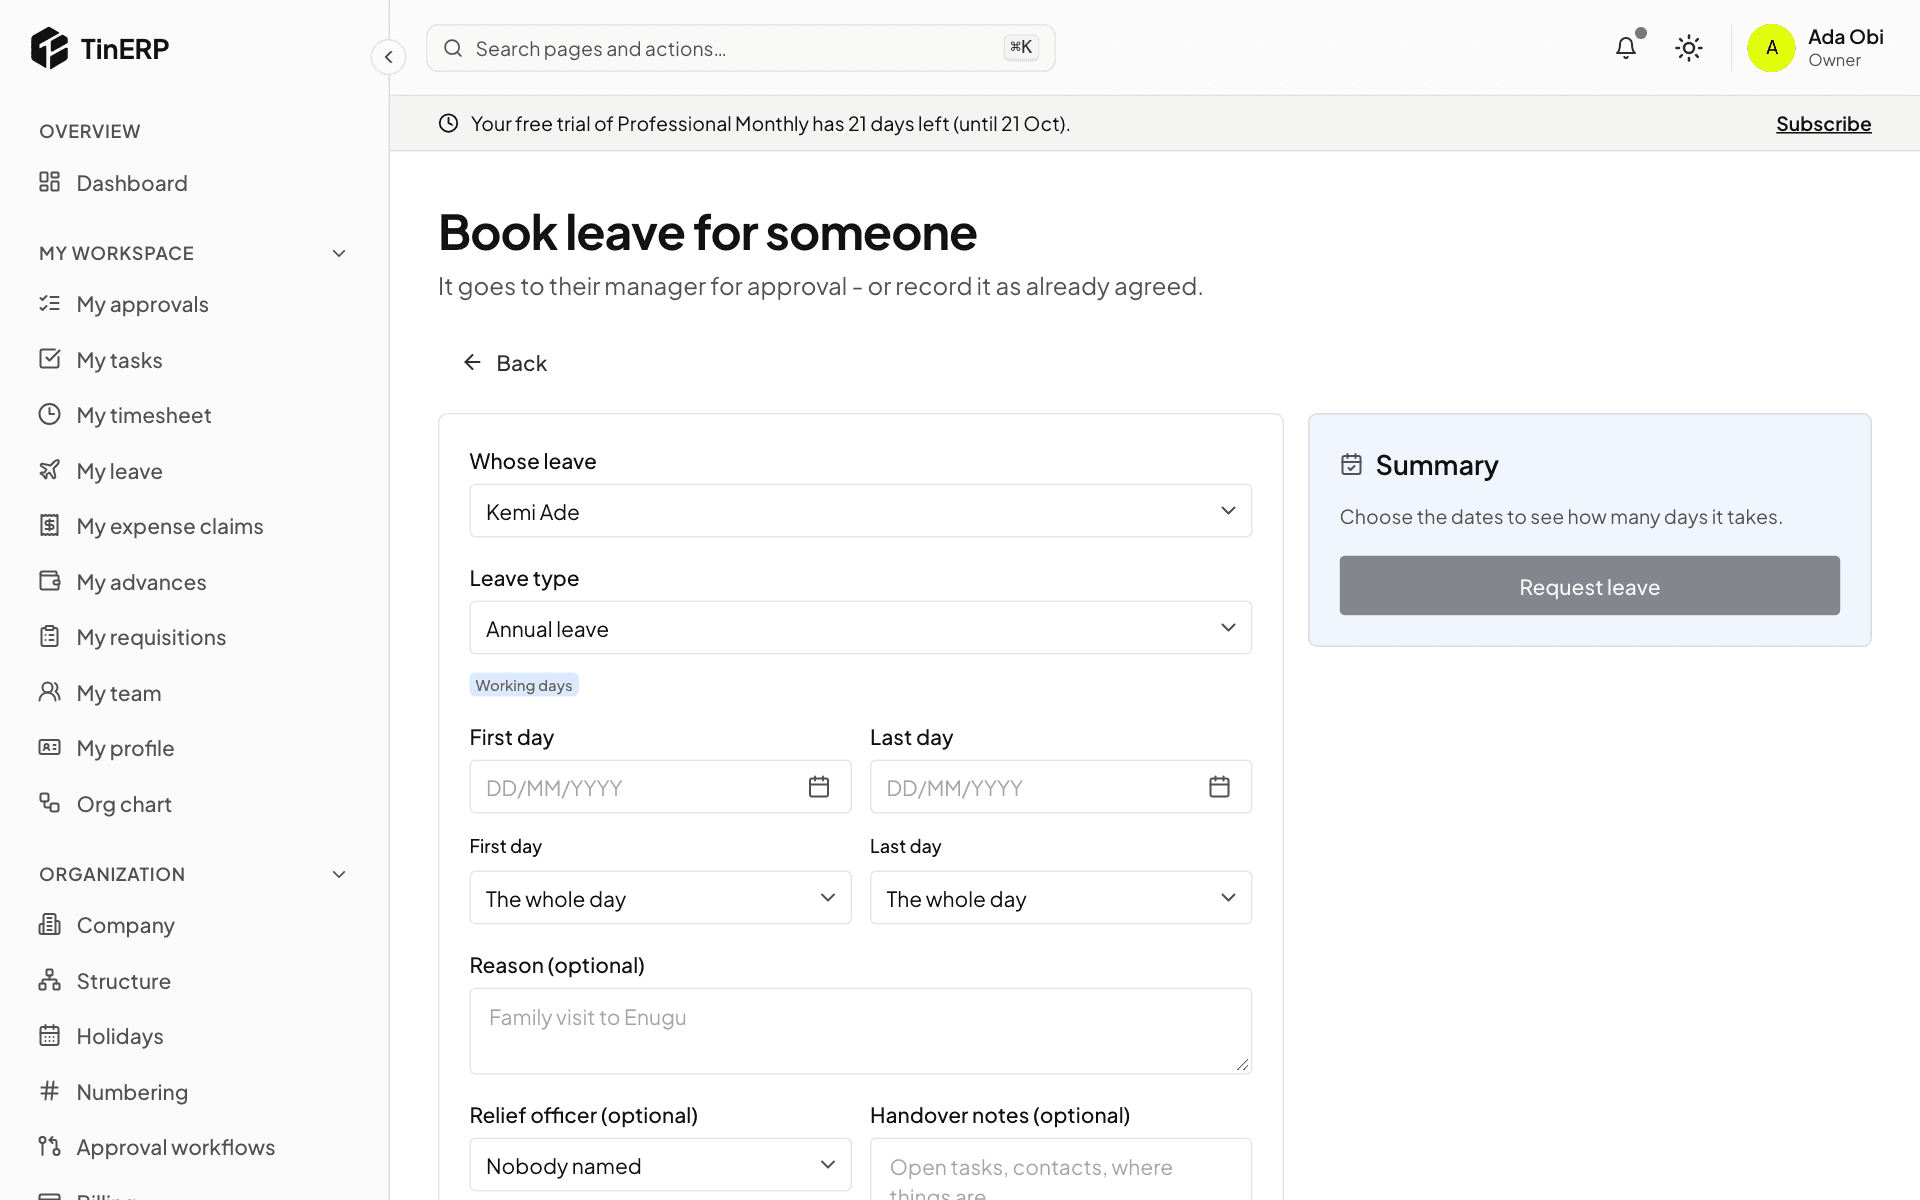
Select Book for someone (1) - for people who don't sign in, such as drivers. Choose whose leave it is, the type and the dates; it goes to their manager for approval.
For leave already agreed - sick leave recorded afterwards, for example - tick Record as already approved. It skips the approval, and the request says so.
The Book leave form for someone else, with Whose leave and Record as already approved
3. See the calendar
Select Calendar. Besides leave, holidays, birthdays people chose to share and work anniversaries, HR also sees probation ends, contract ends and - with the sensitive-details permission - documents about to expire.
The HR leave calendar for the month
Questions
Can approved leave be cancelled?
Yes, until it starts - from the request. The days go back to the person's balance.
HR · HR teams · about 3 min
Joiners and leavers
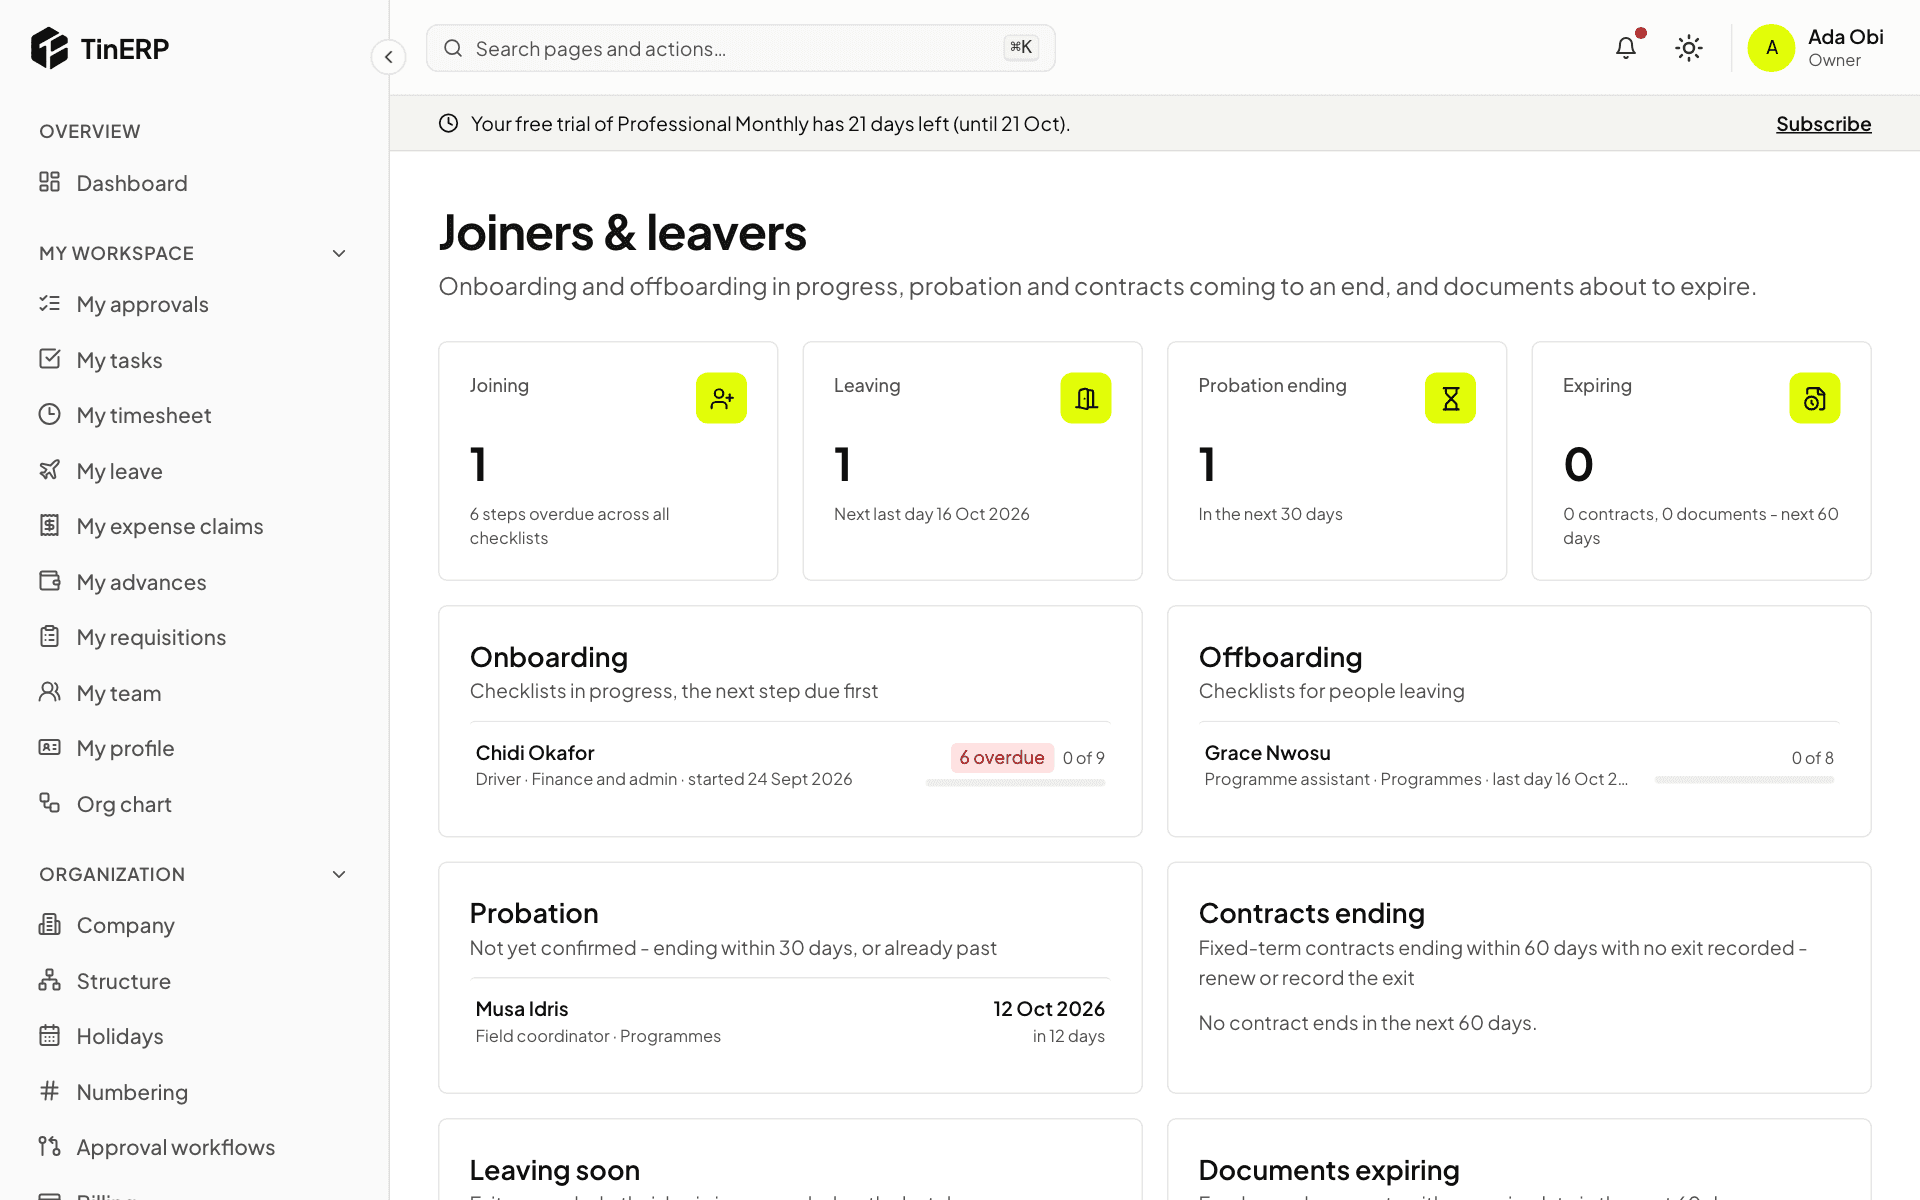
HR → Joiners & leavers brings together everything to follow up as people join and leave.
1. See what's coming up
The page shows onboarding and offboarding in progress, with overdue steps; probation ending within 30 days or already past; fixed-term contracts ending within 60 days; people leaving soon; and documents expiring within 60 days.
Joiners & leavers: one joiner, one leaver, one probation ending, with the onboarding and offboarding checklists
2. Tick off the steps
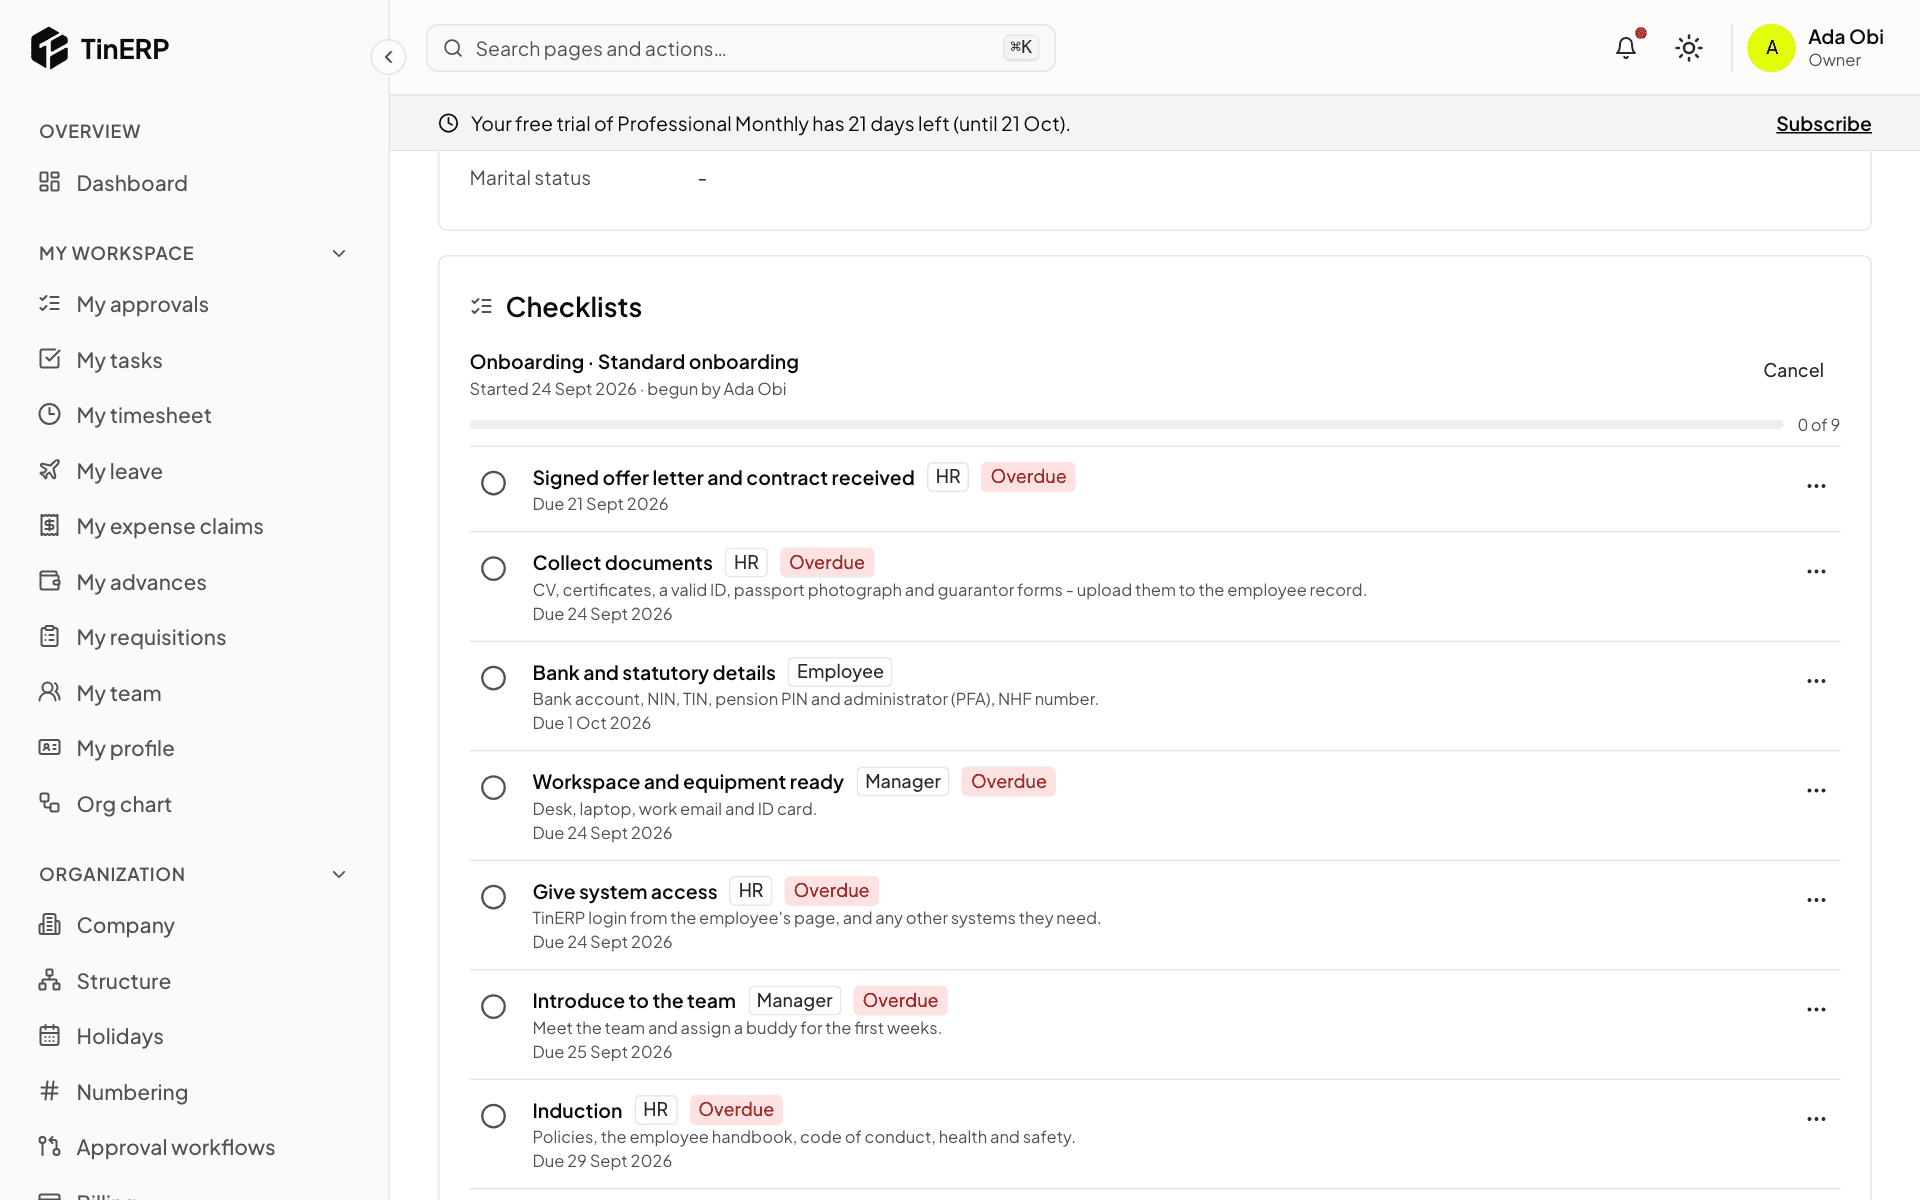
Open an employee to see their checklist: each step, who does it, when it's due, and whether it's overdue. Tick the circle when a step is done. If a step doesn't apply, open its menu (⋯) and choose Skip - doesn't apply, with a reason. The checklist completes when no steps are left.
Managers tick their steps on the employee's page, and employees theirs in My profile.
Chidi's onboarding checklist with steps for HR, his manager and him
Tip: Reminders come by themselves: probation ending in 14 days, fixed-term contracts ending in 30, and documents expiring in 30.
HR · Everyone · about 2 min
The org chart
The org chart is built from each employee's manager, and from positions if your organization uses them. Everyone can see it.
1. Explore it
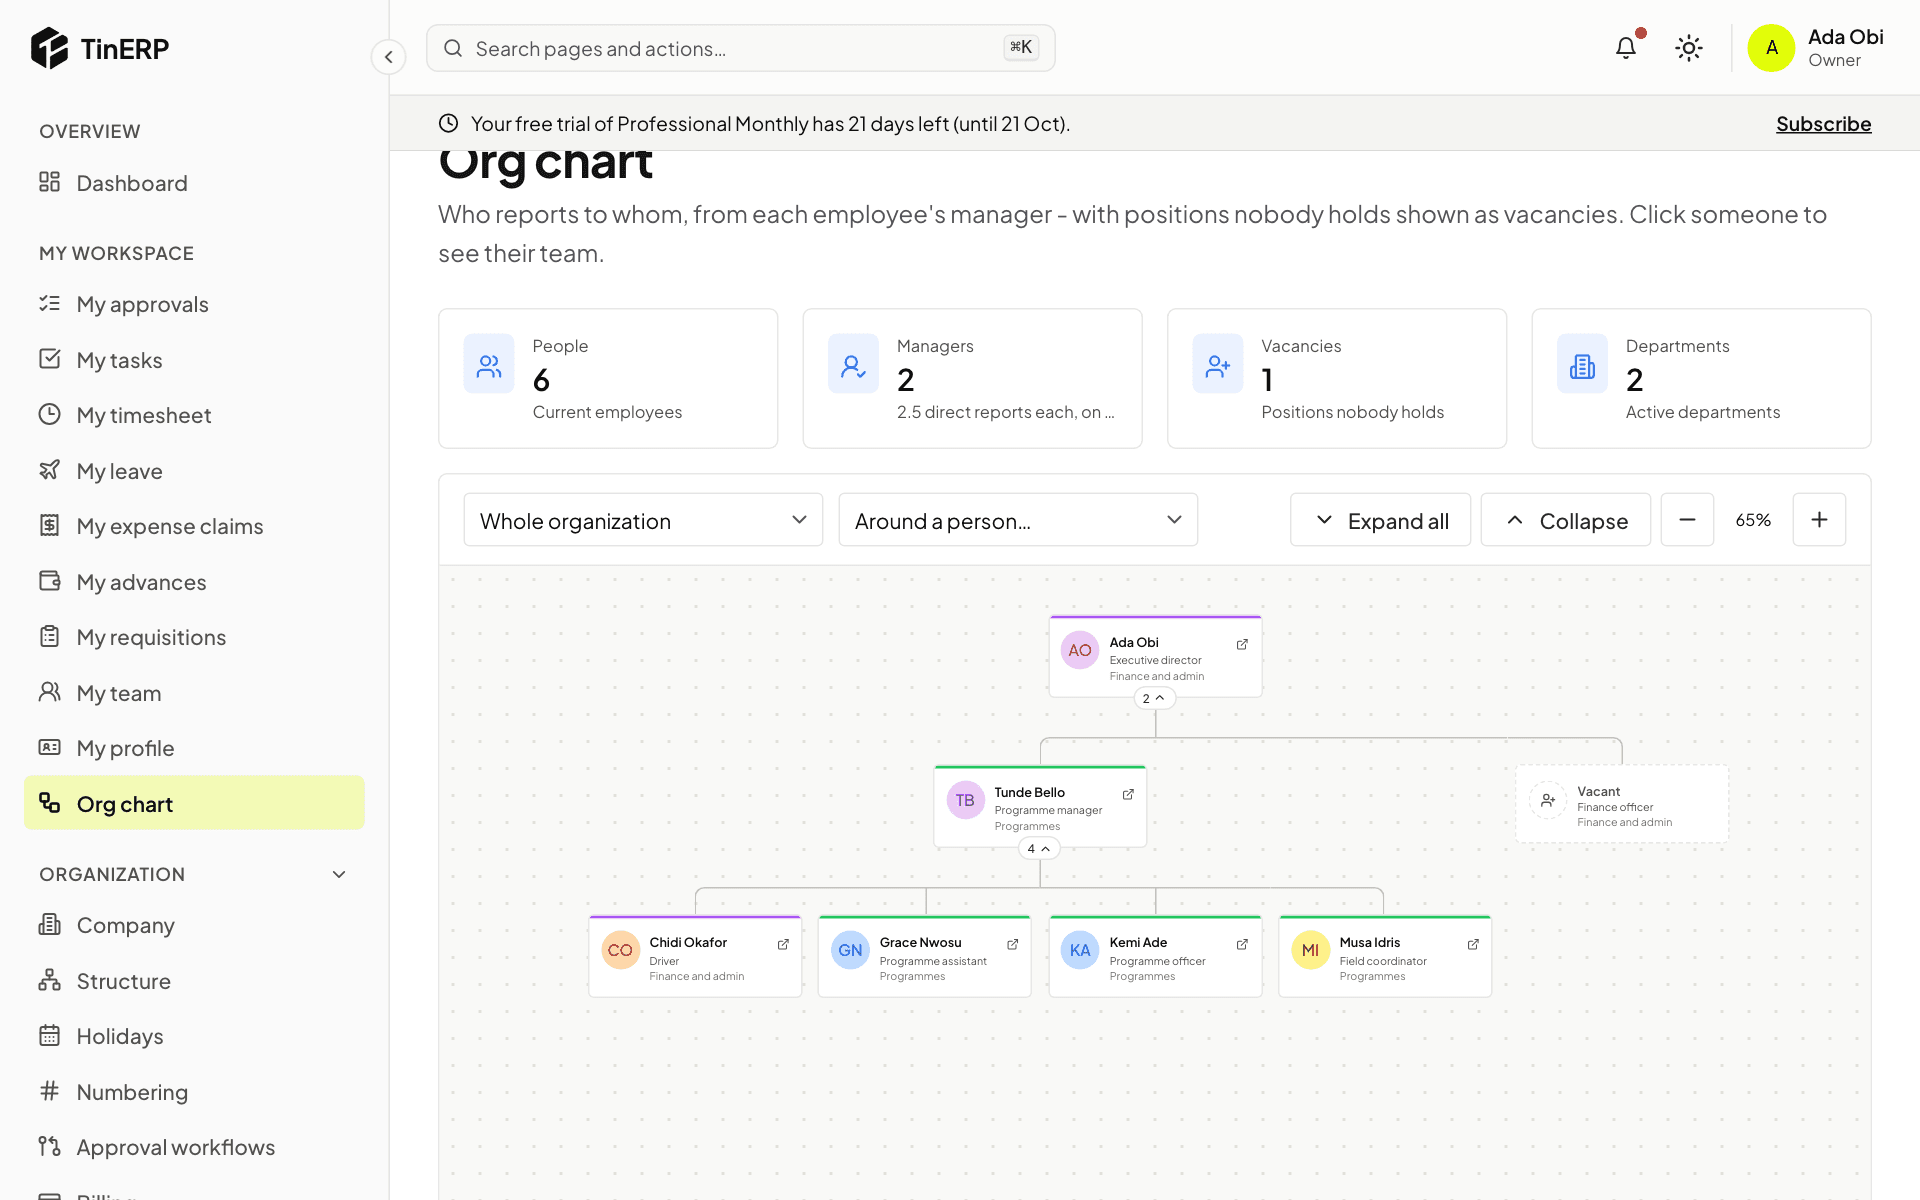
Go to My workspace → Org chart. Each box shows a person's name, job and department; the number under it is how many people report to them - select it to open or close their team. Expand all opens everything; zoom with + and −.
Choose a department at the top, or Around a person for someone's manager and team. Boxes marked Vacant are positions nobody holds.
The org chart fully expanded, with a vacant Finance officer position
Questions
Someone is in the wrong place on the chart.
The chart follows the manager on their employee record. HR corrects it with Record a change.
HR · HR teams and managers · about 3 min
HR reports
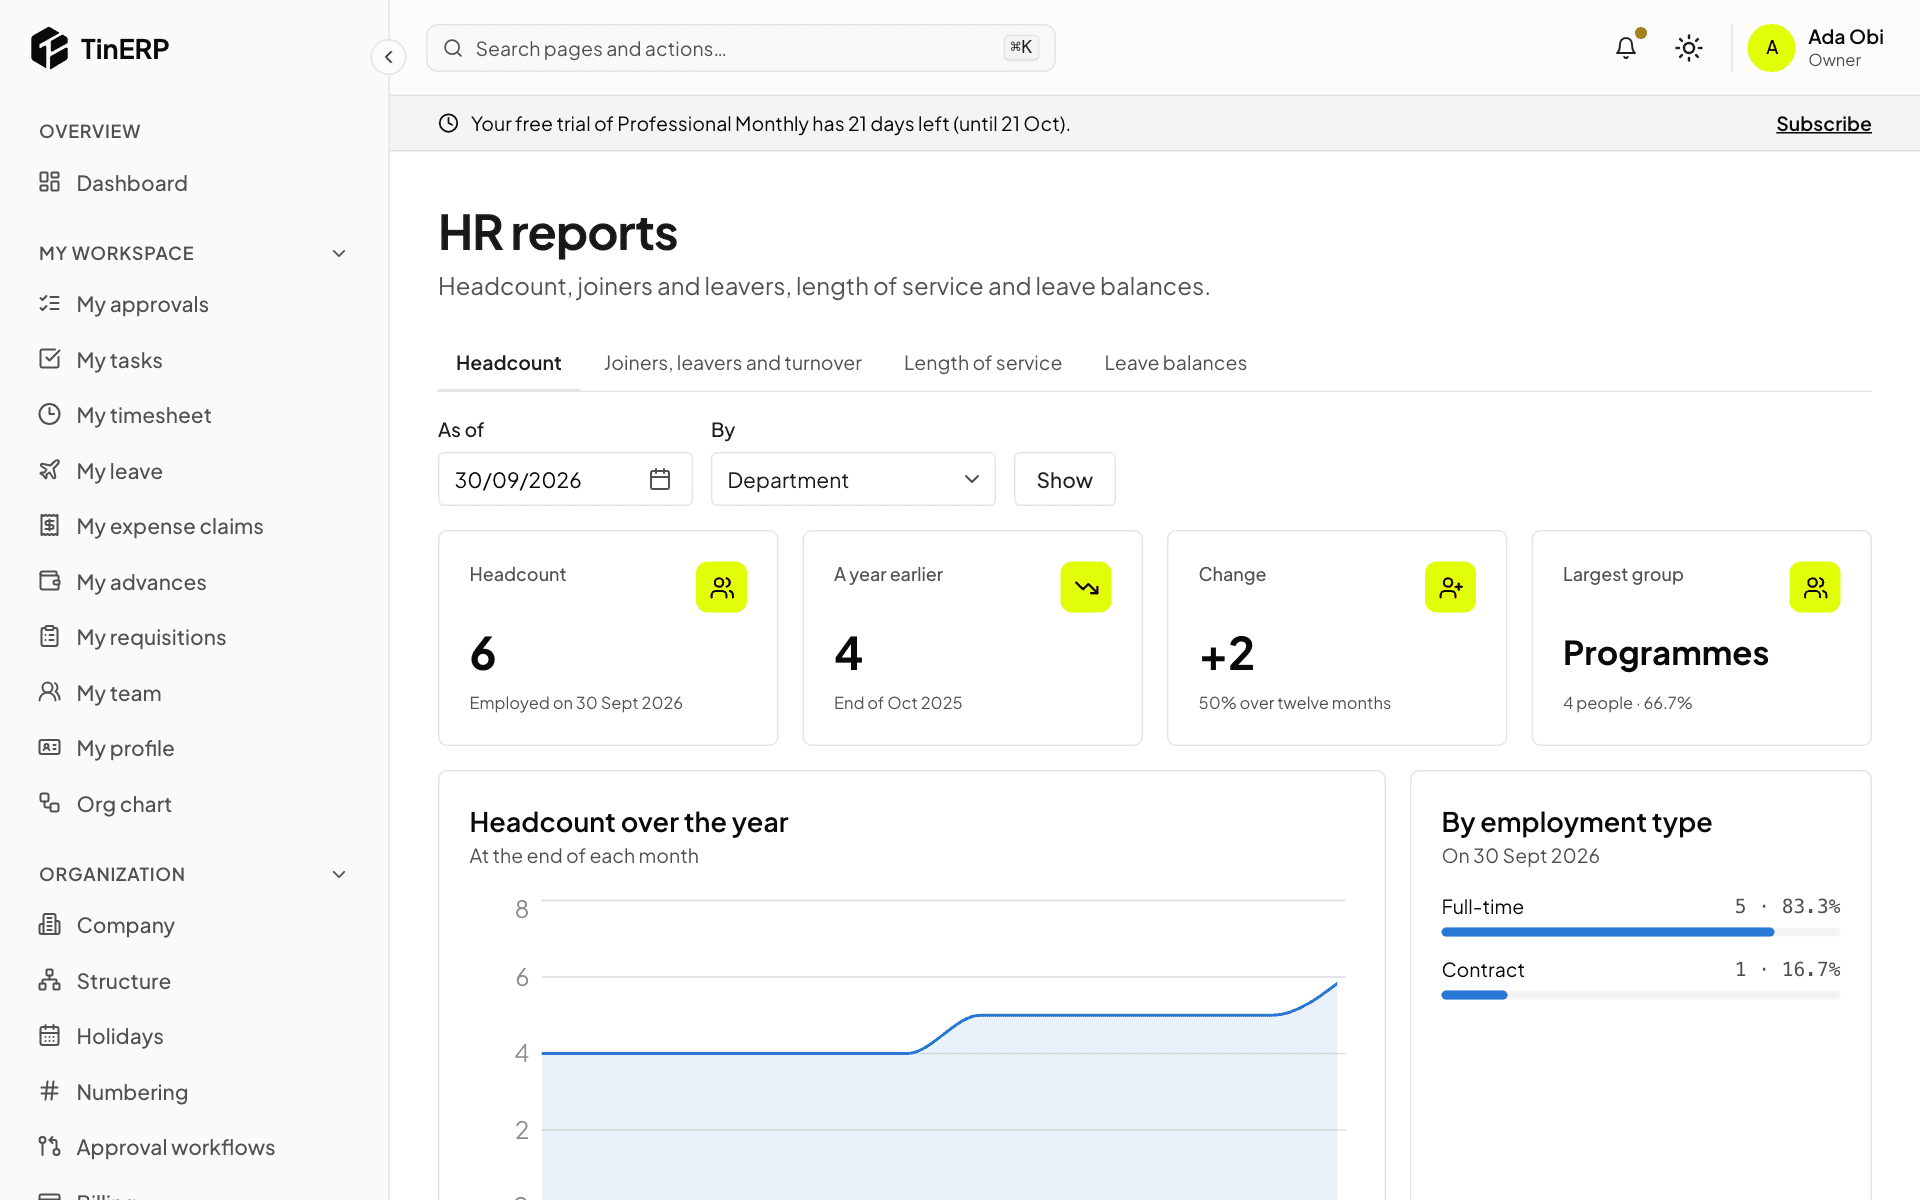
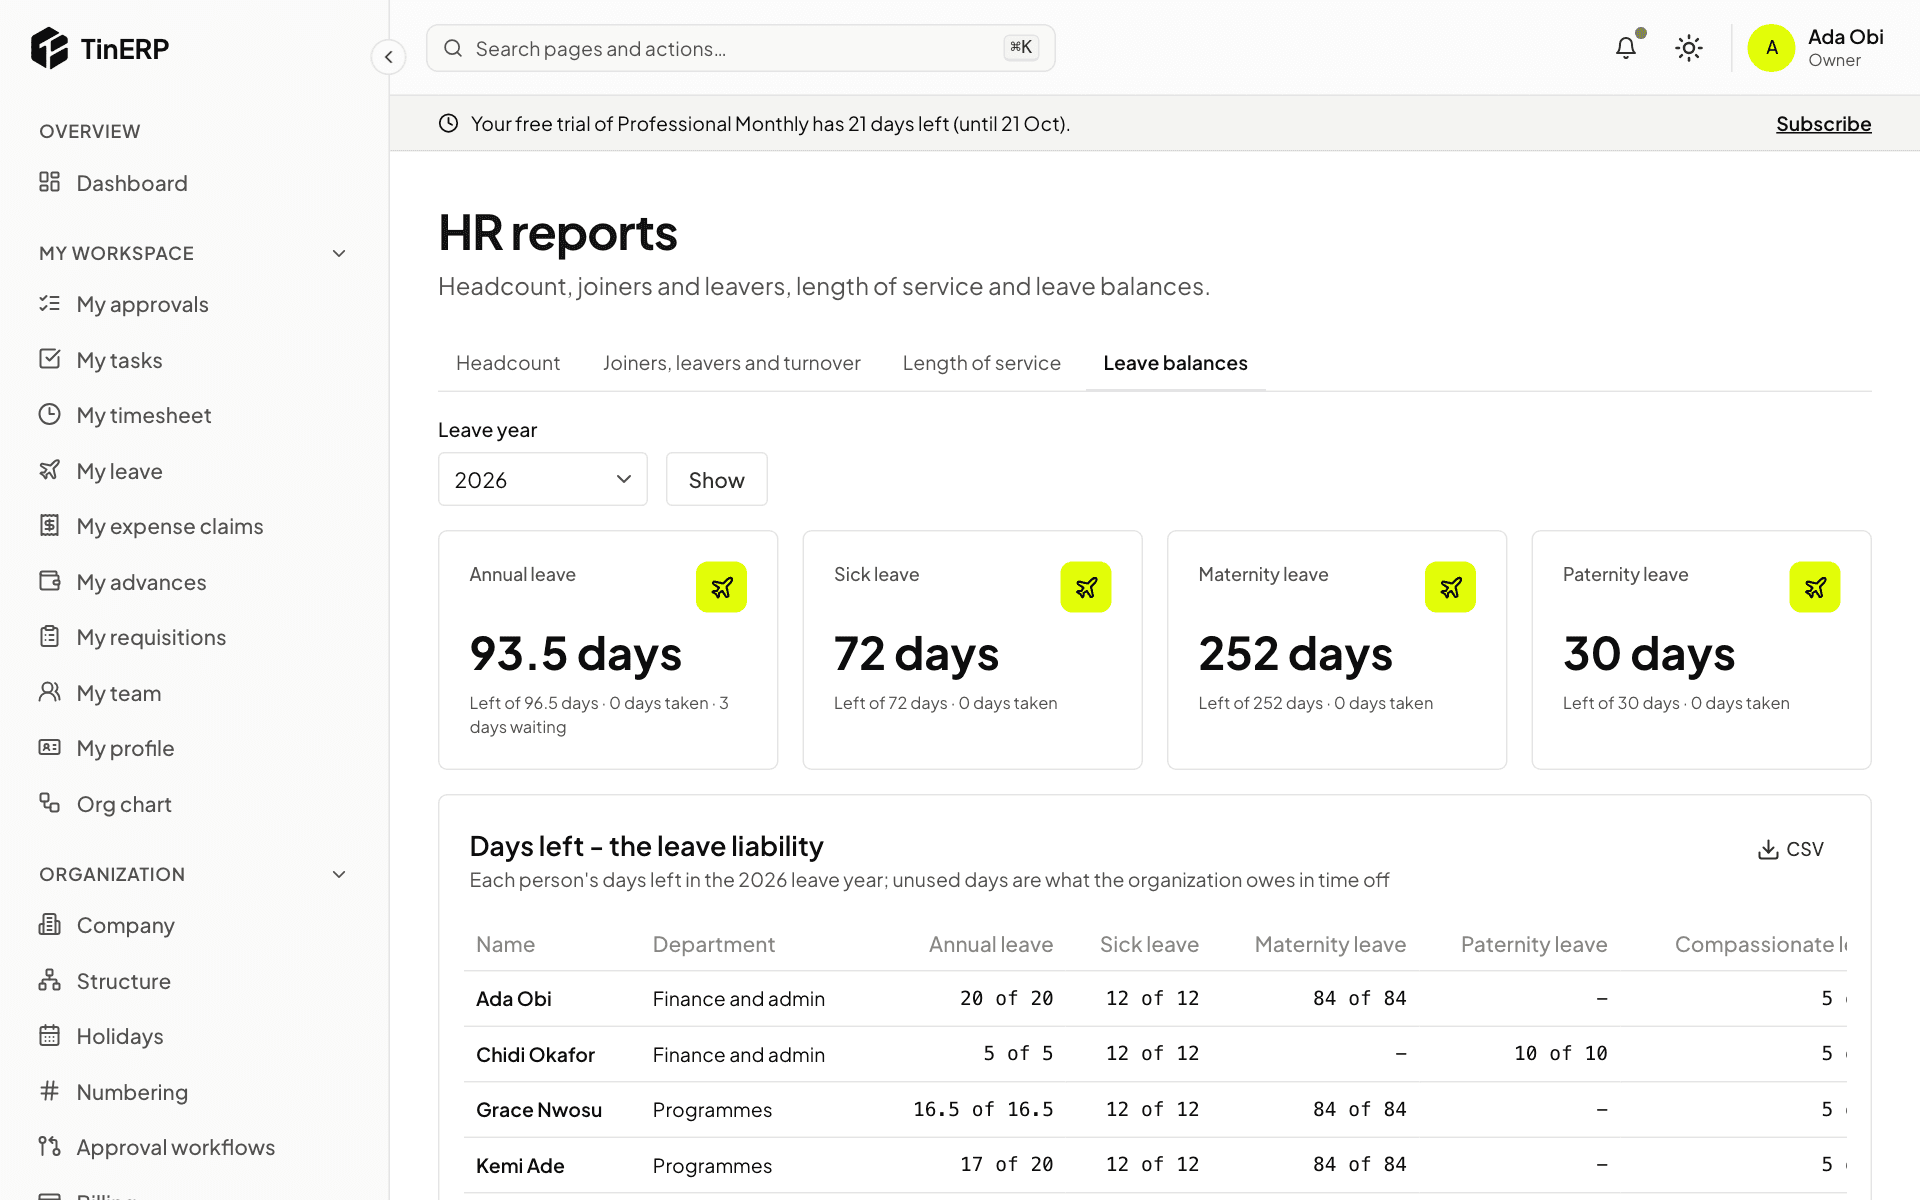
HR → HR reports has four reports. Each shows only the people you may see - HR sees everyone, a manager their department and reporting line. Every table can be exported as CSV.
1. Headcount
Who was employed on any date, grouped by department, branch, grade, employment type or gender - with the trend over the last year. Choose As of and By, then Show.
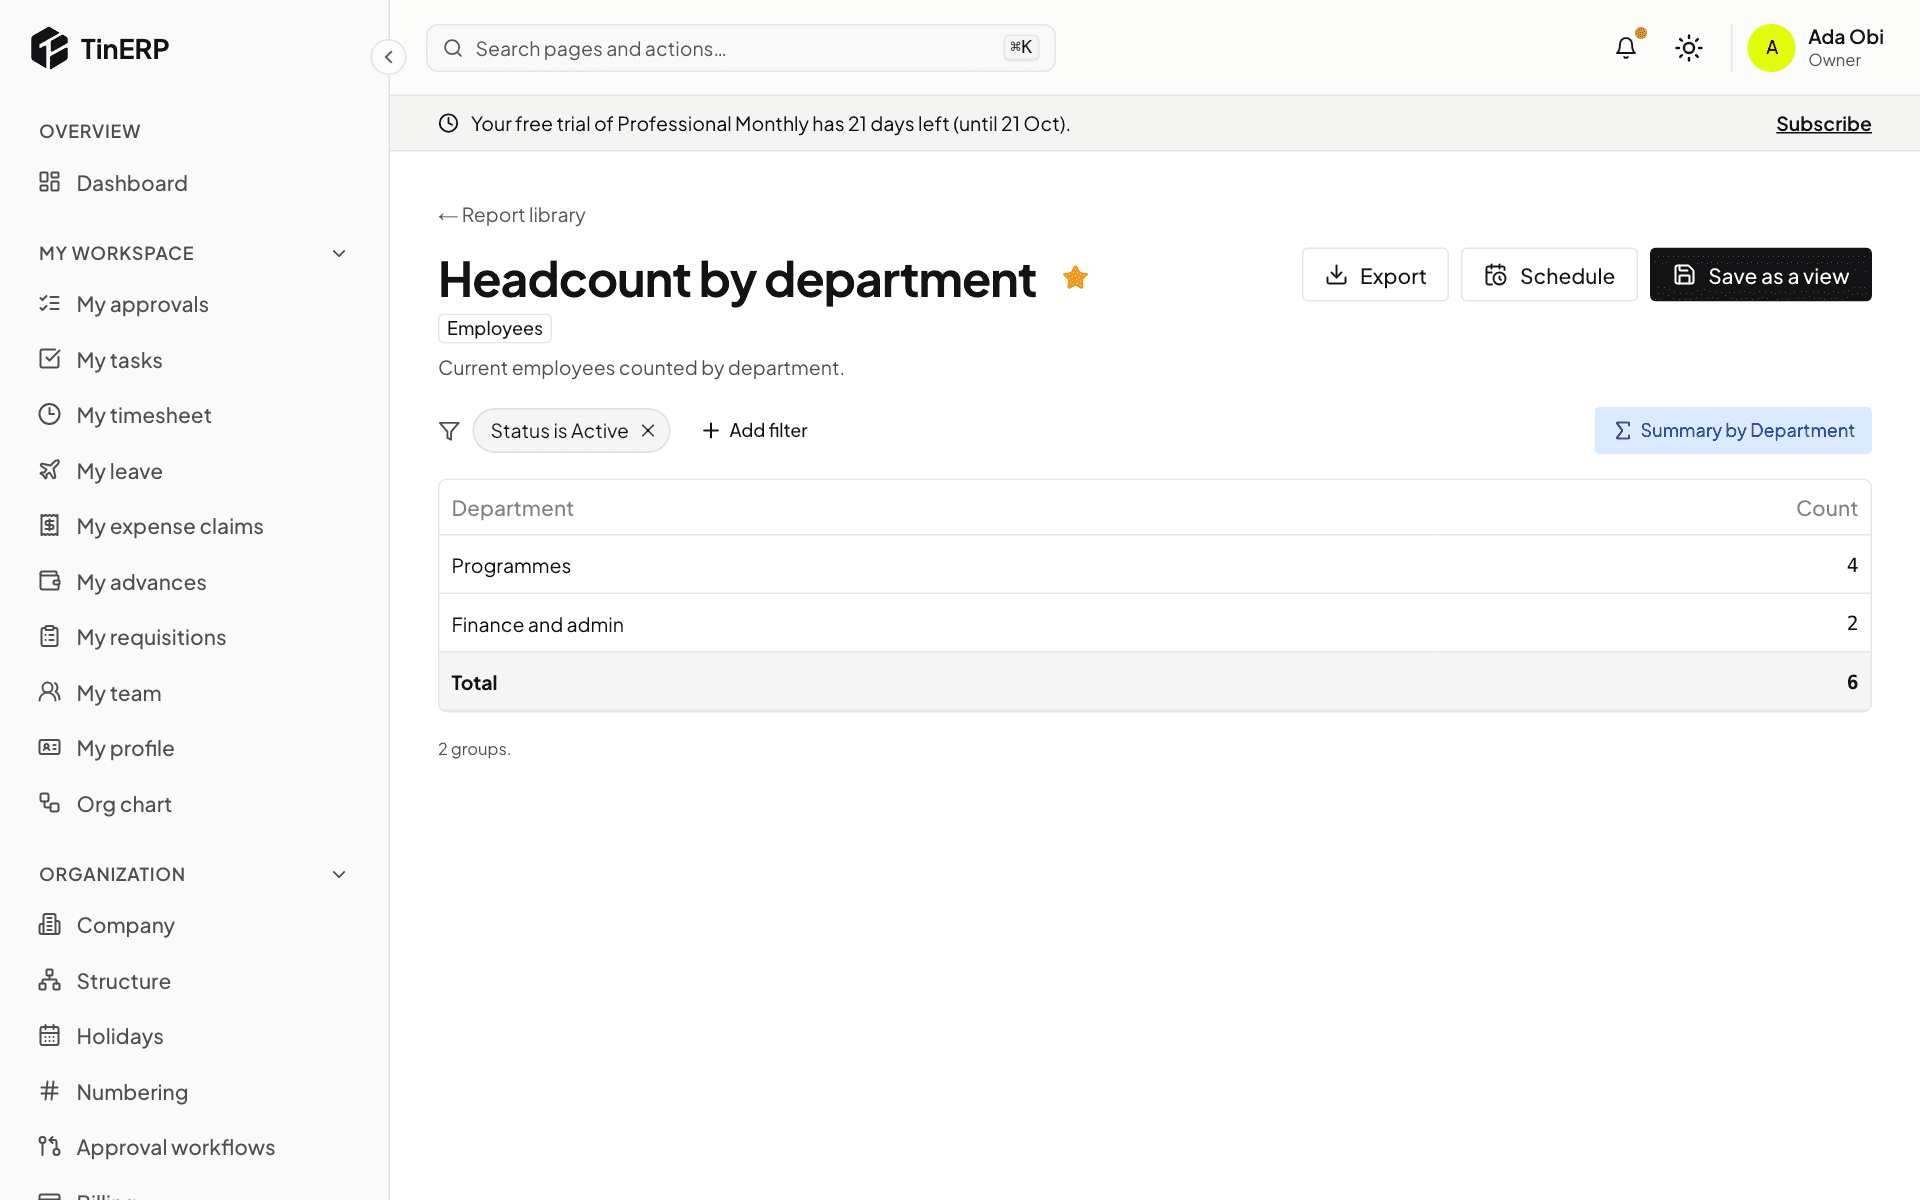
The Headcount report grouped by department, with the trend over the year
2. Joiners, leavers and length of service
Joiners, leavers and turnover covers a period you choose: who joined and left, turnover (leavers divided by the average headcount) and exit reasons. Length of service groups people by years of service, and lists work anniversaries and birthdays in the next 60 days.
3. Leave balances
Each person's allowance, days taken, waiting and left, for every leave type with an allowance. The days left are your organization's leave liability.
The Leave balances report
Projects · Project managers · about 3 min
How Projects works
Projects keeps things simple: each project has members and a task board, and people log their time against projects on a timesheet their manager approves.
1. Who does what
Everyone works from My tasks and My timesheet. Managers and Admins can start projects and have the Projects menu: Overview, Projects, Team timesheets and Reports.
Whoever manages a project runs it - its details, members and tasks. Admins see every project and choose how timesheets work.
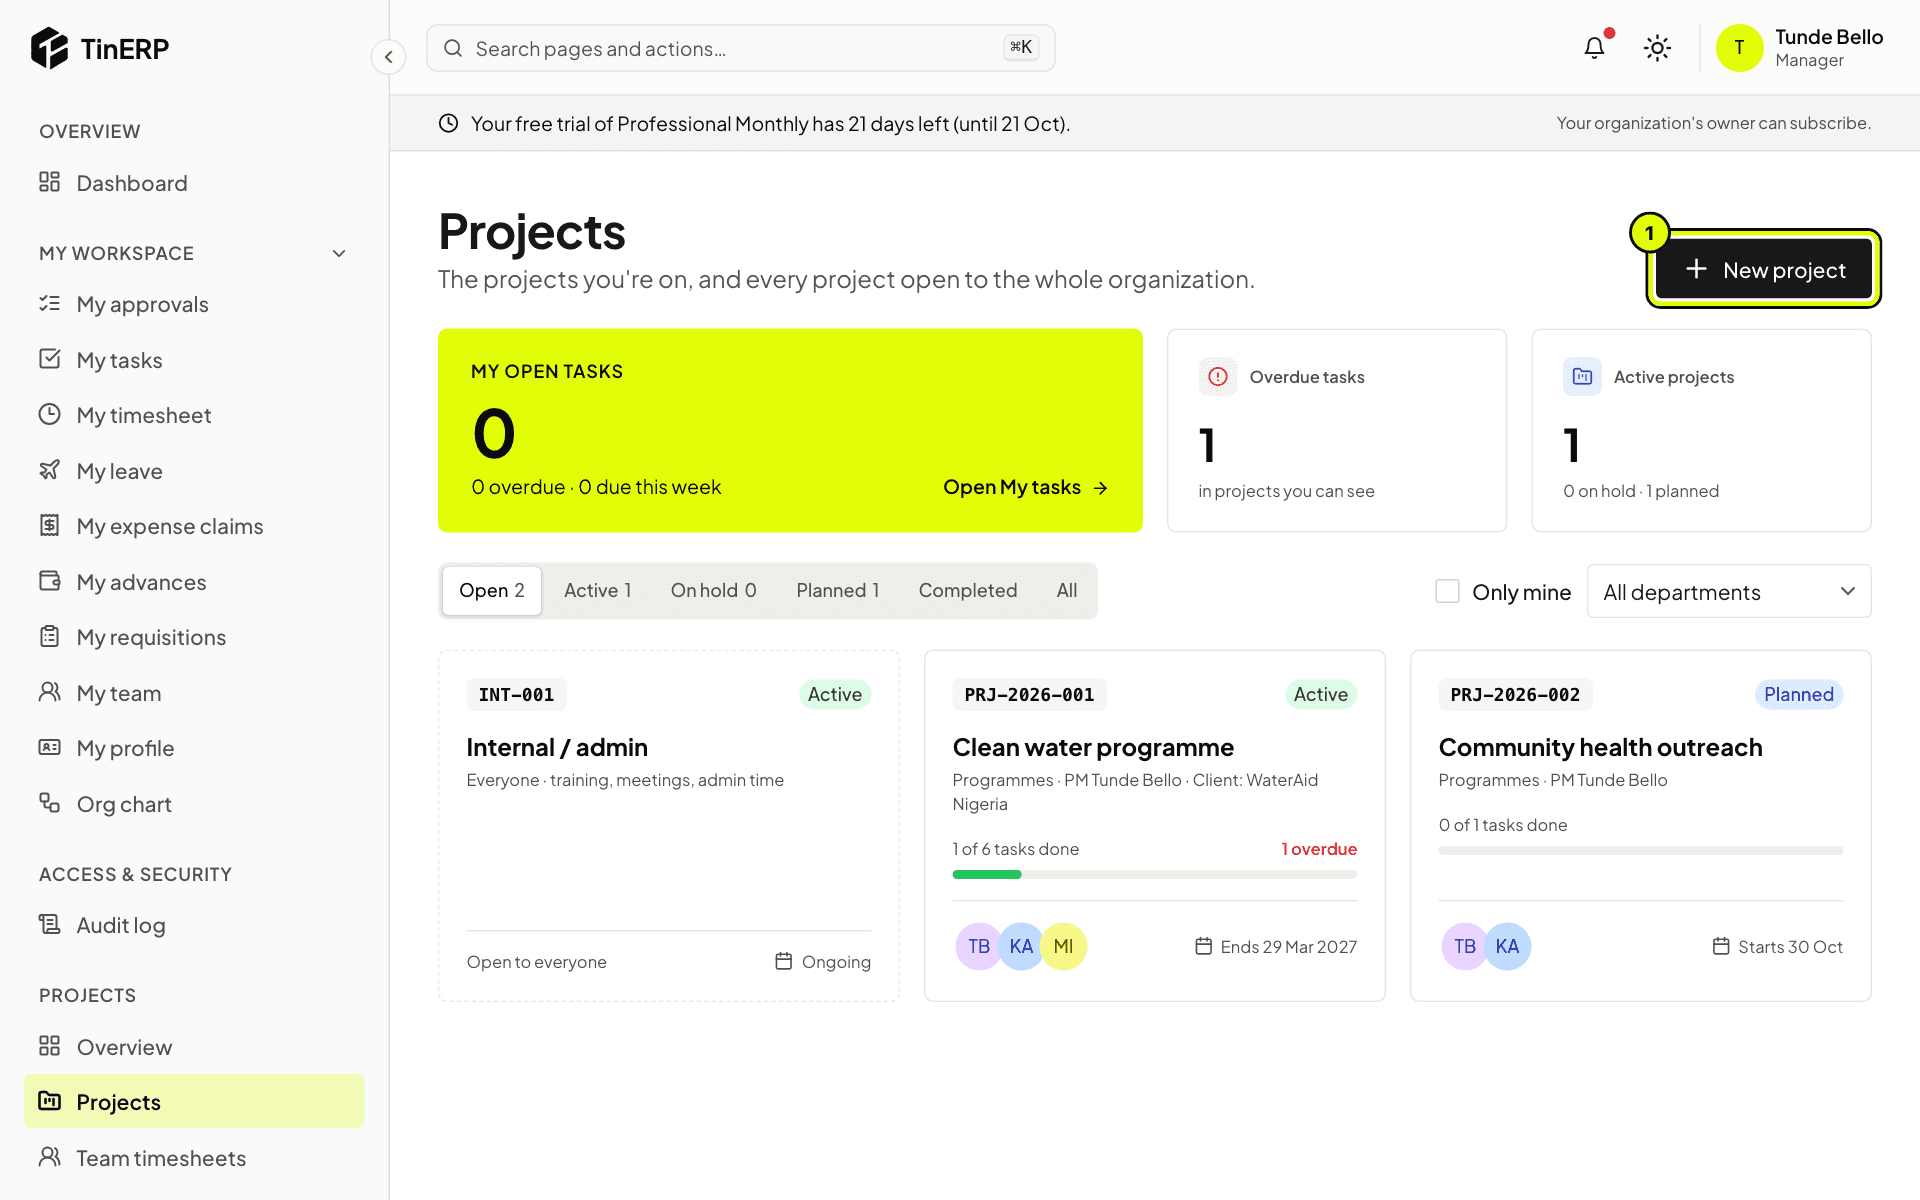
2. Your projects
Go to Projects → Projects. Each card shows the project's code, status, tasks done, members and dates. Filter by status, tick Only mine, or choose a department. Your own open and overdue tasks are at the top.
The Projects page with three projects and New project marked 1
3. Time that isn't project work
For training, meetings and admin, create an internal project (like INT-001 Internal / admin). Everyone can log time to it, and it has no task board.
Projects · Project managers · about 4 min
Start a project
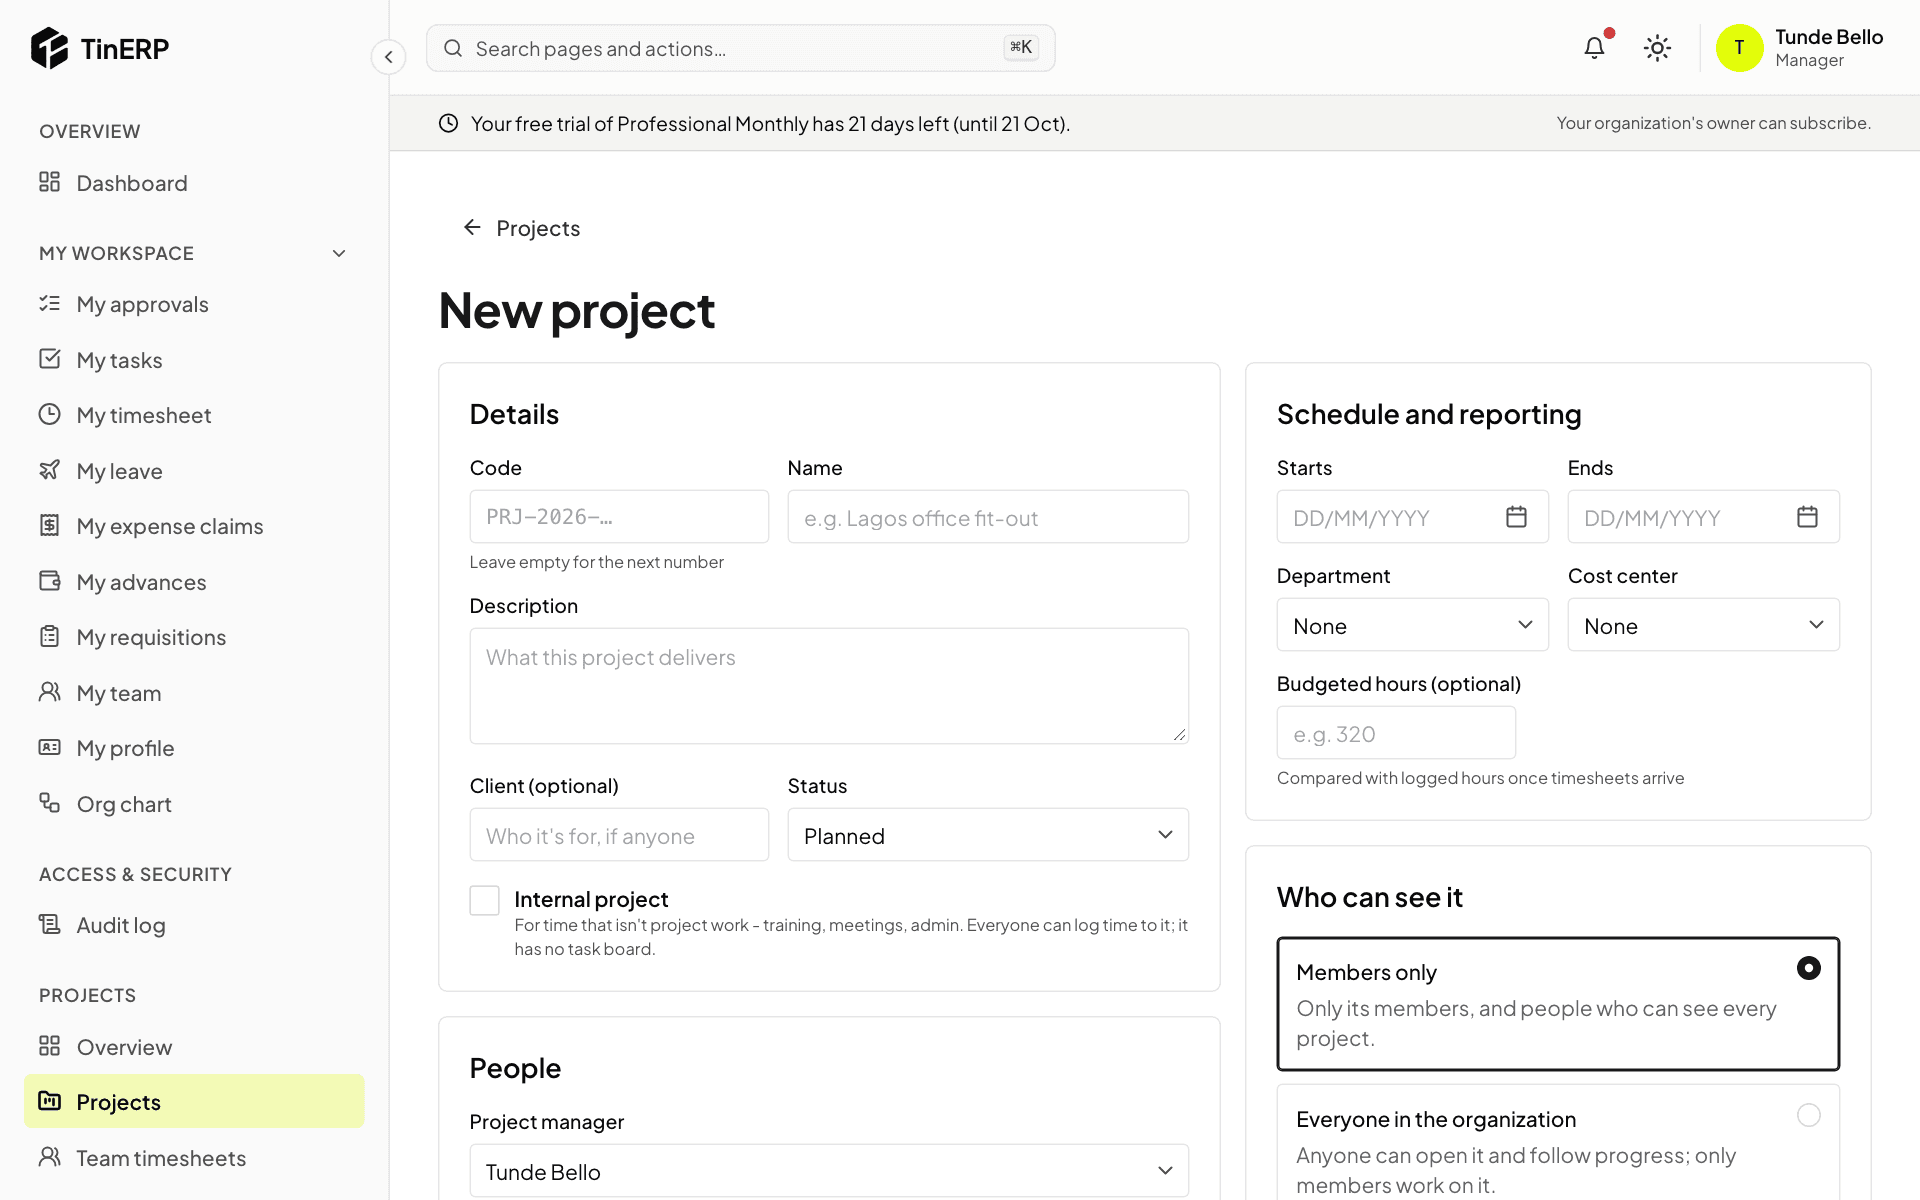
Select New project on the Projects page.
1. Fill in the project
Details: leave Code empty for the next number (such as PRJ-2026-003) or type your own; add a name, a description, the client if there is one, and the status - Planned or Active.
Schedule and reporting: the dates, department, cost center and Budgeted hours, which logged hours are compared with. People: the project manager and members. Who can see it: Members only, or Everyone in the organization - everyone can follow it, only members work on it.
The New project form: details, schedule and reporting, people, and who can see it
2. Manage members
On the project, Members lists who can be given tasks and log time. Add a member, or remove one - their open tasks on the project are unassigned. The project manager can't be removed. People are told when they're added.
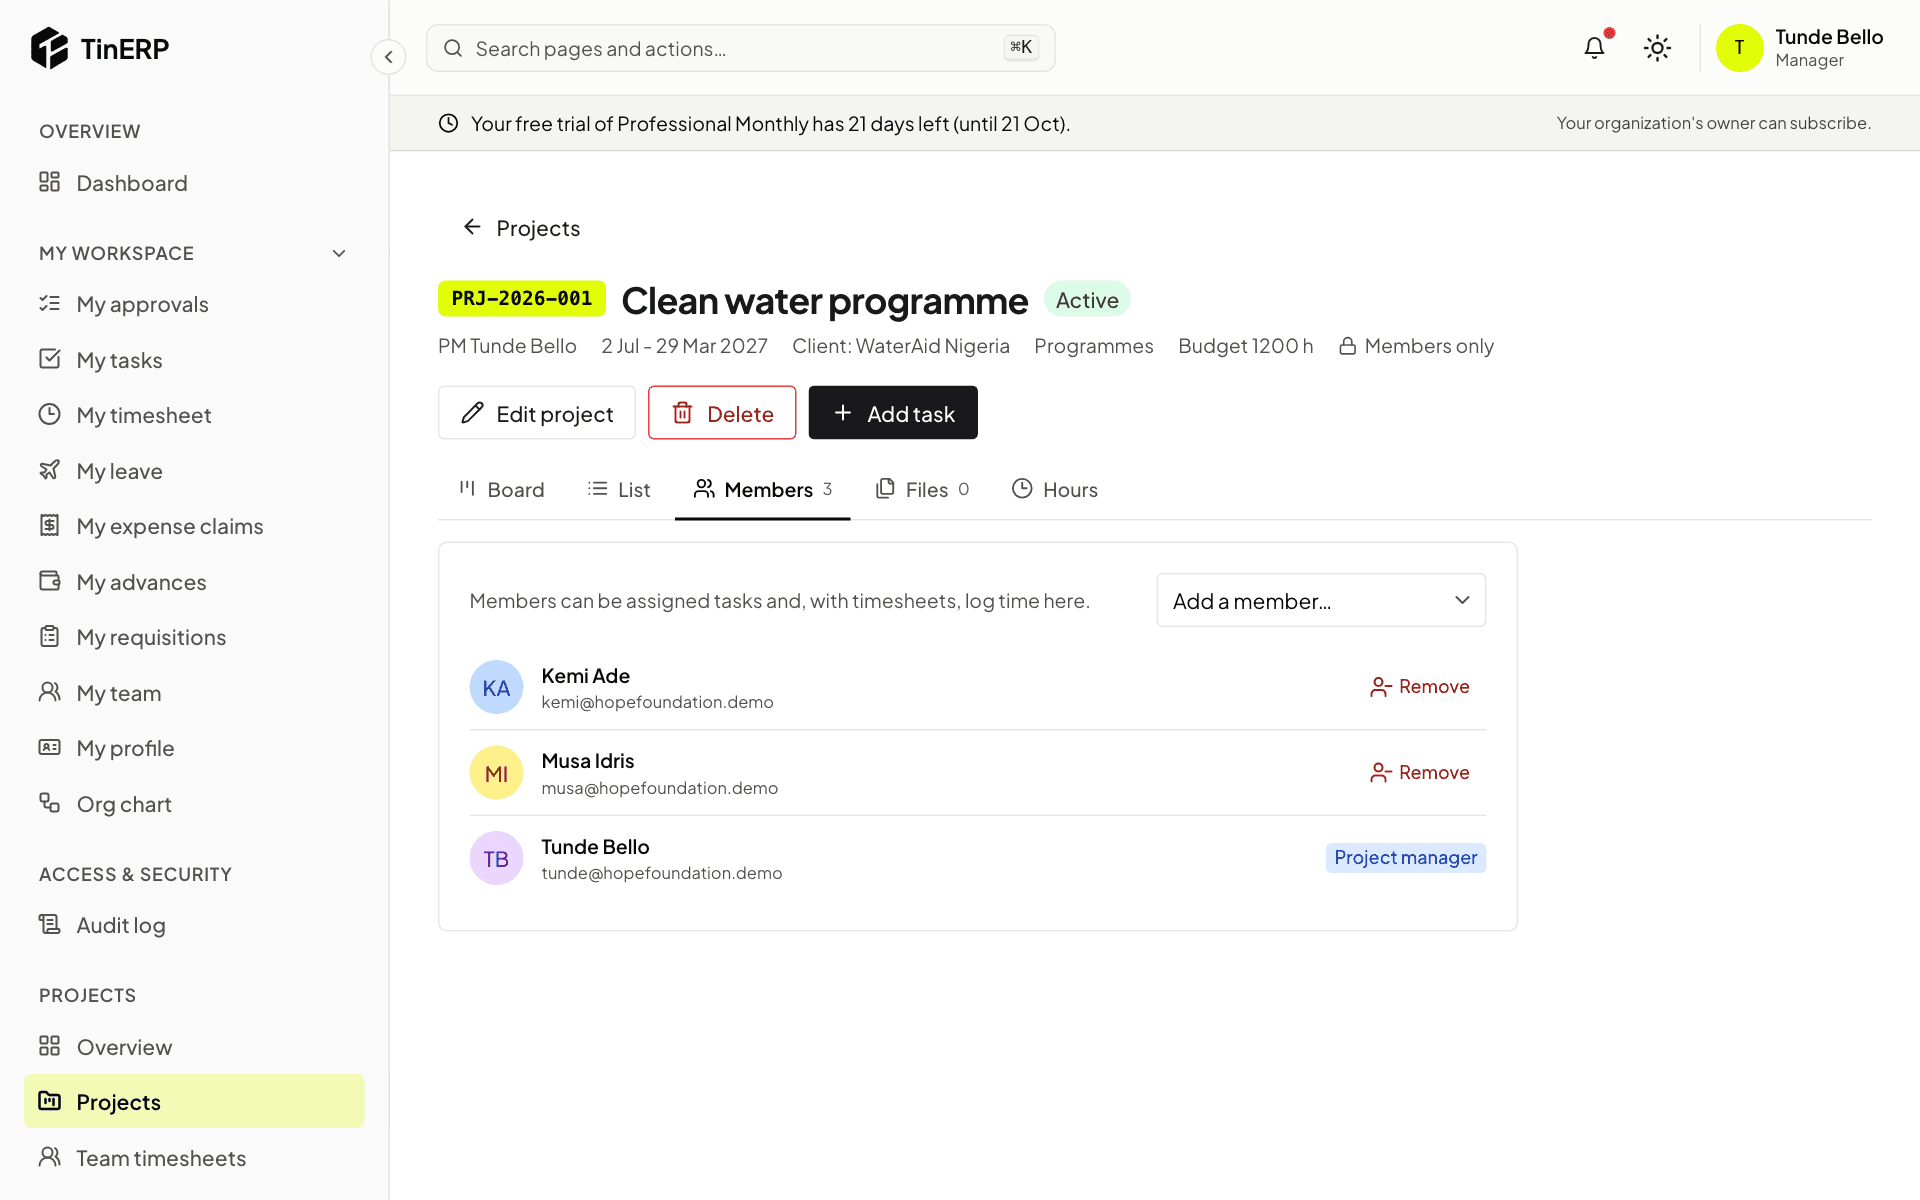
The Members tab of the Clean water programme
3. Change or close it
Edit project changes its details and status - Active, On hold, Completed or Cancelled. Completed and cancelled projects take no new tasks or time.
Delete removes a project for good - only while no time has been logged on it. After that, complete or cancel it instead, so the hours stay on record.
Projects · Project managers and members · about 4 min
Plan the work on the board
Every project (except internal ones) has a task board with three columns: To do, In progress and Done.
1. Add tasks
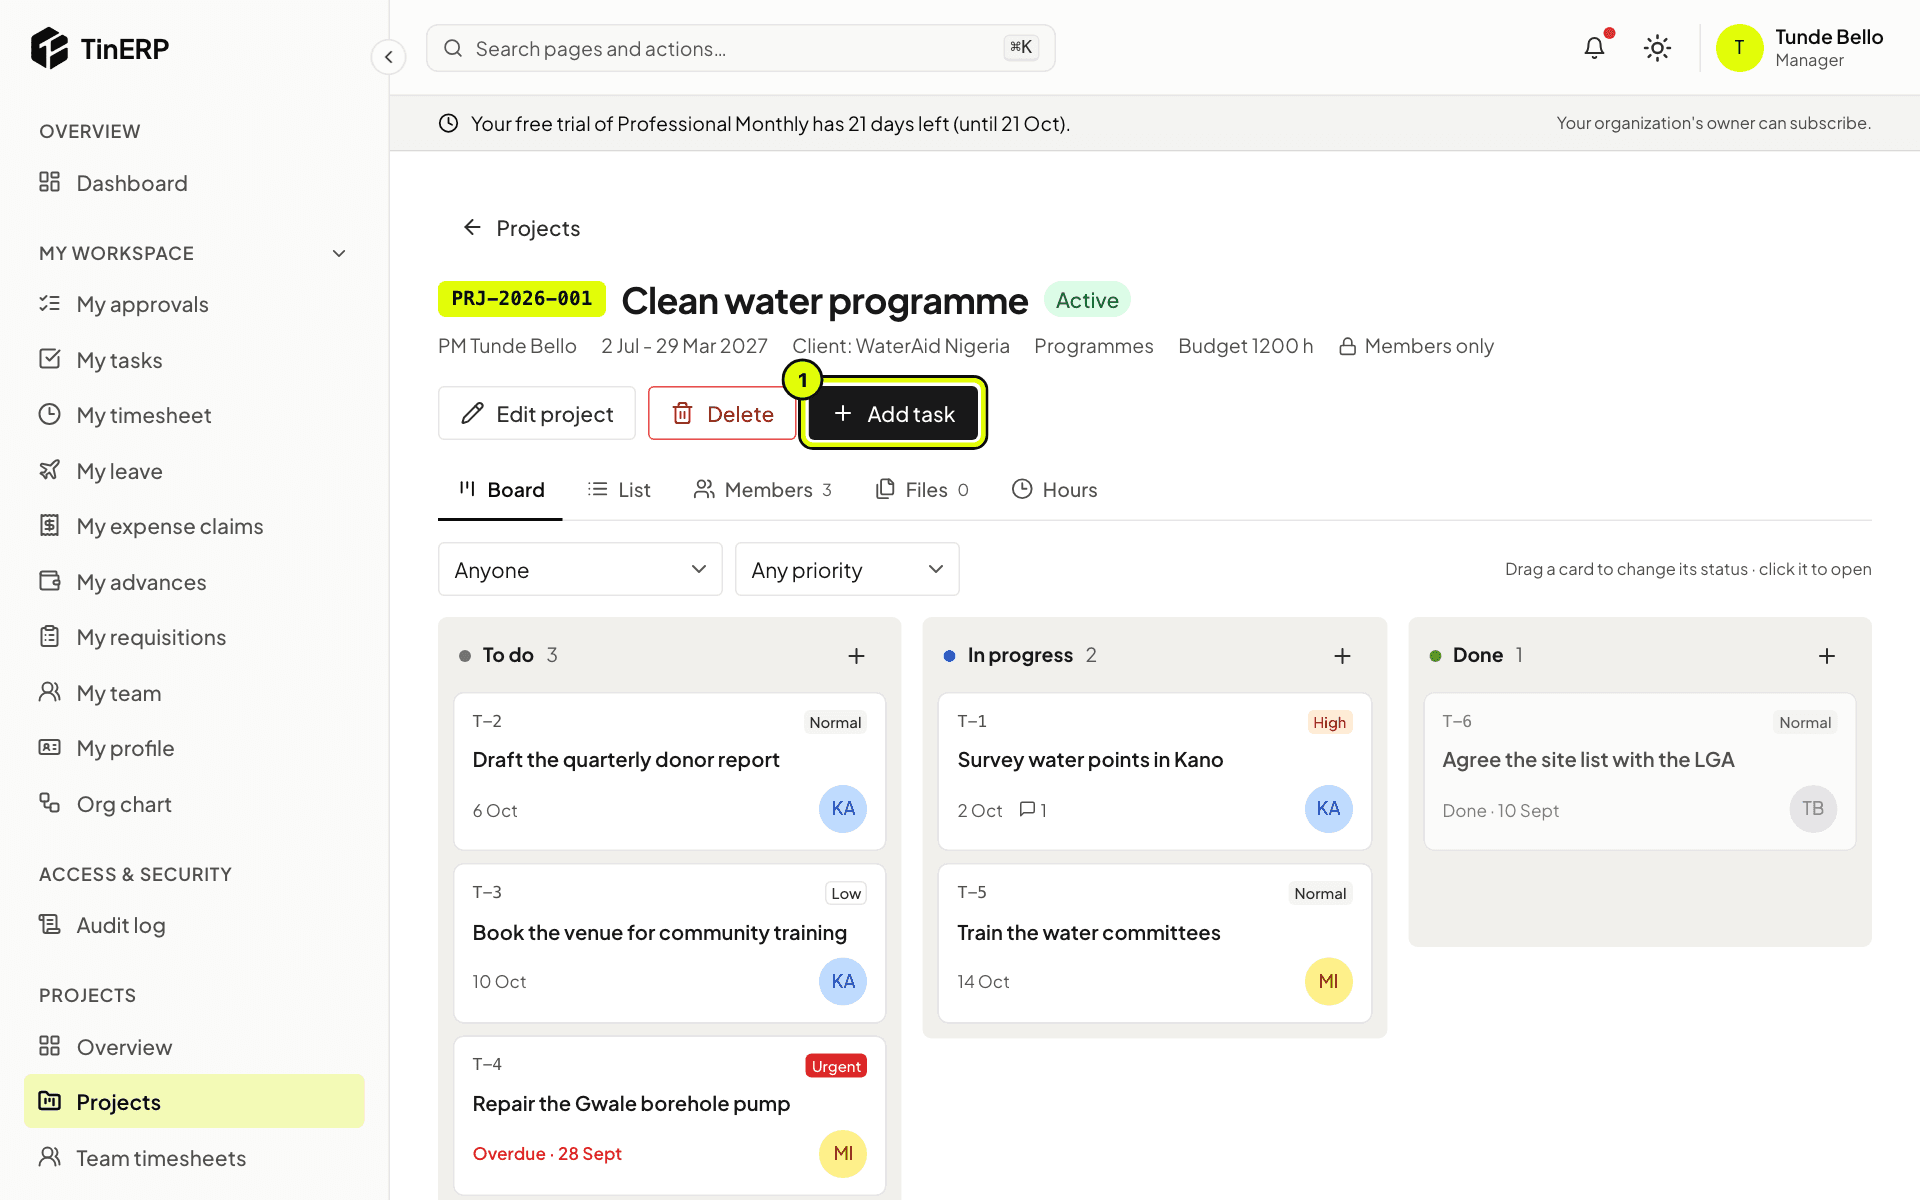
Select Add task (1), or the + at the top of a column. Give it a title, an assignee (one of the members), a due date and a priority - low, normal, high or urgent. The assignee is told.
The Clean water programme's board with tasks in To do, In progress and Done, and Add task marked 1
2. Follow the board
Drag a card to another column to change its status. Filter by assignee or priority. Overdue tasks are marked in red.
Select a card to open it: the task panel has its details, files, comments and history.
Tip: Assignees are reminded the day before a task is due, and again when it's overdue.
3. Or use the list
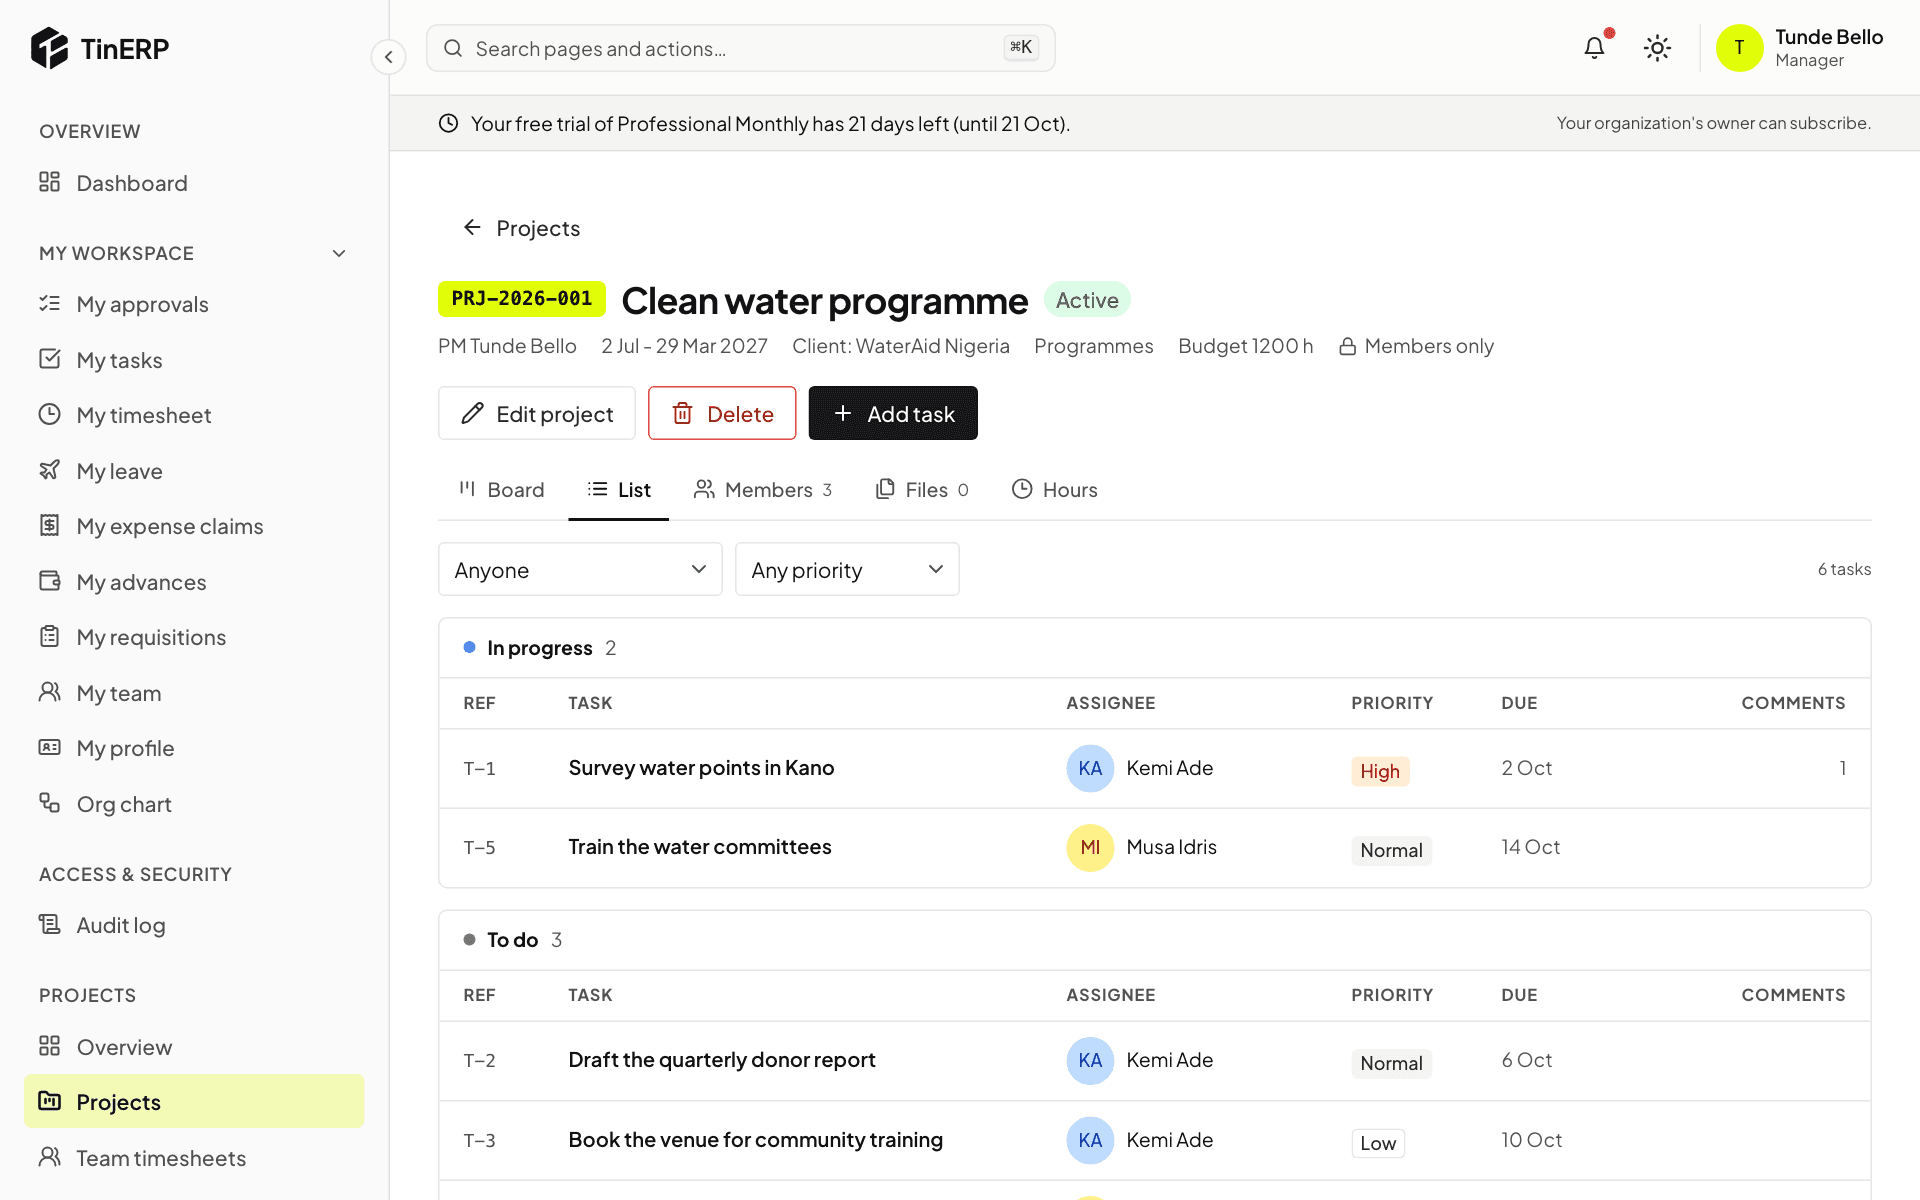
List shows the same tasks grouped by status, with their assignee, priority, due date and comments.
The project's tasks as a list, grouped by status
Projects · Admins · about 4 min
Set up timesheets
These settings apply to everyone's timesheets. Leave (from HR), public holidays and weekends are filled in on everyone's timesheet by themselves.
1. Choose the period
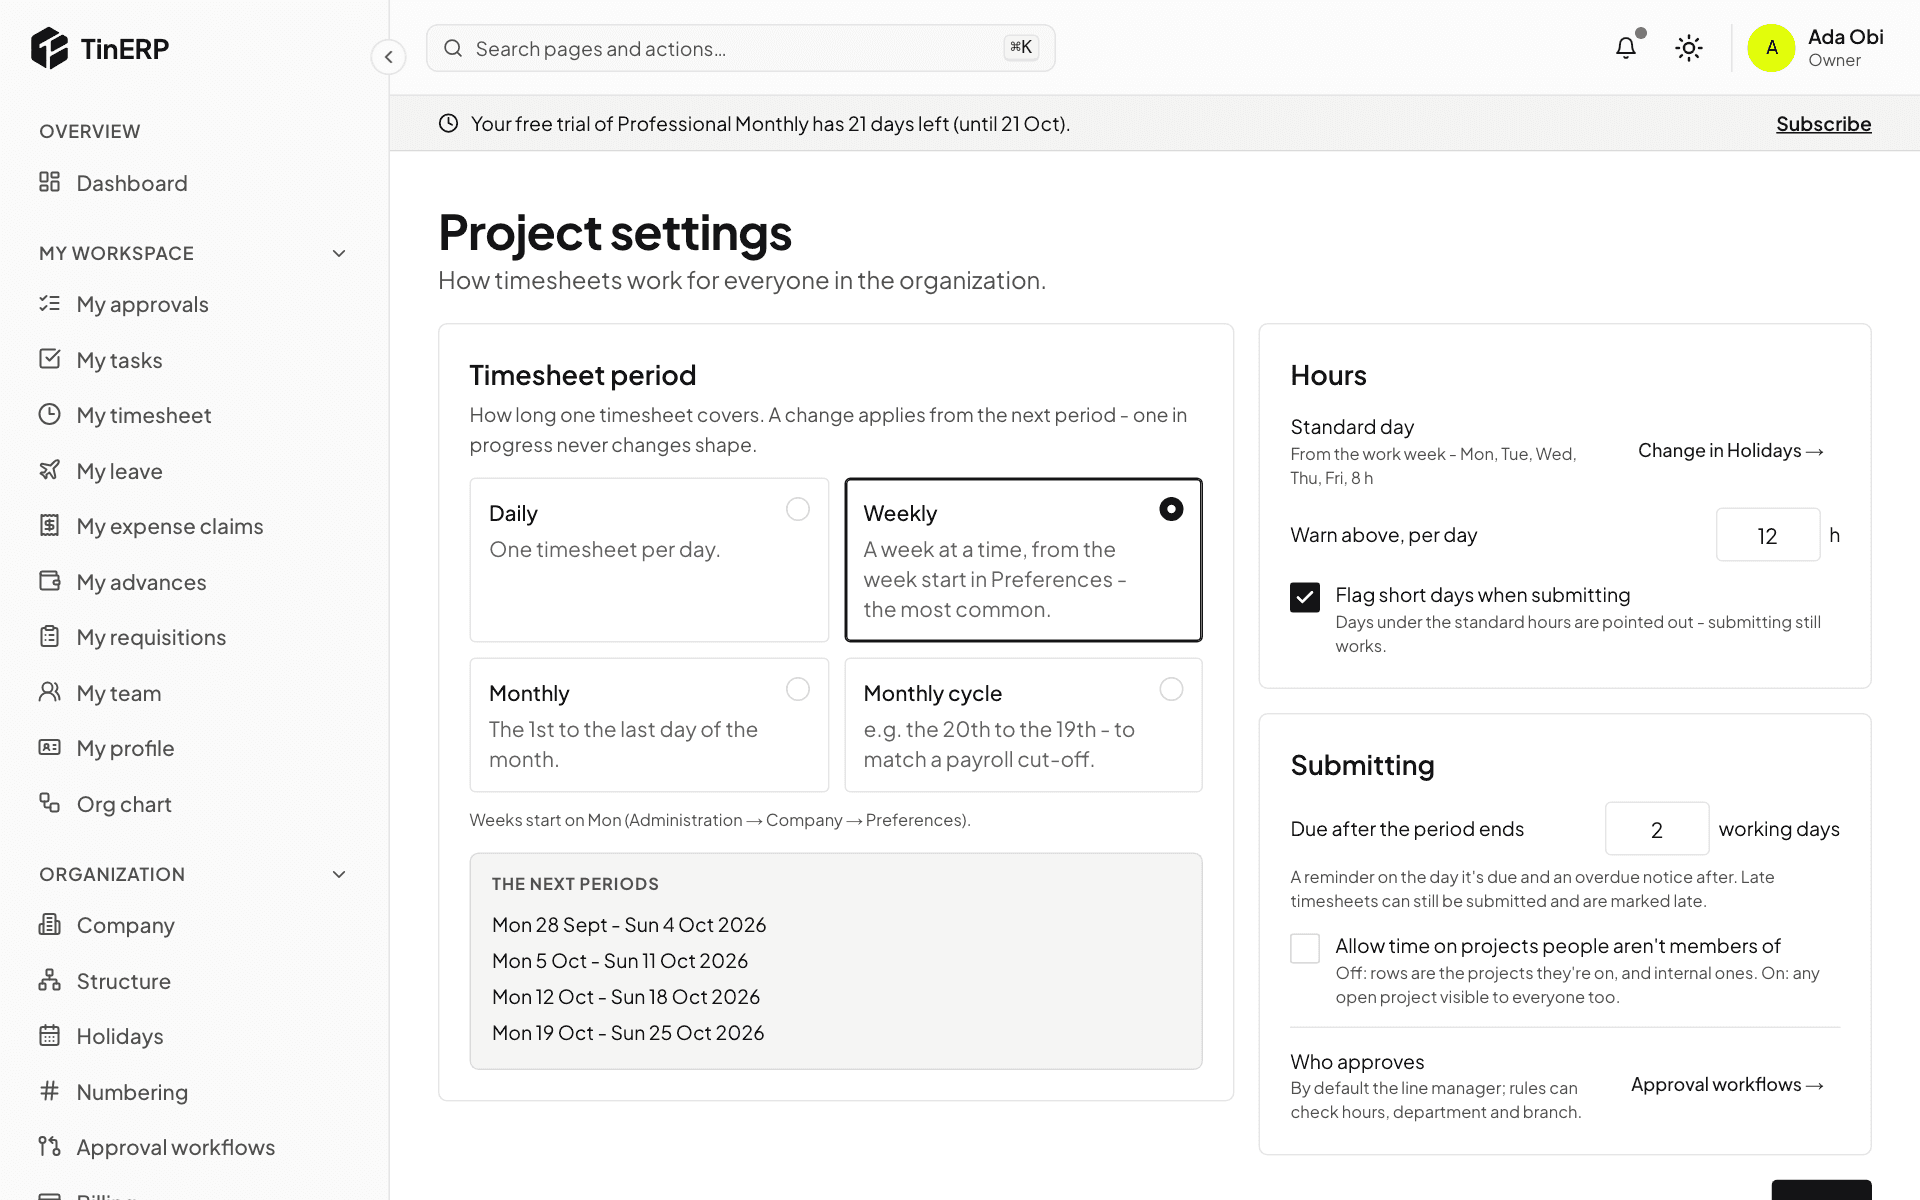
Go to Projects → Project settings. Under Timesheet period, choose Daily, Weekly, Monthly or Monthly cycle - for example the 20th to the 19th, to match a payroll cut-off. The next periods shows what people will see.
A change applies from the next period; one in progress never changes shape.
Project settings: the timesheet period, hours and submitting
2. Set the hours rules
The standard day comes from your work week, set in Organization → Holidays. Choose when to warn about long days (Warn above, per day), and whether to Flag short days when submitting.
3. Deadline and approval
Under Submitting, choose how many working days after a period ends timesheets are due. People get a reminder on the day and an overdue notice after; late timesheets can still be submitted and are marked late.
Tick Allow time on projects people aren't members of if you want people to log time freely. Who approves links to Approval workflows - by default, each person's line manager.
Projects · Project managers · about 4 min
Follow progress and hours
Hours come from timesheets: approved ones, and - where you choose - those still waiting for approval.
1. Start from the overview
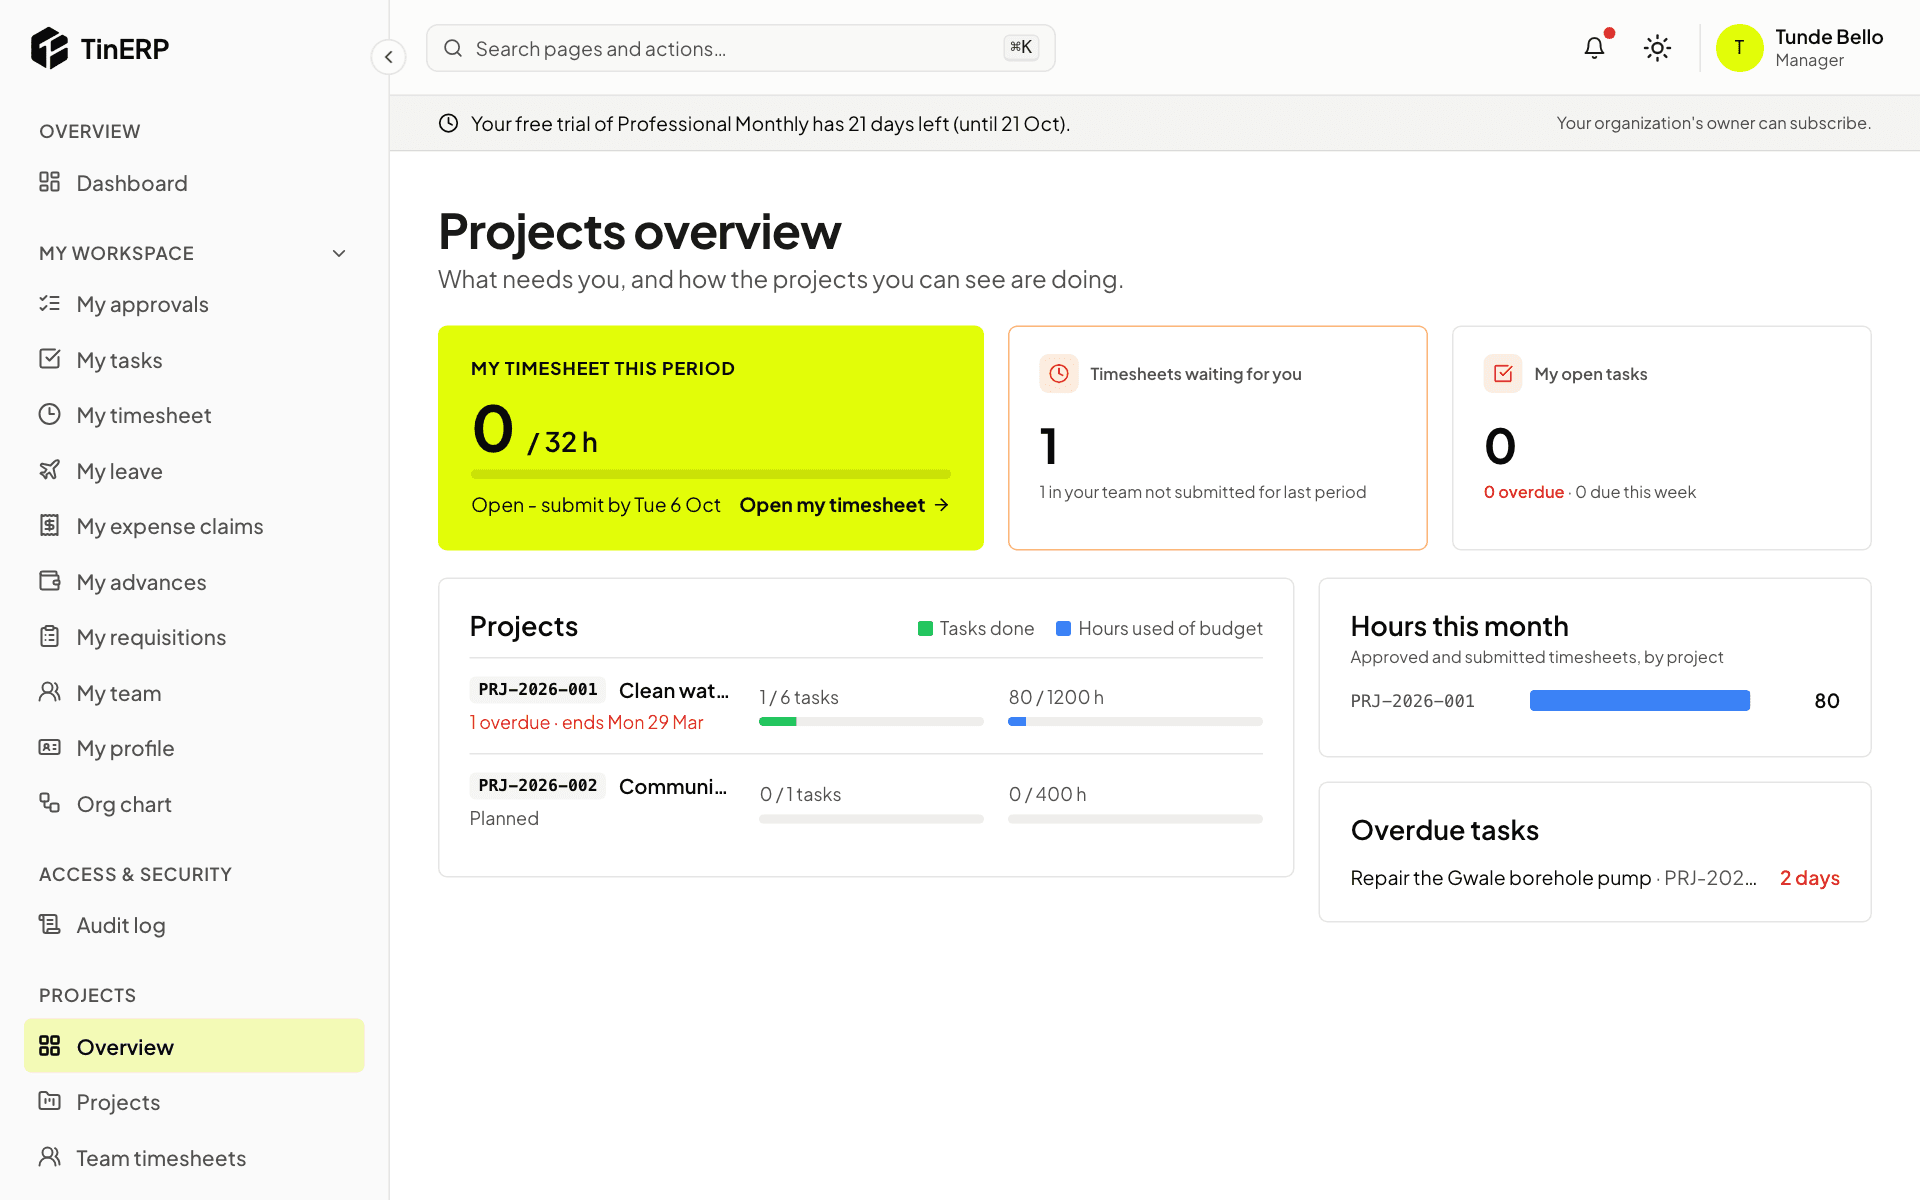
Projects → Overview shows your timesheet this period, timesheets waiting for you, your open tasks, and each open project's tasks done and hours used of budget - red above 90%. Hours this month and overdue tasks are alongside.
The Projects overview: my timesheet, timesheets waiting, projects with tasks done and hours used of budget
2. A project's hours
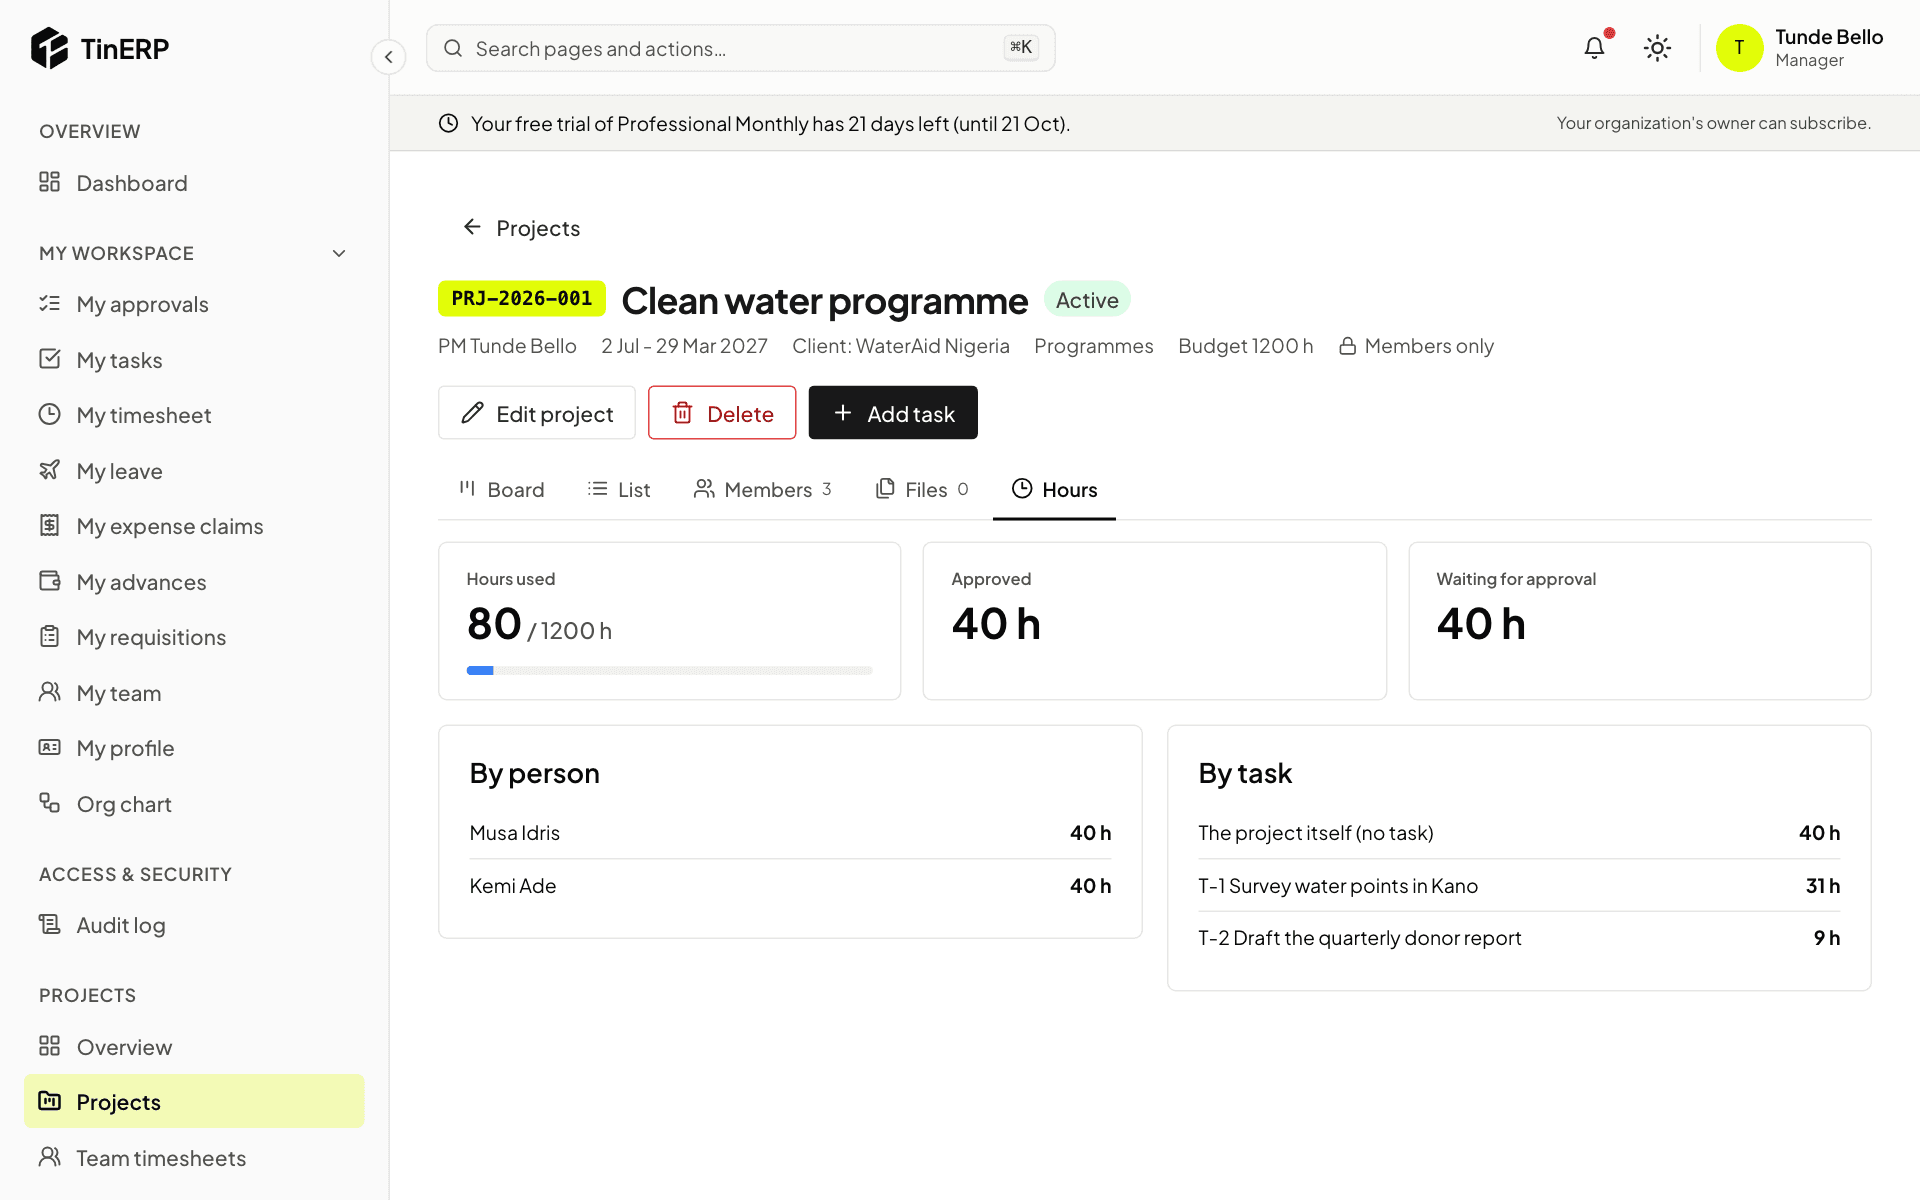
On a project, Hours shows approved and waiting hours against its budget, by person and by task.
The Hours tab of the Clean water programme
3. Reports
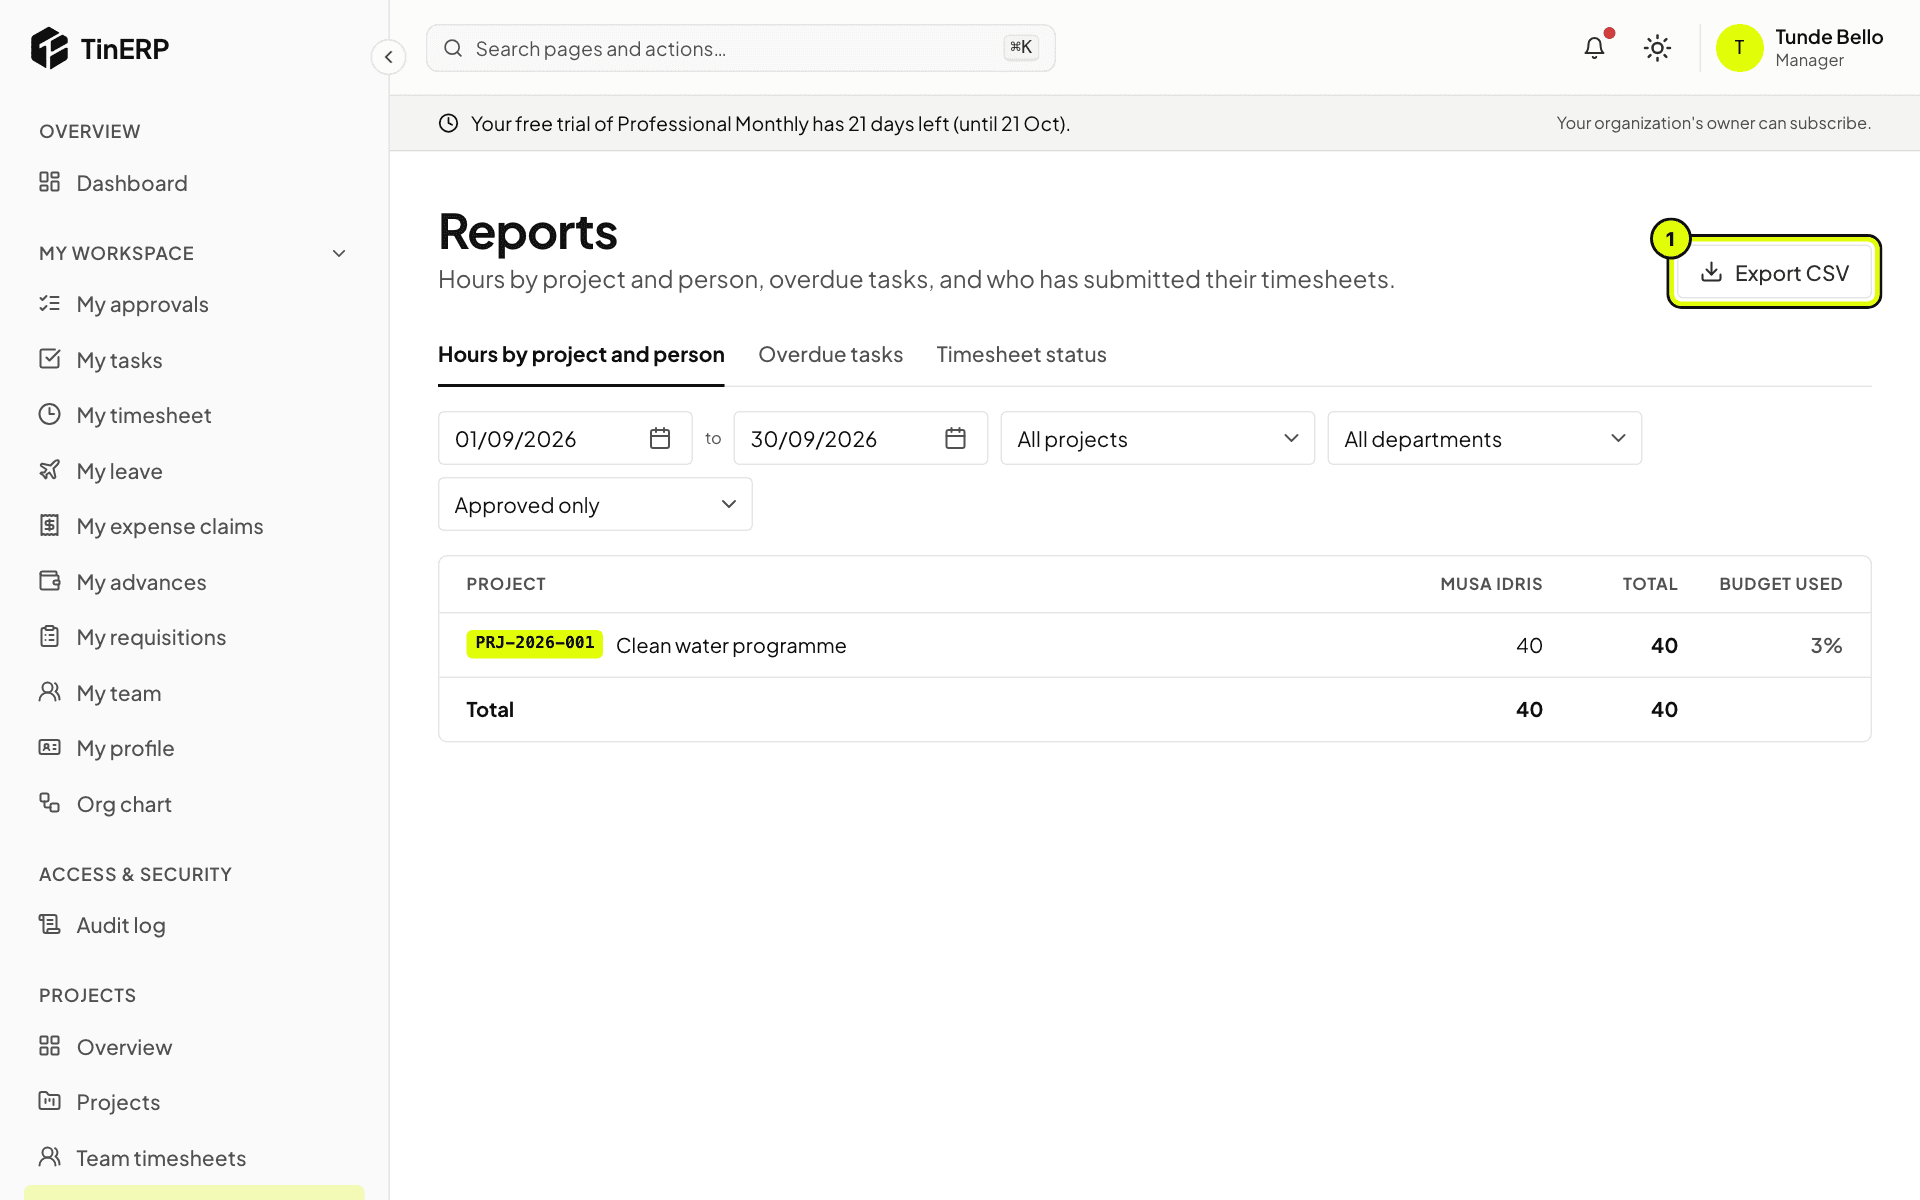
Go to Projects → Reports. Hours by project and person covers any dates - approved only, or with those waiting - with each project's budget used. Export CSV (1) downloads it.
Overdue tasks lists them by project and assignee. Timesheet status shows who has submitted each period, and who is missing once the deadline has passed.
Projects reports: hours by project and person, with Export CSV marked 1
Finance · Finance teams · about 5 min
How Finance works
Finance keeps your organization's books: its accounts, what it's owed and owes, its bank and cash, its taxes, budgets, funds and grants - and the financial statements that come out of them. If you don't have a finance background, these ideas are all you need to follow the rest of this chapter.
1. The ideas behind it
Double entry. Every transaction is recorded in at least two accounts, and the debits always equal the credits. Paying ₦50,000 rent: Rent is debited, Bank is credited. TinERP won't post anything that doesn't balance.
Journals. Each transaction is a journal entry. Invoices, bills, payments, claims and advances all create journals behind the scenes; you write journals yourself only for adjustments.
Posted means final. A posted journal is never edited or deleted. A mistake is corrected with a reversal linked to the original, so the history stays - auditors require it.
Periods. Books are kept by month. A closed month can't change, so figures already reported don't quietly move.
Control accounts agree with their detail.Trade receivables always equals the unpaid customer invoices; Trade payables the unpaid bills; the same for VAT, WHT and employee advances. Only their own documents post to them.
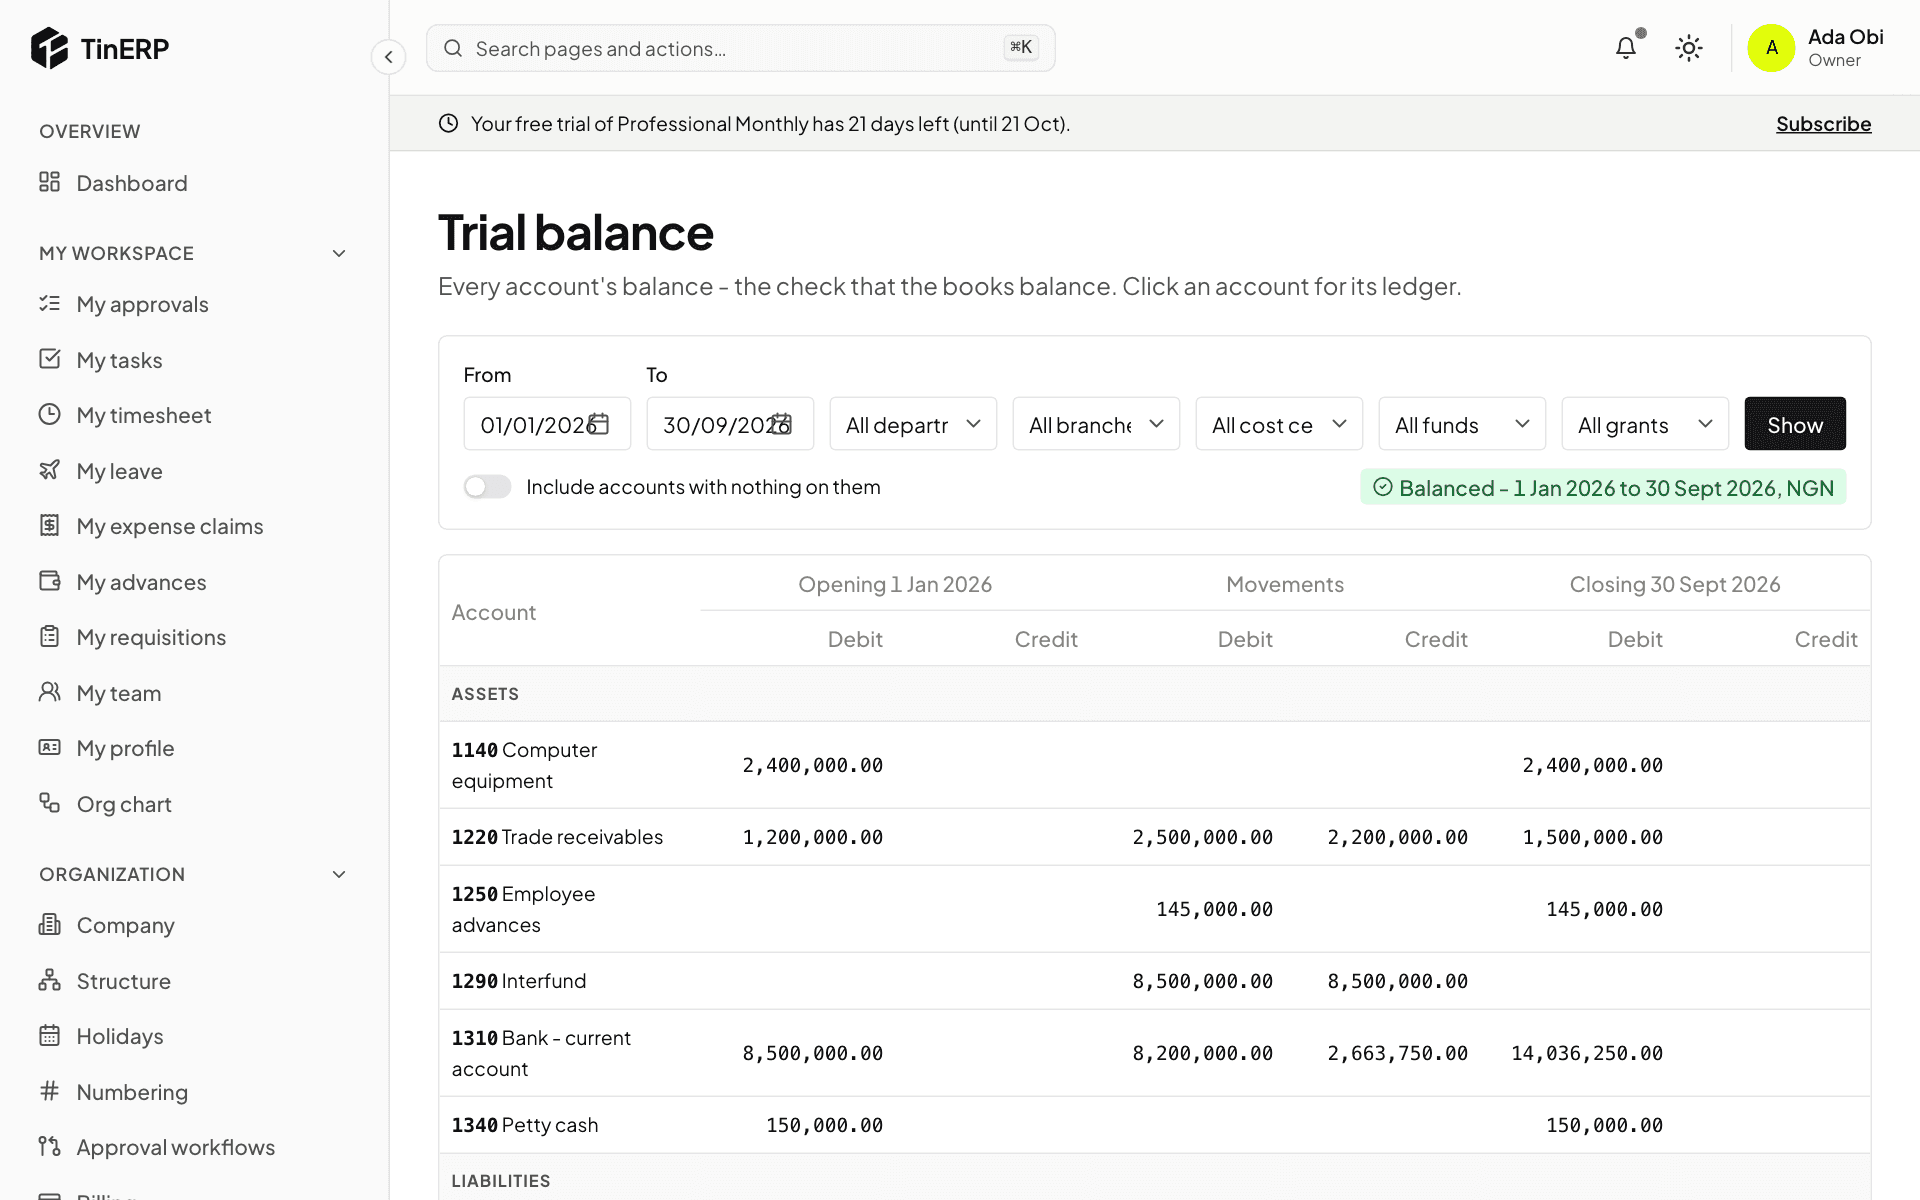
The trial balance from 1 January, balanced, with each account's opening balance, movements and closing balance
2. Who does what
Finance has its own permissions, so a team can split the work - for example one person enters bills, another pays them. The Admin role has them all except Reopen closed periods, which no role has until you give it.
Most organizations add roles such as an Accountant (the ledger, journals, invoices, bills) and a Finance manager (approvals, periods, budgets), and give Pay expense claims and Pay and settle advances to whoever pays people. See Roles and permissions.
Everyone else meets Finance through My expense claims and My advances, and managers through their approvals.
3. Where everything is
The Finance menu holds it all: Journals, Banking, sales (Sales invoices, Receipts, Customers, Aged receivables), purchases (Bills, Payments, Payment runs, Vendors (finance), Aged payables), Tax returns, Expense claims and Advances, Budgets and Budget vs actual, Prepayments and deferrals, Recurring journals, the reports (Financial statements, Trial balance), and the setup (Opening balances, Chart of accounts, Periods, Finance settings).
Questions
Finance says it isn't set up yet.
Someone who can manage accounting setup does it once, from Finance → Chart of accounts - see Set up Finance. Until then the other Finance pages explain it rather than working.
Finance · Finance managers · about 10 min
Set up Finance
Before you start, check Organization → Company → Preferences: Finance keeps its books in the base currency and uses the fiscal year start from there, and both are hard to change later.
1. Set Finance up
Go to Finance → Chart of accounts. The first time, it asks three things:
What kind of organization is this?Business, or Not-for-profit (NGO) - an NGO gets funds and grants, and statements by fund. Which reporting framework?IFRS for SMEs for most small and medium organizations, IFRS Accounting Standards for public-interest entities, or Another framework your accountant has approved. Start from the ready-made chart (recommended - reviewed for Nigerian organizations) or a blank one.
Select Set up Finance. TinERP creates the chart of accounts and this financial year's twelve months - and for an NGO, the General fund.
2. Check your accounting policies
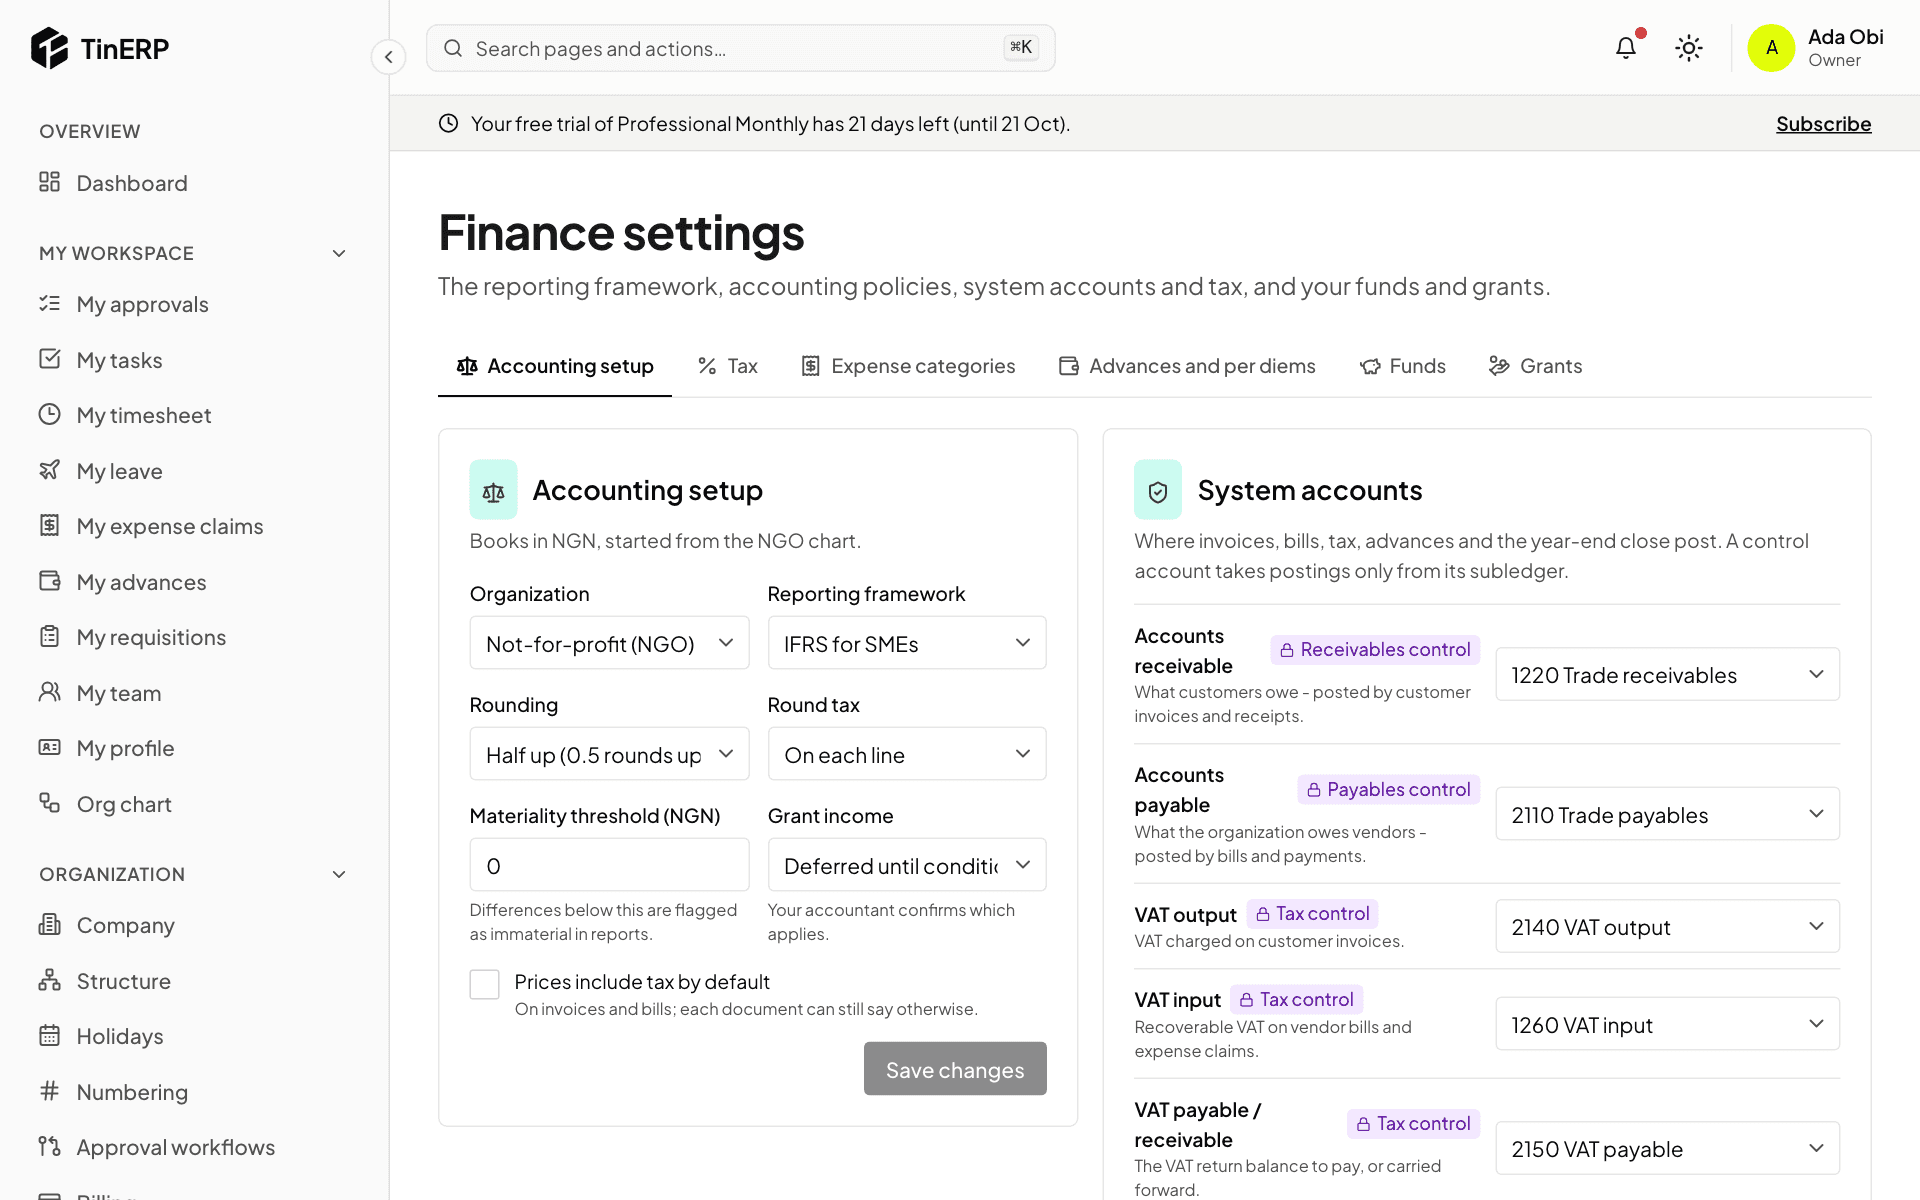
Go to Finance → Finance settings. Accounting setup holds the framework, rounding, how tax is rounded (on each line or the document), the materiality threshold, whether prices include tax by default and - for NGOs - when grant income is recognised. Your accountant confirms these.
System accounts are where invoices, bills, tax, advances and the year-end close post. The ready-made chart fills them all in. Every change asks for a reason, kept in the audit log.
Finance settings: Accounting setup and the system accounts
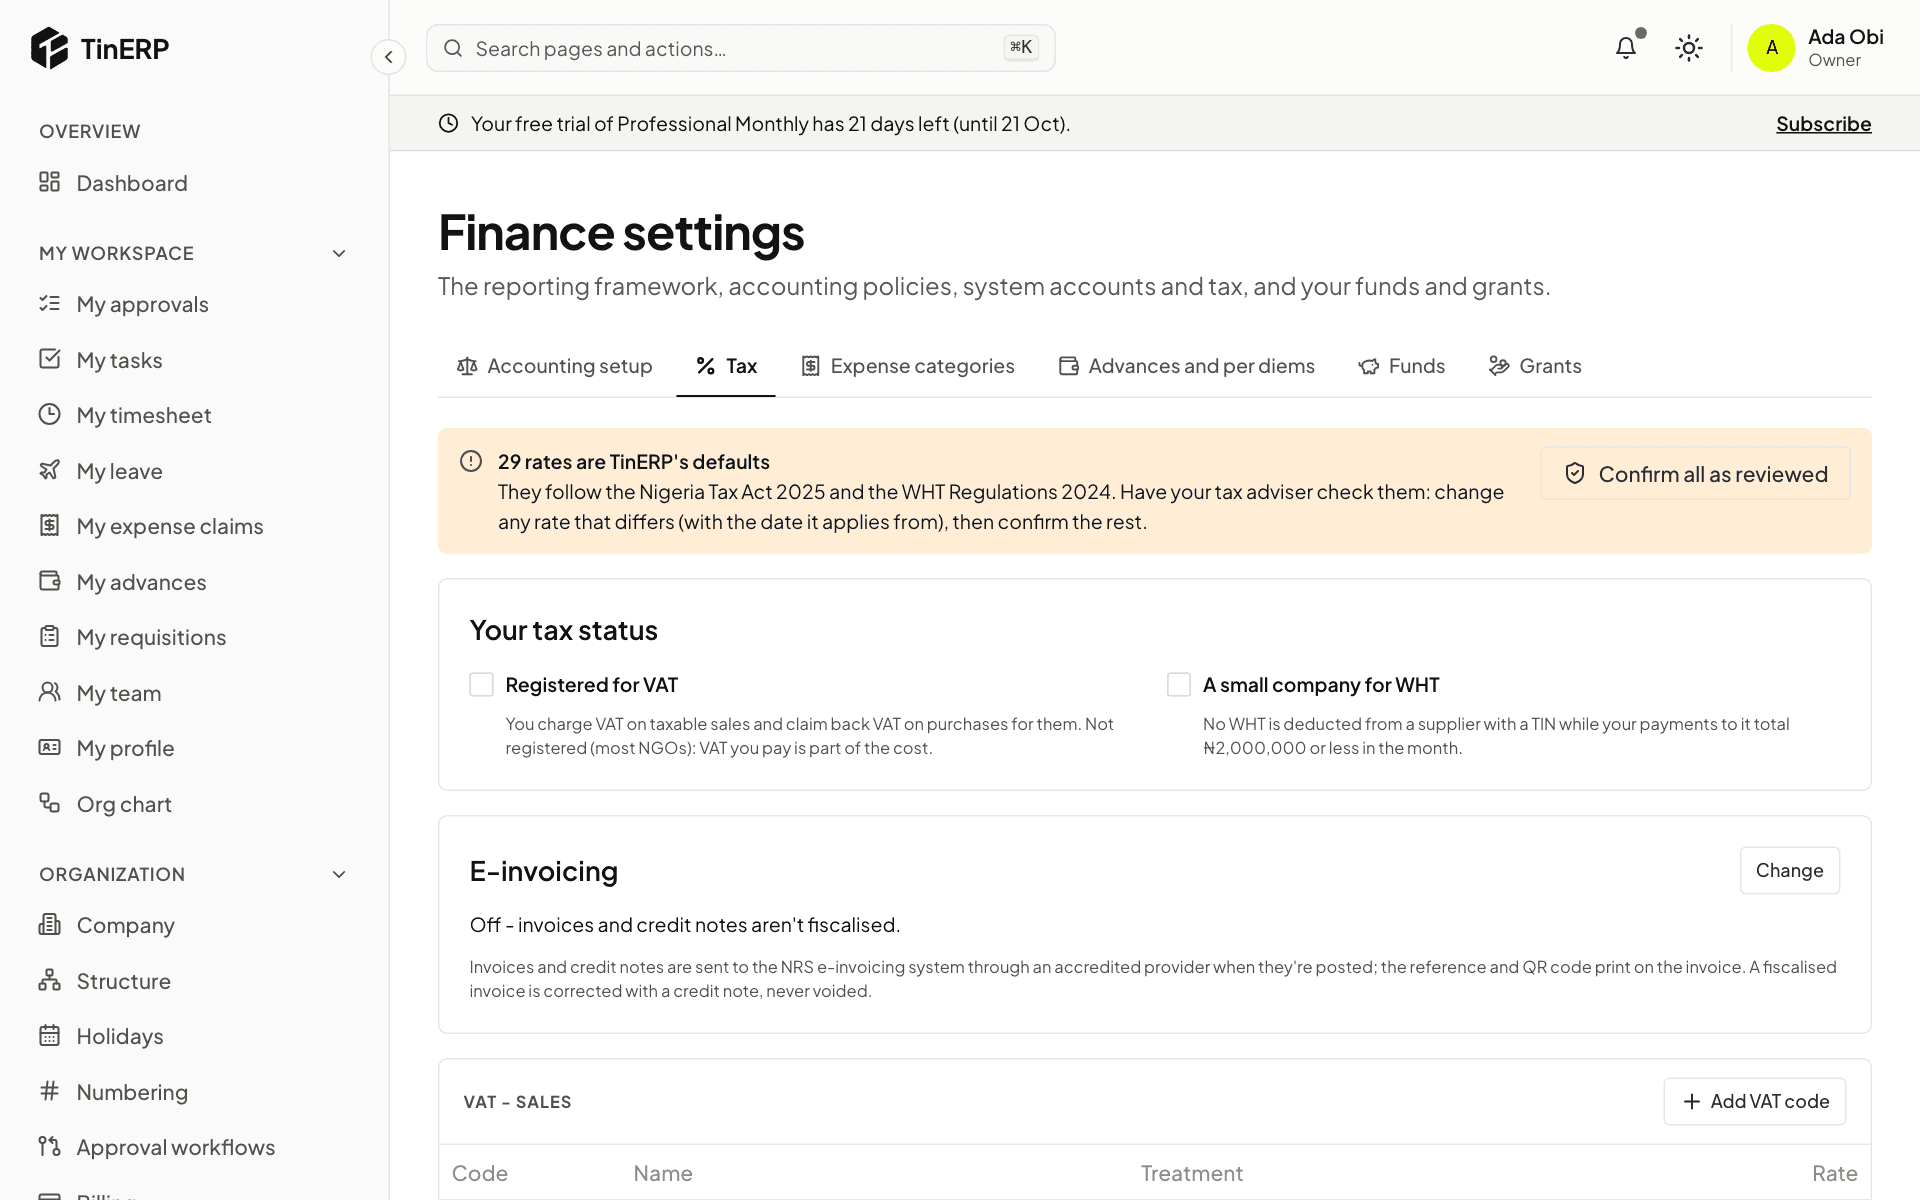
3. Set your tax status and check the rates
Under Tax, tick Registered for VAT if you are - then you charge VAT on taxable sales and claim it back on purchases. Most NGOs aren't: VAT they pay is part of the cost. Tick A small company for WHT if it applies.
TinERP comes with Nigeria's VAT codes and WHT rates. Have your tax adviser check them, change any that differ (with the date the new rate applies from), then Confirm all as reviewed.
Finance settings → Tax: the default rates to review, your tax status and e-invoicing
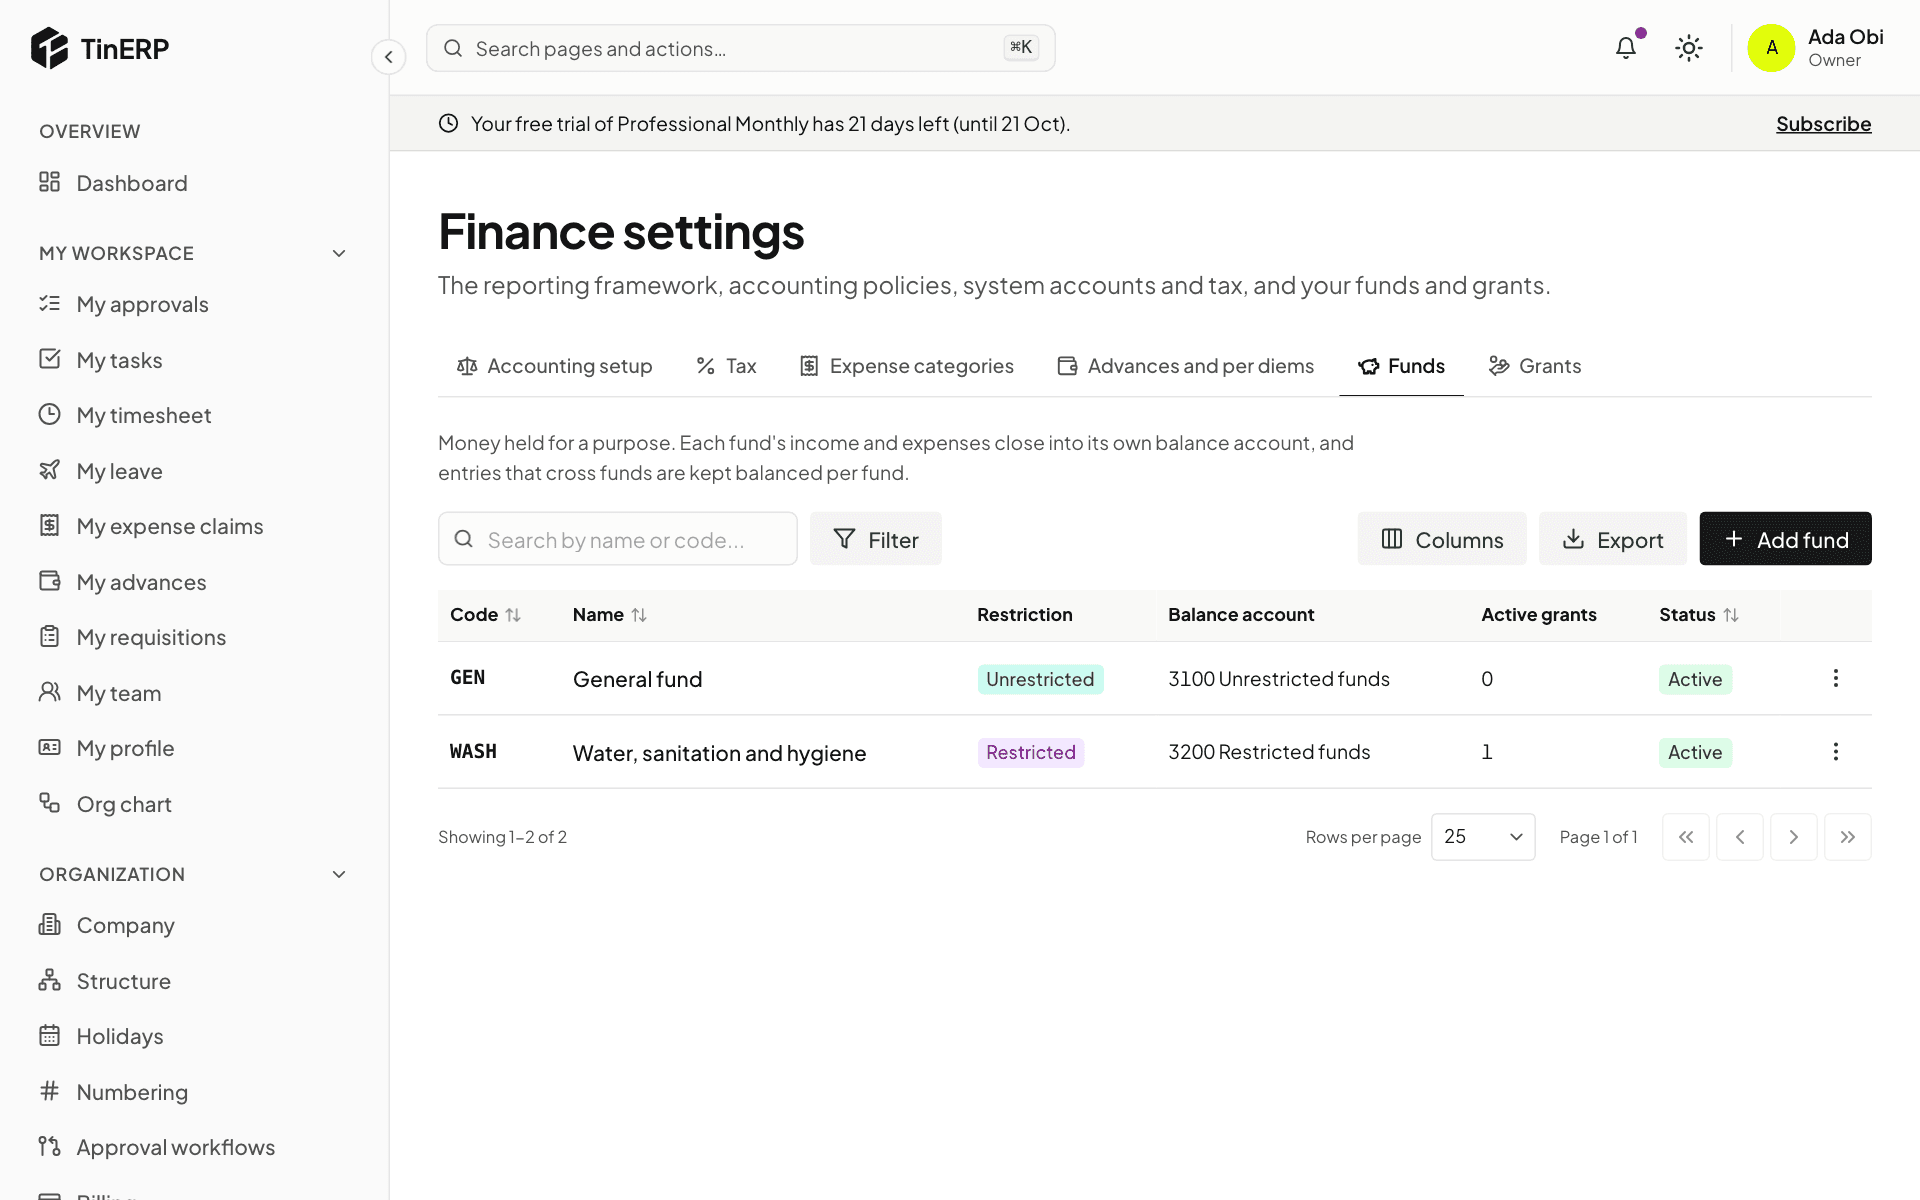
4. NGOs: add your funds and grants
Under Funds, add each pot of money held for a purpose: restricted (a donor limits what it's spent on), unrestricted or endowment, each with the equity account its balance is kept in.
Under Grants, add each donor award: the donor, reference, the fund it belongs to, the amount in the award's own currency, and its dates. Tagging spending with the grant is what makes donor reports come straight from the books.
Finance settings → Funds: the General fund and a restricted WASH fund
5. Check the periods
Go to Finance → Periods. Your financial year is there as twelve open months. Open the next year before its first month starts - nothing can be posted into a year that doesn't exist yet.
Tip: Bringing in balances from an old system? That's next - see Opening balances.
Finance · Finance managers and accountants · about 5 min
The chart of accounts
The chart of accounts is the list of every account the books use, grouped under headers by type: assets, liabilities, equity (funds for NGOs), income and expenses.
1. Read the chart
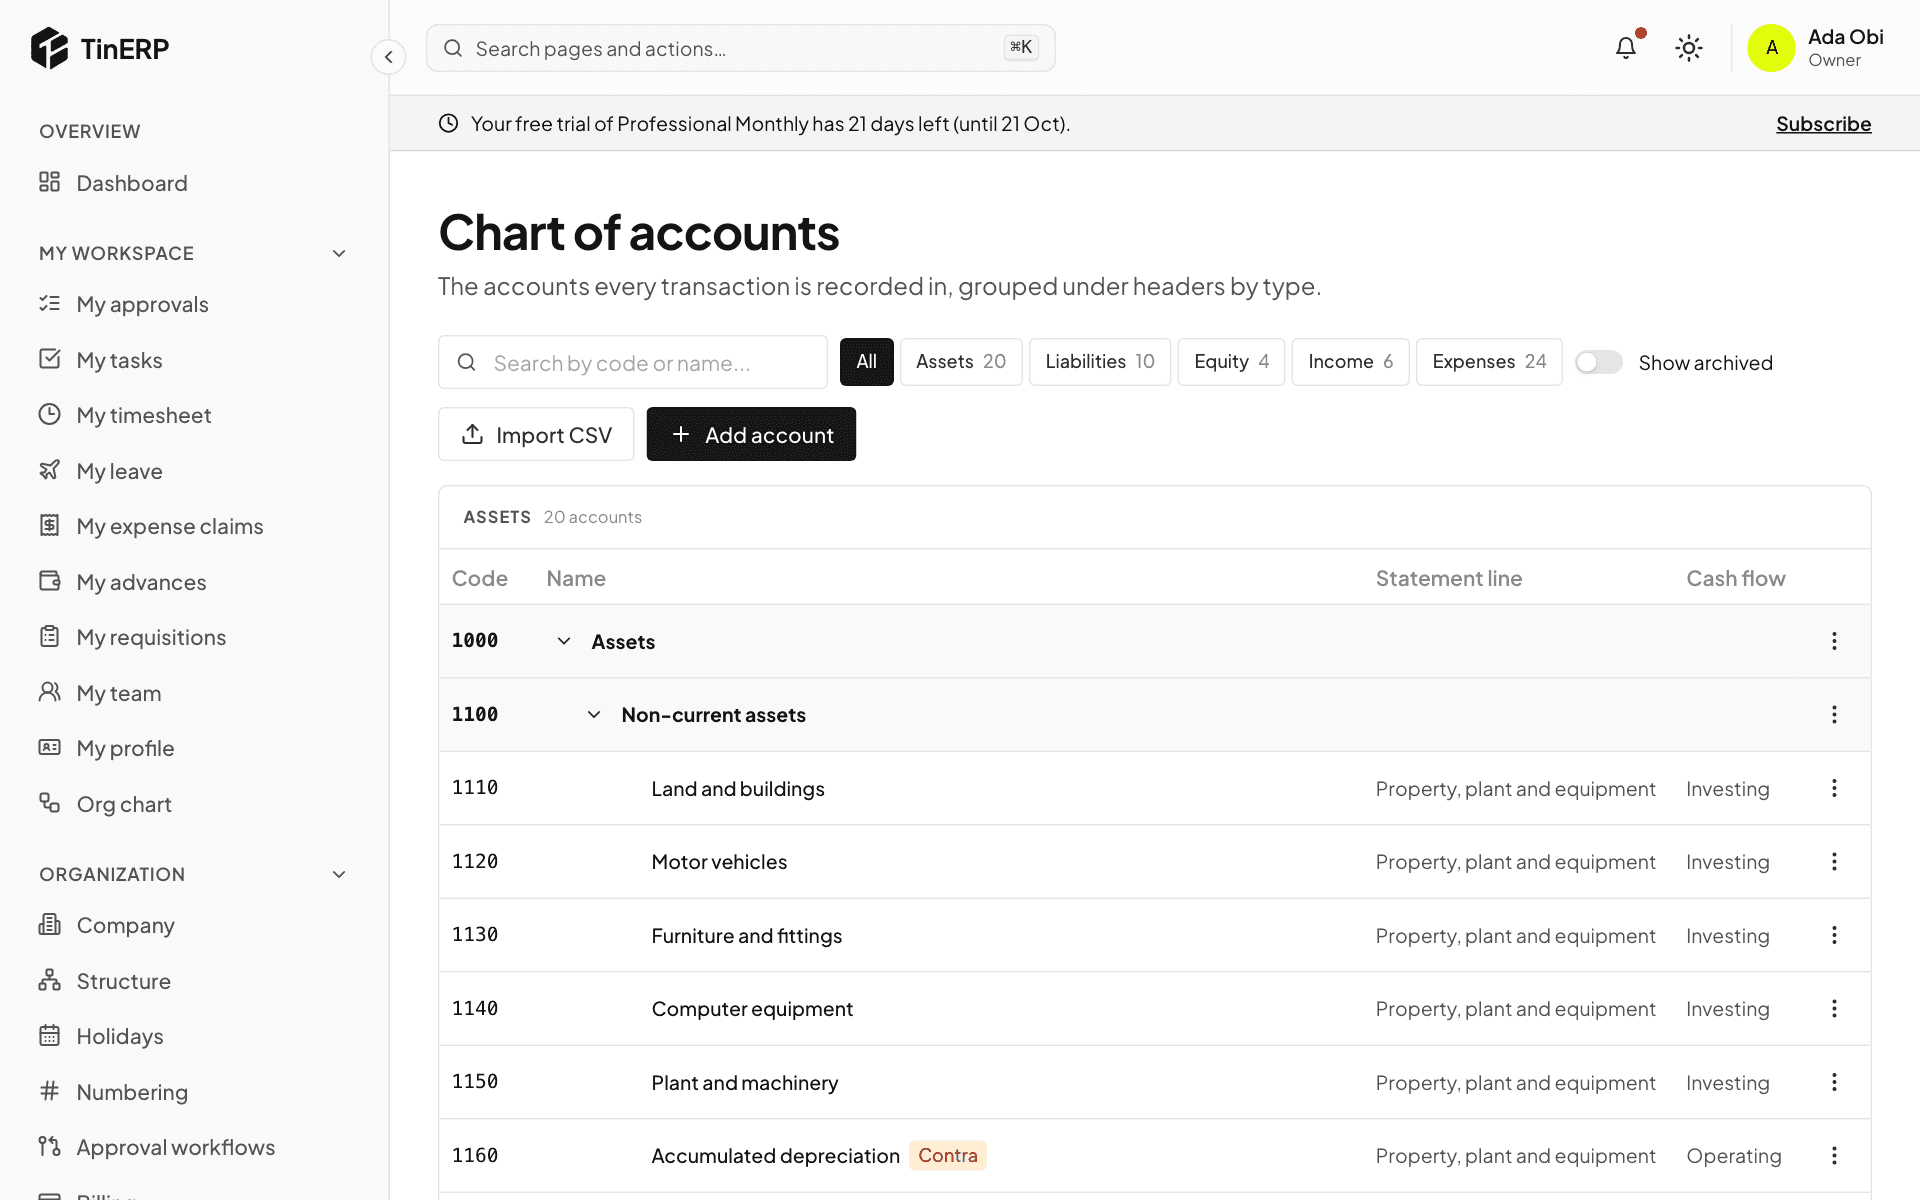
Go to Finance → Chart of accounts. Codes group accounts: 1xxx assets, 2xxx liabilities, 3xxx equity or funds, 4xxx income, 5xxx-6xxx expenses. Headers group other accounts and are never posted to.
Badges show how an account behaves: a control account takes postings only from its own documents; a Contra account's balance is the opposite of its type (accumulated depreciation). Each account shows its Statement line and Cash flow category. Select an account's name to open its ledger.
The chart of accounts: assets under headers, with statement lines and cash flow categories
2. Add or change an account
Select Add account, or use a header's menu to add one under it. Give it a code in the chart's numbering, a name, its type and the header it sits under, whether journals may post to it, and where it goes in the statements.
Dimensions on its lines make reports useful: for each of department, branch and cost center (and fund and grant for NGOs), choose Required, Optional or Not allowed. With department required on salaries, you can see payroll by department.
Accounts are never deleted: use the menu to Archive one. You can't archive a system account, or a header with active accounts under it.
3. Import a chart
Import CSV adds many accounts at once - for example your old system's chart. Every row is checked first; if any is wrong, nothing is imported and you're told which rows to fix.
Finance · Finance managers and accountants · about 5 min
Opening balances
If your organization existed before TinERP, start from your last trial balance in the old system - and the invoices, bills and advances still open.
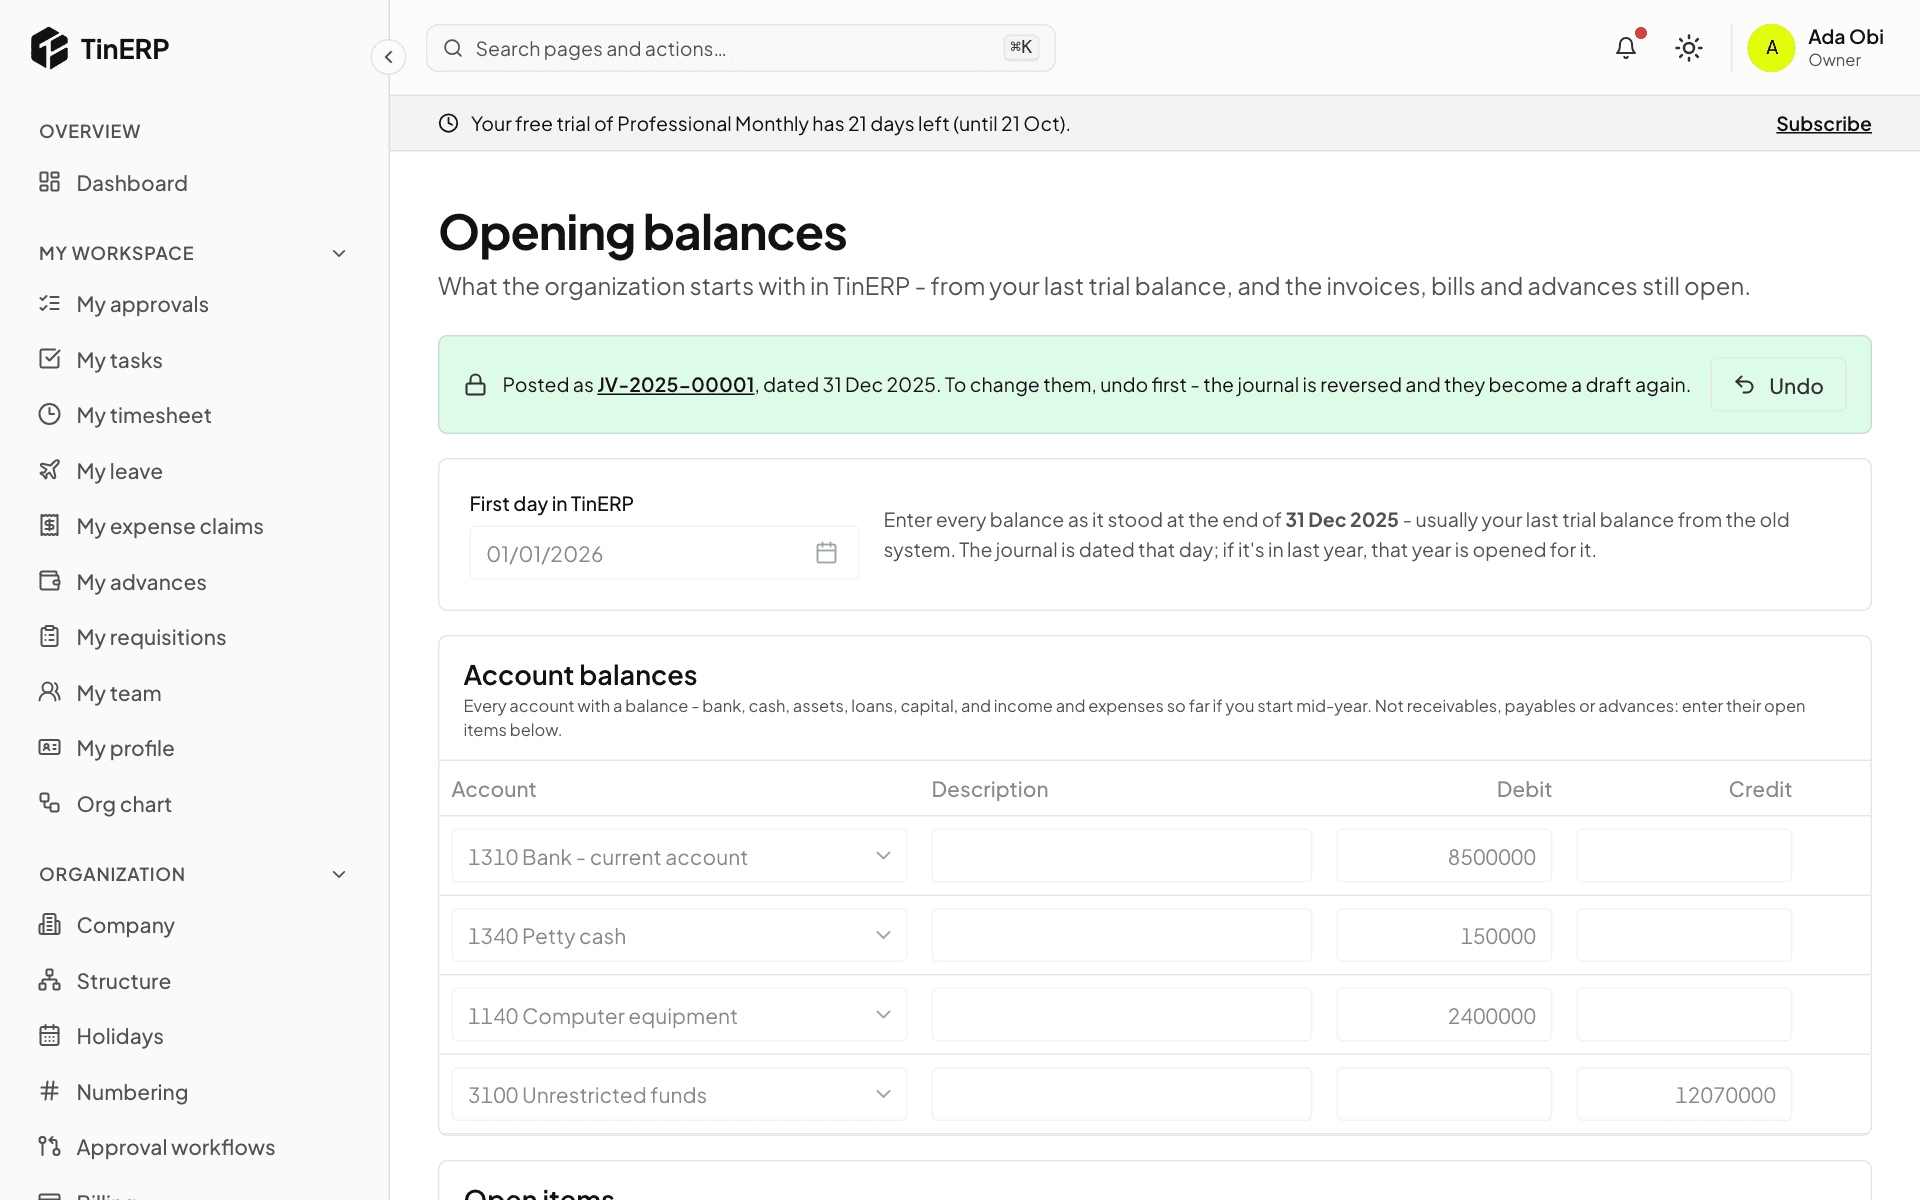
1. Enter the balances
Go to Finance → Opening balances. Choose your First day in TinERP - usually the start of the financial year. Balances are as they stood the day before.
Under Account balances, enter every account with a balance - bank and cash, equipment, loans, funds or capital, and income and expenses so far if you start mid-year. Debits on the left, credits on the right.
Opening balances posted, with the first day in TinERP and the account balances
2. Add the open items
Receivables, payables and advances aren't one figure: under Open items, enter each unpaid customer invoice, unpaid vendor bill and unretired advance, with its number, date and what's outstanding. TinERP adds them up into the control accounts, and later each one can be paid or received against.
Both parts can be imported from CSV: Template gives you the columns, Import CSV reads them back.
3. Post them
The footer shows whether debits equal credits. Save draft as you go, and Save and post when it balances. It posts one journal dated the day before your first day.
Found a mistake later? Undo (with a reason) reverses the journal and makes the balances a draft again.
Finance · Accountants · about 6 min
Journals
Most journals are made for you by invoices, bills, payments, claims and advances. You write your own for adjustments - accruals, depreciation, corrections, reclassifications.
1. Write a journal
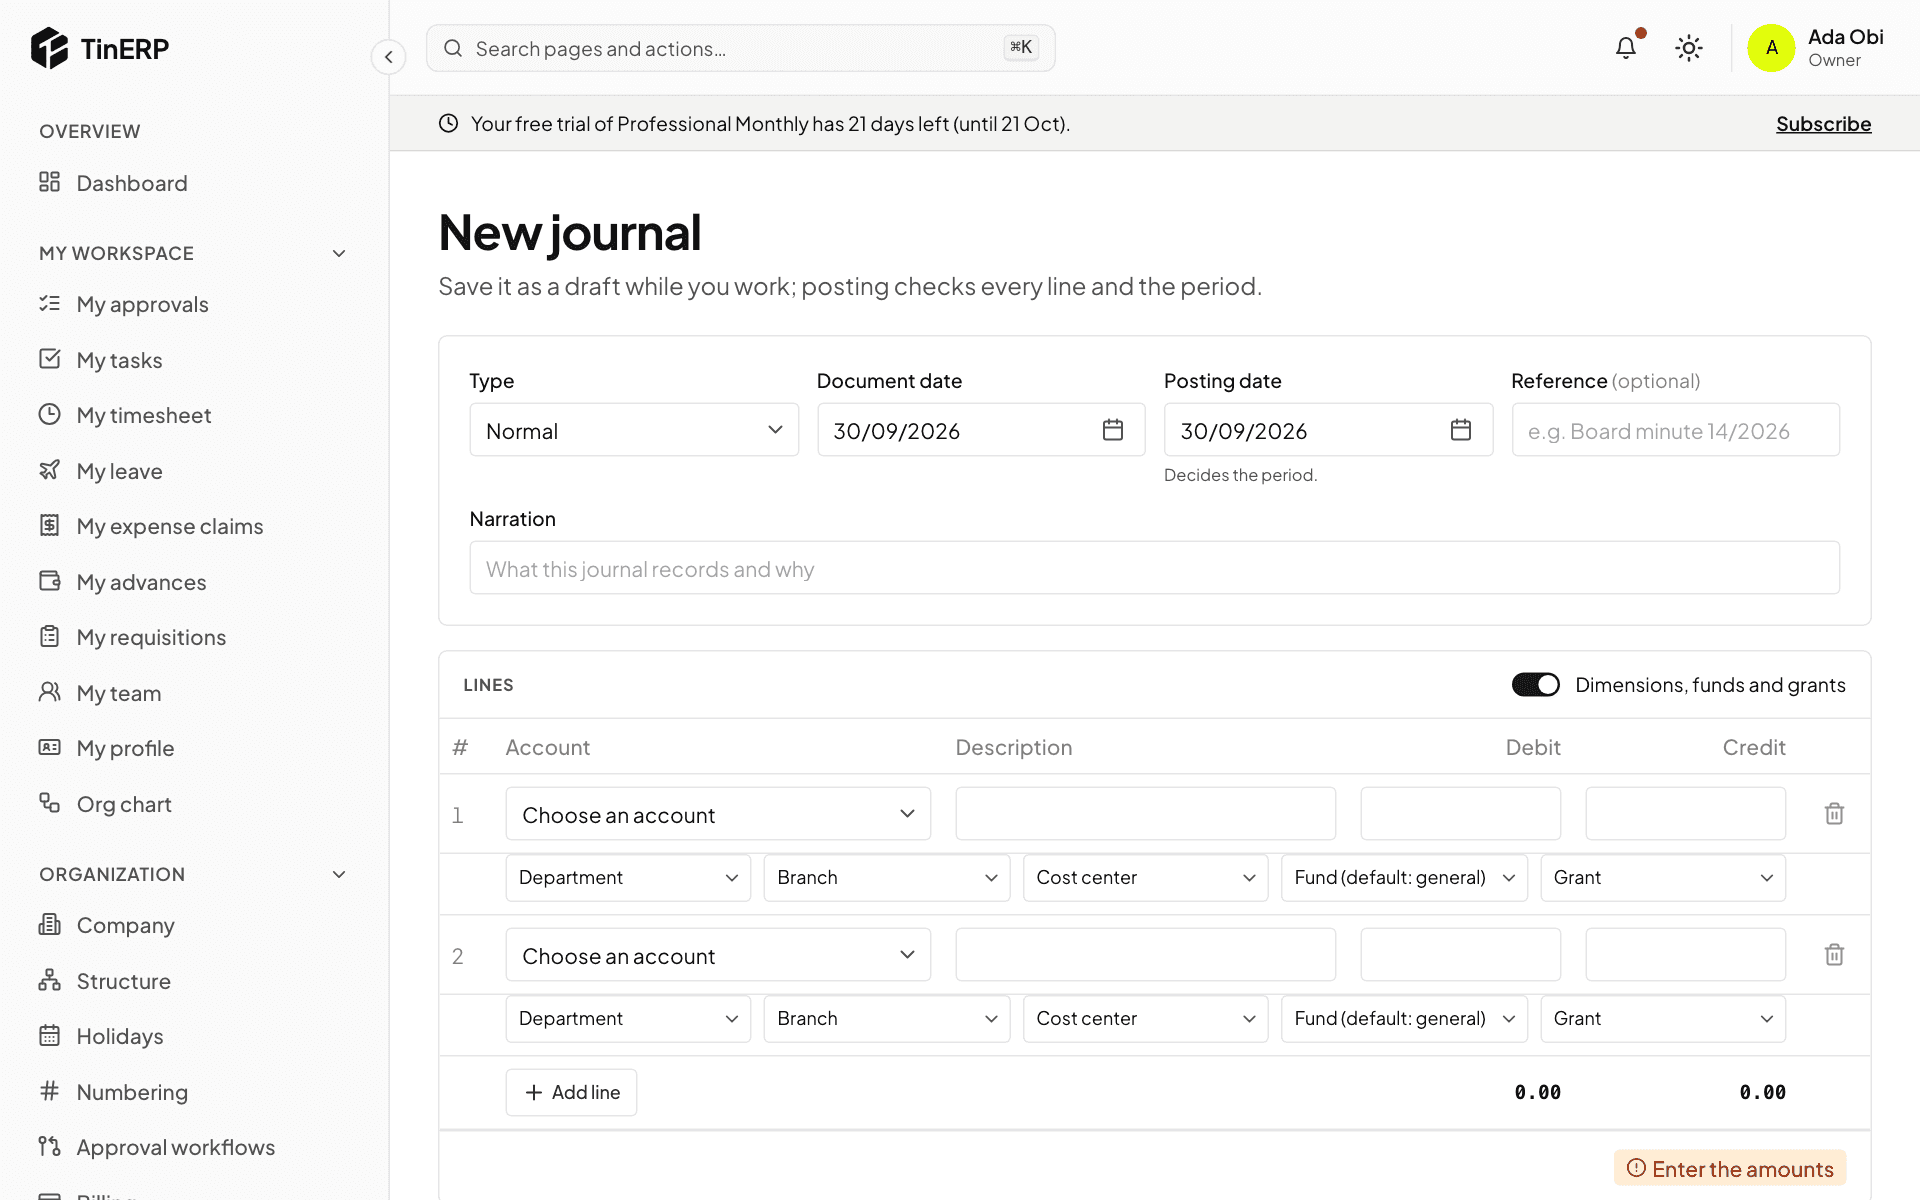
Go to Finance → Journals and select New journal. Choose the Type - usually Normal; Accrual for a cost used but not yet billed, Correction, Reclassification, Adjustment, or for NGOs a transfer between funds.
The Document date is on the paperwork; the Posting date decides the month it counts in. Add a Reference and a Narration someone can understand in two years, then the lines: an account, and a debit or a credit on each.
Turn on Dimensions, funds and grants to tag lines; required ones are marked. Control accounts aren't offered - they change only through their own documents.
A new journal: type, dates, reference, narration and lines with dimensions
2. Save or post it
Save draft keeps it to finish later - a draft may not balance yet. Save and post checks every line and that the month is open, then posts it.
By default journals post at once. Your organization can require approval - for example over ₦1,000,000, or any journal touching fund balances - in Organization → Approval workflows → Manual journal. Nobody approves their own.
3. Reverse a mistake
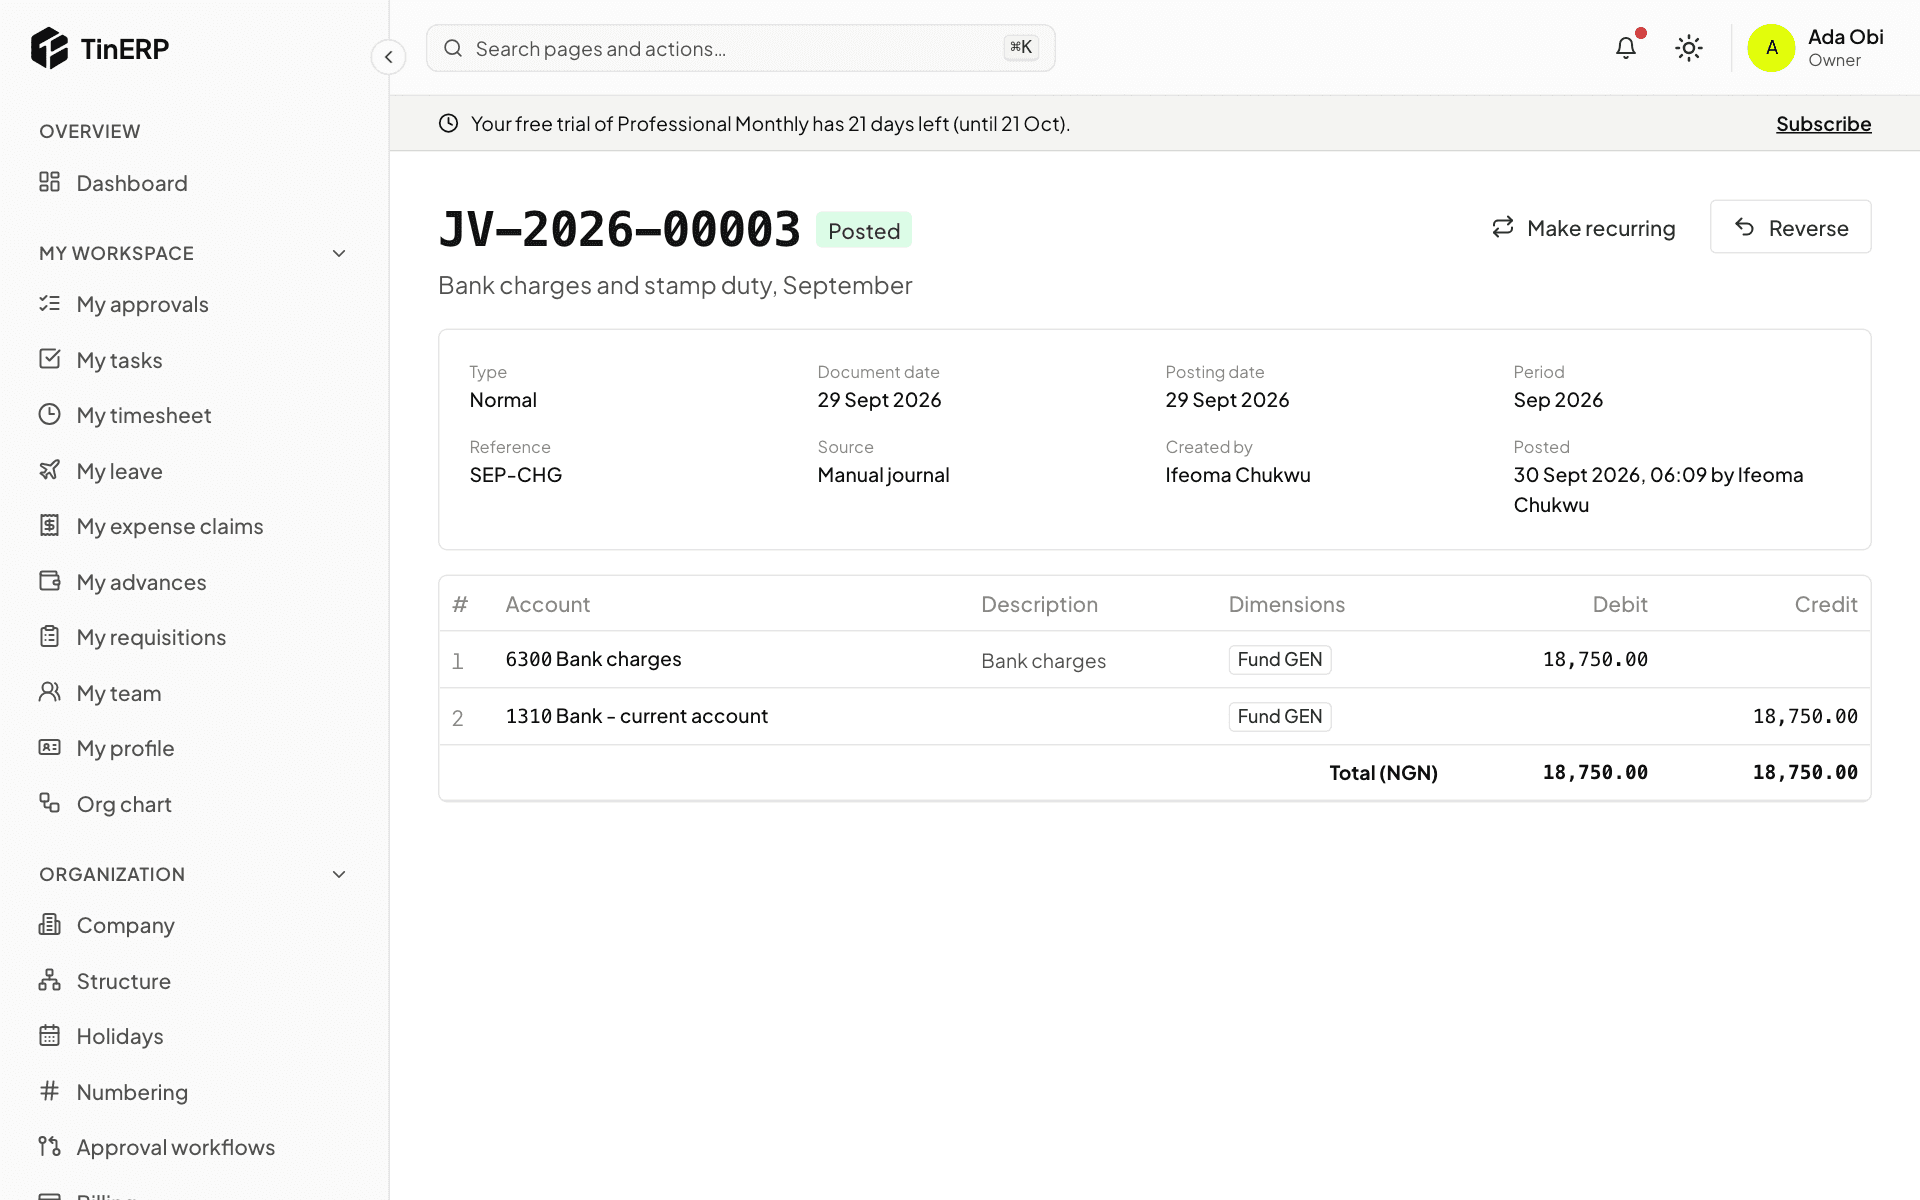
Open the posted journal and select Reverse. Choose the reversal date and give a reason: a new journal is posted with every line on the other side, and both are linked. Then post the correct one.
Journals made by invoices, bills and other documents are corrected in those documents instead - a credit note, a void, a retirement.
A posted journal with Make recurring and Reverse
4. Journals that repeat
For rent, depreciation or standing charges, open a journal and select Make recurring: every month, quarter or year, on a day you choose, from a start date until an end date if there is one. Tick Post each one automatically, or leave each as a draft for someone to check.
Finance → Recurring journals lists them; pause, resume or end them there.
Tip: An Accrual can reverse itself on the first day of next month - so when the real bill arrives, the cost isn't counted twice.
Finance · Accountants · about 5 min
Everyday journal examples
Most transactions come from invoices, bills, payments, claims and advances. These are the ones you journal yourself. Codes are from TinERP's ready-made charts - the same in the business and NGO charts, except where only the name is given.
1. Common transactions
Each of these is one Normal journal with two lines, unless it says otherwise.
Transaction
Debit
Credit
Buy laptops for ₦4,800,000
1140 Computer equipment
1310 Bank - current account
Pay quarterly rent of ₦1,500,000
6200 Rent and rates
1310 Bank - current account
Bank loan of ₦15,000,000 received
1310 Bank - current account
2210 Long-term loans
Repay ₦500,000 of the loan
2210 Long-term loans
1310 Bank - current account
Withdraw ₦400,000 for cash on hand
1330 Cash on hand
1310 Bank - current account
Diesel of ₦250,000 paid in cash
6220 Diesel and generator
1330 Cash on hand
Monthly depreciation of ₦370,000 (type Adjustment)
6320 Depreciation
1160 Accumulated depreciation
A donation of ₦2,000,000 received (NGO)
1310 Bank - current account
Donations
Owners put in ₦25,000,000 (business)
1310 Bank - current account
Share capital
2. Payroll
Until TinERP's Payroll arrives, record each month's payroll as one journal. Gross salaries ₦4,000,000; PAYE withheld ₦360,000; pension 8% from staff (₦320,000) and 10% from the employer (₦400,000). Tag the salary line with the department.
Next month, when you remit them: debit 2170 PAYE payable ₦360,000 and 2180 Pension payable ₦720,000, credit 1310 Bank ₦1,080,000.
Account
Debit
Credit
6100 Salaries and wages
4,000,000
6110 Pension - employer contribution
400,000
2170 PAYE payable
360,000
2180 Pension payable (staff and employer)
720,000
1310 Bank - net pay to staff
3,320,000
3. A cost you've used but not been billed for
September's electricity, estimated at ₦210,000, not yet billed: type Accrual - debit 6210 Electricity and utilities, credit 2120 Accruals, with the automatic reversal left on. On 1 October the reversal is posted by itself; when the real bill is posted in October, September carries the cost and October only the difference.
4. NGOs: a programme cost paid from the general account
A ₦300,000 workshop for a donor-funded programme, paid from the general bank account: debit 5120 Workshops and trainings with the programme's grant on the line, credit 1310 Bank. The grant brings its fund, and when you post, TinERP adds two Interfund lines so each fund still balances - you don't add them yourself.
5. A mistake in a posted journal
A generator service posted to Diesel instead of Repairs: open the journal and Reverse it with a reason, then post a new Correction journal to the right account. The original, the reversal and the correction are linked, so auditors can follow them.
Finance · Accountants · about 6 min
Customers, invoices and receipts
Sales invoices are what you bill - for services, donor-funded work, rent or goods. Receipts are the money coming in against them.
1. Add the customer
Go to Finance → Customers and add them: name, type, TIN, whether they're VAT registered and whether they deduct WHT from what they pay you, contacts, payment terms, a credit limit if you want one, and the income account their invoices default to.
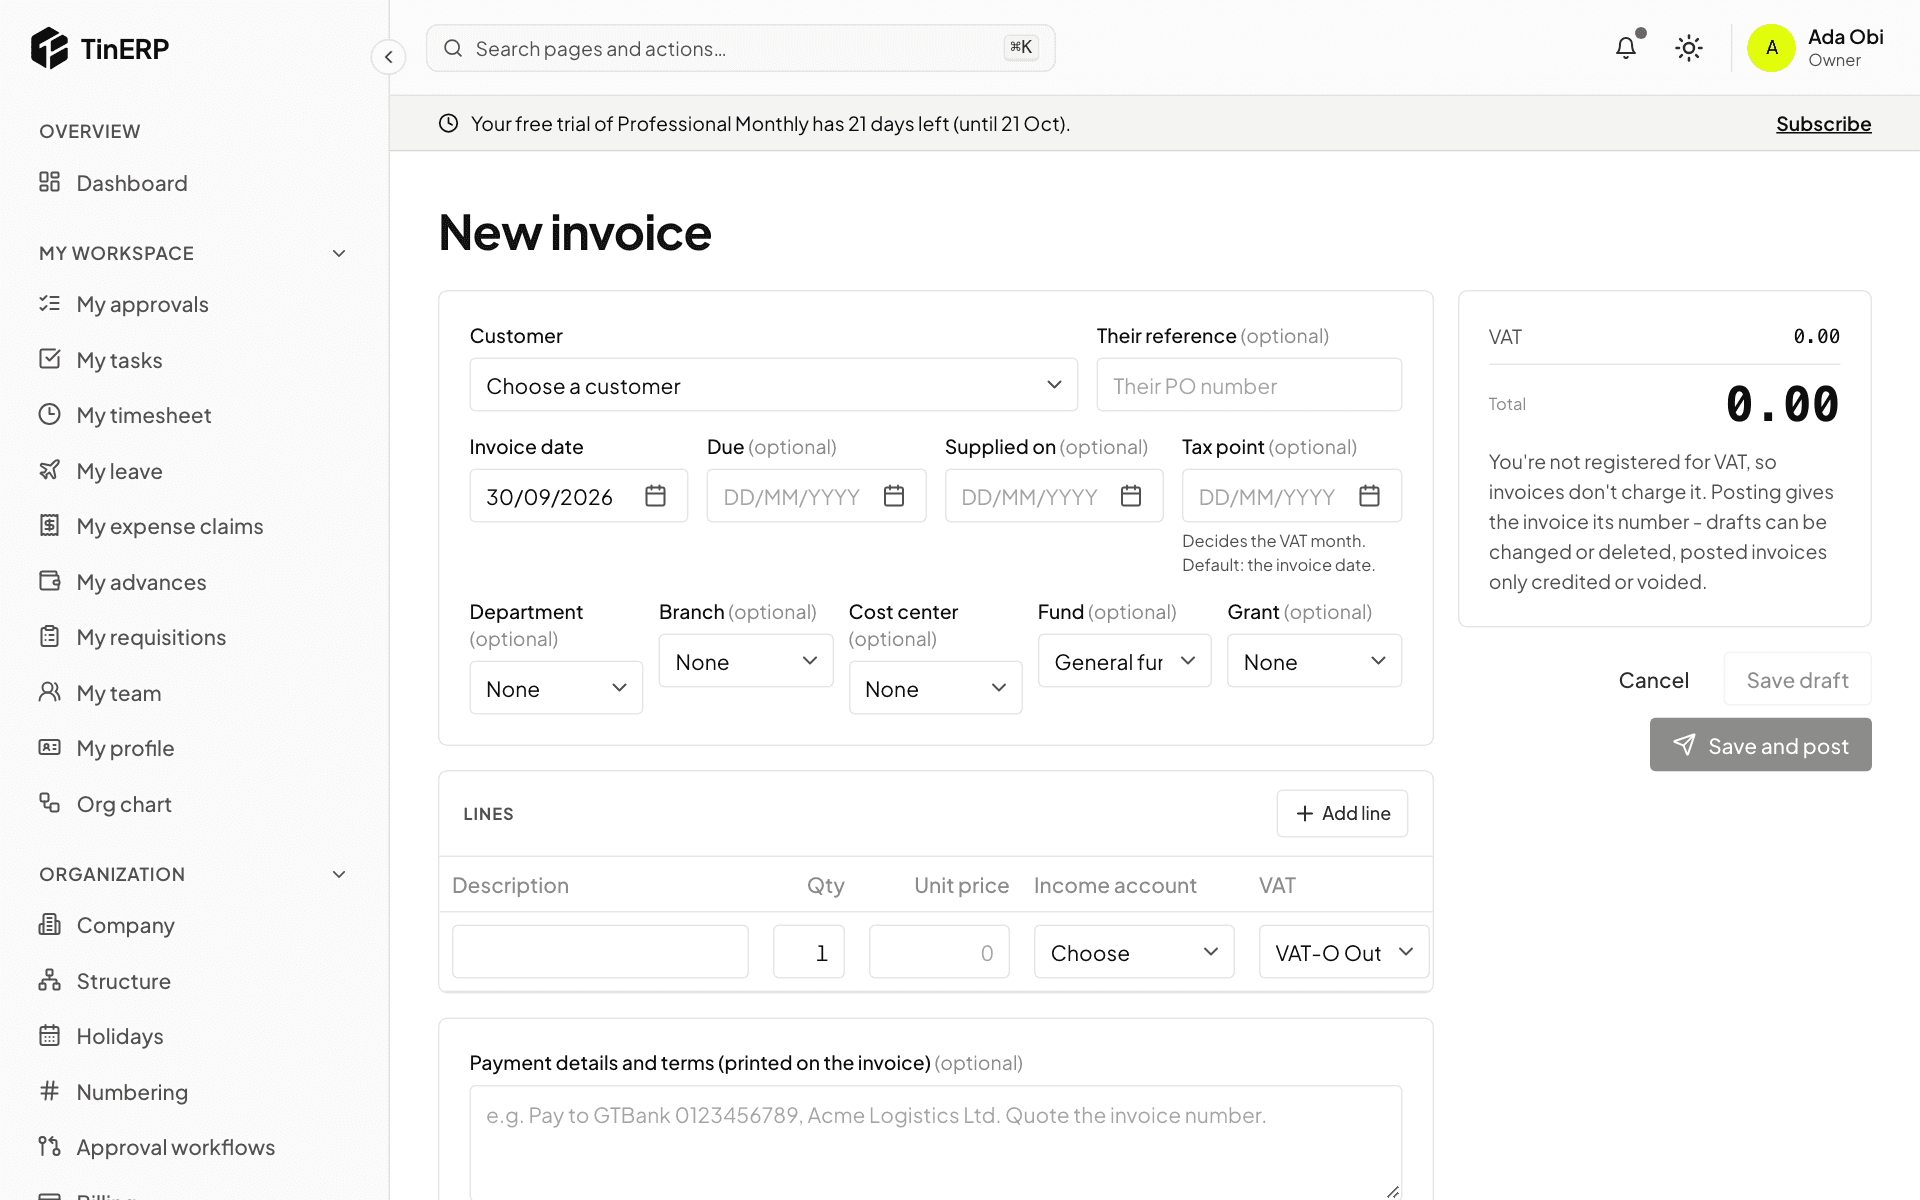
2. Write the invoice
Go to Finance → Sales invoices and start a new one. Choose the customer, the dates - the Tax point date decides the VAT month - and add the lines: description, quantity, unit price and income account. VAT comes from each line's code.
Add Payment details and terms (your bank account, for example). Save draft, or Save and post to give it its number and post it.
The new invoice form: customer, dates, lines and payment details
3. Send it, and follow it
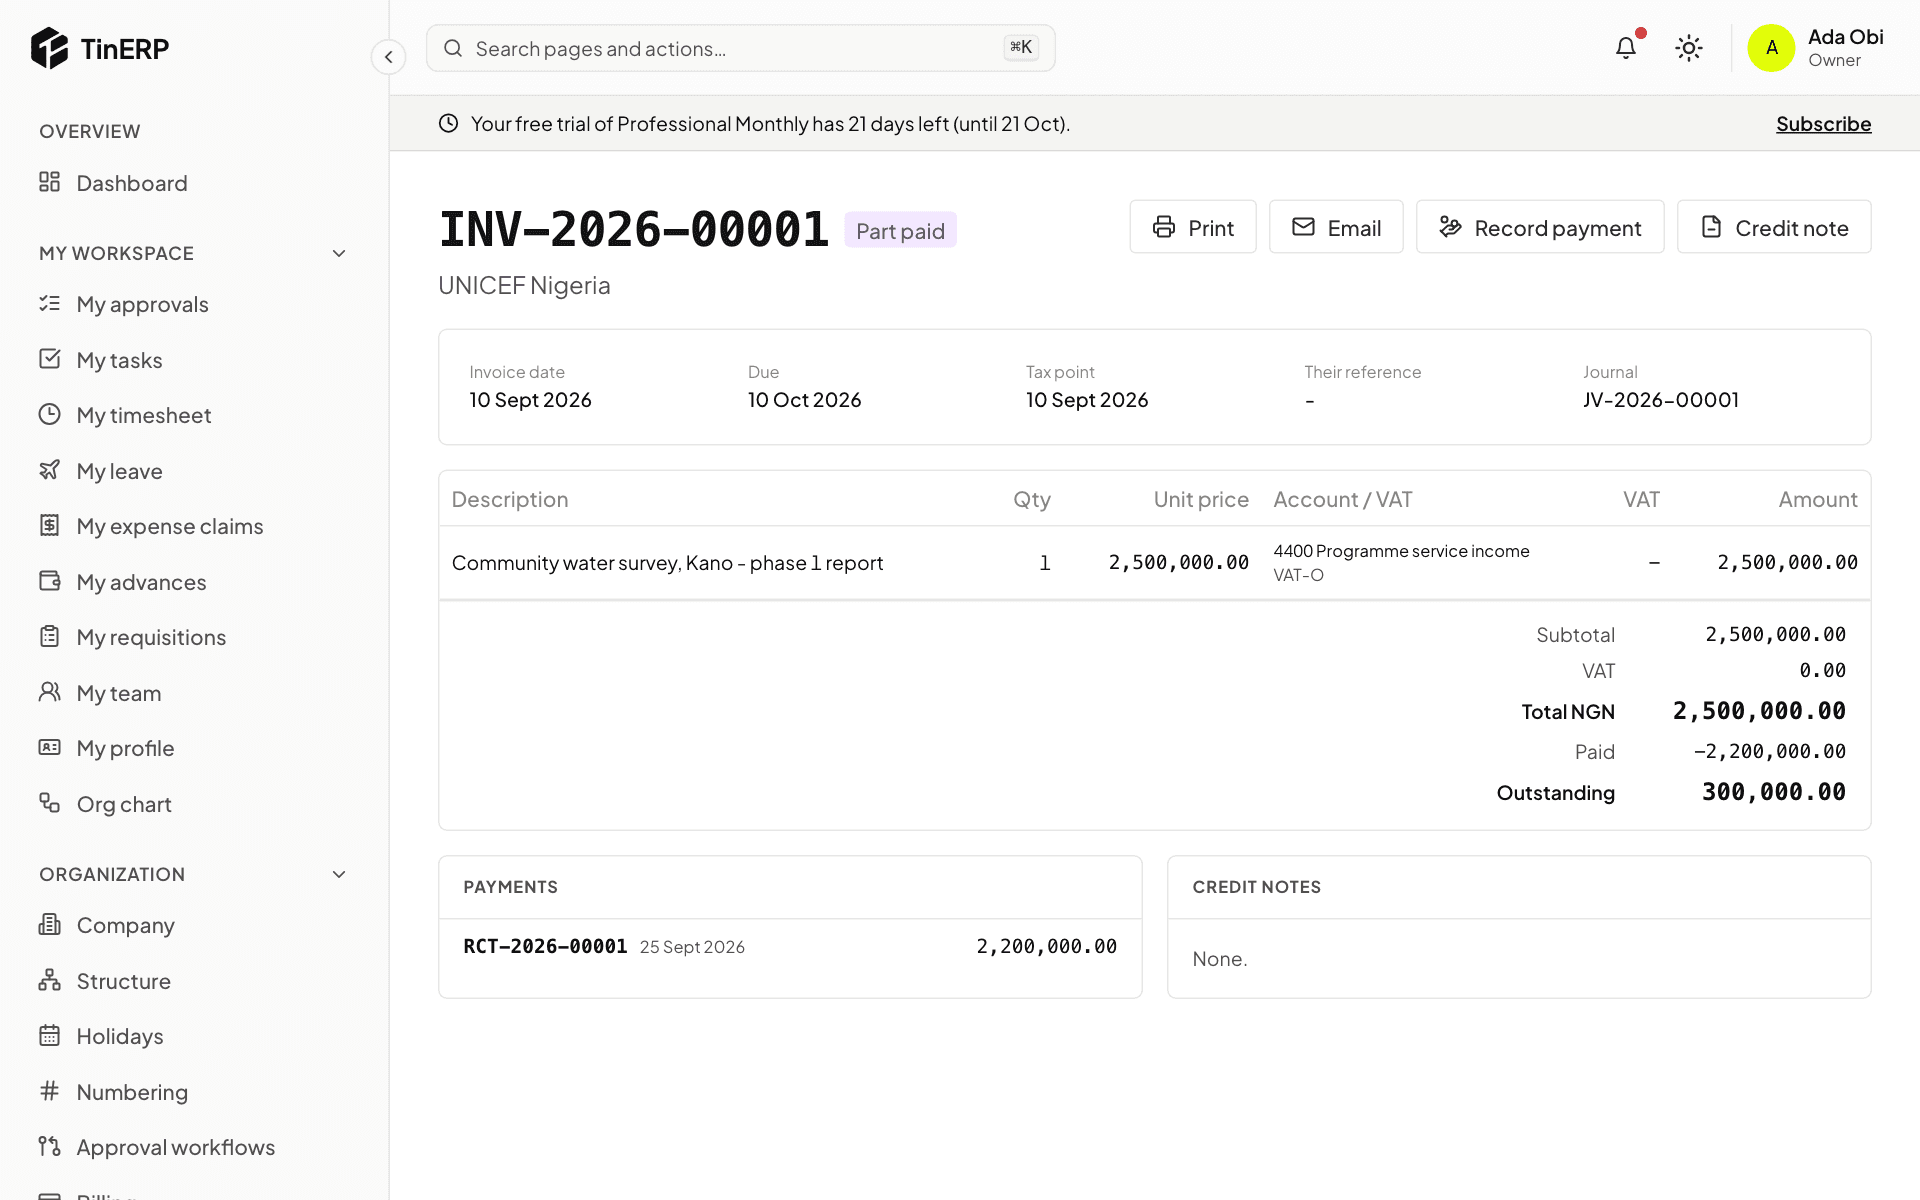
On the invoice, Print it on your letterhead or Email it to the customer. It shows what's been paid and what's outstanding.
To correct a posted invoice, issue a Credit note - for everything or chosen lines. Void is only for an invoice nothing has been paid or credited on; the number stays used.
A posted invoice, part paid, with Print, Email, Record payment and Credit note
4. Record what they pay
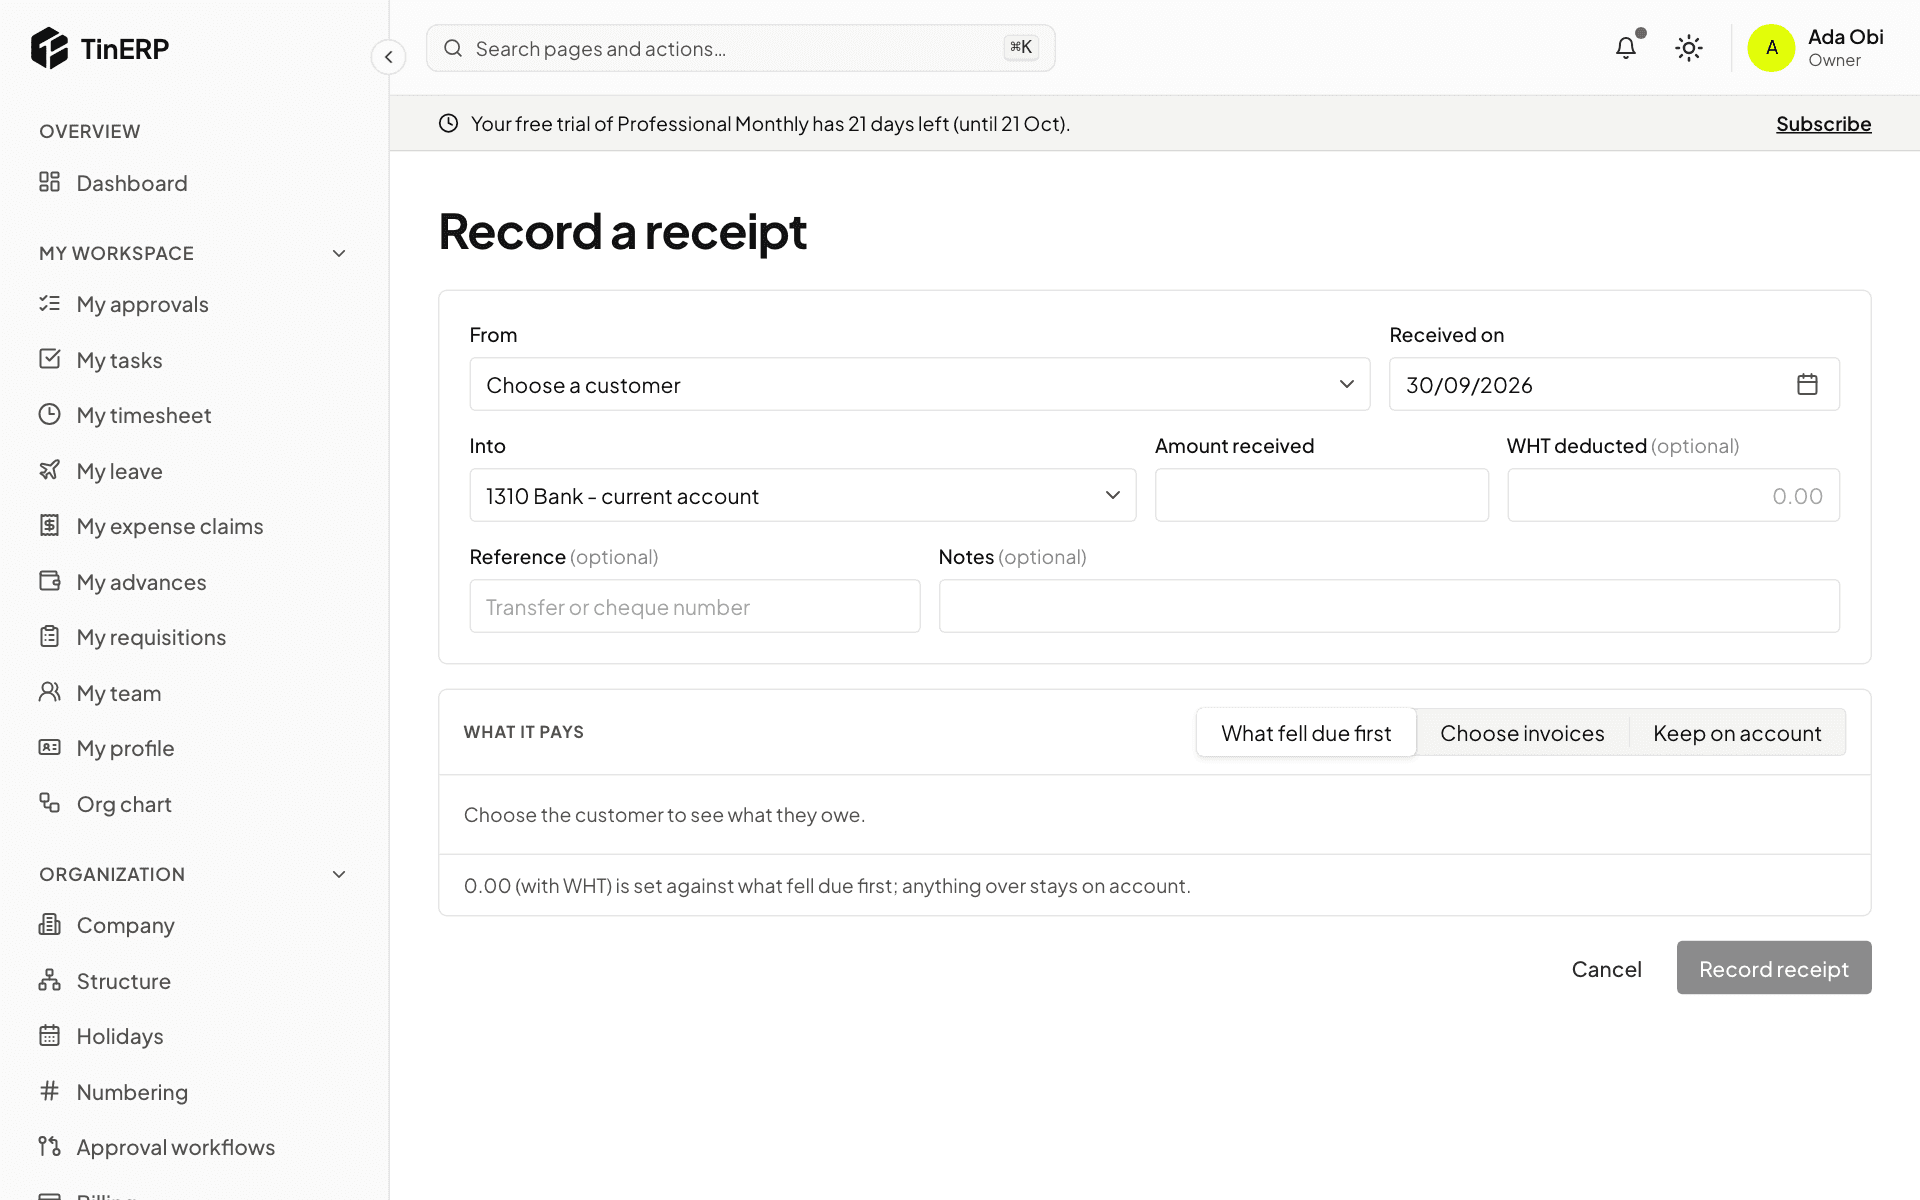
Select Record payment on the invoice, or go to Finance → Receipts. Enter the date, the bank account it came into, the amount, and any WHT deducted by the customer - it pays the invoice too.
Choose what it pays: What fell due first, Choose invoices, or Keep on account for later.
Record a receipt: customer, account, amount, WHT deducted and what it pays
5. See who owes what
Finance → Aged receivables shows what each customer owes on any date - not yet due, then 1-30, 31-60, 61-90 and over 90 days late. A customer's page has their statement for any period.
Finance · Accountants · about 6 min
Bills and payments
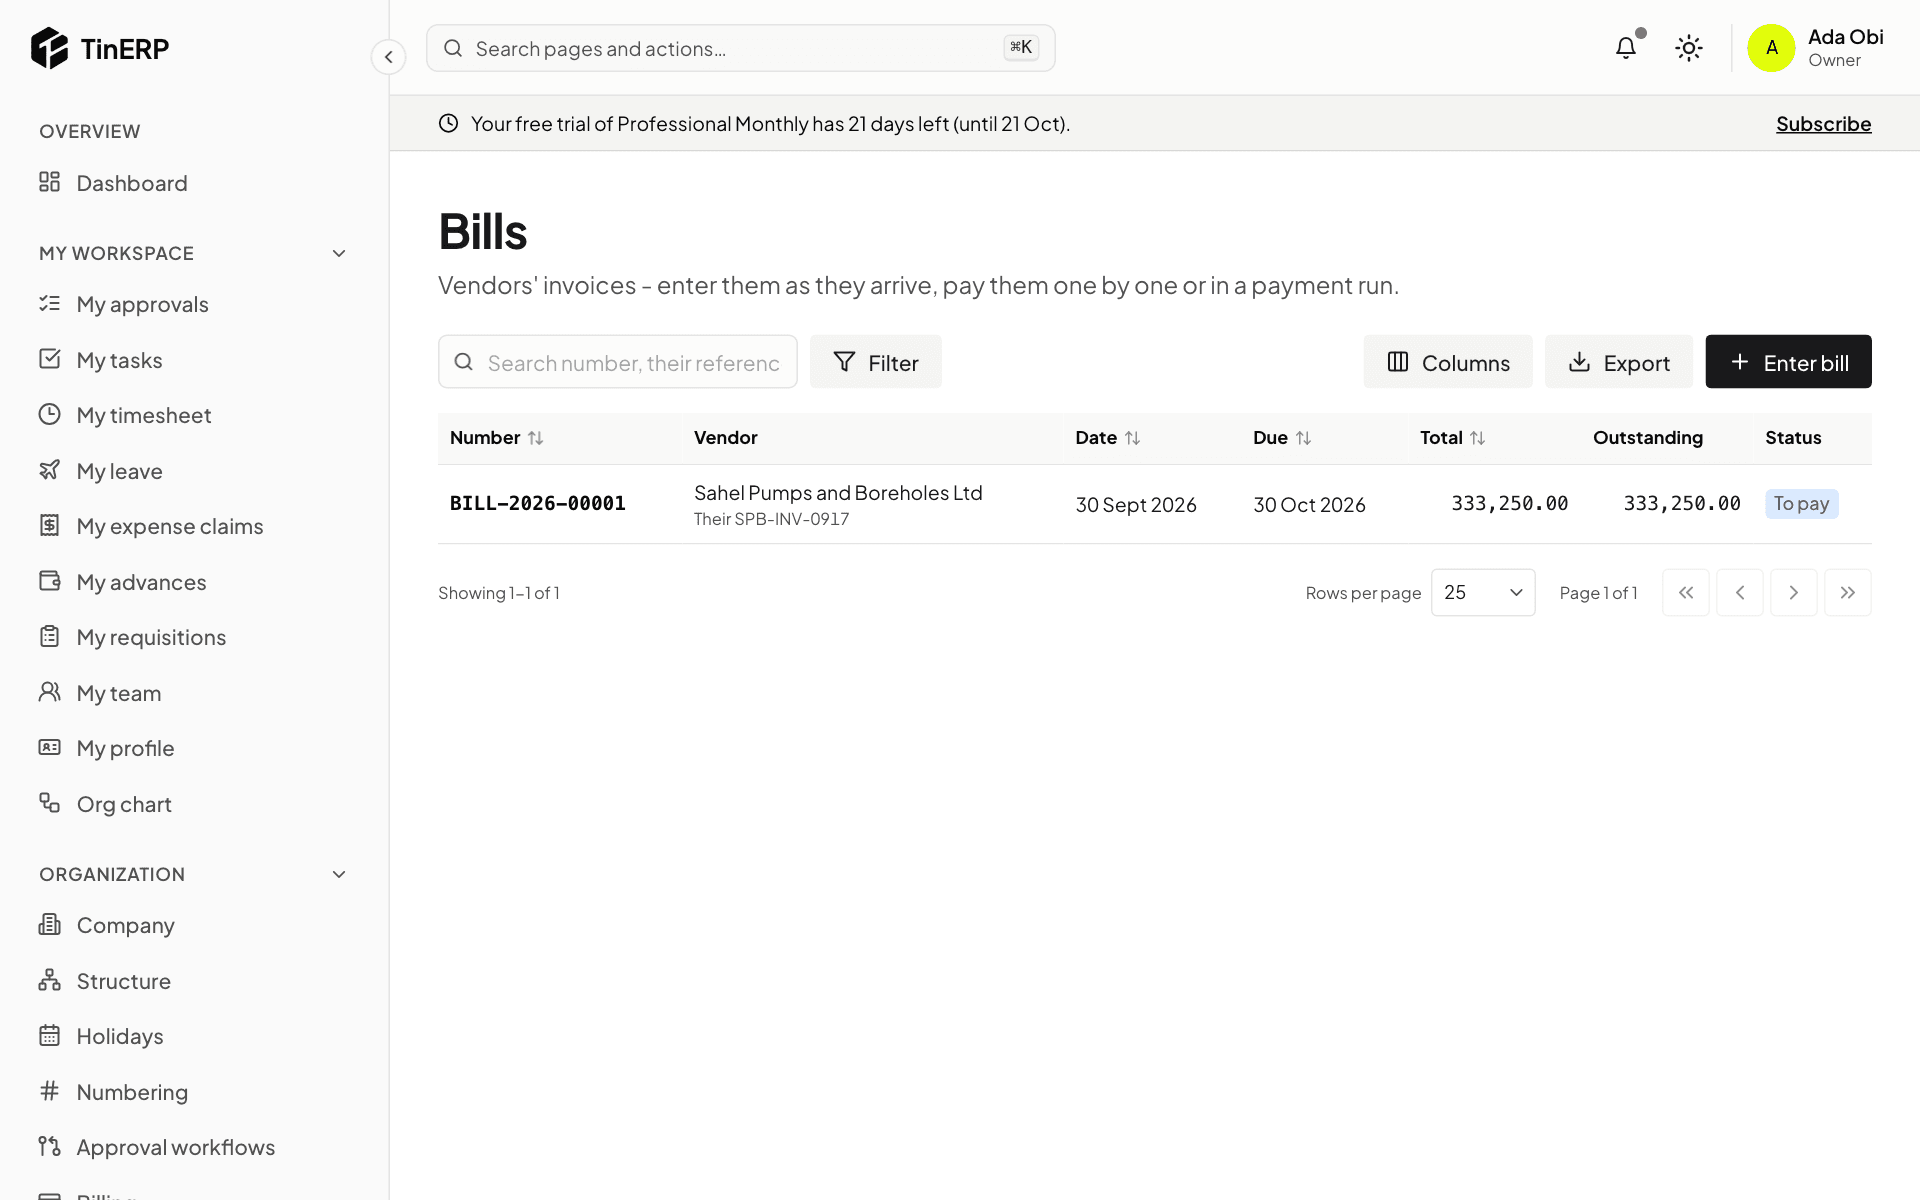
Bills are vendors' invoices. With Procurement, invoices approved there arrive here as posted bills by themselves; you enter other bills - rent, utilities, professional fees - directly.
1. Enter a bill
Go to Finance → Bills and start a new one: the vendor, their invoice number (TinERP refuses the same number twice for a vendor, so nothing is paid twice), the dates, and the lines with an expense or asset account and the VAT code.
Post it. To correct a posted bill, record a Debit note against it; Void is for one entered by mistake.
Bills: the pump parts bill that came from Procurement, posted and unpaid
2. Pay a vendor
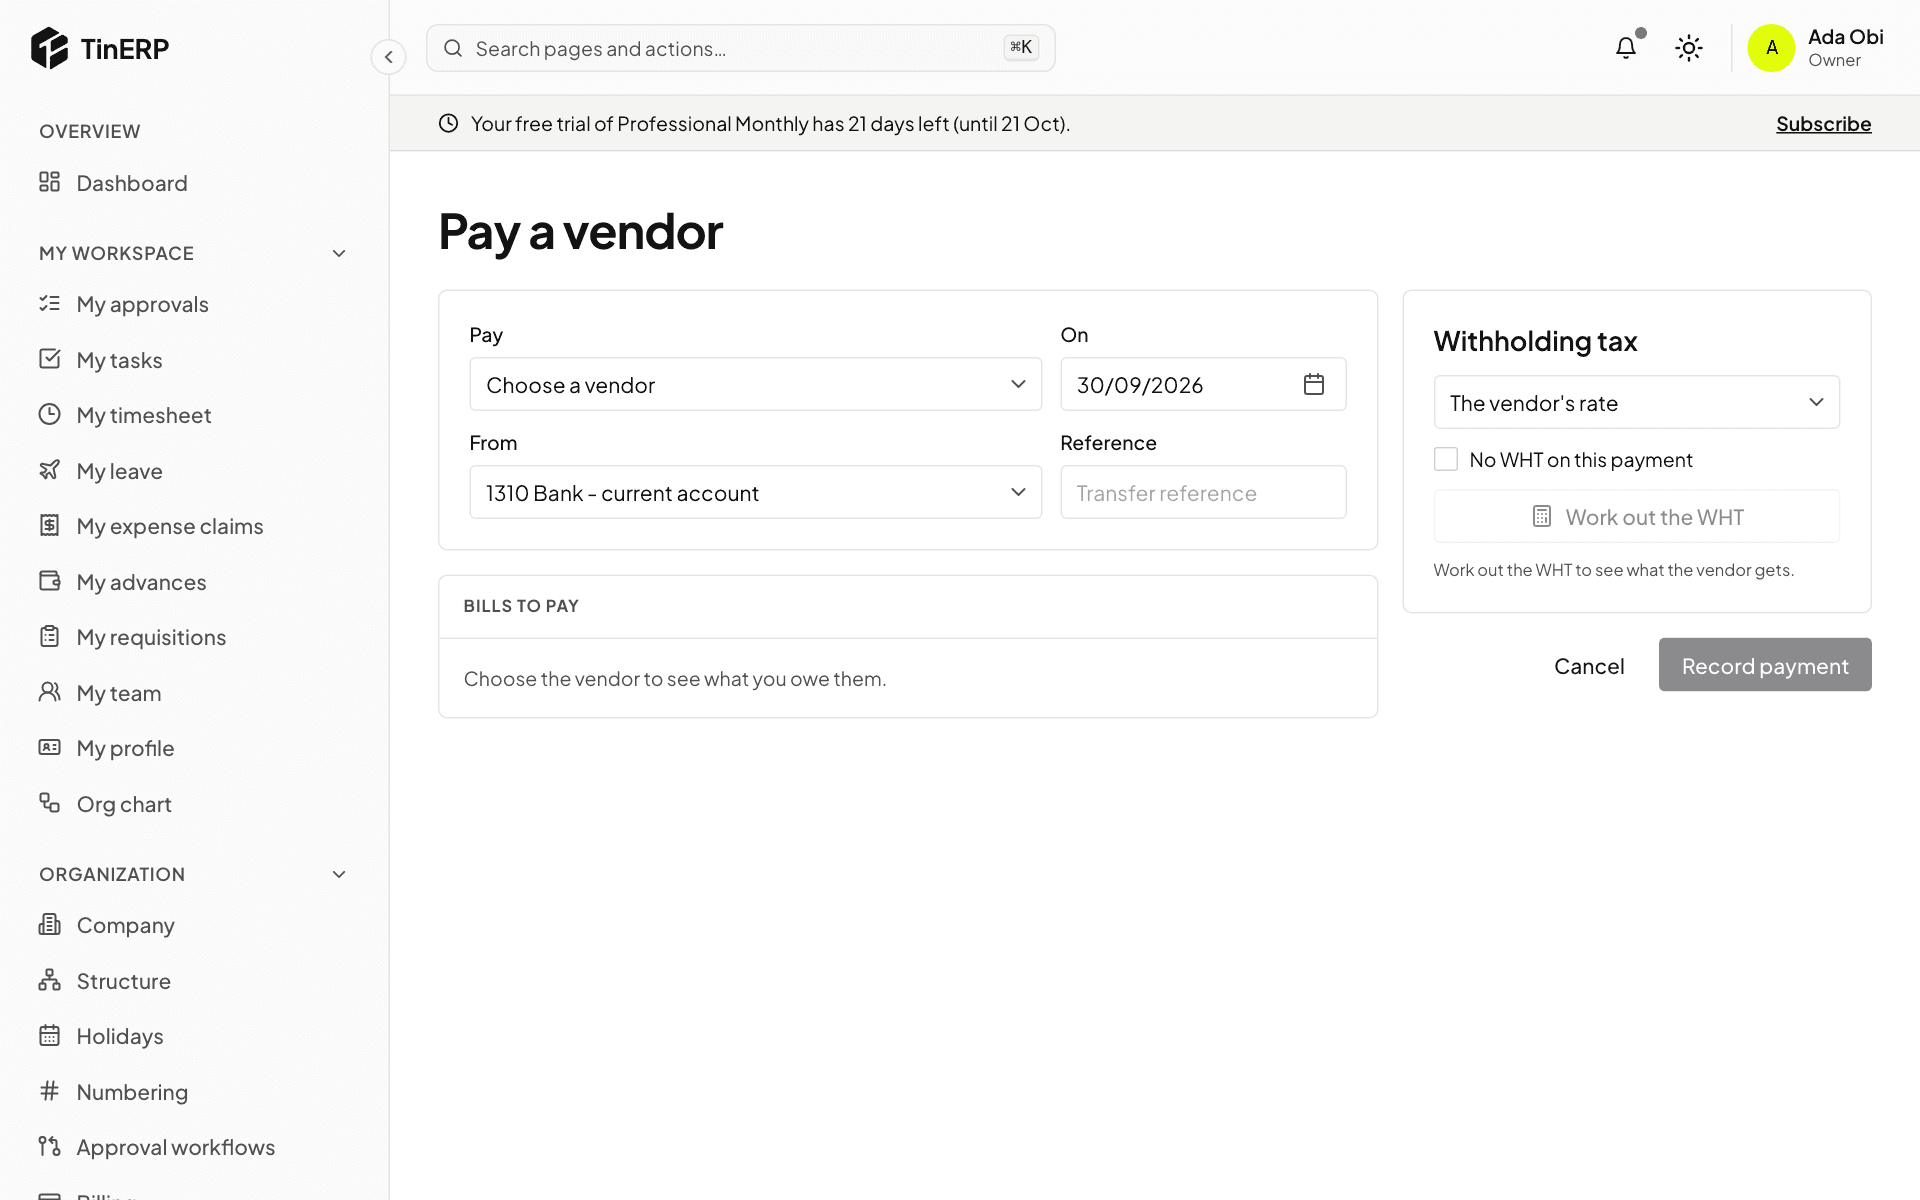
Go to Finance → Payments and pay a vendor: choose them, the date, the bank account and the transfer reference; their unpaid bills are listed - tick what this pays.
Select Work out the WHT: it's worked out on the amount before VAT at the vendor's rate, doubled if they have no TIN. You can change the rate, or tick No WHT on this payment and say why (an exemption certificate). Then Record payment.
Pay a vendor: vendor, date, bank account, bills to pay and the withholding tax
Tip: A payment is held while a change to the vendor's bank details is waiting for approval - a common fraud is changing an account just before a payment.
3. Pay many at once
Finance → Payment runs takes every posted bill due by a date, with WHT per vendor, from one bank account. It goes for approval - never by whoever created it. Once approved, download the Bank file for your bank, and someone who neither created nor approved the run selects Execute to record the payments.
4. See what you owe
Finance → Aged payables shows what's owed to each vendor by how late it is; a vendor's page has their statement.
Finance · Accountants and petty cash custodians · about 6 min
Banking and reconciliation
Every bank account, cash box and petty cash float is set up in Finance → Banking, over its ledger account.
1. Your accounts and transfers
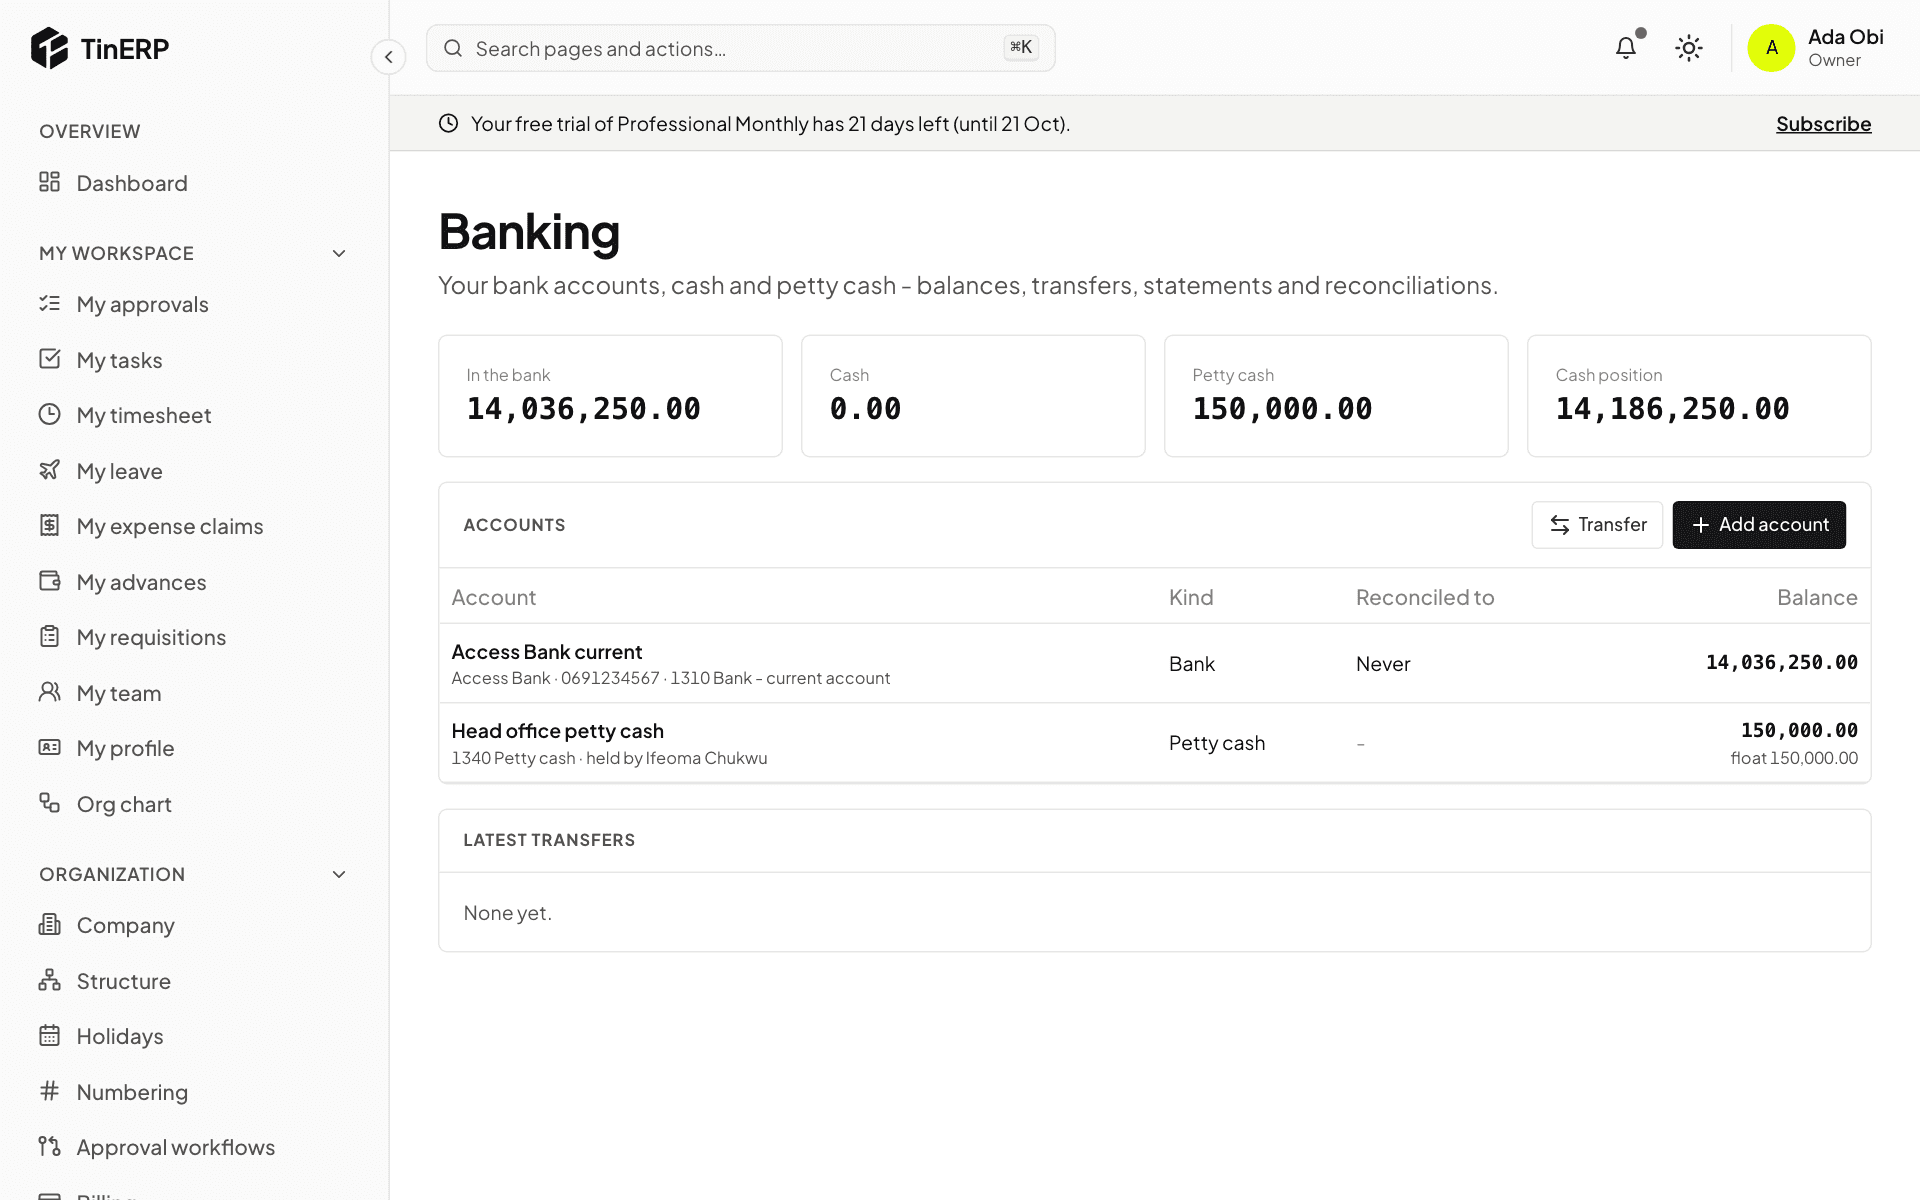
Go to Finance → Banking. The top shows what's in the bank, in cash and in petty cash - your cash position. Add account sets up a bank account, cash, or petty cash (with its custodian, float and the bank account it's topped up from).
Transfer moves money between them - for example cash withdrawn to the petty cash box.
Banking: the cash position, the bank and petty cash accounts, and Transfer
2. Petty cash
Open the petty cash account. The custodian selects Record spending for each payment, with the expense account - keep the receipt with the voucher number on it. Count the box regularly; any difference from the books must be explained. Top up asks for approval to refill it from the bank.
3. Import the bank statement
Open the bank account and select Import statement, with the CSV file from your bank. The first time, match its columns - TinERP remembers them. The lines must add up from the opening to the closing balance, so a file read the wrong way round is refused.
4. Reconcile
Select Reconcile. Match each statement line with what's in the books - TinERP suggests matches with the same amount within a week. For what the books don't have yet, such as bank charges, stamp duty or interest, say what it is and choose the account: the entry is made and matched in one go.
When every line is explained and the Difference is zero, select Finish and lock.
Finance · Accountants · about 5 min
VAT and WHT returns
Every tax amount on a posted invoice, bill and payment goes into the tax ledger. Returns are built from it, month by month - due by the 21st of the next month.
1. See what's due
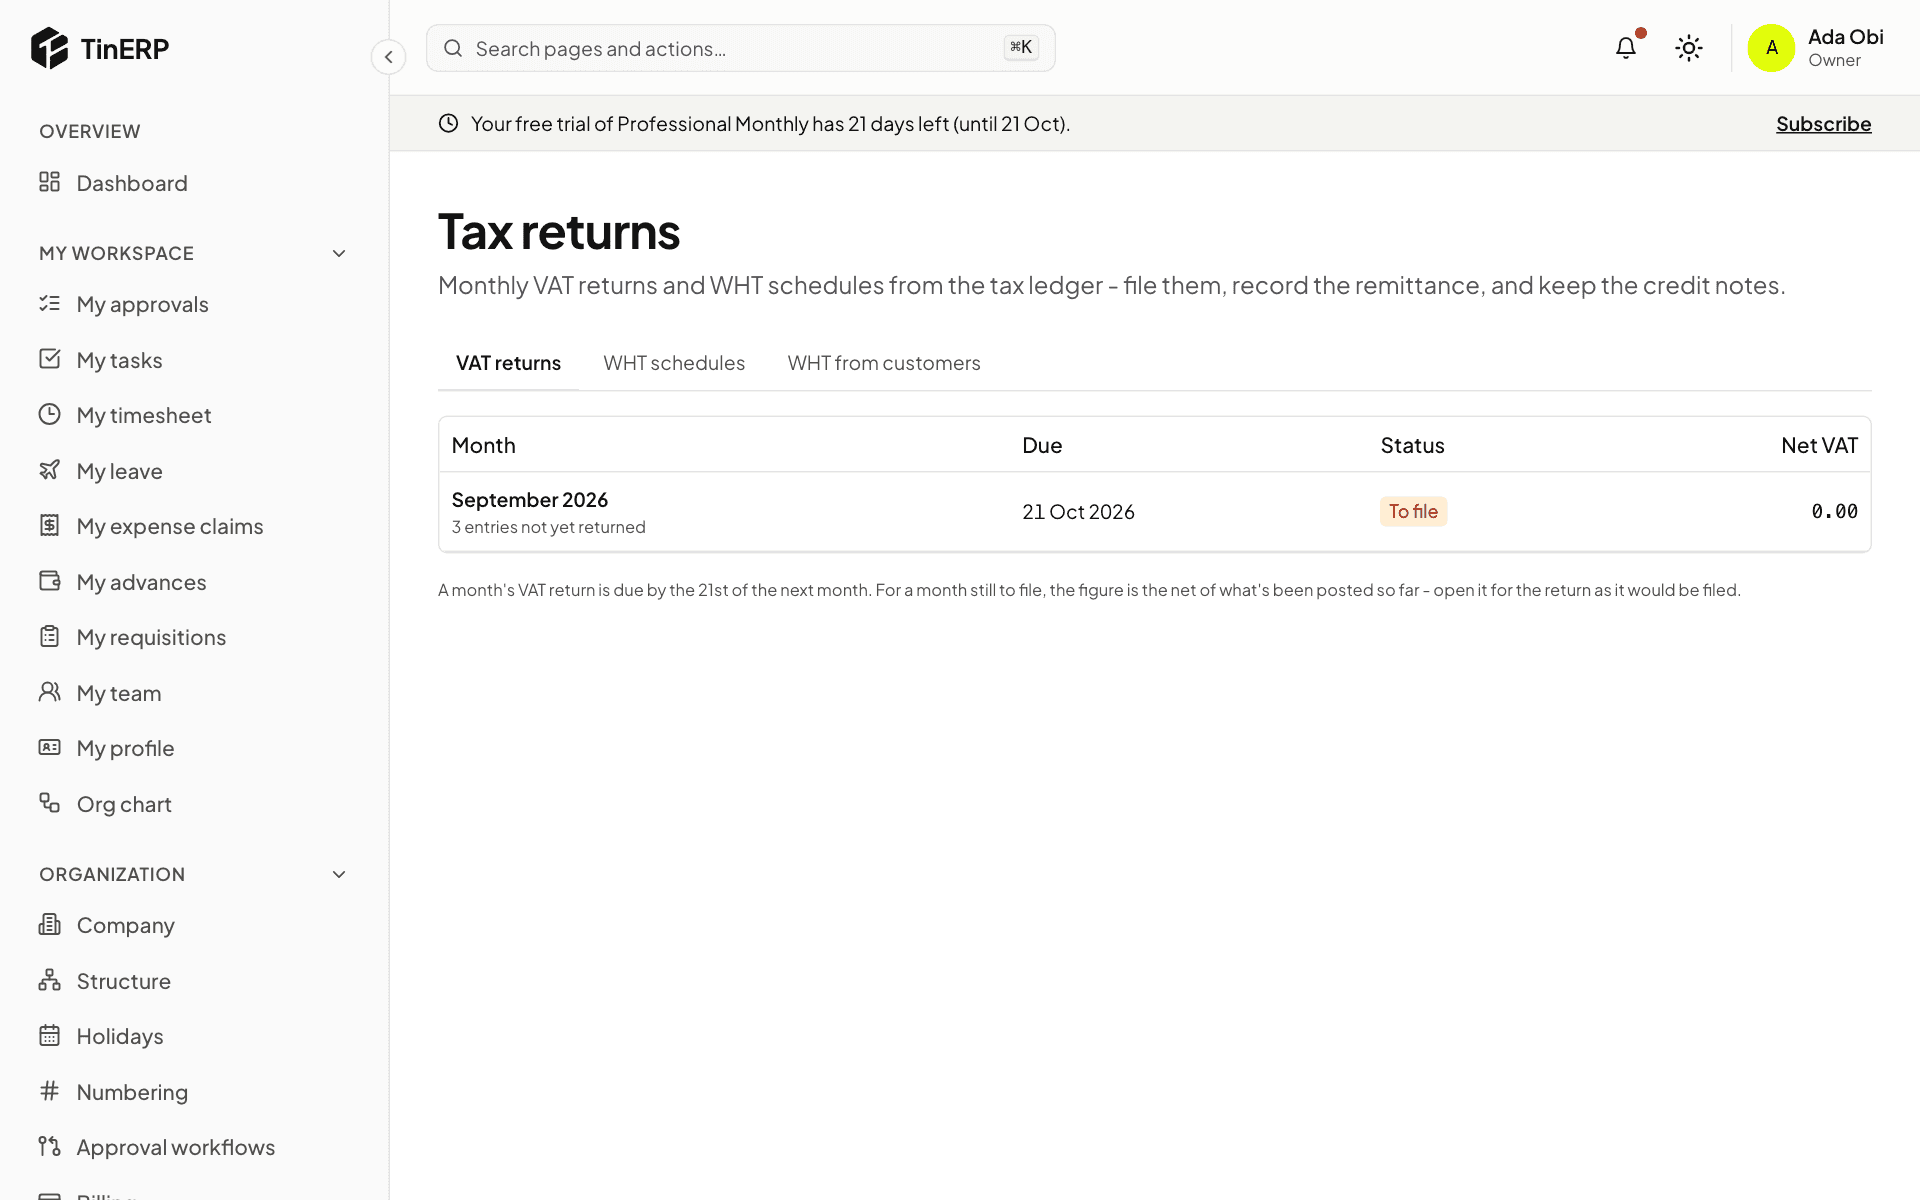
Go to Finance → Tax returns. VAT returns lists each month with tax, its due date and status - To file, Filed, Paid - and flags any overdue. Open a month for the return as it would be filed: sales by type, output VAT, recoverable input VAT, and the net due or carried forward.
Tax returns: September's VAT return to file by 21 October
2. File and pay
Once the month is over, file the return on the NRS system, then record it here with the date and acknowledgement. When you pay, Record payment with the Remita or receipt reference. Part payments are allowed.
3. WHT schedules and credit notes
WHT schedules lists what you withheld from vendors, per tax authority - companies' to the NRS, individuals' to their state. File and pay them the same way, and record each vendor's WHT credit note once issued.
WHT from customers lists what customers withheld from you. When their credit note arrives, record it and use it against income tax - or, for organizations that pay none, such as most NGOs, write it off to an expense.
Finance · Finance staff who pay people · about 5 min
Pay expense claims and advances
Employees claim and request in My workspace; their manager approves. Finance then pays, reviews what was spent against advances, and settles the difference. (How employees claim is in Claim expenses and request advances.)
1. Pay an approved claim
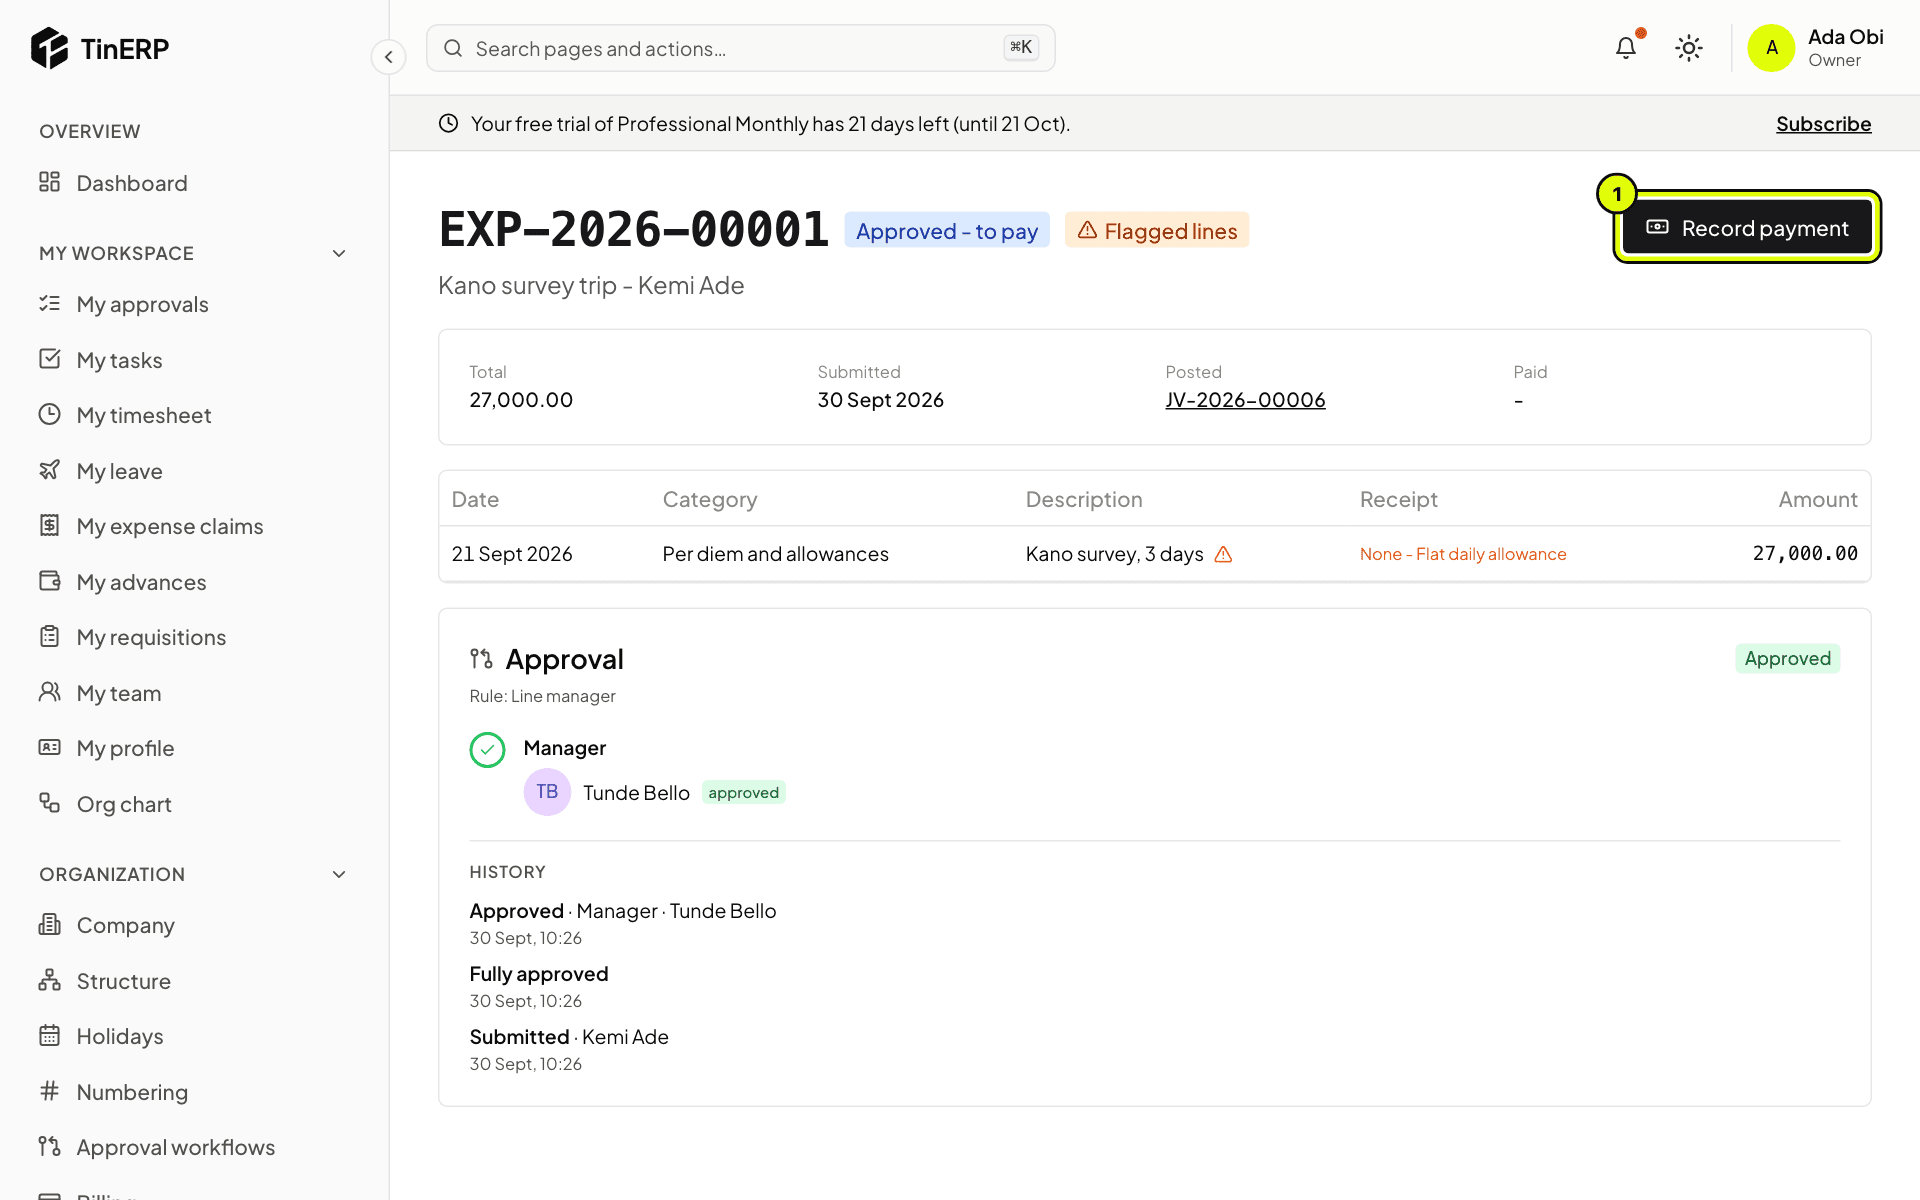
Go to Finance → Expense claims and filter Approved - to pay. Open a claim, check the lines and receipts - flagged lines have no receipt, with the reason - then select Record payment (1): the date, the bank or cash account and the transfer reference. The claimant is told.
Kemi's claim, approved and waiting to be paid, with Record payment marked 1
2. Pay an advance
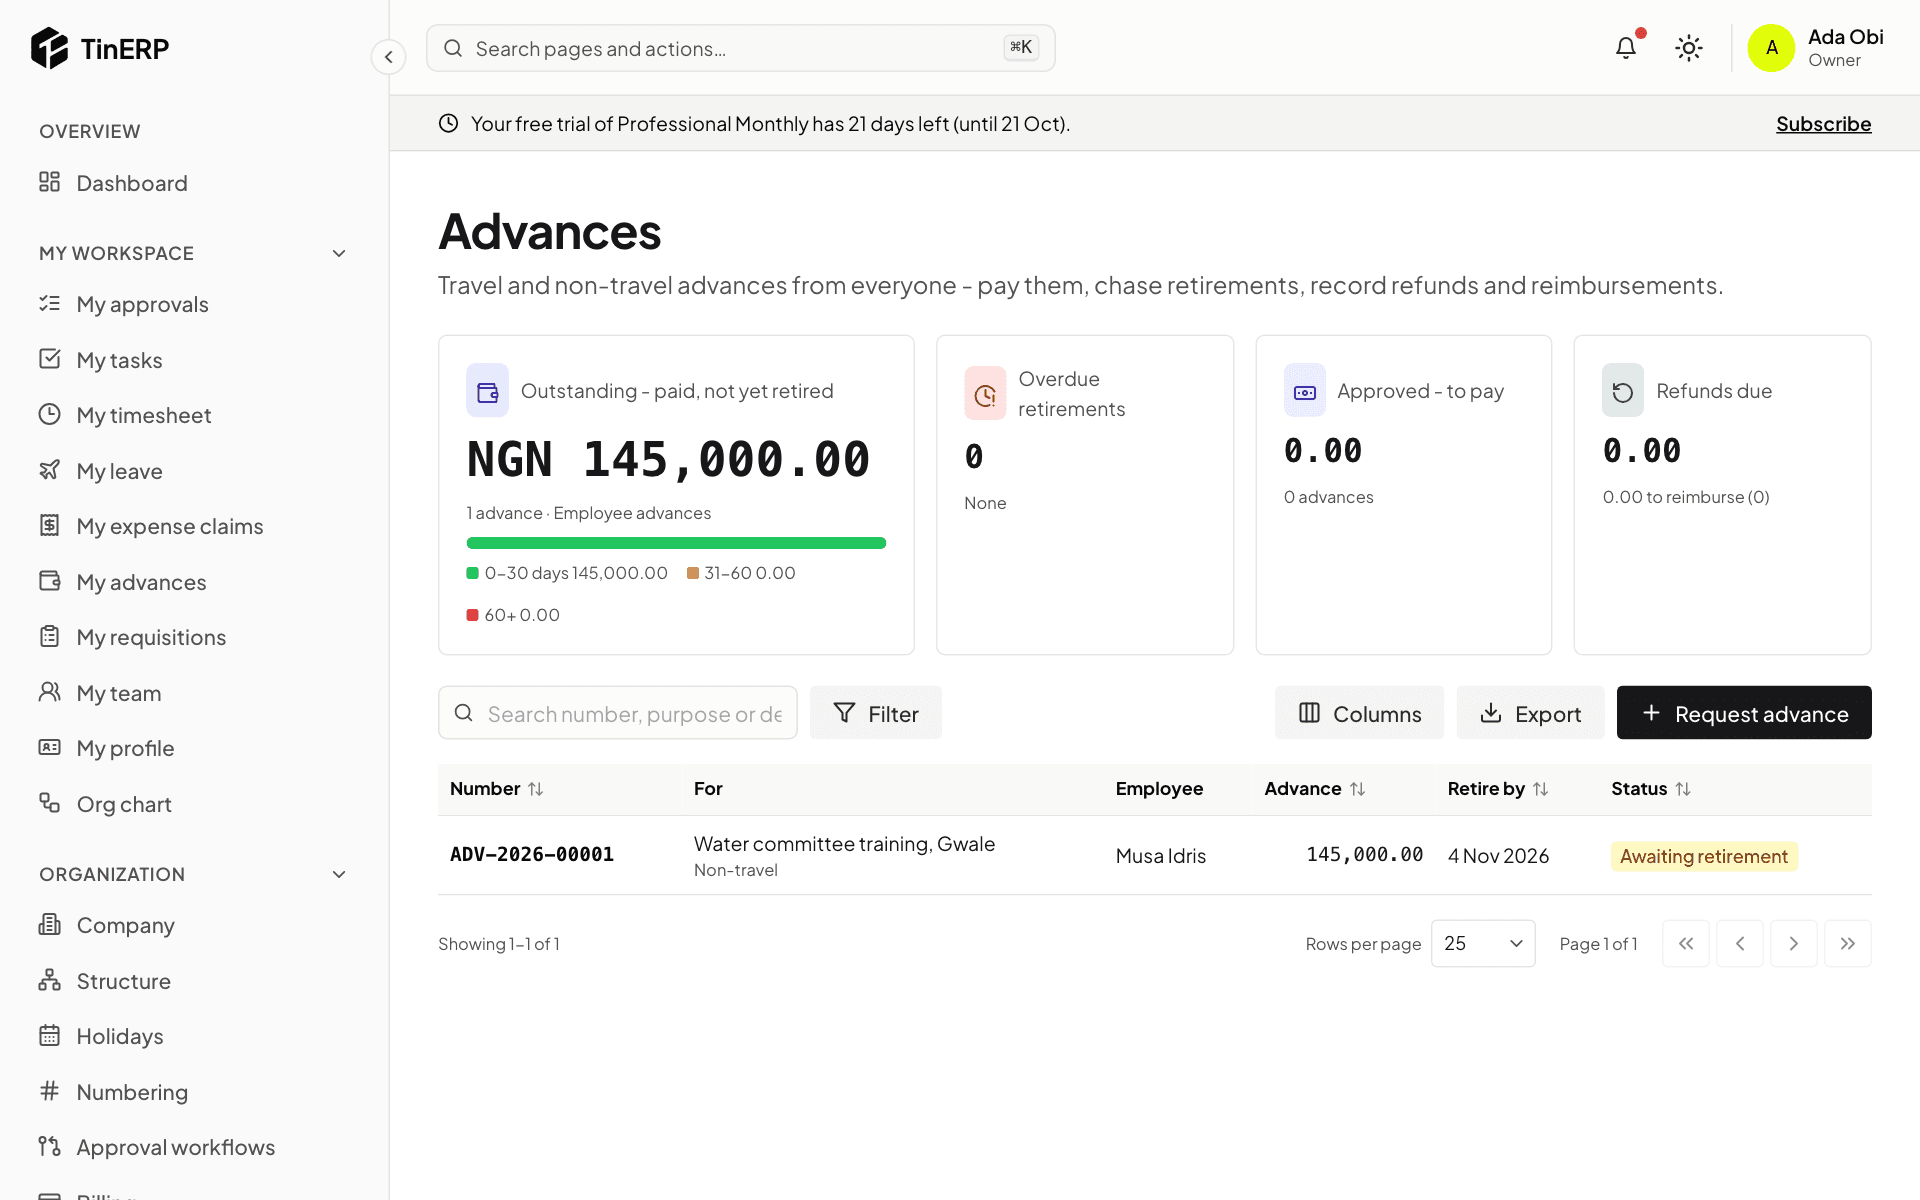
Finance → Advances shows what's outstanding by age, what's overdue, what's approved to pay and what's to settle. Open an approved advance and select Record payment. The employee is told when they must retire it by.
Finance → Advances: outstanding by age, and the list of advances
3. Review the retirement
When they're back, the employee retires the advance: actual dates, what each line cost with receipts, proof of travel, and anything extra. For each line you can accept it, Reduce it, Reject it, or - if the trip ran longer - Refuse the extra days, each with a reason they see. Save decisions, then approve in the approval panel. Whoever paid the advance doesn't approve its retirement.
4. Settle the difference
If they spent less, select Record refund received when the money comes back. If they spent more, select Pay reimbursement. The advance then closes.
Tip: TinERP reminds people before a retirement is due, tells them and their manager when it's overdue, and tells finance a week later. An overdue retirement stops them getting another advance.
Questions
Where are the per diem rates and advance rules?
In Finance → Finance settings → Advances and per diems: rates by destination (and grade), what the per diem covers, how travel days count, how much is paid upfront, the limits, and the documents rules - a supporting document above an amount, proof of travel on retirement. Add an Other destinations rate for places without their own.
Finance · Finance managers · about 6 min
Budgets and grant budgets
A budget is what you plan to earn and spend each month. TinERP compares it with what's posted and what's committed, and can flag - or stop - spending that would go over.
1. Make a budget
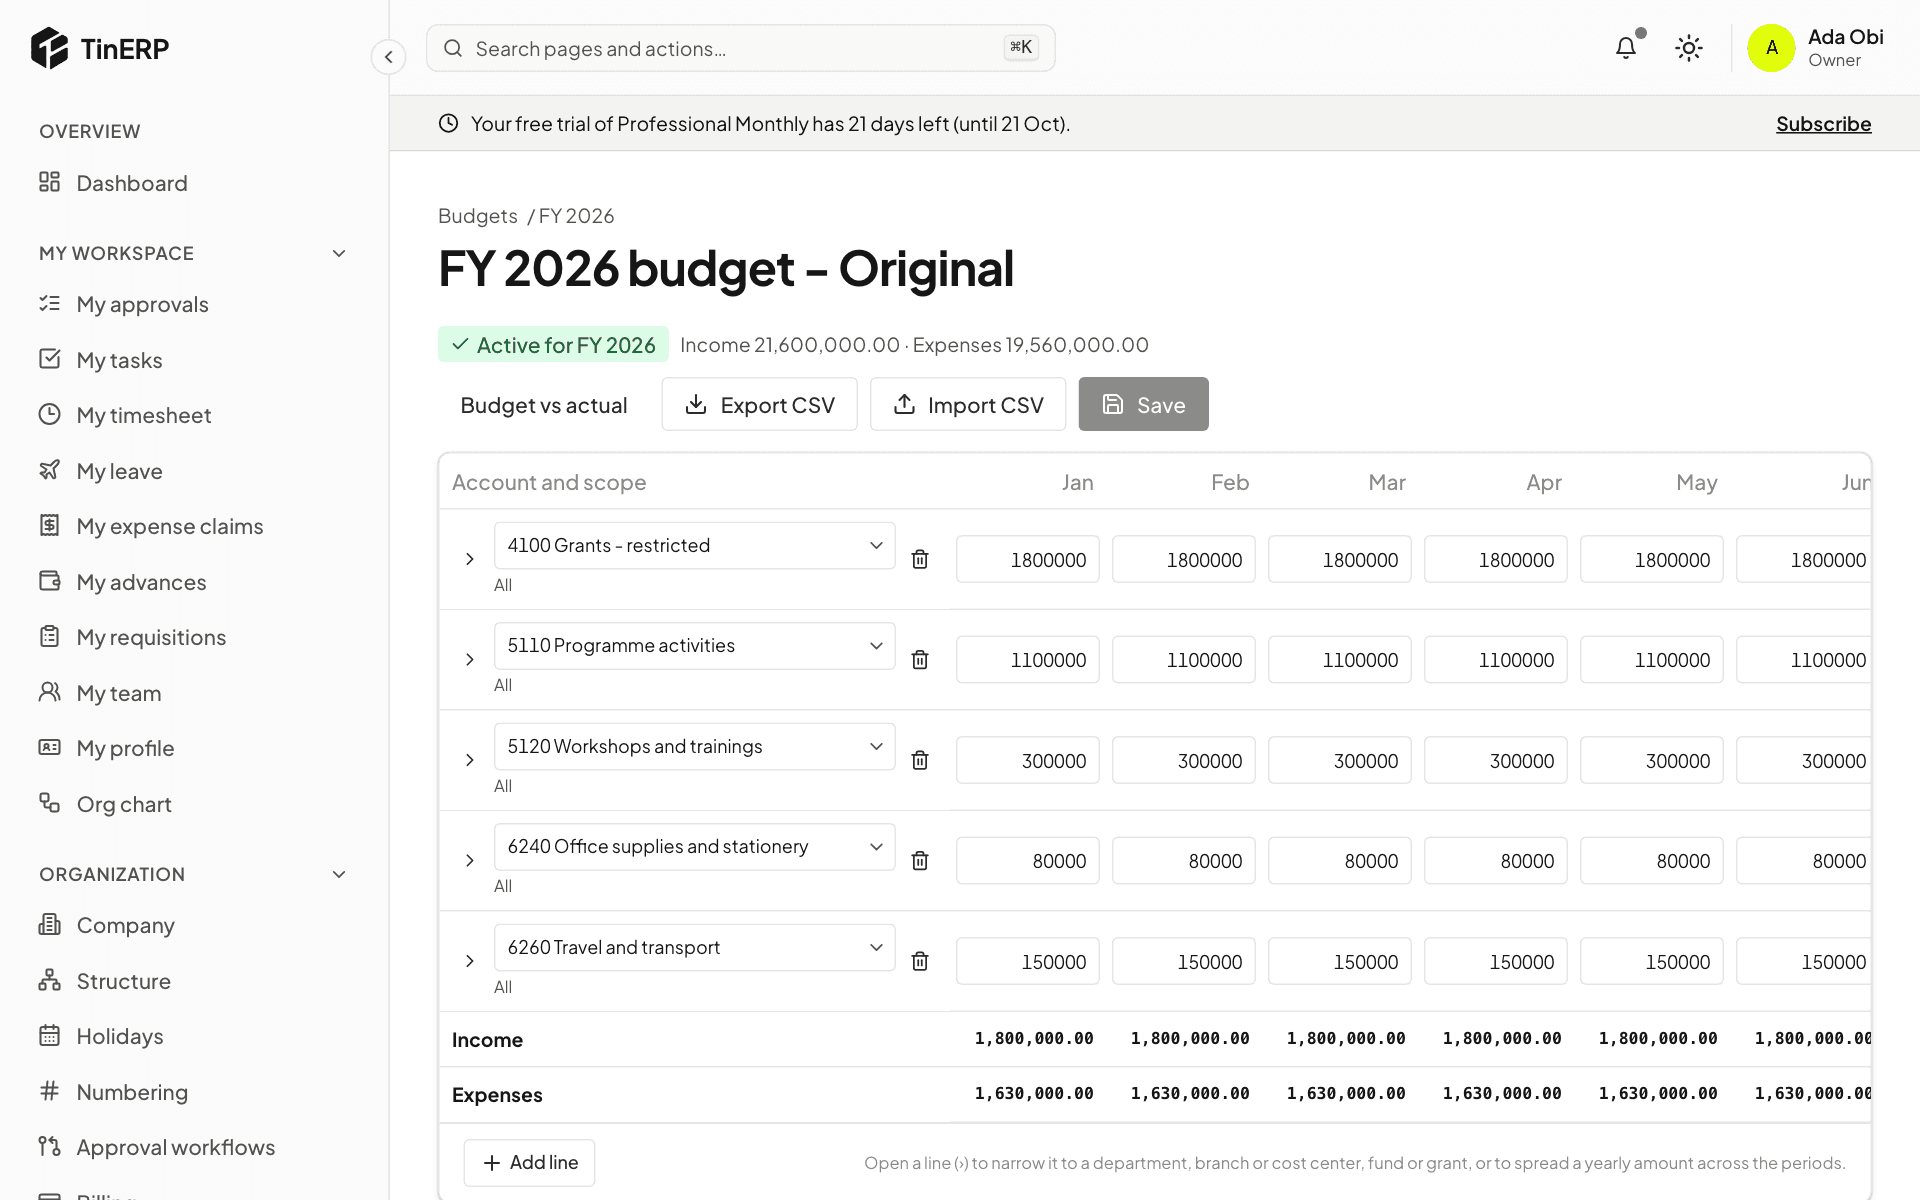
Go to Finance → Budgets and select New budget: the financial year, a name (Original), and start from A blank grid, A copy of another budget or A year's actuals - raised by a percentage if you like. The year's first budget is active.
The grid has a line per income or expense account, with an amount for each month. Open a line (›) to narrow it to a department, branch, cost center, fund or grant, or to spread a yearly amount across the months. Save saves the whole grid; Export CSV and Import CSV work with a spreadsheet.
The FY 2026 budget grid: grant income, programme activities, trainings, office supplies and travel
Tip: Later, make a Revised version and Make active when it's agreed - the old one stays for comparison.
2. Compare with what's spent
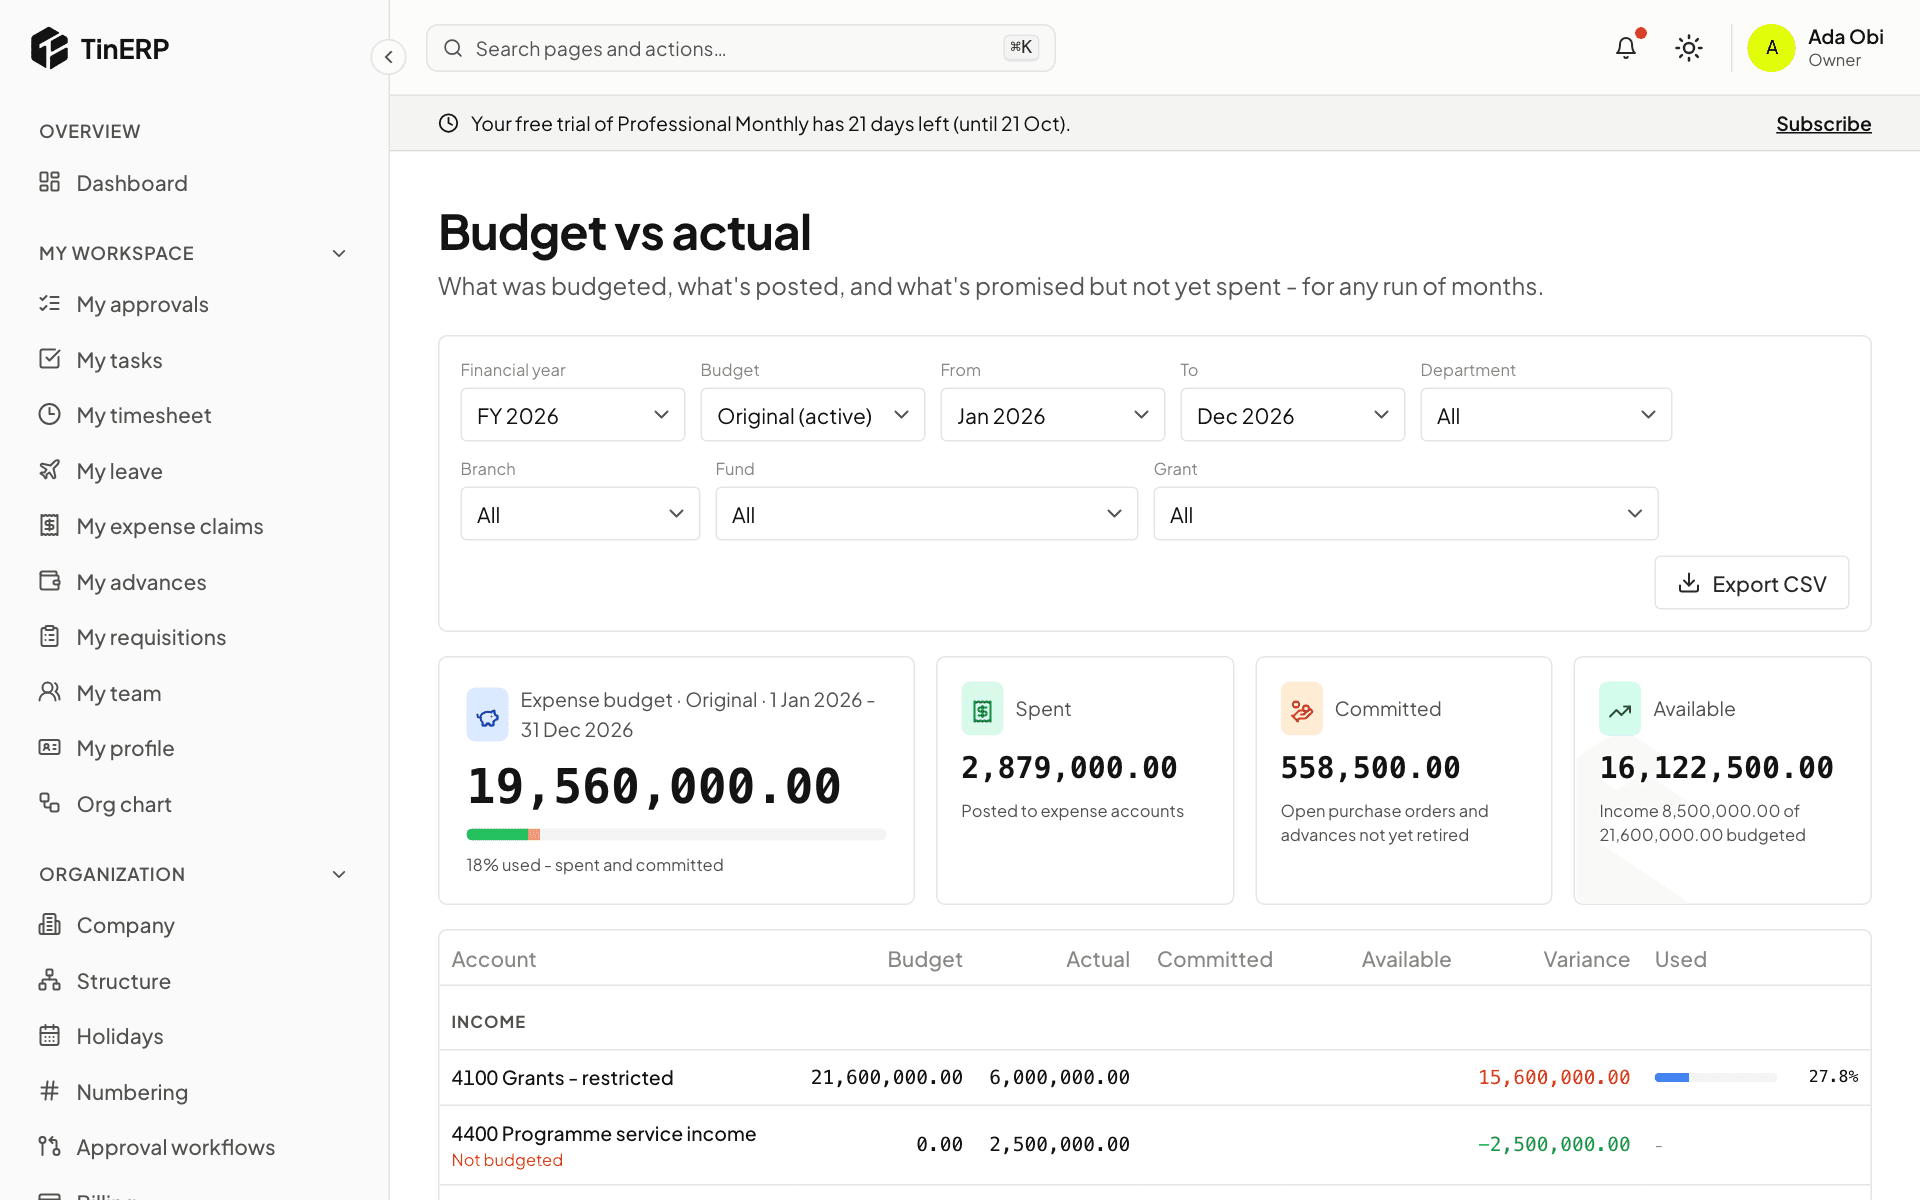
Finance → Budget vs actual shows, for any run of months, each line's budget, what's posted (Actual), what's Committed - open purchase orders and advances not yet retired - what's Available, and how much is used. Accounts with spending but no budget line show as Not budgeted.
Budget vs actual for FY 2026: the expense budget, spent, committed and available
3. Choose budget control
On the Budgets page, Budget control decides what happens when a claim, advance or purchase order would spend more than is left: Off (nothing), Warn (it goes ahead, marked over budget for the approver - approval rules can route those to someone else), or Block (it can't be submitted). Accounts with no budget line aren't checked.
4. NGOs: follow each grant's budget
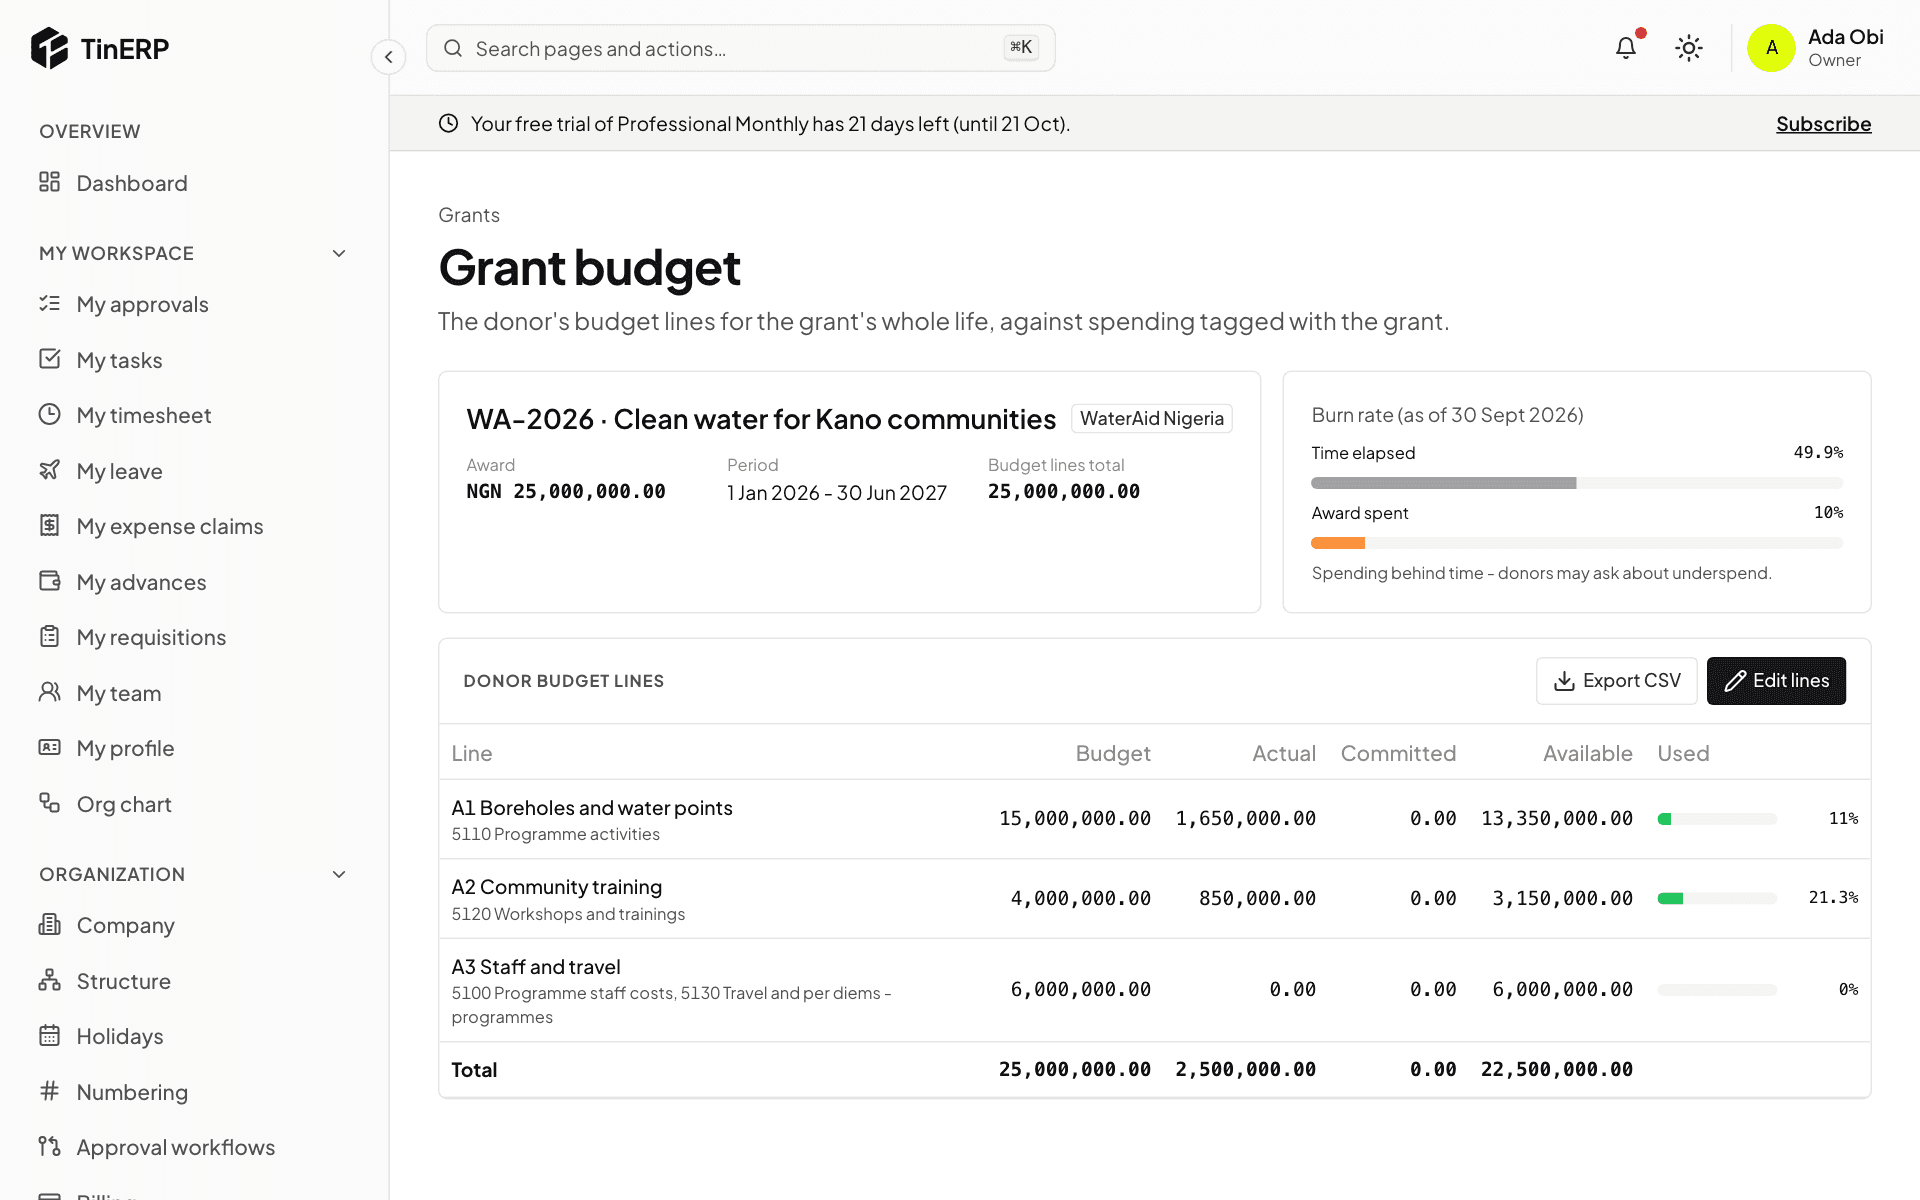
From Finance settings → Grants, open a grant's donor budget and select Edit lines: the donor's own lines, each with the expense accounts that count against it. The page shows each line's actual, committed and available, spending on the grant outside the lines, and the burn rate - time elapsed against the award spent. Export CSV for the donor report.
The WaterAid grant budget: three donor lines, and the burn rate
Finance · Accountants · about 3 min
Prepayments and deferred income
Insurance paid for a year, rent paid for six months, a software licence - or income received before it's earned. A schedule releases it month by month, by itself.
1. Create a schedule
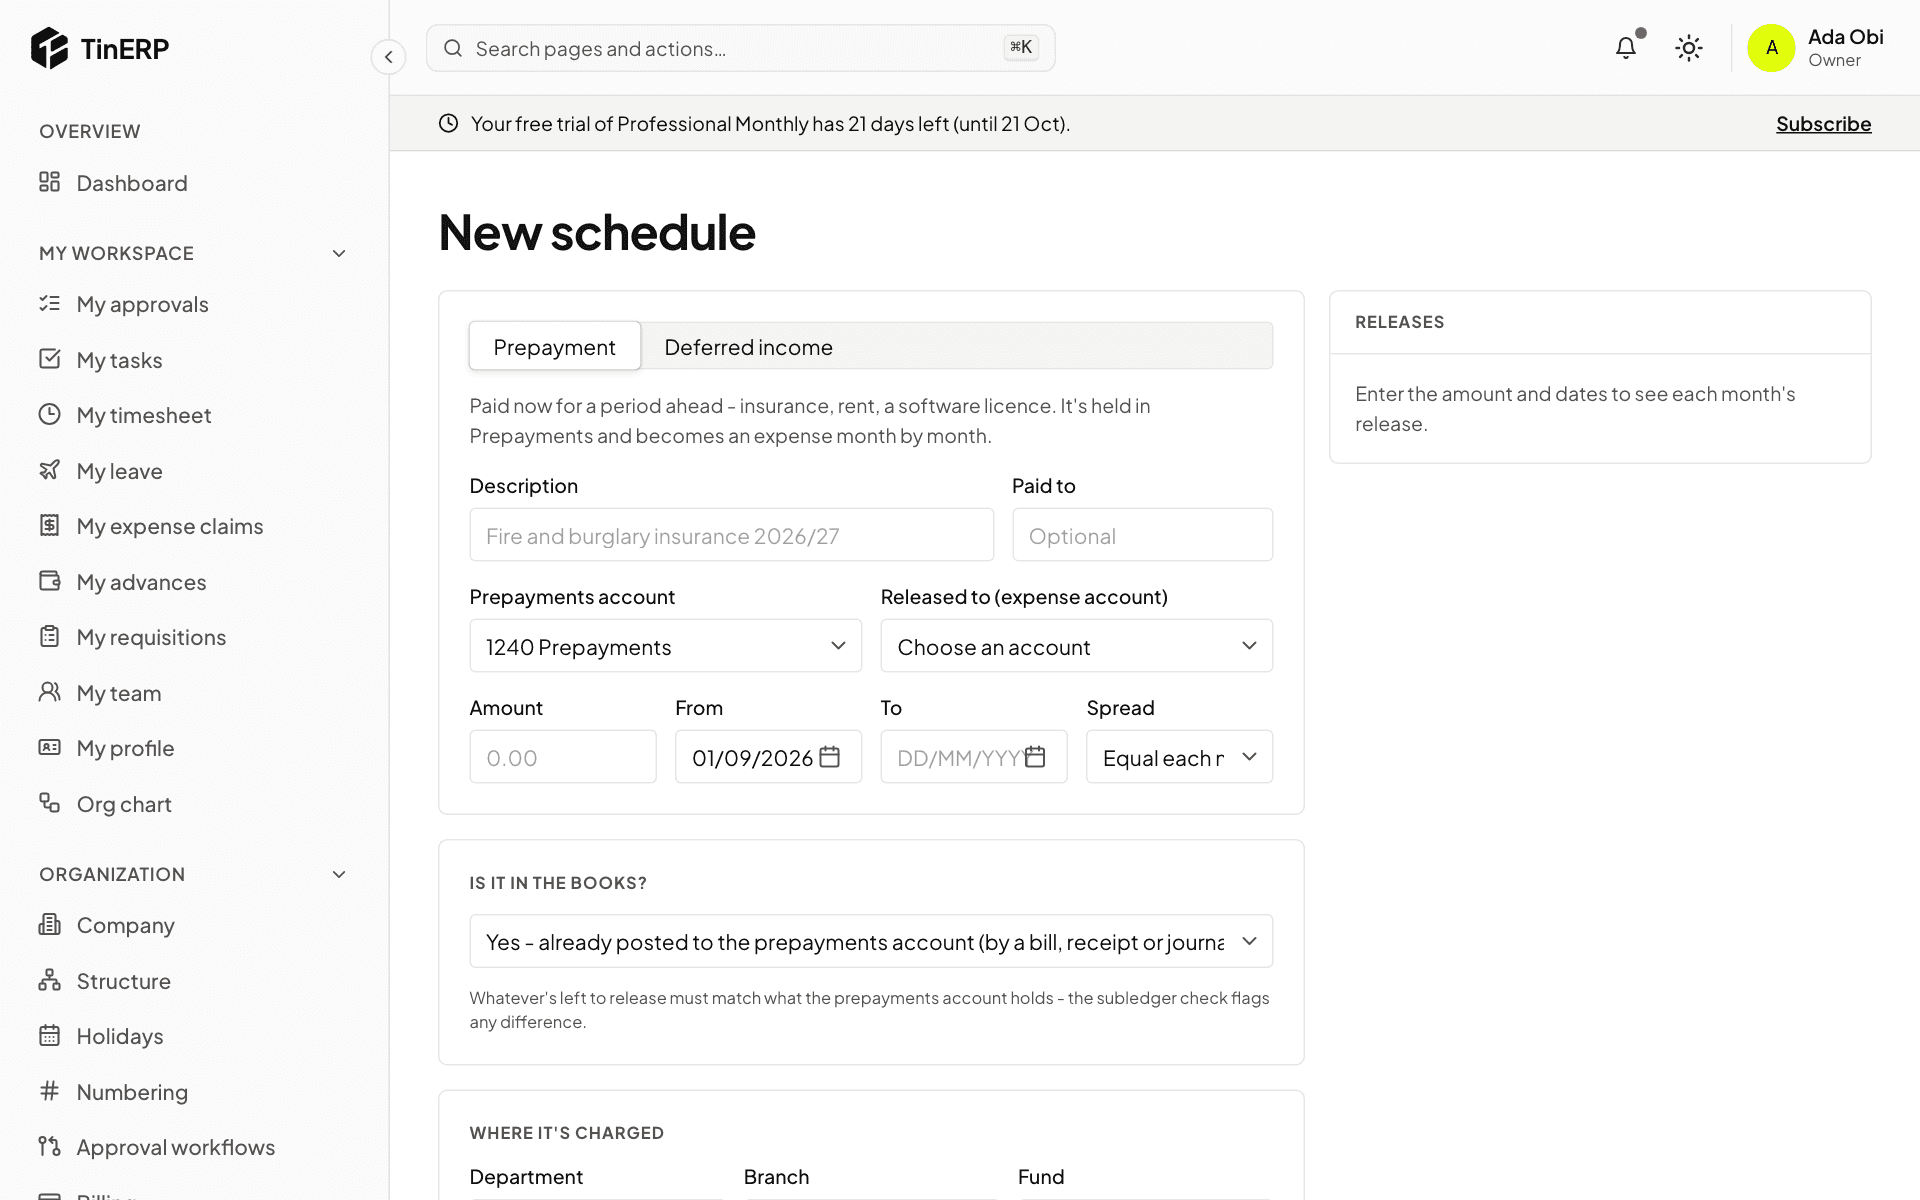
Go to Finance → Prepayments and deferrals and start a new schedule. Choose Prepayment or Deferred income, describe it, and choose the account it's held in and the account it's released to. Enter the amount, the dates, and how it's spread - equally each month, or by days.
Is it in the books? Usually yes - a bill or payment already put it in Prepayments. If not, the schedule can post it now. The releases are shown before you save.
A new prepayment schedule: description, accounts, amount, dates and spread
2. Let it run
Each month's release posts by itself on the month's last day. If one can't (the month is closed, say), the schedule shows why and it's tried again. To stop a schedule early, cancel it with a date and reason: what's left is cleared in one entry.
Finance · Finance teams and management · about 4 min
Reports and financial statements
Every report comes straight from the posted journals - there's nothing to prepare or refresh.
1. The trial balance
Finance → Trial balance lists every account's opening balance, movements and closing balance between two dates, and confirms the books balance. Filter by department, branch, cost center, fund or grant. Select an account for its ledger, with the balance after each line.
Below it, Subledgers checks each control account against its detail - receivables against unpaid invoices, payables against unpaid bills, and so on. They should always agree; a month can't be closed if one doesn't.
The trial balance, balanced, from 1 January to 30 September
2. The financial statements
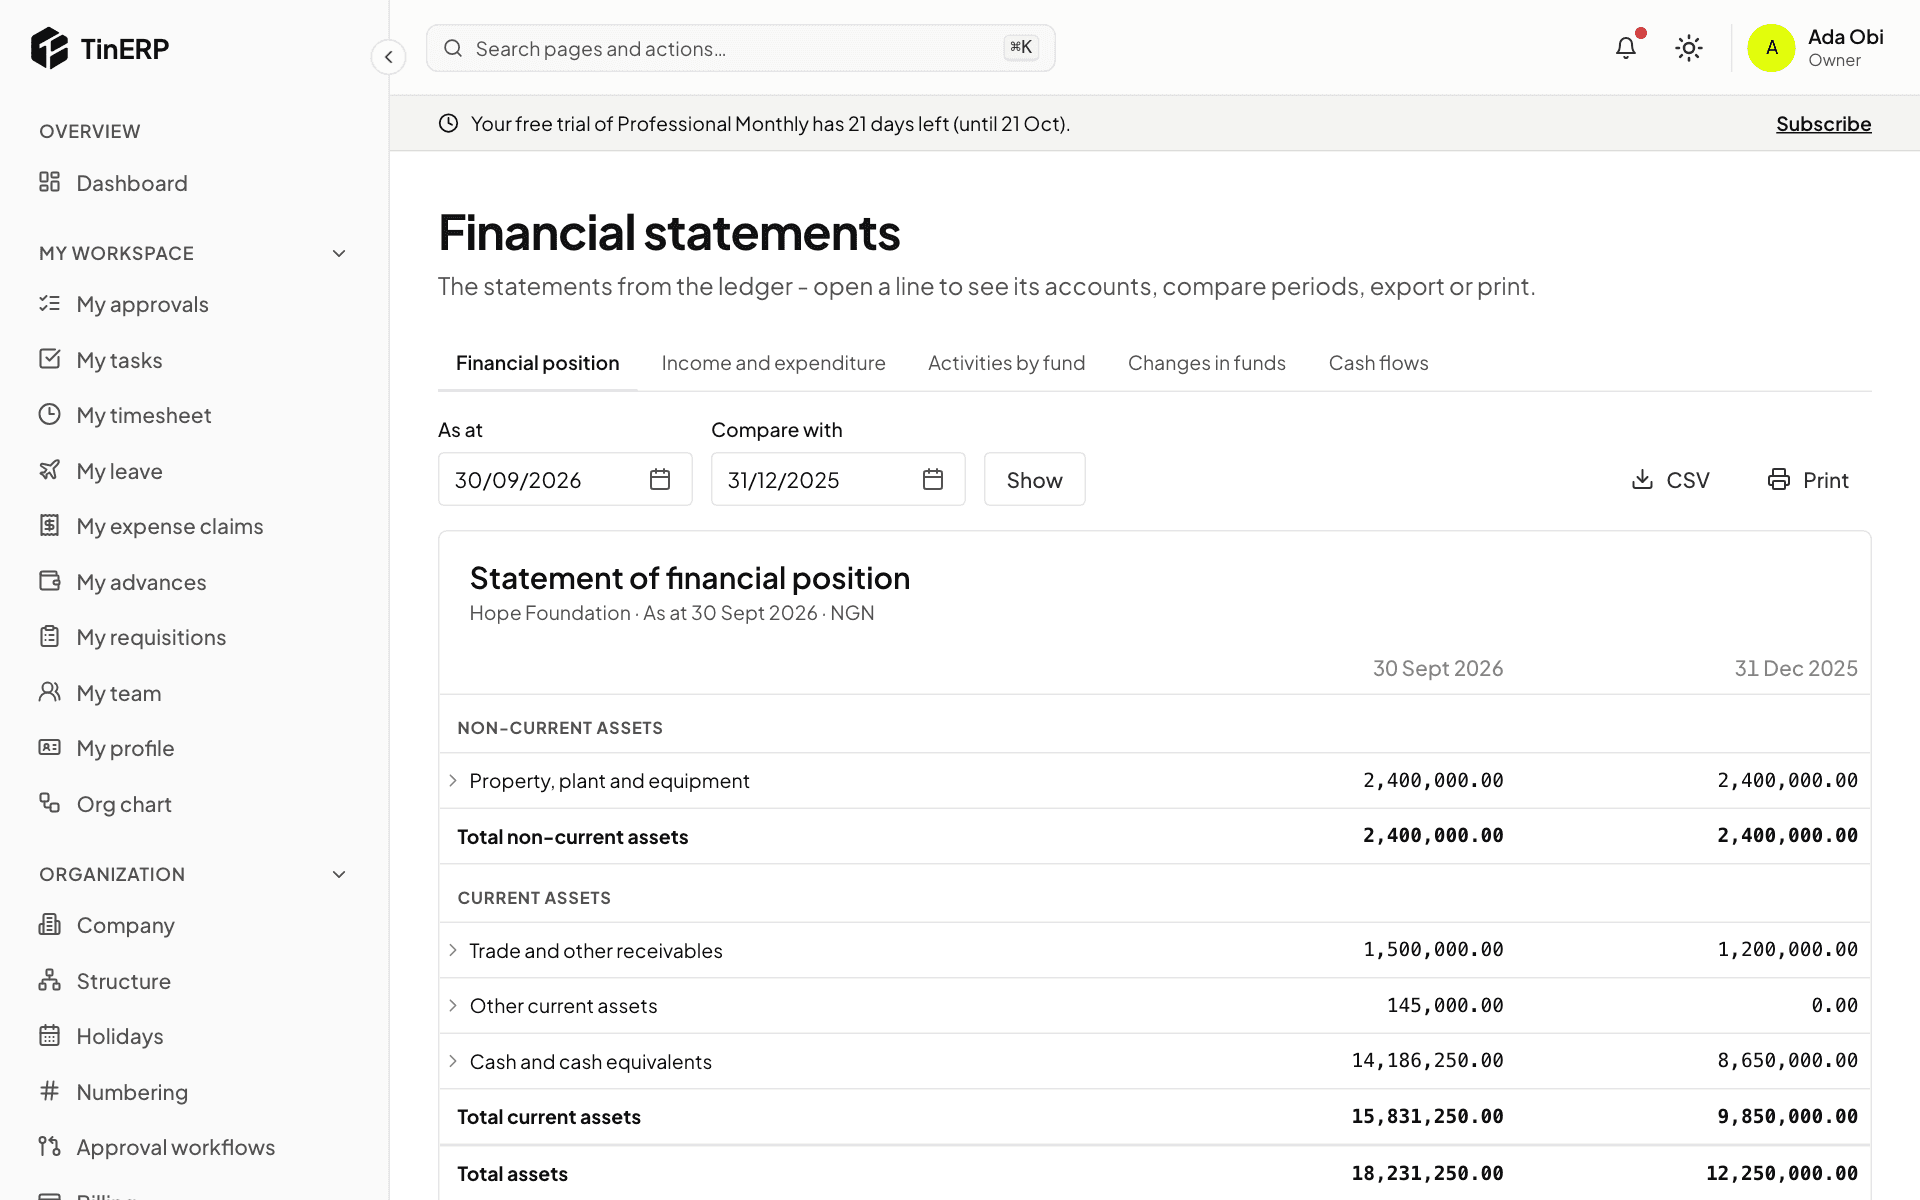
Finance → Financial statements has the Financial position at a date (compared with the end of last year), Profit or loss - for NGOs Income and expenditure - for any dates compared with a year earlier, changes in equity (NGOs: Changes in funds), and Cash flows. NGOs also get Activities by fund.
Open a line to see its accounts. CSV exports it; Print puts it on your letterhead, to print or save as PDF.
The statement of financial position at 30 September, compared with 31 December
Finance · Finance managers · about 4 min
Close a month and the year
Closing a month stops anything more being posted into it, so the figures you've reported stay put. See Month-end for everything to do first.
1. Close and lock months
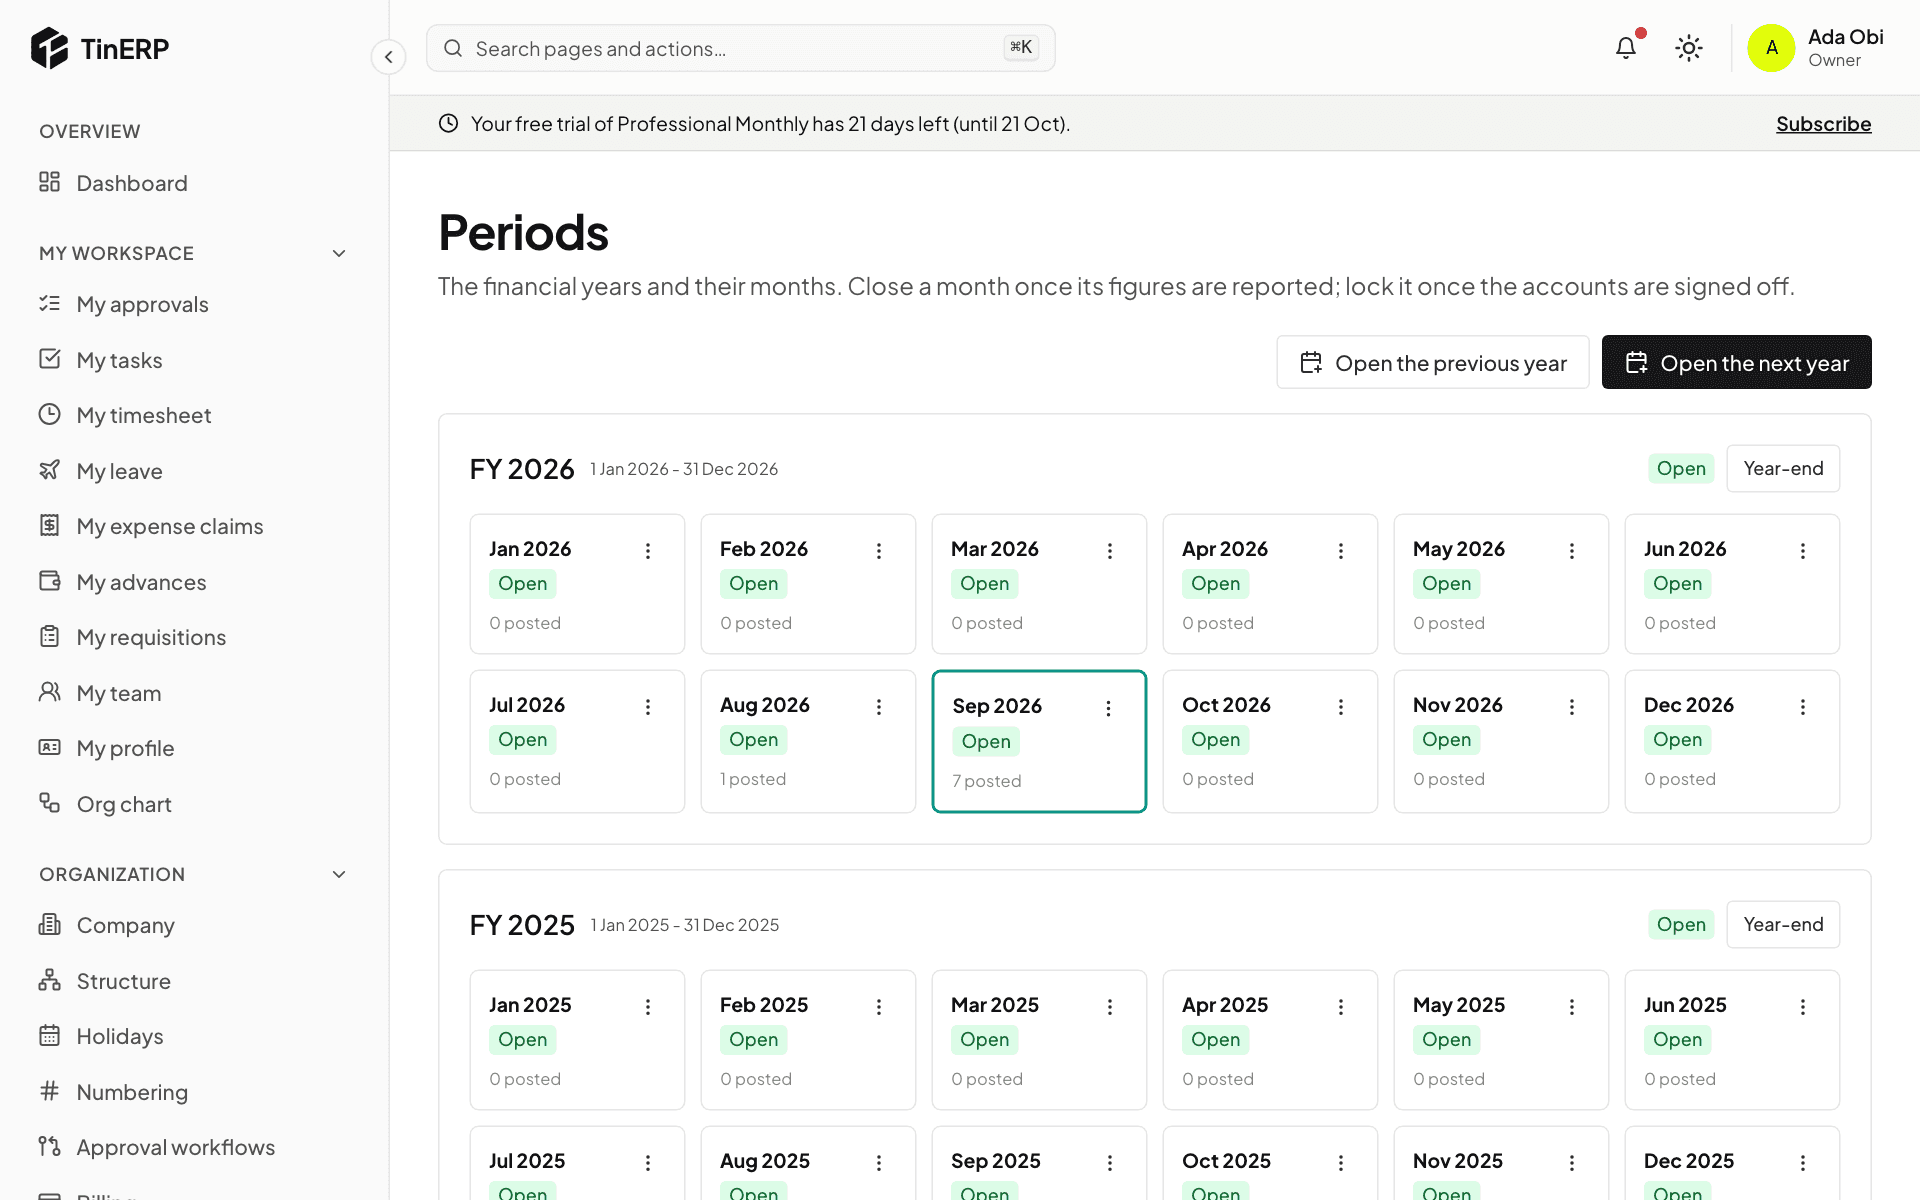
Go to Finance → Periods. Each month shows its status and how many journals are posted in it. Use a month's menu to Close it once its figures are reported - not while journals in it wait for approval, or a control account disagrees with its detail.
Reopen needs its own permission and a reason; it changes nothing already posted, it only lets a correction in. Lock a closed month once the accounts are signed off - locked is final.
Periods: FY 2026's twelve months, with September current
2. Close the year
Select Year-end on the year. You see each income and expense account's balance, the result - for NGOs, each fund's - and anything that stops the close (an earlier year still open, journals waiting, a locked last month).
Give a reason and Close: one closing journal on the year's last day brings income and expenses to zero and puts the result into retained earnings, or each fund's balance. Then the year and its months are closed. It can be reopened (with the permission and a reason) for an audit adjustment, and locked once signed off.
Procurement · Buyers and procurement teams · about 4 min
How Procurement works
Procurement follows one chain: requisition → (quotations) → purchase order → receiving → vendor invoice → payment. Each step is done by a different person, so no one can buy, receive and pay on their own.
1. Who does what
Anyone raises a requisition in My requisitions; their line manager approves it. Buyers turn approved requisitions into orders - after getting quotations when it's worth it - and send them. Store keepers record what arrives. Accounts enter the vendor's invoice, which is matched to the order and the delivery and approved for payment. Finance pays it.
The Admin role can do all of it. Most organizations give buyers, store keepers and approvers their own roles, and TinERP keeps them apart: whoever raised an order doesn't receive it, and whoever submitted or received doesn't approve the invoice.
2. The dashboard
Procurement → Dashboard shows this year's spend, what's committed on open orders, late deliveries and invoices to act on, then the pipeline - requisitions waiting, lines to order, quotations out, orders to approve and to receive. Select any figure for its list.
The Procurement dashboard: spend, committed, late deliveries, invoices to act on and the pipeline
Questions
Staff can't see the Procurement menu.
That's by design: everyone raises requisitions from My workspace → My requisitions. The Procurement menu is for the people who run buying.
Procurement · Buyers and procurement managers · about 4 min
Add and approve vendors
Orders only go to approved vendors. Each vendor is checked once - who they are, their documents and their bank details - and approved by someone other than whoever added them.
1. Add a vendor
Go to Procurement → Vendors and add one: company or individual, their names, CAC number and TIN (the same twice is refused - it's almost always a duplicate), VAT registration, payment terms, what they supply, contacts - mark one Orders go here - and their bank details.
Under Documents, upload the CAC certificate, tax clearance, VAT certificate and insurance, with their expiry dates. You're told before one expires; an expired document stops new orders.
An approved vendor: details, contacts, bank details, documents and the approval
2. Get it approved
A new vendor is prospective. Select Submit for approval; someone else approves it (by default an Admin). Then orders can go to them.
3. Changing bank details
For an approved vendor, Change on their bank details makes a new account that waits for approval by someone other than you - the old one stays in use until then, and payments to them are held. Check new details with the vendor by phone, on a number you already have.
Tip: A request to change a vendor's bank account, especially by email, is a common fraud. Always confirm it another way.
4. Block a vendor
Block (with a reason) stops new orders to a vendor - for repeated late deliveries, say. Unblock when it's resolved.
Procurement · Procurement managers · about 4 min
Categories, items and settings
Set these up once. Categories and items make requisitions quicker and reports useful; the settings are your purchasing policy.
1. Spend categories and items
Procurement → Spend categories groups what you buy, two levels deep (IT → Hardware). With Finance, each category has an expense account: that's where its spending posts, and how orders are checked against the budget.
Finance chooses the account, not procurement. Anyone who can Manage the chart of accounts sees the Spend categories page too, with an account picker on each row, and is notified when a new category needs one. Buyers see Not mapped yet until then - they don't need any Finance permission. A vendor invoice in an unmapped category can't go to payables until it's mapped, or the vendor has a default expense account in Finance → Vendors.
Procurement → Items is your catalogue - code, name, goods or service, unit, category, preferred vendor and a guide price that orders keep up to date. People pick items when they raise requisitions.
2. Your purchasing rules
Procurement → Procurement settings: when to warn about vendor documents expiring; the VAT rate on orders; Larger orders need quotations - orders over an amount need a number of quotations, or a sole-supplier reason; how much over the order a delivery may be; whether whoever raised an order may also receive it; and how far above the order price an invoice may be and still match.
Procurement settings: vendor documents, orders, quotations, receiving and vendor invoices
Procurement · Buyers · about 5 min
Raise and send purchase orders
Approved requisition lines wait in To order until someone orders them. One order can take lines from many requisitions, as long as one vendor supplies them.
1. Pick what to order
Go to Procurement → To order. Tick the lines one vendor will supply, change the quantity or price if needed, choose an approved vendor, and select Create order - a draft order is made. Or select Request quotations first (see Get quotations).
Lines already out for quotations show it, and are ordered from the award.
To order: paper and toner out for quotations, and motorbike tyres waiting to be ordered
2. Check and submit it
Open the draft order: the vendor, delivery date and place, terms, and the lines with their VAT. Edit anything, then Submit for approval. By default, orders over ₦1,000,000 need an Admin's approval; smaller ones are approved at once. Your organization can change this.
With Finance, the order is checked against the budget when submitted.
3. Send it to the vendor
Once approved, send it: it's emailed to the vendor's orders contact, or mark it sent if you gave it to them another way. Print gives a copy on your letterhead to print or save as PDF. Whoever raised the requisition is told.
A purchase order from a requisition, received in full, with its approval and delivery
4. Change, cancel or close
Revise an approved order that hasn't been received (with a reason) - the old version is kept, and it's approved again only if the total goes up. Cancel order frees its requisition lines to order again. Close a part-received order when nothing more is coming.
Procurement · Buyers · about 5 min
Get quotations
A request for quotation (RFQ) asks several vendors to price the same lines. Your organization may require quotations above an amount.
1. Send the request
In To order, tick the lines and select Request quotations - or start one in Procurement → Quotations (RFQs). Give it a deadline, where to deliver, any instructions, and the vendors to invite. You can also set how quotations are weighed: price, delivery and quality.
Send to vendors emails each one. Vendors without an email are marked, so you can send it another way.
2. Record the quotations
As each quotation arrives, record it against the vendor: their reference, the date, how long it's valid, delivery days, payment terms, and a price for each line. Mark a vendor Won't quote if they decline.
Quotations side by side compares them, with the lowest price for each line highlighted and the best overall Ranked first.
An RFQ with two quotations side by side and one vendor that won't quote
3. Award it
Once the deadline has passed - or every vendor has answered - select Award. Each line goes to one quotation; you can split lines between vendors. A line that doesn't go to its lowest price needs a reason. Award and create orders makes one draft order per vendor, at the quoted prices.
Procurement · Store keepers · about 3 min
Receive deliveries
Recording deliveries is what lets an invoice be matched: the vendor is paid for what actually arrived.
1. Receive a delivery
Go to Procurement → Receiving. To receive lists sent orders with what's still to come; late ones are marked. Select Receive: the date, the vendor's delivery note, and what arrived on each line (everything outstanding to start with - change it for a part delivery). For services, record a service confirmation instead.
Whoever raised the order can't receive it, unless your organization allows it.
Receiving: an order from Abuja Office Mart waiting, with Receive
2. Send back what isn't right
From a receipt, record a return: the quantities and why. They come off what's received, so the order expects them again, and the vendor's credit note can settle them later.
Procurement · Accounts and procurement · about 5 min
Match and approve vendor invoices
The three-way match compares the invoice with the order and the delivery: nobody pays for more than was received, or at a higher price than agreed.
1. Enter the invoice
Open the order and select Enter invoice, or go to Procurement → Vendor invoices. Enter their invoice number (the same one twice is refused), the dates, and what each line bills - it starts from what's been received and not yet invoiced. Save and match.
2. Check the match
Each line is checked: the quantity against what was received, the price against the order (within your tolerance, 2% by default). A line outside either is an exception, with the reason shown - invoiced 45, but only 40 received.
Correct it, or someone with the permission to override chooses Accept the difference with a reason, which stays on the invoice.
3. Approve it for payment
Select Submit for payment. By default an Admin approves - never whoever submitted it or received the goods, and not while a change to the vendor's bank details is waiting.
With Finance, an approved invoice becomes a posted bill in Finance → Bills, and Finance pays it; the invoice shows when it's paid. Without Finance, record the payment on the invoice.
A vendor invoice approved for payment and matched, now a bill in payables
4. Credit notes
When the vendor credits you - for a return, say - record their Credit note against the invoice, linked to the return. What's owed goes down; with Finance, a debit note is posted on the bill.
Procurement · Procurement managers · about 3 min
Procurement reports
Procurement → Reports has five reports, each with CSV export.
1. The reports
Spend - approved orders before VAT, by vendor, category or department, for any dates. Open orders - what's still to come, how much is received, and days late. Received, not invoiced - delivered but not yet billed: what Finance accrues at month end.
Vendor performance - on-time delivery, average delay, returns, invoice exceptions and price differences. Savings - what each award saved against the average and lowest quotations, and orders against requesters' estimates.
Procurement reports: spend by vendor this year
Reports · Everyone with Reports · about 4 min
Find and run a report
Reports → Report library lists every report you can run, from each module in your plan. What any report shows follows your own access - a manager sees their department, HR everyone.
1. Find a report
Go to Reports → Report library. Reports are grouped by module, with your Favorites at the top. Search by name.
Most open here. Those marked In the module - HR reports, the financial statements, aged receivables and others - open in their own module. Select the star to make any report a favorite.
The report library: a favorite at the top, then HR's reports
2. Run it your way
Open a report. The chips at the top are its filters - remove one, or Add filter on any field: a value, a range, text it contains, or a relative period such as this month or last quarter, which moves with the calendar.
Choose the columns to show and sort by any column. Totals cover every matching row, even when the screen shows the first 1,000. Select a row to open its record.
The Headcount by department report, with its filter, Export, Schedule and Save as a view
3. Export it
Select Export: CSV for anyone; Excel - numbers and dates stay numbers and dates, with a totals row - and PDF on your letterhead need the export permission. A very large report is made in the background: you're told when it's ready, and it's waiting in Reports → My report files for 7 days.
Tip: Every export is recorded in the audit log - who, which report, which filters.
Reports · Managers and admins · about 5 min
Build and share your own reports
You don't need to write anything technical: you choose the data, the columns, the filters and how to summarize it.
1. Start a report
In the library, select New report and choose the data - employees, leave requests, purchase orders, expense claims, journal lines, timesheet entries and more, as your plan and access allow. Or open any report and change it.
2. Summarize it
Select Summarize and choose: A list of rows; Group and total - up to three groupings (Then by) and up to four figures (count, total, average, lowest, highest), with a chart above the table if you like; or a Pivot - rows × columns × a figure, with totals across and down.
In a filter, My department follows whoever runs the report, so one shared report shows each manager their own department.
A saved view of spending by account, summarized by account, shared with everyone
3. Save and share it
Select Save as a view, name it, and choose Who sees it: only you, some roles, or everyone. Each person who opens it sees what their own access allows. Only you can change it; others can Save as new.
Reports · Everyone with Reports · about 4 min
Dashboards
A dashboard puts the figures you watch on one page, for one date range and department, each opening the report behind it.
1. Start from one of ours
Go to Reports → Dashboards. Start from has an overview for each module in your plan - HR, Procurement, Finance, Projects. Select Use this to make it yours, or New dashboard to start empty.
Dashboards: yours, and the starters to copy
2. Read it
Choose the date range and department at the top - every widget that follows the dashboard's dates changes with them. Key figures show the change on the period before. Select Report on any widget for the figures behind it, ready to filter or export.
The Finance overview dashboard: expenses, claims, expenses by month and by fund
3. Make it yours
Select Edit, then Add a widget: choose the data, show it as a Key figure, Bar chart, Trend line, Donut, Ranked list or Table, and its width. Move and resize widgets; everything saves as you go.
Share it with roles or everyone - and make it a role's default - if your role allows. Each viewer sees their own access.
Reports · Managers and admins · about 3 min
Reports on a schedule
A scheduled report is made for each person it's sent to, with their own access - so one schedule gives each manager their own department's figures.
1. Schedule a report
Open the report or saved view and select Schedule: daily, weekly on a day, or monthly on a date, at a time; as PDF, Excel or CSV; Send to chosen people and everyone with a role. Tick to skip sending when there's nothing in it.
Relative periods - last month, month to date - keep a schedule meaningful.
2. Follow your schedules
Reports → Scheduled reports shows each one: when it runs, to whom, and how the last run went. Send now runs it at once; the menu pauses or deletes it.
Each recipient is told, and finds their copy in Reports → My report files - the report itself never travels in the email.
Scheduled reports: a monthly PDF to two people, with Send now
Walk-throughs · Everyone involved in buying · about 6 min
Buying, from request to payment
Here's one real purchase in the Hope Foundation demo - spare parts for a borehole pump - through every step, with who does each. The detail of each step is in its own guide.
1. 1. Kemi asks for the parts
Kemi, a programme officer, raises a requisition in My workspace → My requisitions: what's needed, why, by when, and a rough price for each part. She submits it for approval.
The New requisition form
2. 2. Tunde approves it
Tunde, her manager, sees it in My approvals and approves it. The lines now wait in Procurement → To order.
3. 3. Ada orders them
Ada, the buyer, ticks the lines in To order, chooses Sahel Pumps - an approved vendor - and creates the order. It's under ₦1,000,000, so it's approved at once; she sends it to the vendor. (For a larger or contested purchase, she'd get quotations first.)
The purchase order for the pump parts
4. 4. Femi receives the delivery
When the parts arrive, Femi, the store keeper, records them in Procurement → Receiving with the vendor's delivery note. Ada raised the order, so she couldn't receive it herself.
Receiving
5. 5. The invoice is matched and approved
Sahel's invoice arrives. Ada enters it against the order; it matches what was ordered and received. Ifeoma, in finance, approves it for payment - neither Ada (who submitted it) nor Femi (who received the goods) could. It becomes a bill in Finance.
The matched vendor invoice, approved and passed to payables
6. 6. Finance pays
Ifeoma pays the bill in Finance → Payments - or in the next payment run - with WHT worked out. The vendor invoice shows paid, and the cost sits against the programme's budget and grant.
Pay a vendor
Walk-throughs · Finance teams · about 6 min
Month-end
Do these in the first days of the new month, then close the old one. Once it's closed, your reported figures stay put.
1. 1. Reconcile the bank
For each bank account, import the month's statement and reconcile it in Finance → Banking - recording bank charges and interest as you go. Count petty cash.
Banking
2. 2. Catch up on documents
Post the month's sales invoices and bills. Check Procurement → Reports → Received, not invoiced: anything delivered but not yet billed is a cost of this month - post an Accrual journal for it (it reverses itself next month).
Pay approved expense claims, and chase advances whose retirements are overdue.
3. 3. Let the schedules run
Prepayment and deferred income releases post by themselves. Recurring journals - rent, depreciation - too. Check Finance → Journals for drafts left waiting.
4. 4. Check the books agree
Run the Trial balance for the month and check Subledgers says All agree. Look at Budget vs actual for anything unexpected.
The trial balance
5. 5. Tax
The month's VAT return and WHT schedules are due by the 21st. File them, pay them, and record both in Finance → Tax returns.
6. 6. Close the month
In Finance → Periods, Close the month. Then produce the month's Financial statements - for NGOs, activities by fund and each grant's budget for the donors.
Periods
Walk-throughs · NGO finance and programme teams · about 7 min
An NGO grant, from award to donor report
Here's WaterAid Nigeria's ₦25m grant to the Hope Foundation demo for clean water in Kano, from the award letter to the donor report. The key habit: every naira received or spent on the grant carries the grant on its line - then every report comes straight from the books.
1. 1. Set up the fund and the grant
The award is restricted to clean water, so Ifeoma, the finance officer, adds a restricted fund - Water, sanitation and hygiene - in Finance → Finance settings → Funds, then the grant under Grants: donor, reference, the fund, ₦25,000,000, and its dates.
Finance settings → Grants: WA-2026, WaterAid Nigeria, in the WASH fund
2. 2. Enter the donor's budget
From the grant, she opens its Donor budget and enters the donor's own lines - boreholes, community training, staff and travel - with the accounts that count against each. That's the budget the donor will report against, for the grant's whole life.
3. 3. Tag the money in
When the first ₦6,000,000 tranche arrives, it's recorded to Grants - restricted income with the grant on the line - by a receipt against an invoice to the donor, or a journal. In the NGO chart, restricted grant income can't be posted without a grant.
4. 4. Tag every cost
Every cost of the programme carries the grant: journal lines (turn on Dimensions, funds and grants), and the fund and grant on bills, expense claims and advances. Where the money comes from the general bank account, TinERP adds the interfund lines itself.
A new journal with dimensions, funds and grants on each line
5. 5. Follow the burn rate
The donor budget now shows each line's actual, committed and available, and the burn rate: time elapsed against the award spent. Here, half the grant's time has gone but only 10% of the money - spending behind time, which donors ask about. The programme team knows early.
The WaterAid grant budget with actuals on two lines and the burn rate
6. 6. Report to the donor
For the report, Ifeoma exports the grant budget as CSV (Export CSV), and prints Financial statements → Activities by fund, which separates restricted and unrestricted money. The Trial balance, filtered by the grant, lists every account it touched; each line opens its entries.
The statement of financial activities: restricted grant income and programme costs, by fund
Tip: When the grant closes, its fund's balance should be what's left to return or reallocate - the donor's agreement says which.
Troubleshooting · Everyone · about 3 min
Signing in and access
The messages are shown in quotes as they appear. Your administrators - listed on Help - can fix most of these.
1. "Your role doesn't allow this. Ask an administrator for access."
Your role doesn't include what you tried. Ask an administrator: they can give your role the permission, or give you another role (Access & security → Roles and Users).
2. A menu or page is missing
Either your organization's plan doesn't include that module, or your role doesn't use it. Menus such as HR, Procurement and Finance are for the people who run them - everyone else uses My workspace.
3. "Invalid credentials."
The email or password is wrong. Check the email you were invited with, then use Forgot password?. After several wrong tries: "Account temporarily locked. Try again in N minute(s)." - wait, then try again.
4. "This reset link is invalid or has expired."
Reset links work once, for a short time. Ask for a new one with Forgot password?.
5. Lost the phone with your authenticator app
Ask an administrator to Reset two-factor on the Users page. You'll sign in with your password and set it up again on your new phone.
6. "Turn on two-factor sign-in for your own account first (My account), then require it for everyone."
An administrator can only require two-factor sign-in once they use it themselves. Set it up in My account, then turn the requirement on.
Troubleshooting · Everyone · about 3 min
Leave, timesheets and approvals
Names and numbers in the messages are examples.
1. "You don't have an employee record - ask HR to link your login to it."
Leave, My team and approvals by manager work through your employee record. HR links your login to it from your employee page (Link an existing login).
2. "Only 3 annual leave days left."
The request takes more days than you have. Requests waiting for approval count as booked. Book fewer days, or ask HR - they can adjust a balance with a reason.
3. "Kemi already has leave booked from … to …"
The dates overlap leave already booked. Cancel or change the other request first.
4. "No annual leave policy applies to Kemi."
None of the leave type's policies fits this person - their grade, employment type or length of service. HR adds or widens a policy in HR settings → Leave.
5. "This leave has started - it can't be cancelled."
Leave can be cancelled until its first day. After that, talk to HR.
6. "Tue 1 Oct adds up to 26 hours - a day has 24."
The day's hours across your rows are more than 24. Correct one of them. Hours are 0 to 24, in quarters of an hour.
7. An approval went to the wrong person, or nobody
Approvals follow your organization's rules and the reporting lines HR keeps. Check the person's manager on their employee record, and the rules in Organization → Approval workflows (try Who would approve this?). If nobody a rule names can approve, it goes to the Admins and says so.
Someone away? Their approvals also go to whoever they chose in Out of office.
8. "Only the person who asked can withdraw it."
Only the requester can take back something waiting for approval. The approver can Send back instead.
Troubleshooting · Finance teams · about 4 min
Finance messages
Dates, numbers and account names in the messages are examples.
1. "Set up Finance first."
Someone who manages accounting setup does it once, from Finance → Chart of accounts - see Set up Finance.
2. "No financial year covers 2027-01-15 - open it in Finance → Periods."
The date is in a year that isn't open yet. In Finance → Periods, select Open the next year (or the previous one).
3. "Sep 2026 is closed - post into an open period, or reopen it."
Post into an open month instead, or ask someone with the Reopen closed periods permission to reopen it, with a reason. "… is locked - it's never reopened" means the month is final: post the correction in the current month.
4. "Debits (…) and credits (…) don't balance - a difference of …"
The journal is out by that amount. The editor's footer shows which side is bigger.
5. "… is a control account - only its subledger posts there, never a manual journal."
Receivables, payables, VAT, WHT and employee advances change only through their own documents - invoices, bills, payments, tax returns, claims and advances. Record the document instead.
6. "… this account takes no department" - or a dimension is required
Each account says which of department, branch, cost center, fund and grant its lines must have, may have, or can't have. Turn on Dimensions, funds and grants in the editor and fill in, or clear, the one named.
7. "The grant belongs to another fund."
Choose the grant's own fund, or leave the fund empty - the grant brings it.
8. "JV-2026-00012 is posted - reverse it instead."
Posted journals can't be edited. Open it, Reverse it with a reason, and post a correct one.
9. "The opening balances don't balance …" or "… is a control account - enter its open items …"
Check the balances against your last trial balance. Receivables, payables and advances aren't entered as one figure: list each unpaid invoice, bill and advance under Open items.
10. "Close FY 2025 first - years close in order."
Close the earlier year first - often the one opened for your opening balances, which has nothing to close but its months.
11. "… doesn't agree with its detail - see Finance → Trial balance → Subledgers."
A control account is out of step with the documents behind it, so the month can't close. Look at Subledgers under the trial balance, and contact TinERP support - nothing in TinERP should be able to cause it.
12. "… doesn't match the order and receipts - correct it, or have the exception accepted."
A vendor invoice bills more than was received, or at a higher price than the order. Correct the invoice, or someone with Override match exceptions accepts the difference with a reason.