10 guides ready to print - choose Save as PDF in the print window for a handout. Back to the help centre
TinERP user guide
Everyday tasks
Everyone · What every member of the team does: your day, leave, tasks, timesheets, claims and approvals.
Printed 3 October 2026 · the latest version is always in the help centre online
Contents
Everyday tasks
Sign in and find your way around
Your day at a glance
Book leave
Approve requests
Your tasks
Fill in your timesheet
Claim expenses and request advances
Ask for something to be bought
Notifications
Your profile and account
Everyday tasks · Everyone · about 3 min
Sign in and find your way around
Your administrator invites you by email. Open the invitation, choose a password, and you're in.
1. Sign in
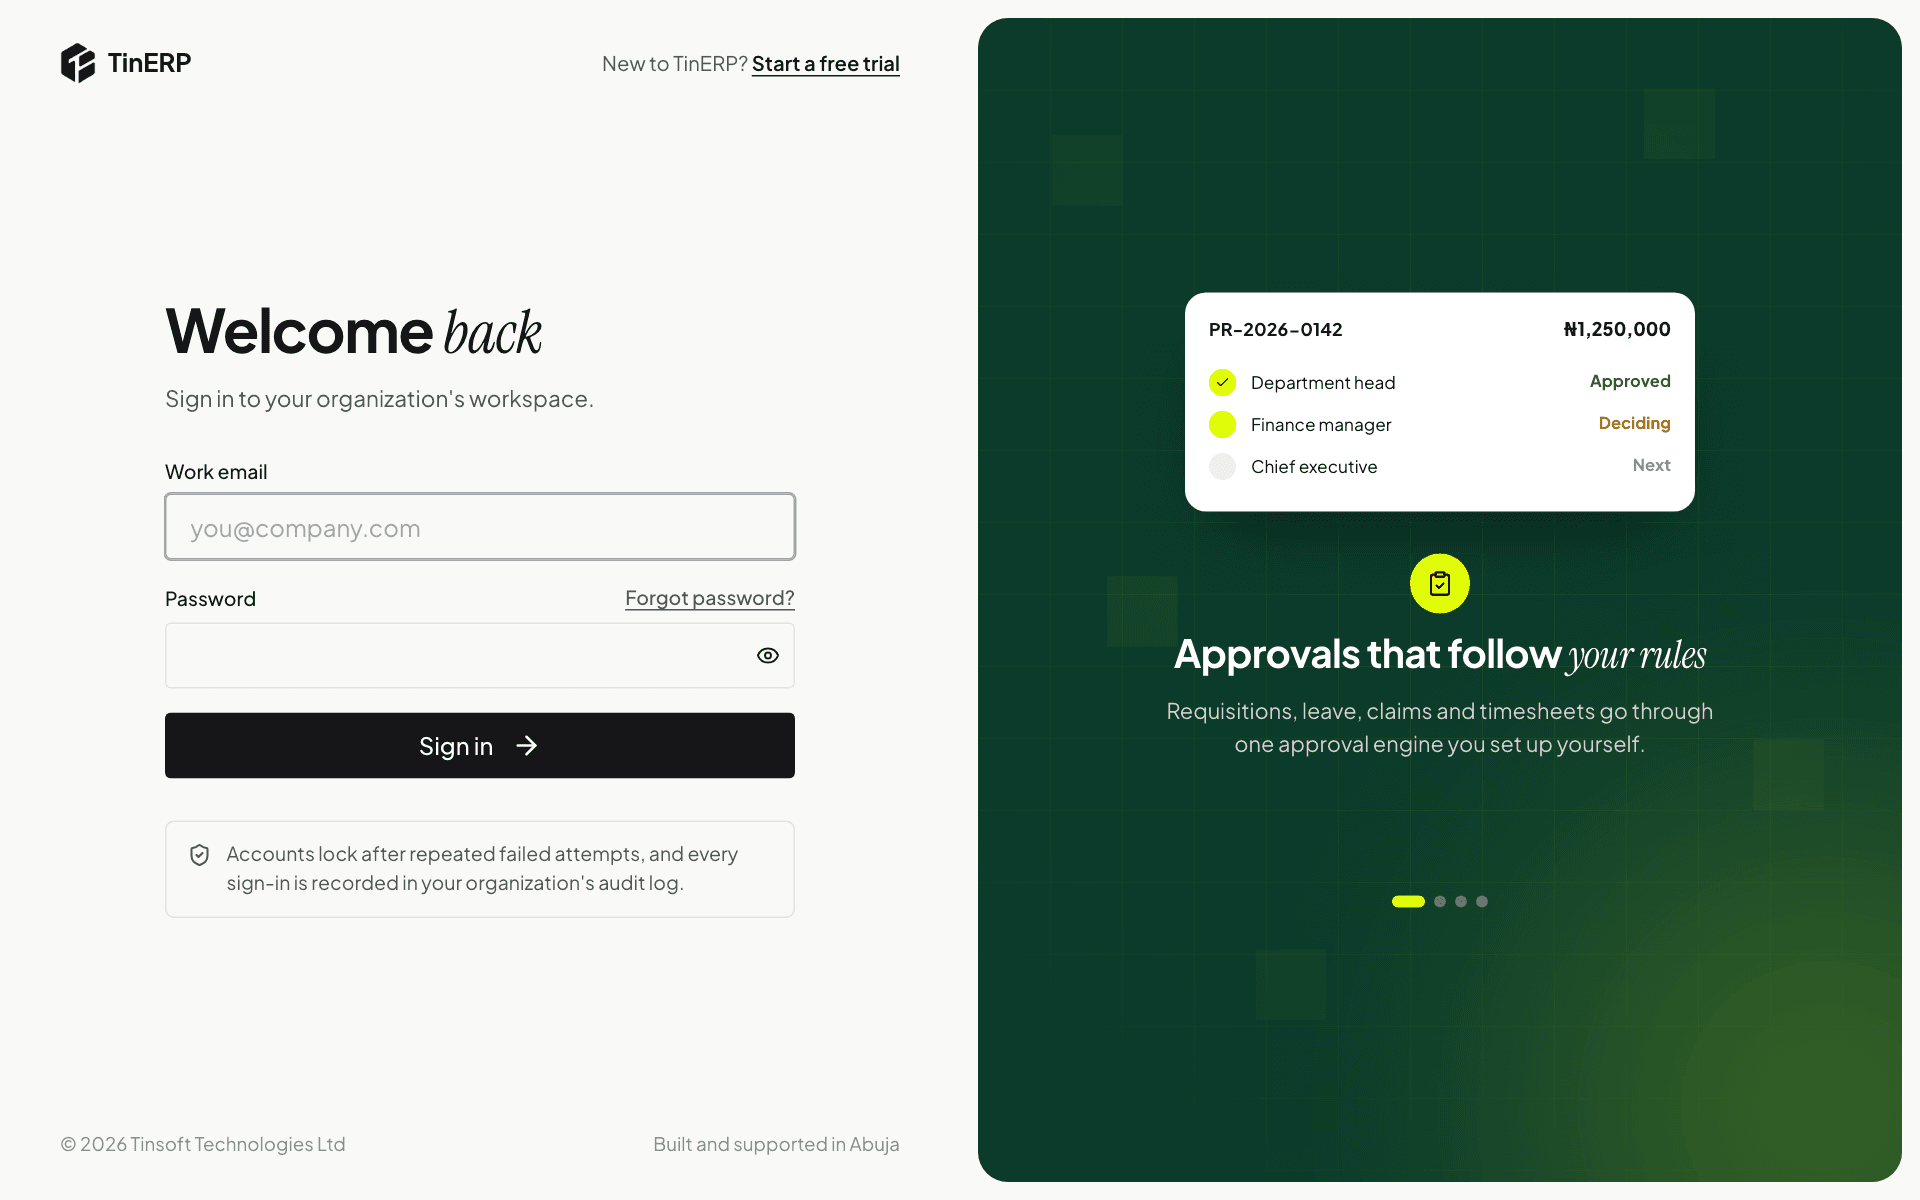
Go to your TinERP sign-in page and enter your email and password. If your organization uses two-factor sign-in, you'll also enter the 6-digit code from your authenticator app.
Forgotten your password? Select Forgot password? next to the password box and we'll email you a link to choose a new one. It works once and expires after 30 minutes.
The TinERP sign-in page
2. Find anything with search
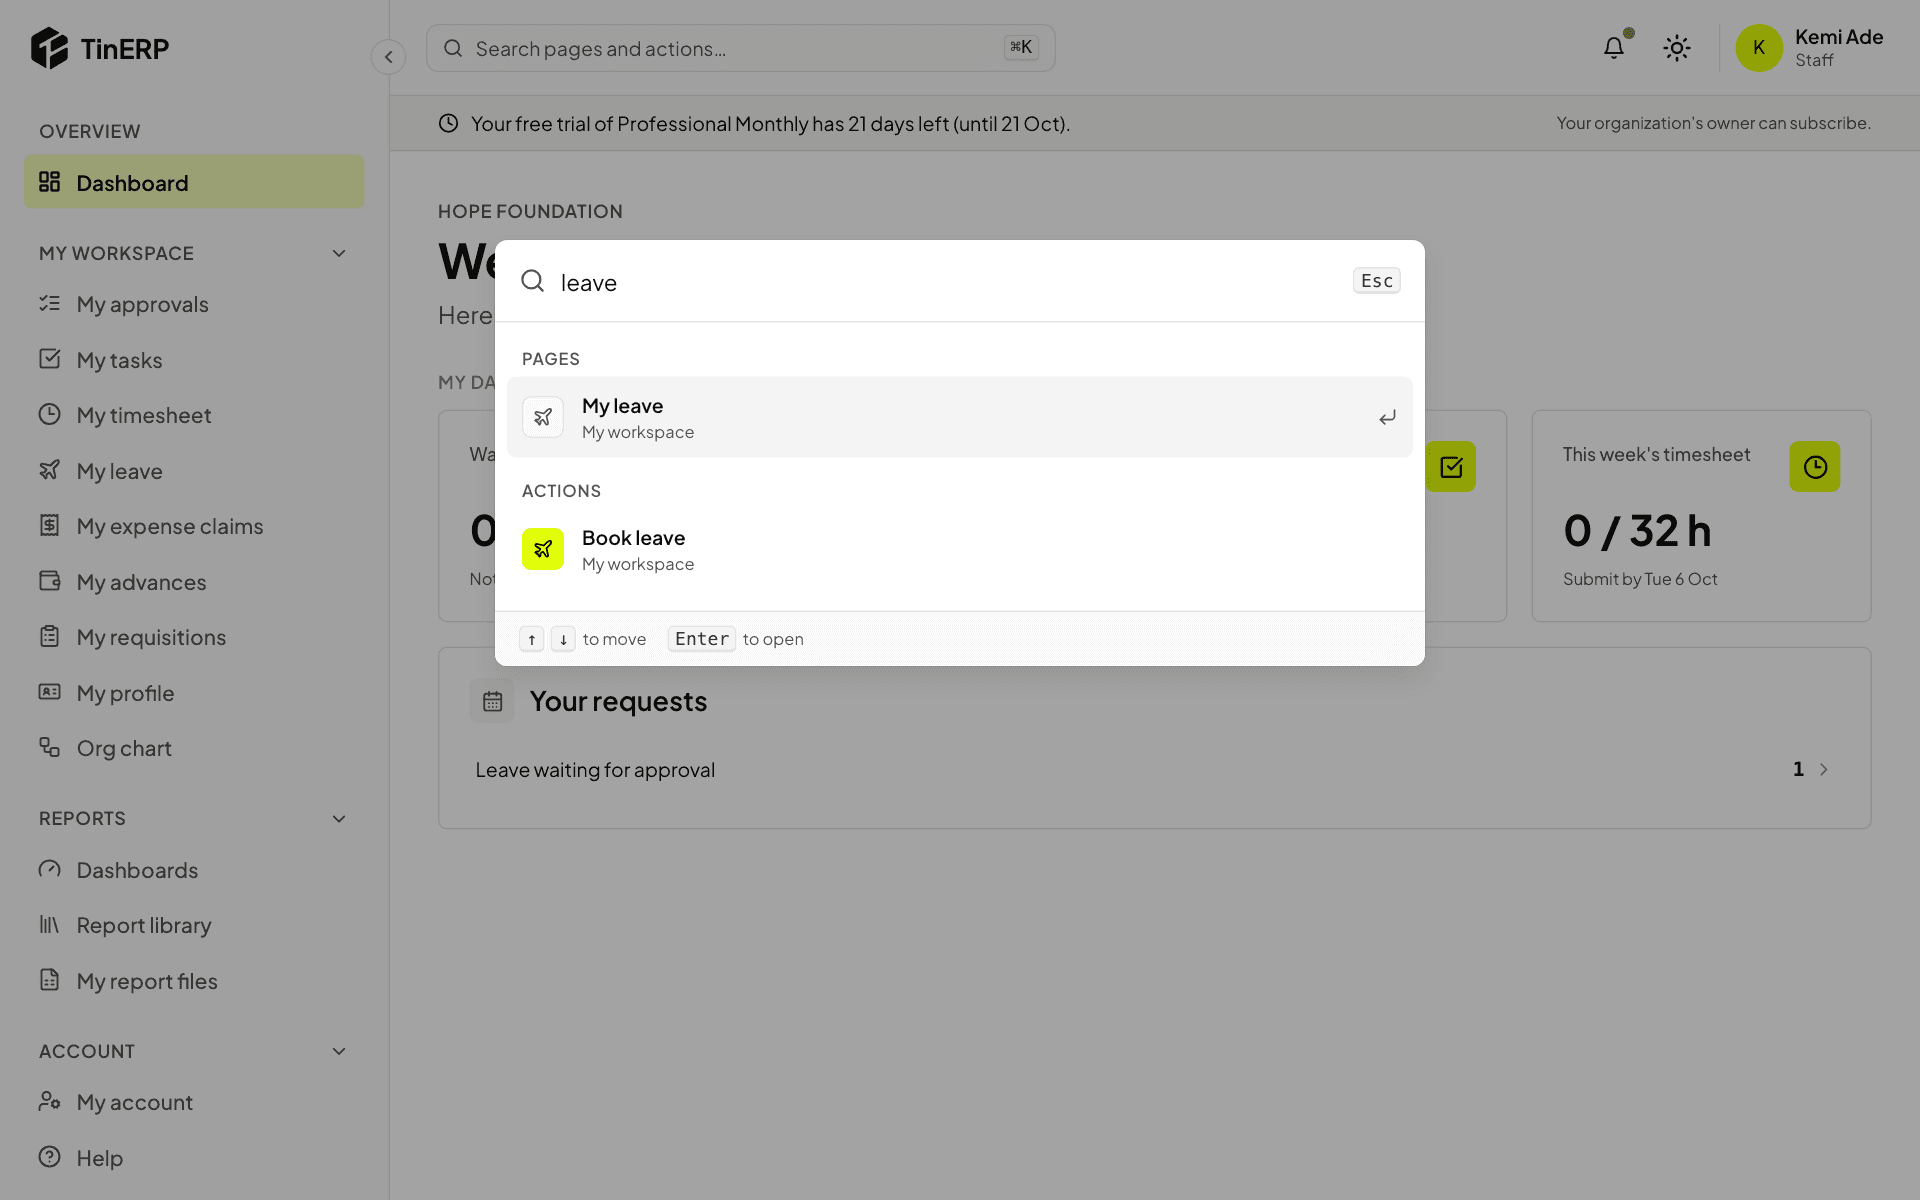
Select the search bar at the top of every page, or press ⌘K (Ctrl+K on Windows). Start typing - for example "leave" - and choose a page or an action with the arrow keys and Enter.
Search only shows what you're allowed to use, and remembers what you opened recently.
The search window with 'leave' typed, showing My leave and Book leave
Everyday tasks · Everyone · about 2 min
Your day at a glance
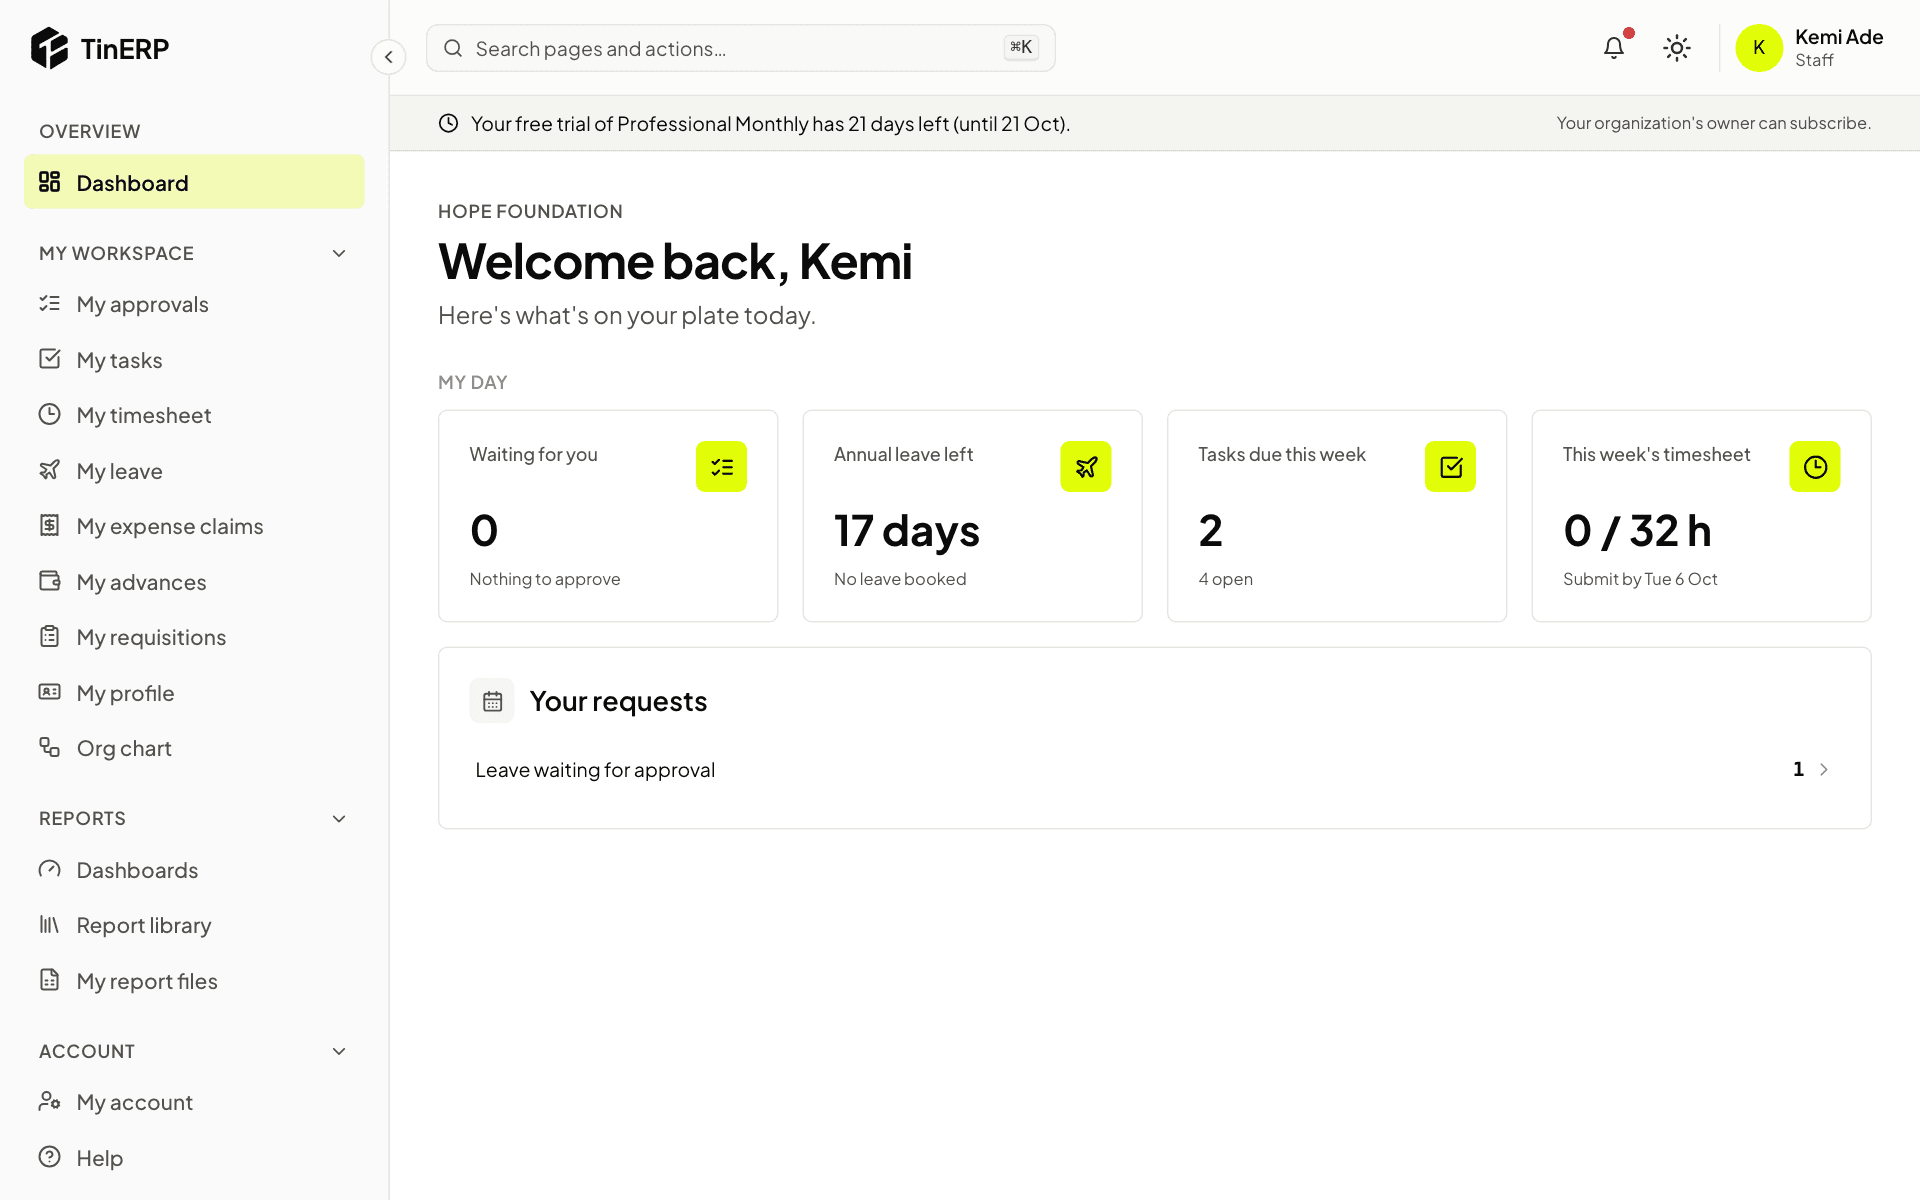
Your Dashboard is built around you: what's waiting for you, your leave, your tasks and your timesheet. Managers also see their team.
1. Read My day
Waiting for you counts approvals only you can decide. Leave left, Tasks due this week and This week's timesheet keep you on track.
Select any tile to go straight to it. Your requests lists what you've asked for that's still waiting, such as leave or an expense claim.
Kemi's dashboard: waiting for you, annual leave left, tasks due and this week's timesheet
Everyday tasks · Everyone · about 3 min
Book leave
Leave requests go to your manager (or whoever your organization's rules say). You're notified when they decide.
1. Check your balances
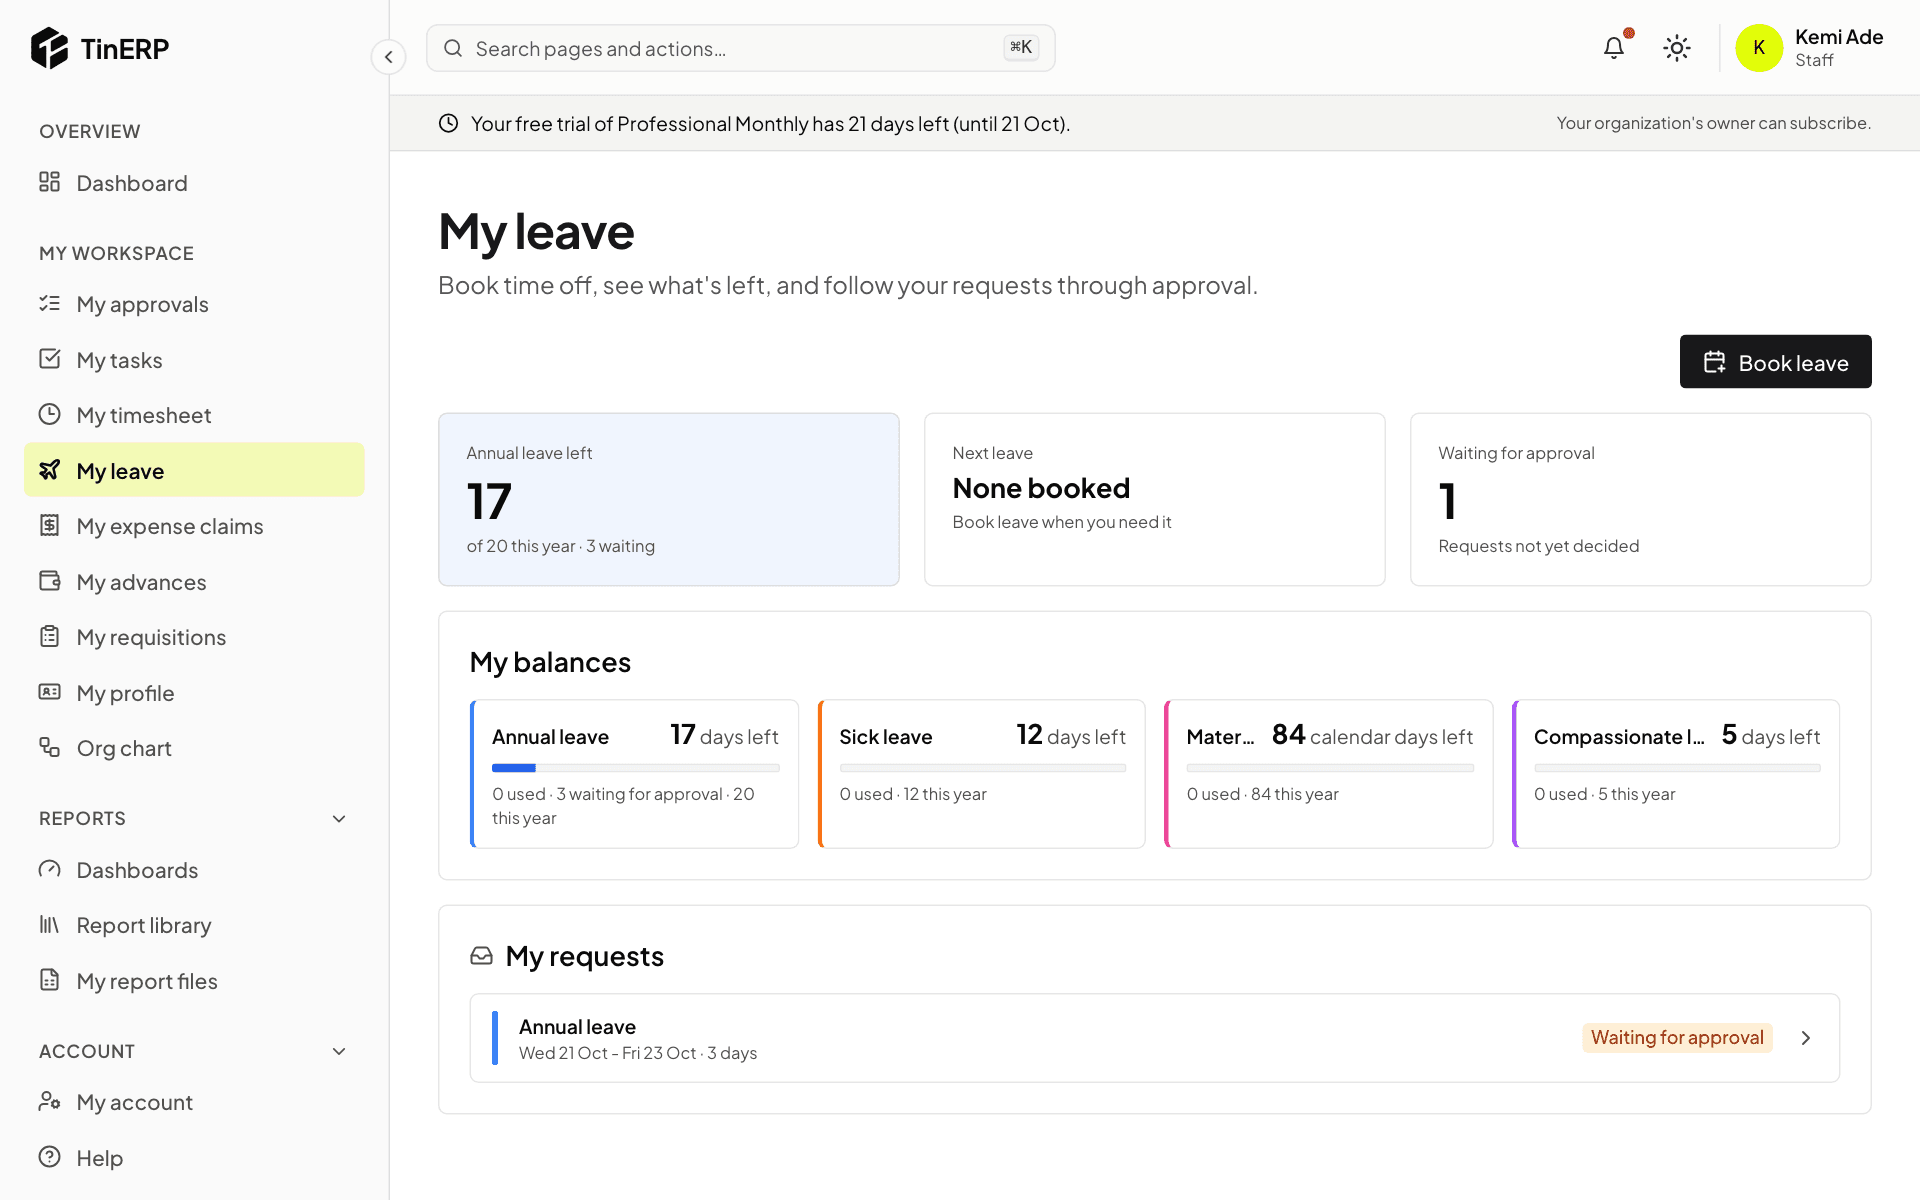
Go to My workspace → My leave. You'll see how many days you have left of each type, your next booked leave, and your requests.
My leave: annual leave left, balances by type and a request waiting for approval
2. Ask for leave
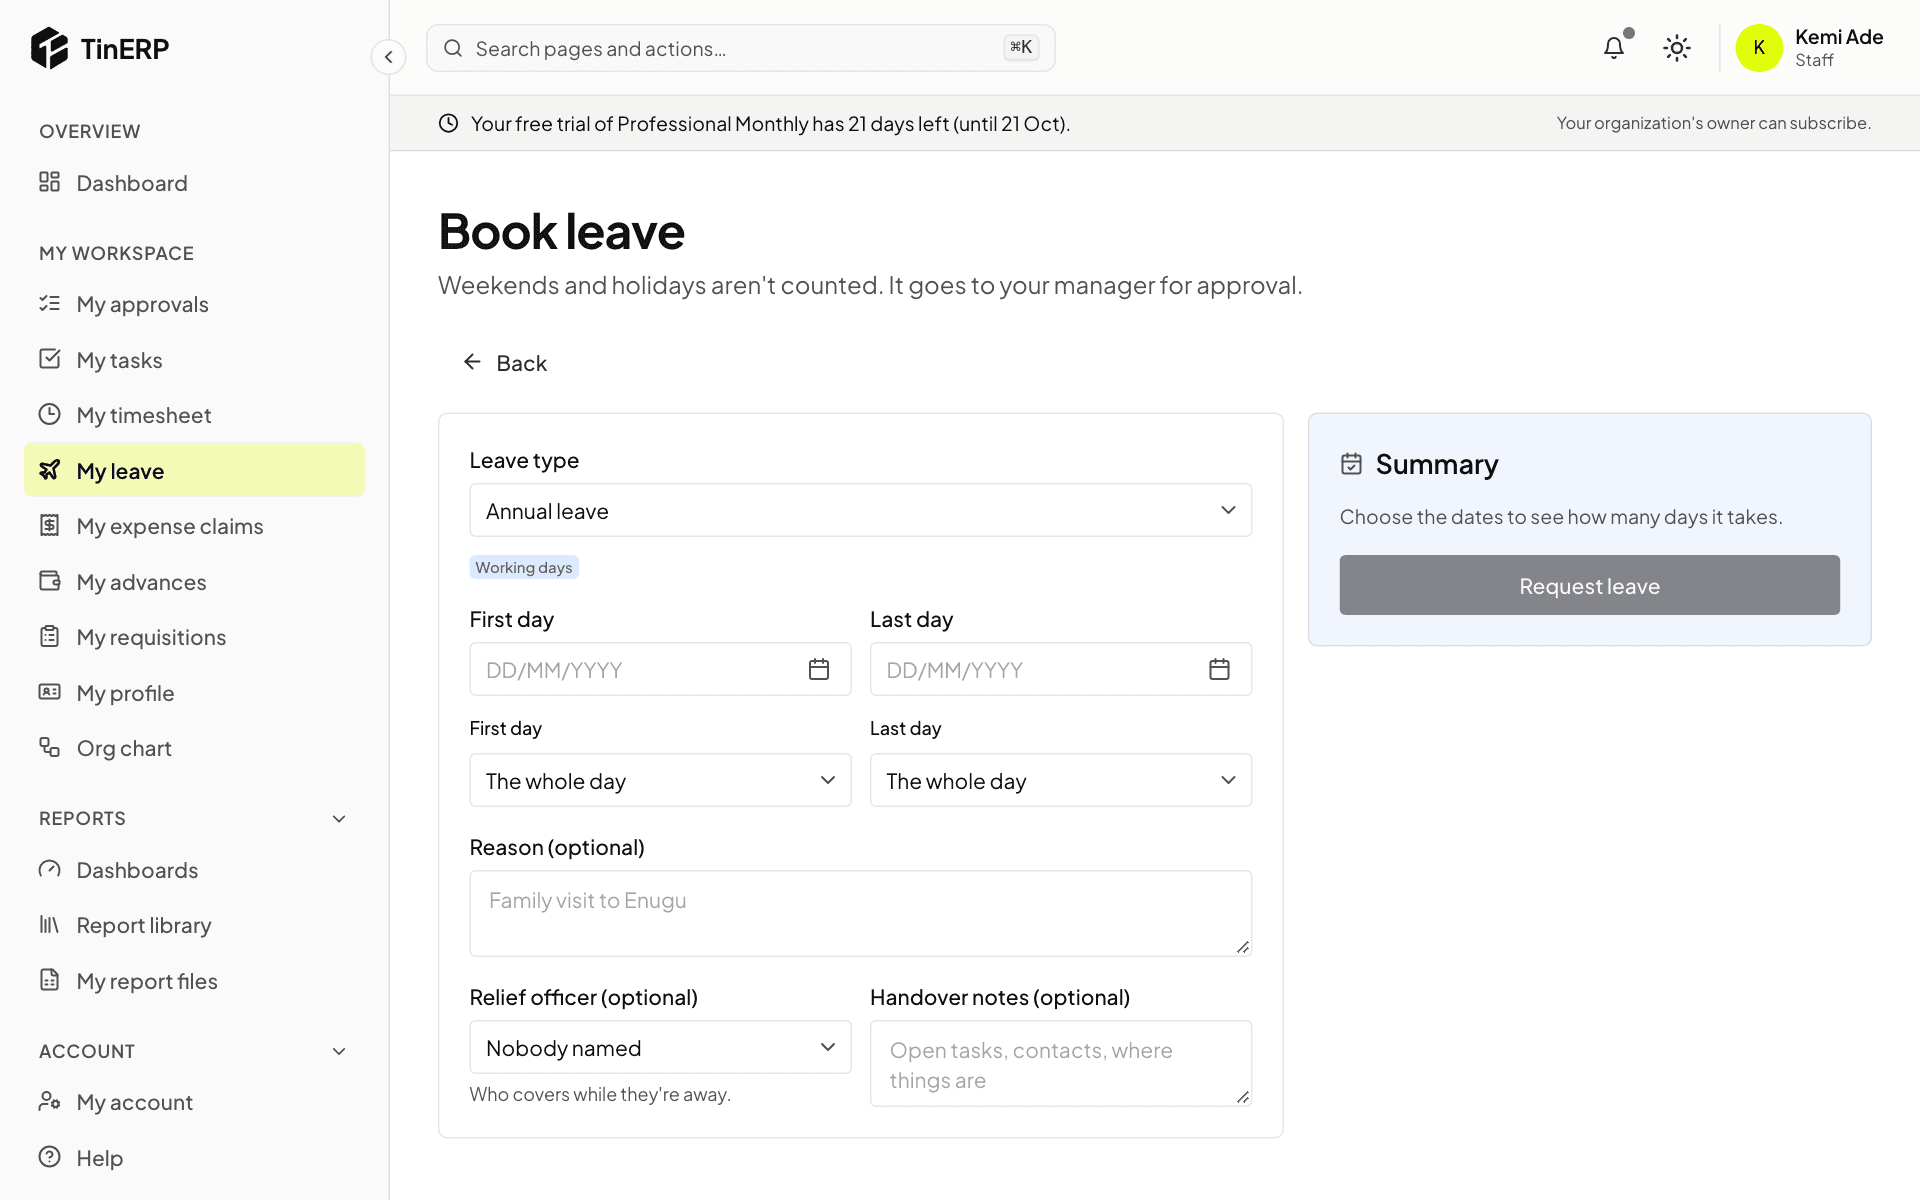
Select Book leave. Choose the leave type, your first and last day, and whether either is a half day. Add a reason, and - if your organization uses them - a relief officer and handover notes.
The Summary shows how many days it takes. Weekends and public holidays aren't counted. Select Request leave to send it.
The Book leave form with leave type, dates, reason, relief officer and the summary
Tip: Changed your plans? Open the request from My leave to cancel it - before it's approved, or ask to cancel it afterwards.
Everyday tasks · Managers and approvers · about 2 min
Approve requests
Everything waiting for your decision is in one place, oldest first - whatever kind of request it is.
1. Approve or reject
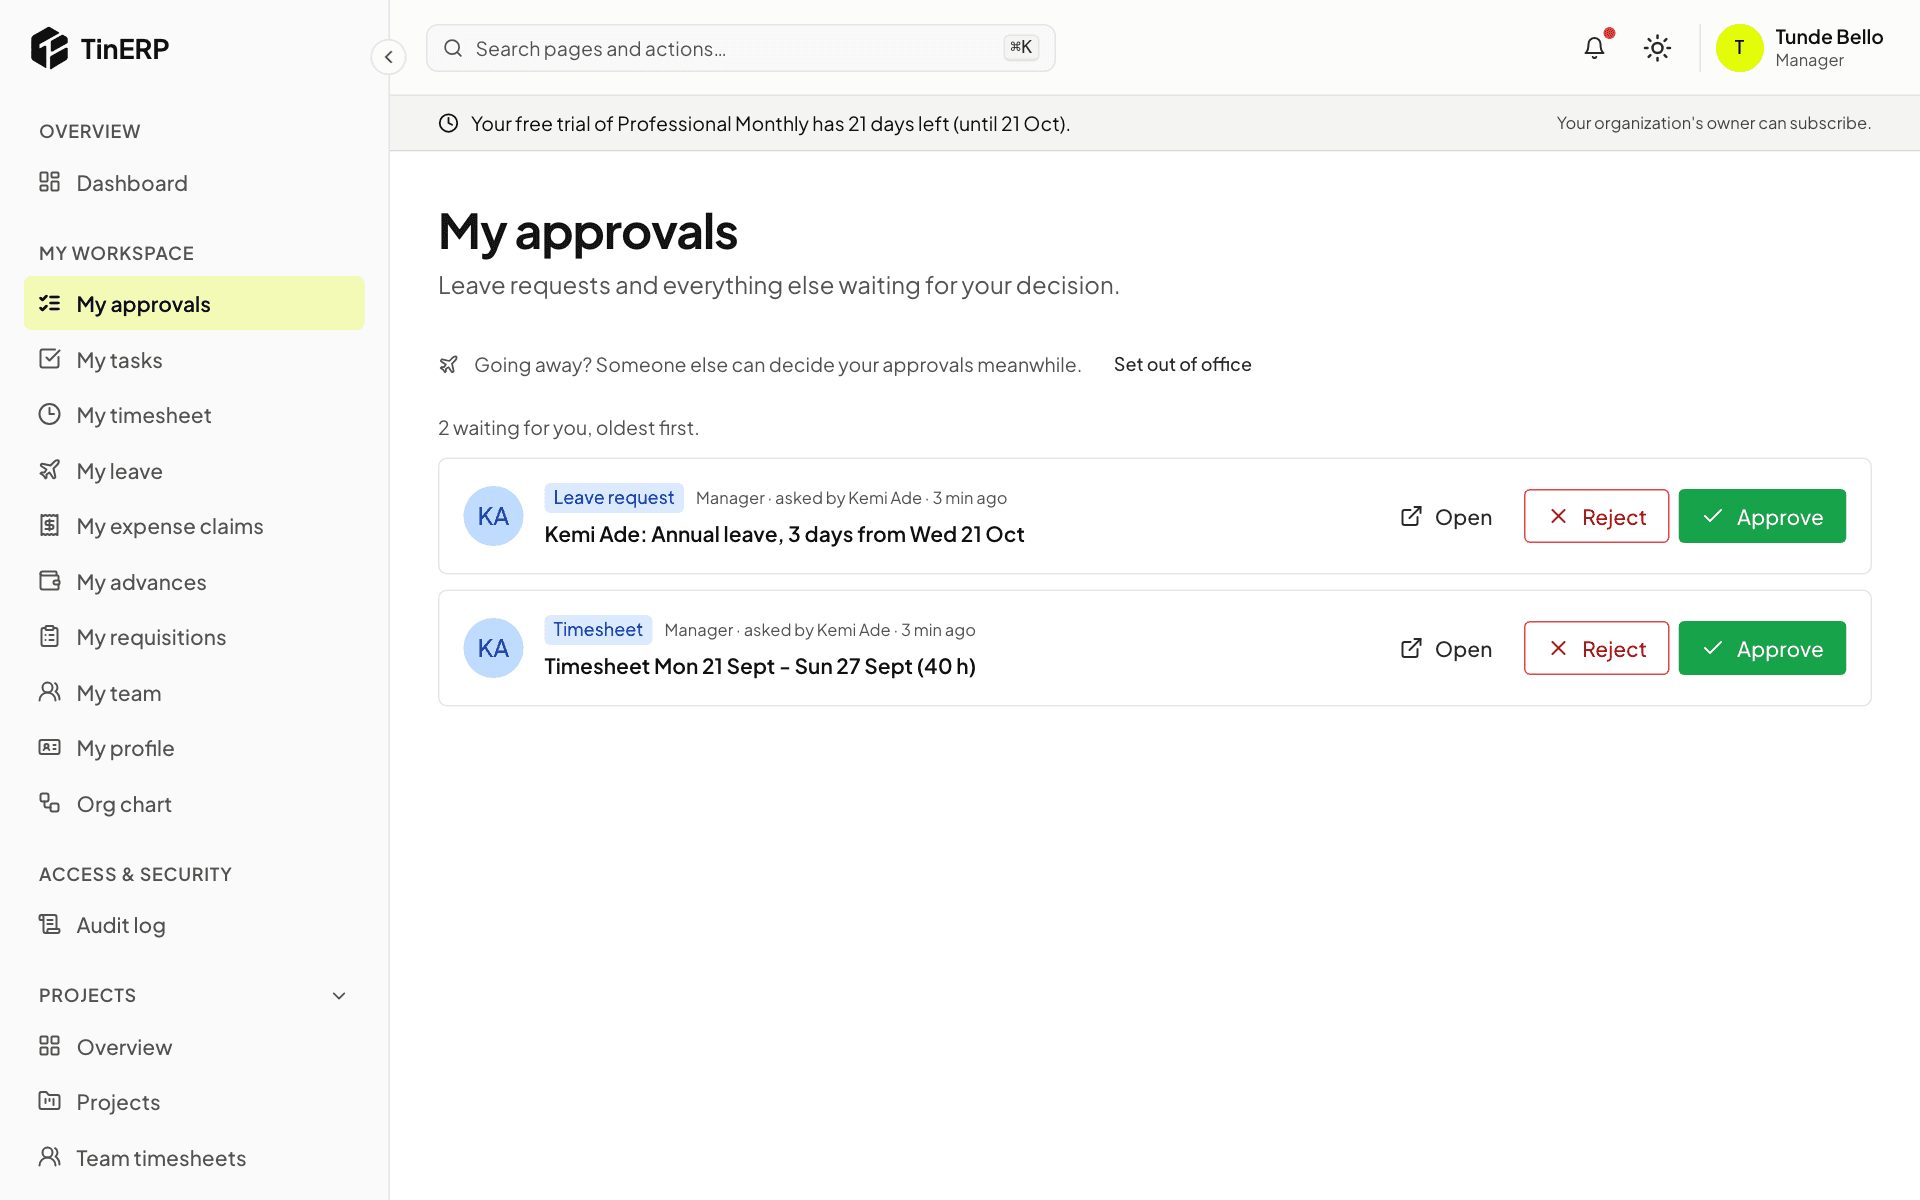
Go to My workspace → My approvals. Each request shows who asked and what for. Select Open for the details, or decide straight away with Approve or Reject - you'll be asked for a reason when you reject.
The person is notified, and if the request needs another step, it moves on to the next approver.
My approvals with Kemi's leave request and the Approve and Reject buttons
2. Going away? Hand over your approvals
Select Set out of office and choose someone to decide for you while you're away. Requests go to them until you're back, and the record shows they decided on your behalf.
Everyday tasks · Everyone on a project · about 3 min
Your tasks
My tasks gathers every task assigned to you, across all your projects.
1. See what's due
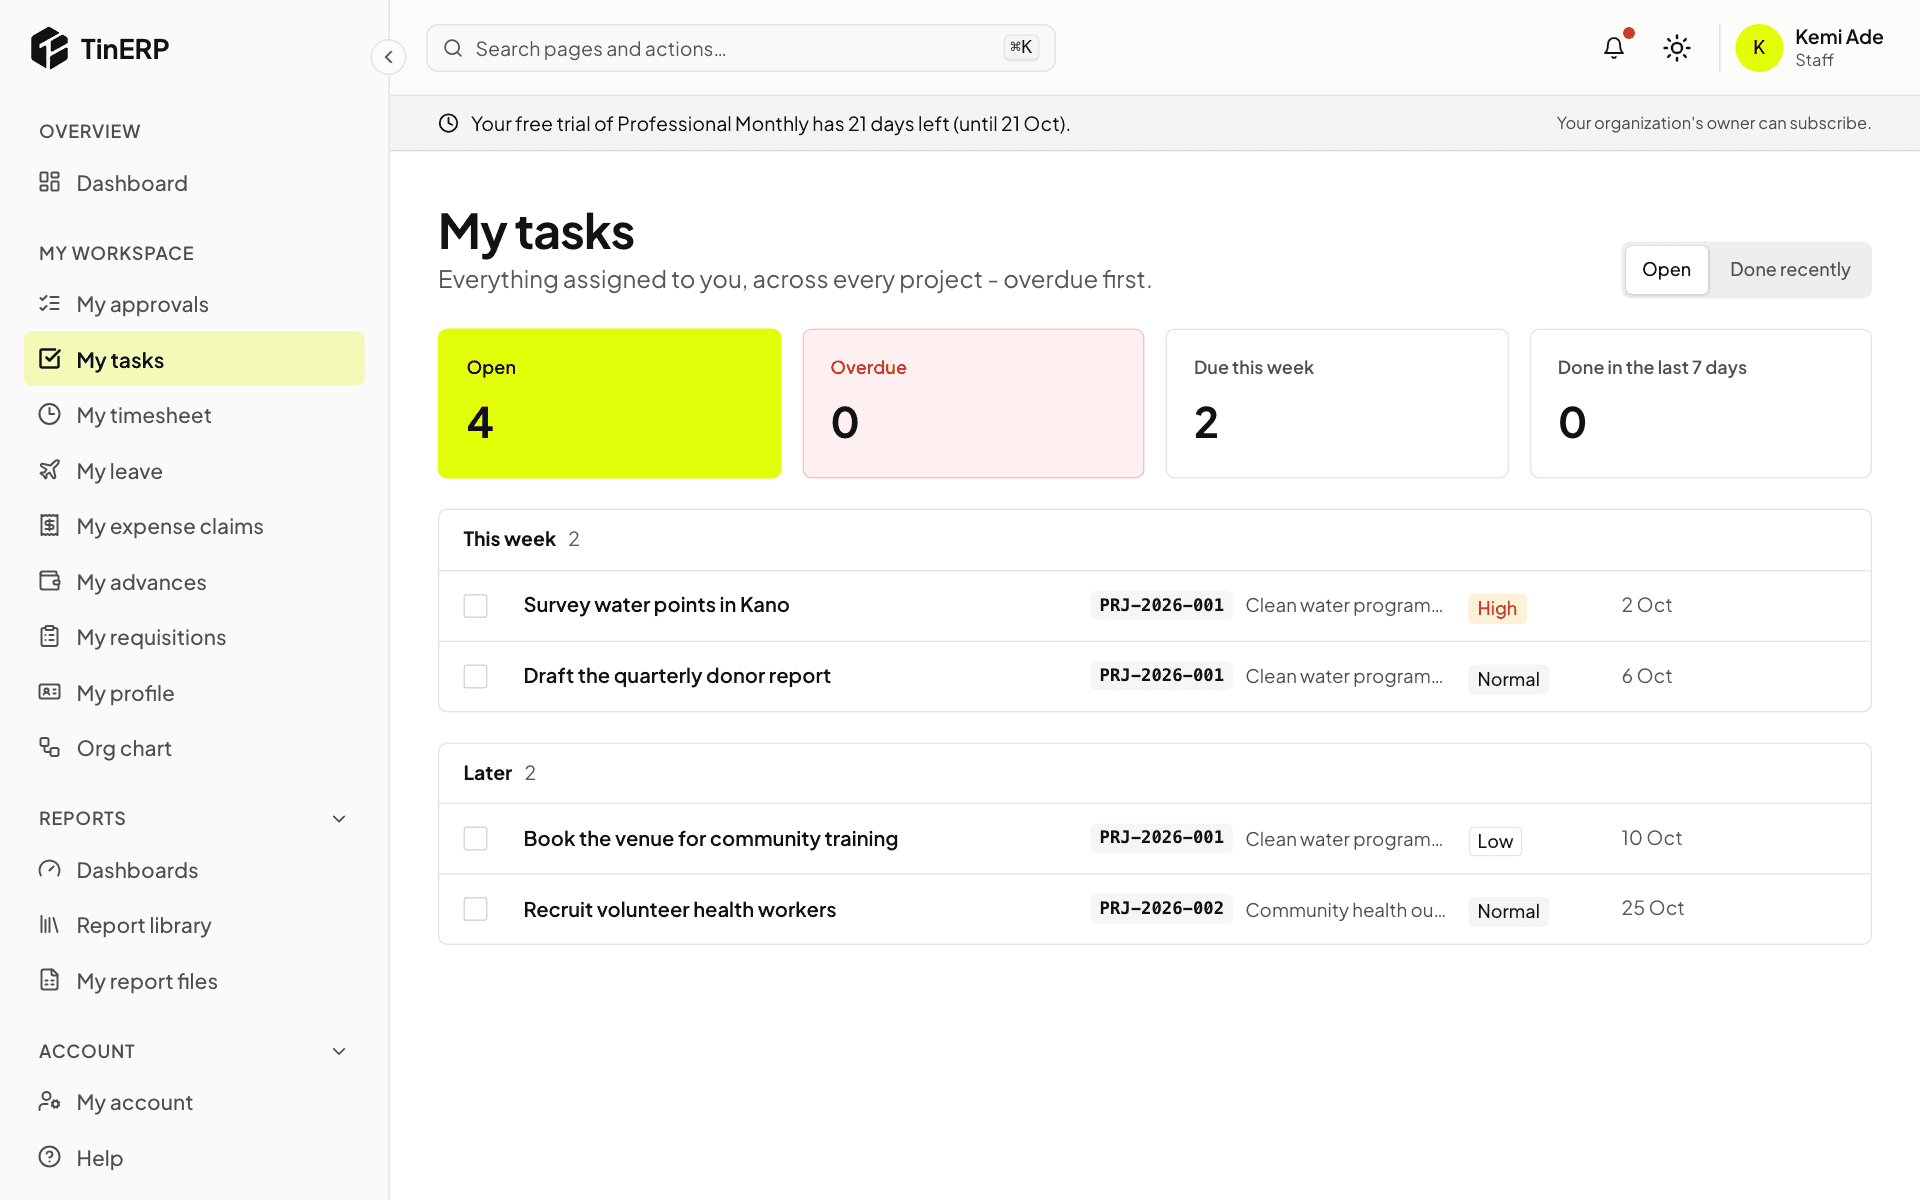
Go to My workspace → My tasks. Tasks are grouped by when they're due. Select a task to open it.
My tasks: open, overdue and due this week, with tasks grouped by week
2. Update a task
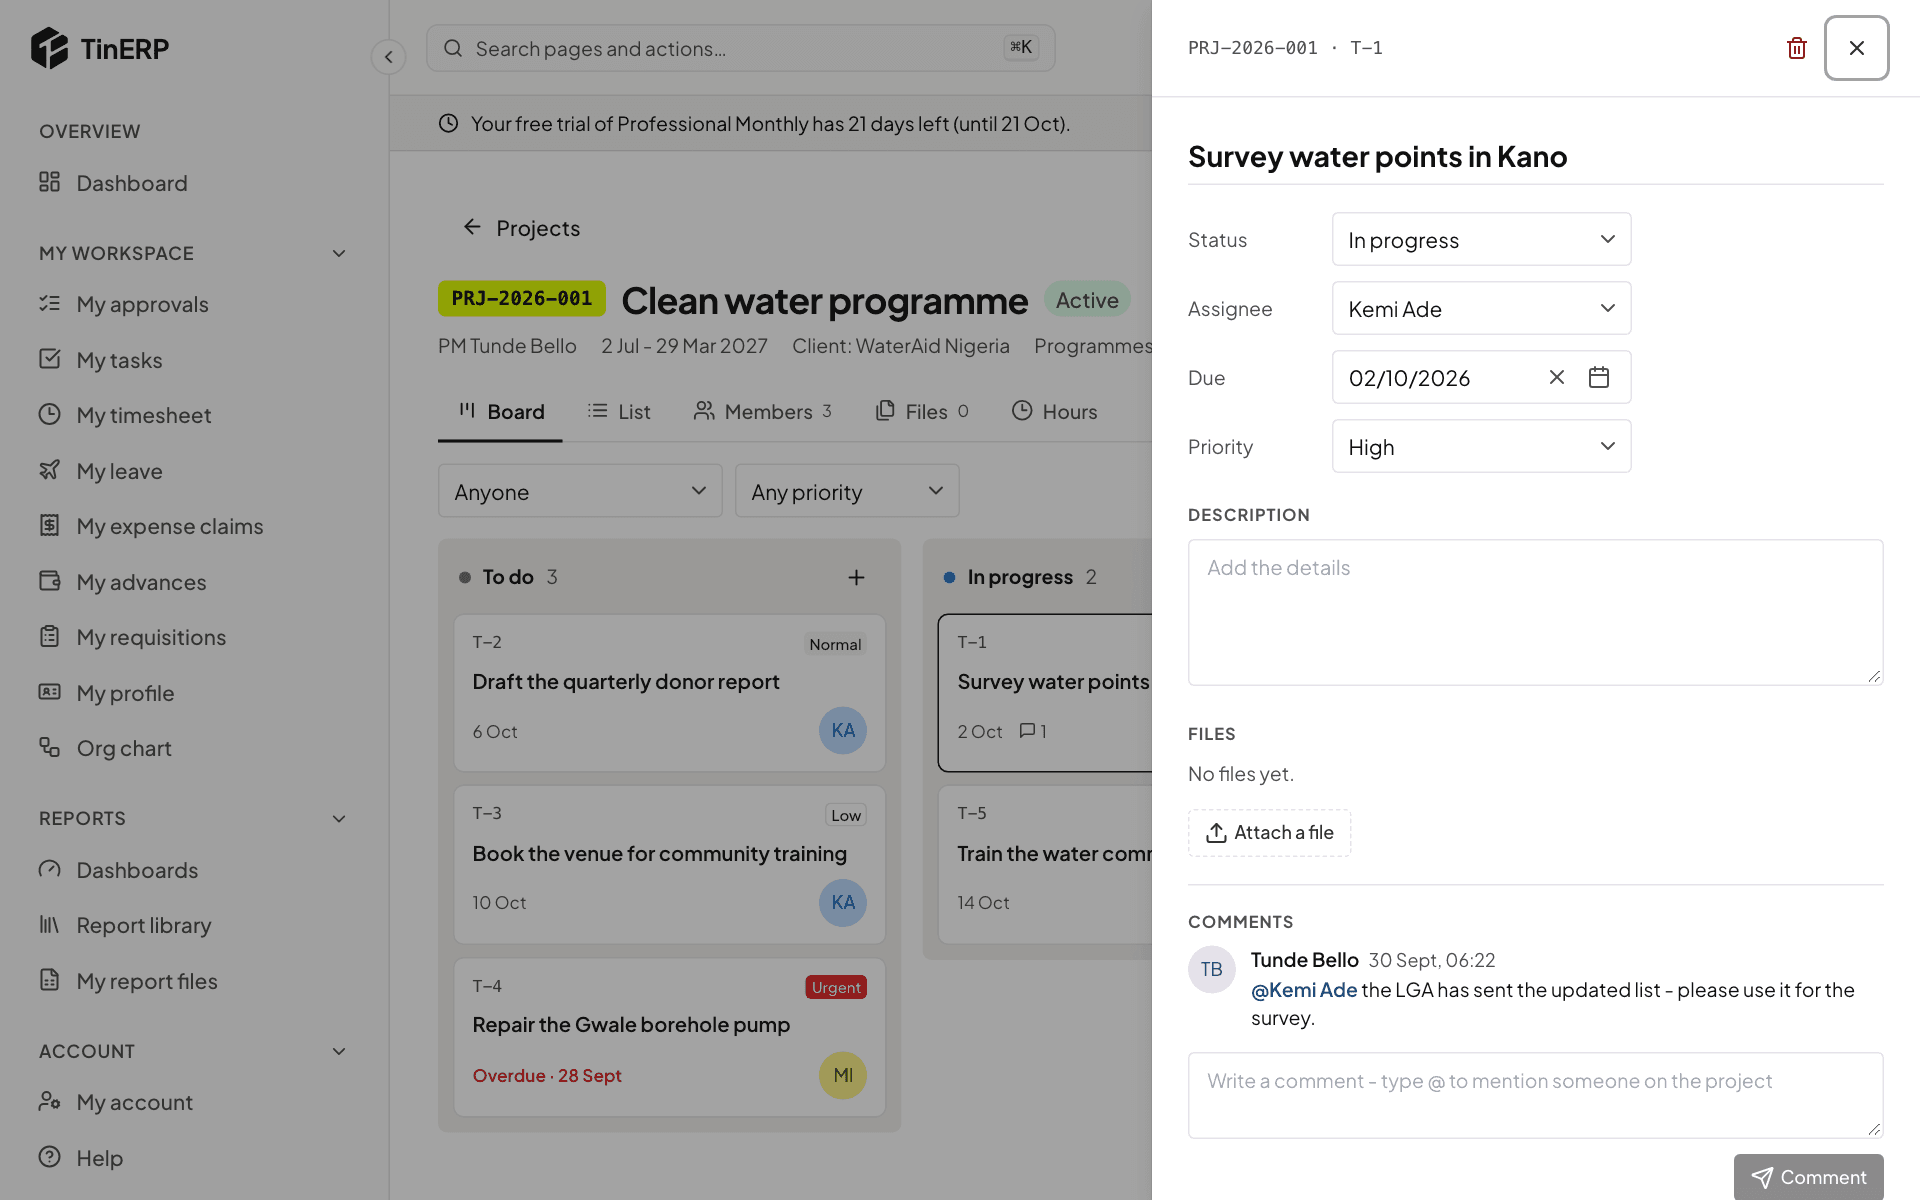
In the task panel, change its status as you work (to do, in progress, done), its due date or priority. Changes save as you make them.
Add files, and write a comment - type @ to mention someone on the project; they're notified.
A task open in its panel: status, assignee, due date, priority, files and comments
Everyday tasks · Everyone who logs time · about 3 min
Fill in your timesheet
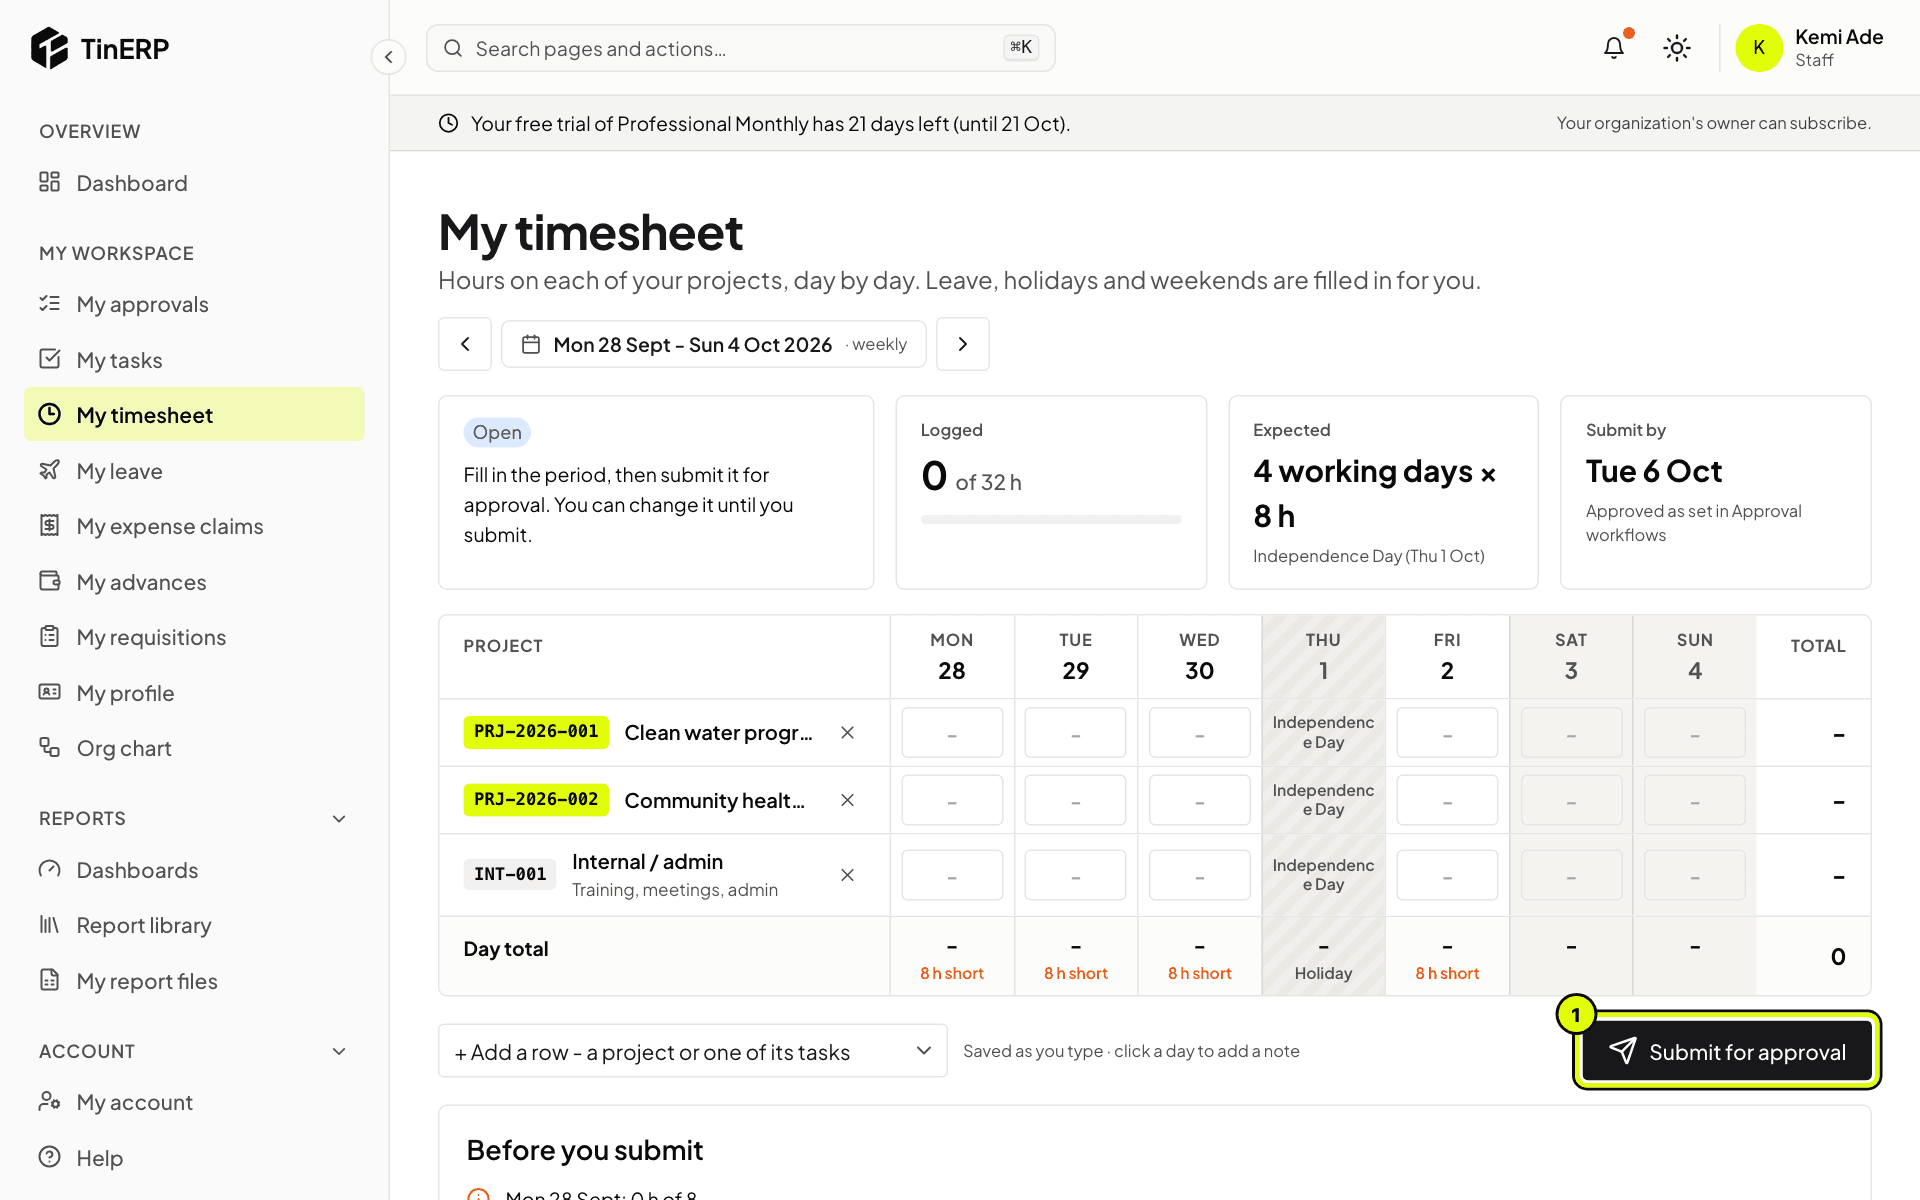
Your timesheet covers a period your organization chooses - usually a week. Leave, holidays and weekends are already filled in.
1. Enter your hours
Go to My workspace → My timesheet. Your projects are listed as rows; type the hours for each day. Use Add a row for another project or one of its tasks.
It saves as you type. The totals show how you compare with the expected hours, and Before you submit points out anything to check.
My timesheet for the week, with Independence Day filled in and Submit for approval marked 1
2. Submit it
When the period is done, select Submit for approval (1). It's locked while it waits; if it's sent back, change it and submit again.
Tip: The deadline is shown under Submit by. Late timesheets are marked late.
Everyday tasks · Everyone · about 4 min
Claim expenses and request advances
Both go for approval and then to your finance team to pay. You'll find your claims under My expense claims and your advances under My advances.
1. Claim expenses
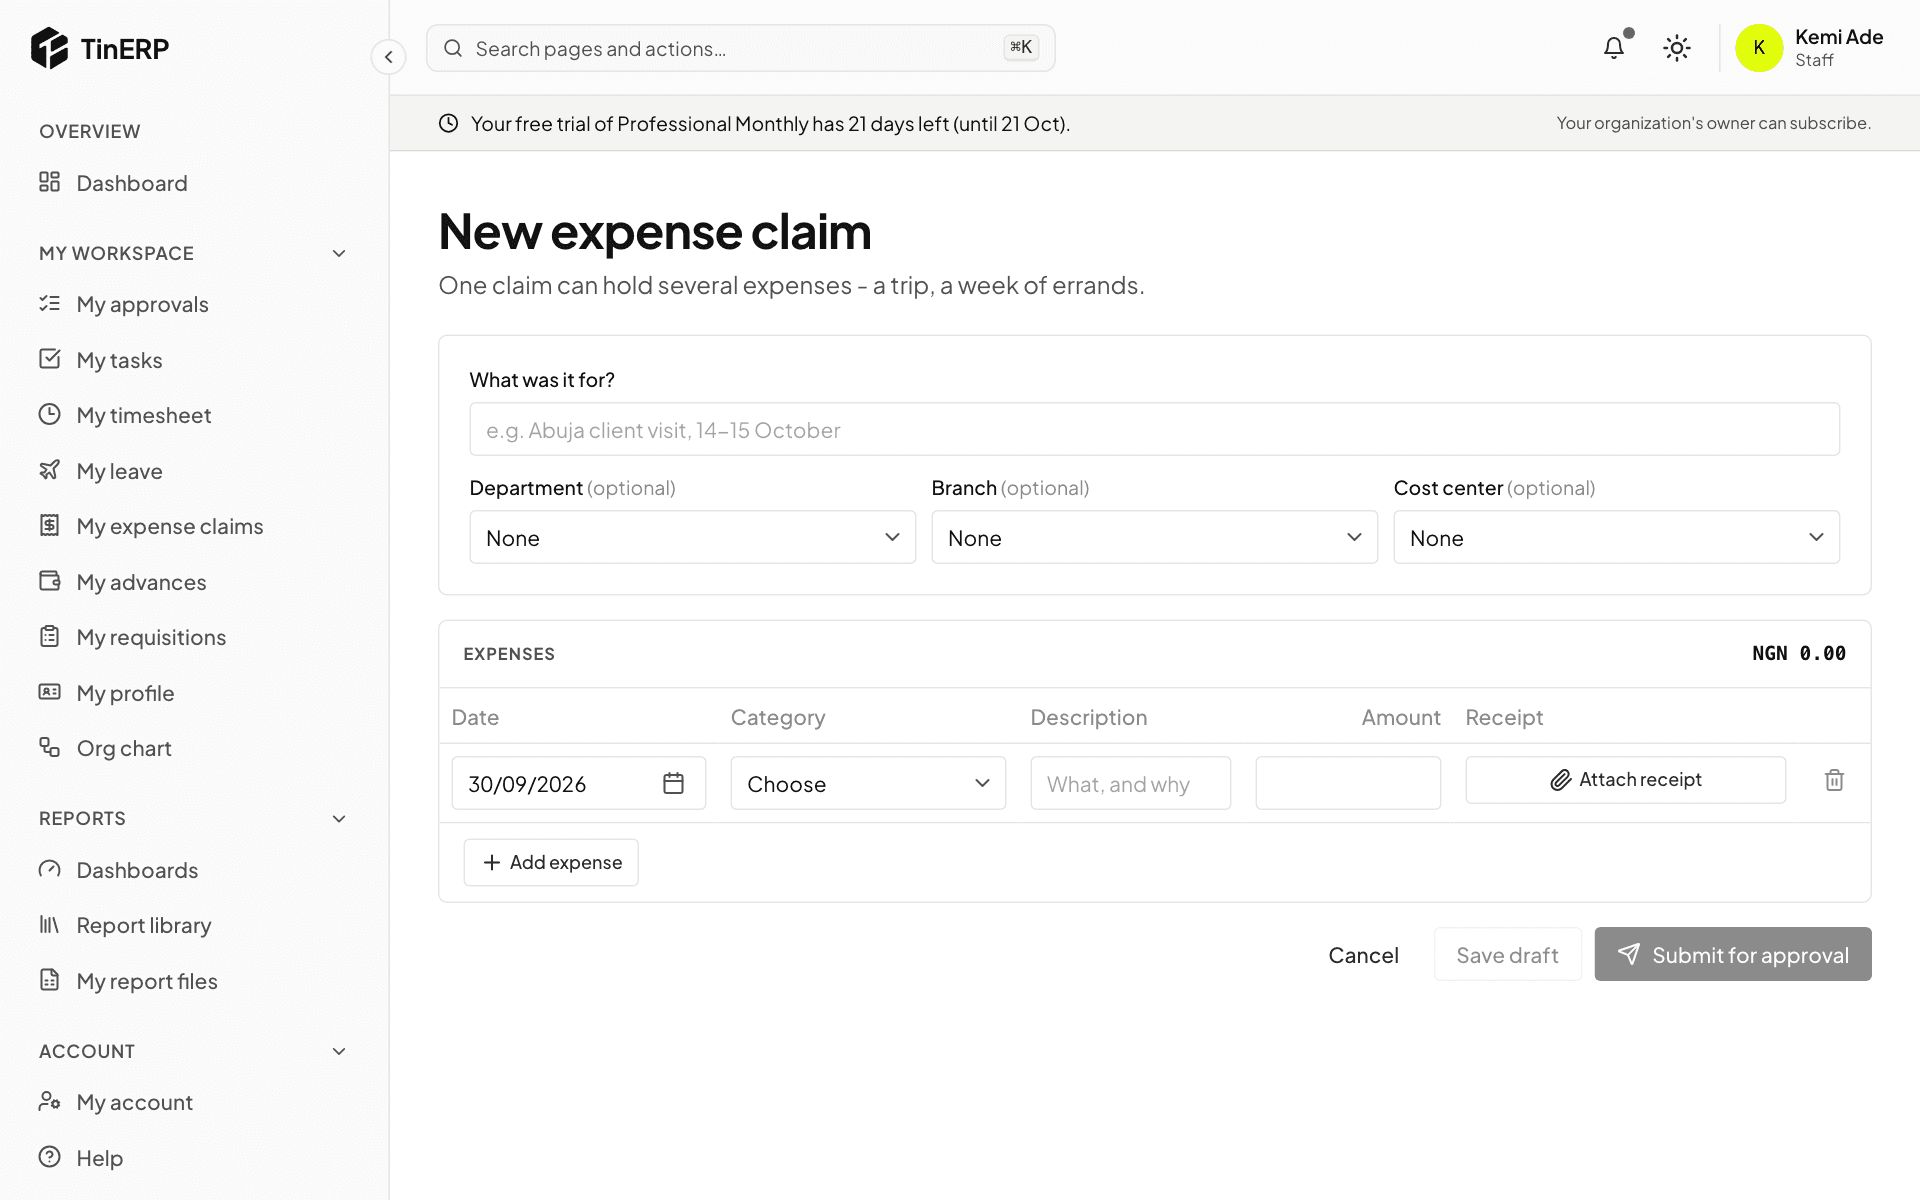
Go to My expense claims and start a new claim. Say what it was for, then add each expense: date, category, description and amount. Attach a photo or scan of the receipt with Attach receipt.
Select Submit for approval, or Save draft to finish later.
The New expense claim form with the expenses table and Attach receipt
2. Request an advance
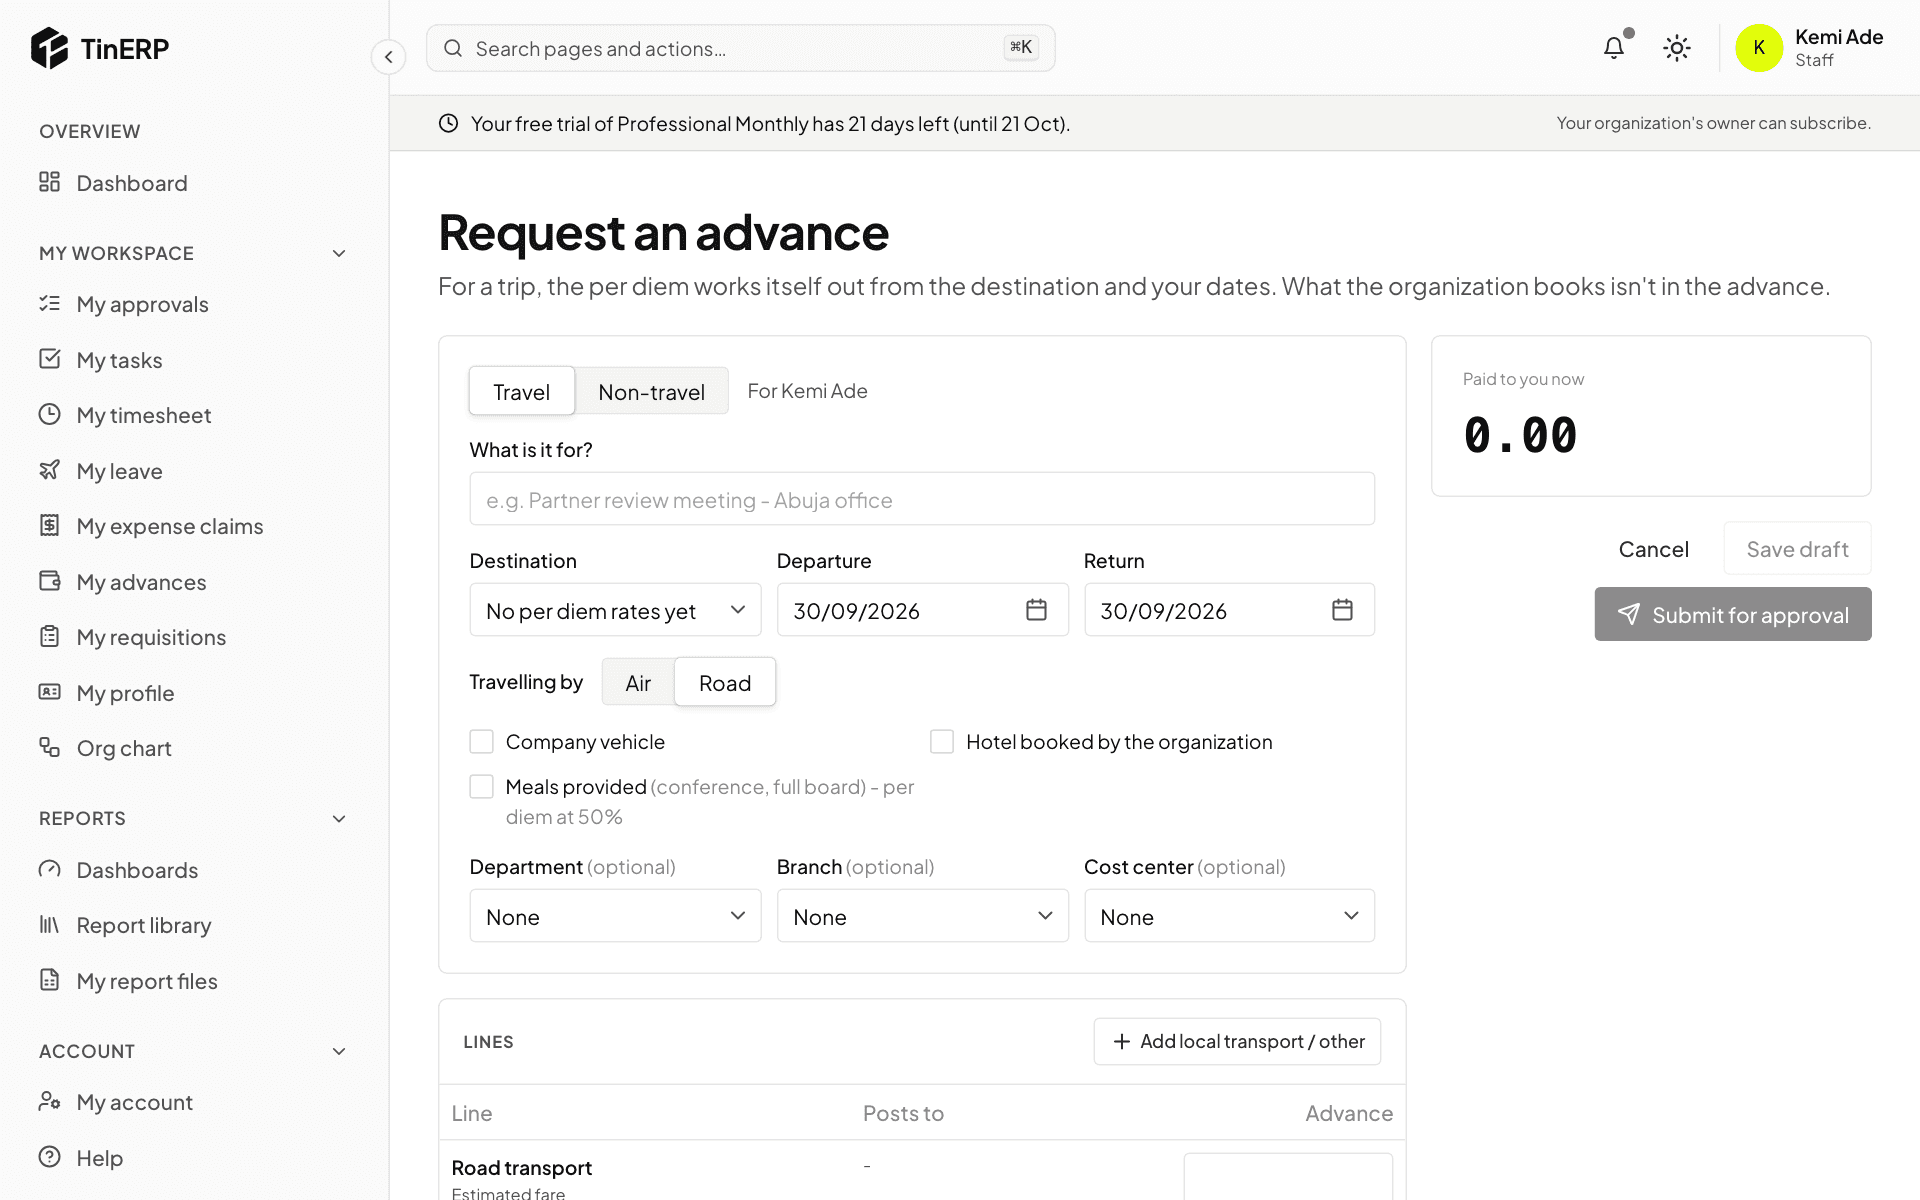
Go to My advances and start a new request. For a trip, choose Travel and fill in the itinerary: each leg's date, where it's from and to, and how you travel. A simple trip is one leg out and one back; Add a stop for a trip through several cities. Tick Hotel booked by the organization for each place it books. The per diem is worked out for you, each place at its own rate. For anything else, choose Non-travel and add the lines.
Save it, then attach supporting documents - the invitation, agenda or memo - on the advance's page before you submit it. Your organization may require one above an amount.
After the trip, retire the advance: show what you spent, with receipts, add proof of travel (boarding passes, tickets, hotel bills), and return anything left over.
The Request an advance form with Travel selected, destination and dates
Everyday tasks · Everyone · about 3 min
Ask for something to be bought
A requisition is a request to buy. Once approved, your procurement team gets quotes and orders it.
1. Raise a requisition
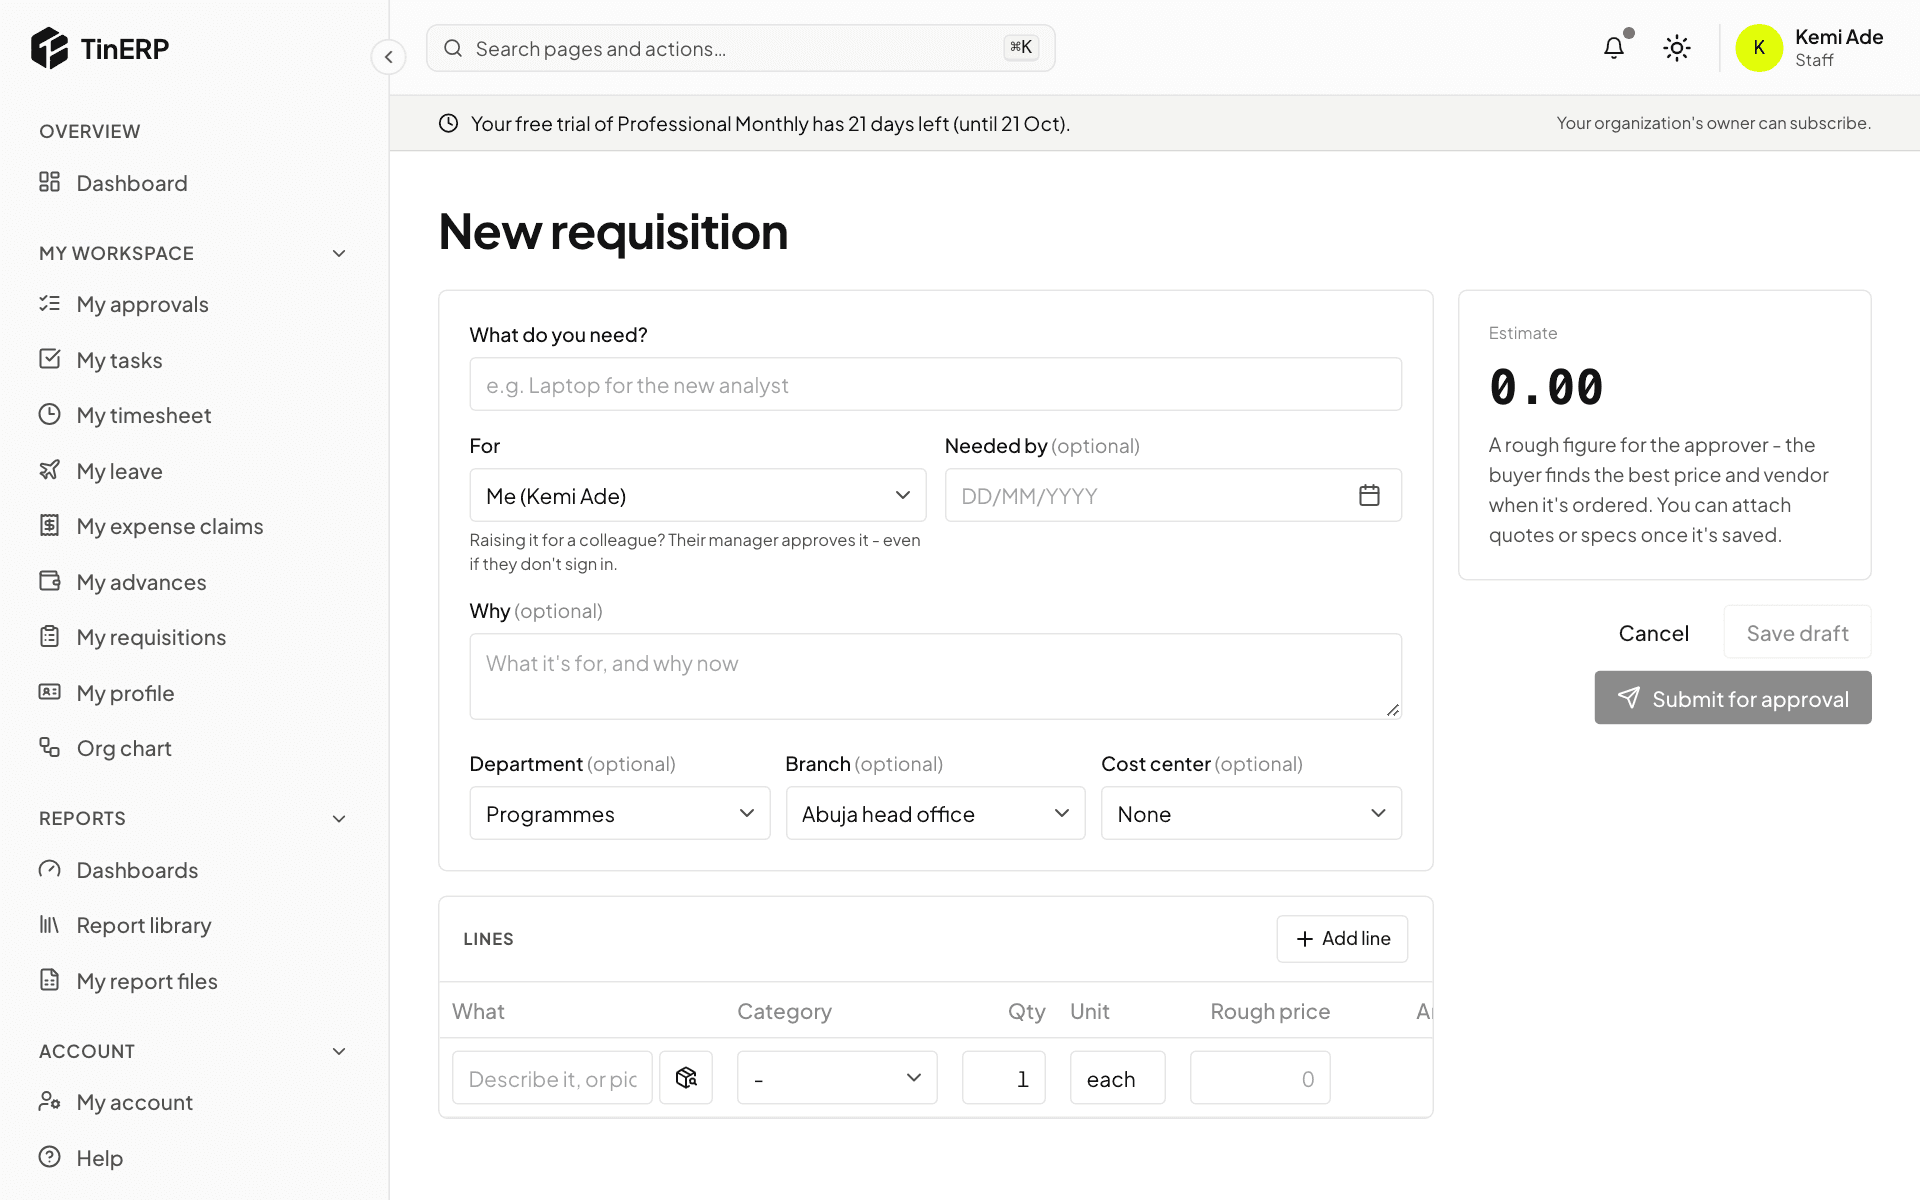
Go to My requisitions and start a new one. Say what you need and why, when it's needed by, and add a line for each item with a quantity and a rough price.
You can raise it for a colleague by choosing them under For. Select Submit for approval - the estimate helps the approver, and the buyer finds the best price.
The New requisition form with the estimate, lines and Submit for approval
Everyday tasks · Everyone · about 1 min
Notifications
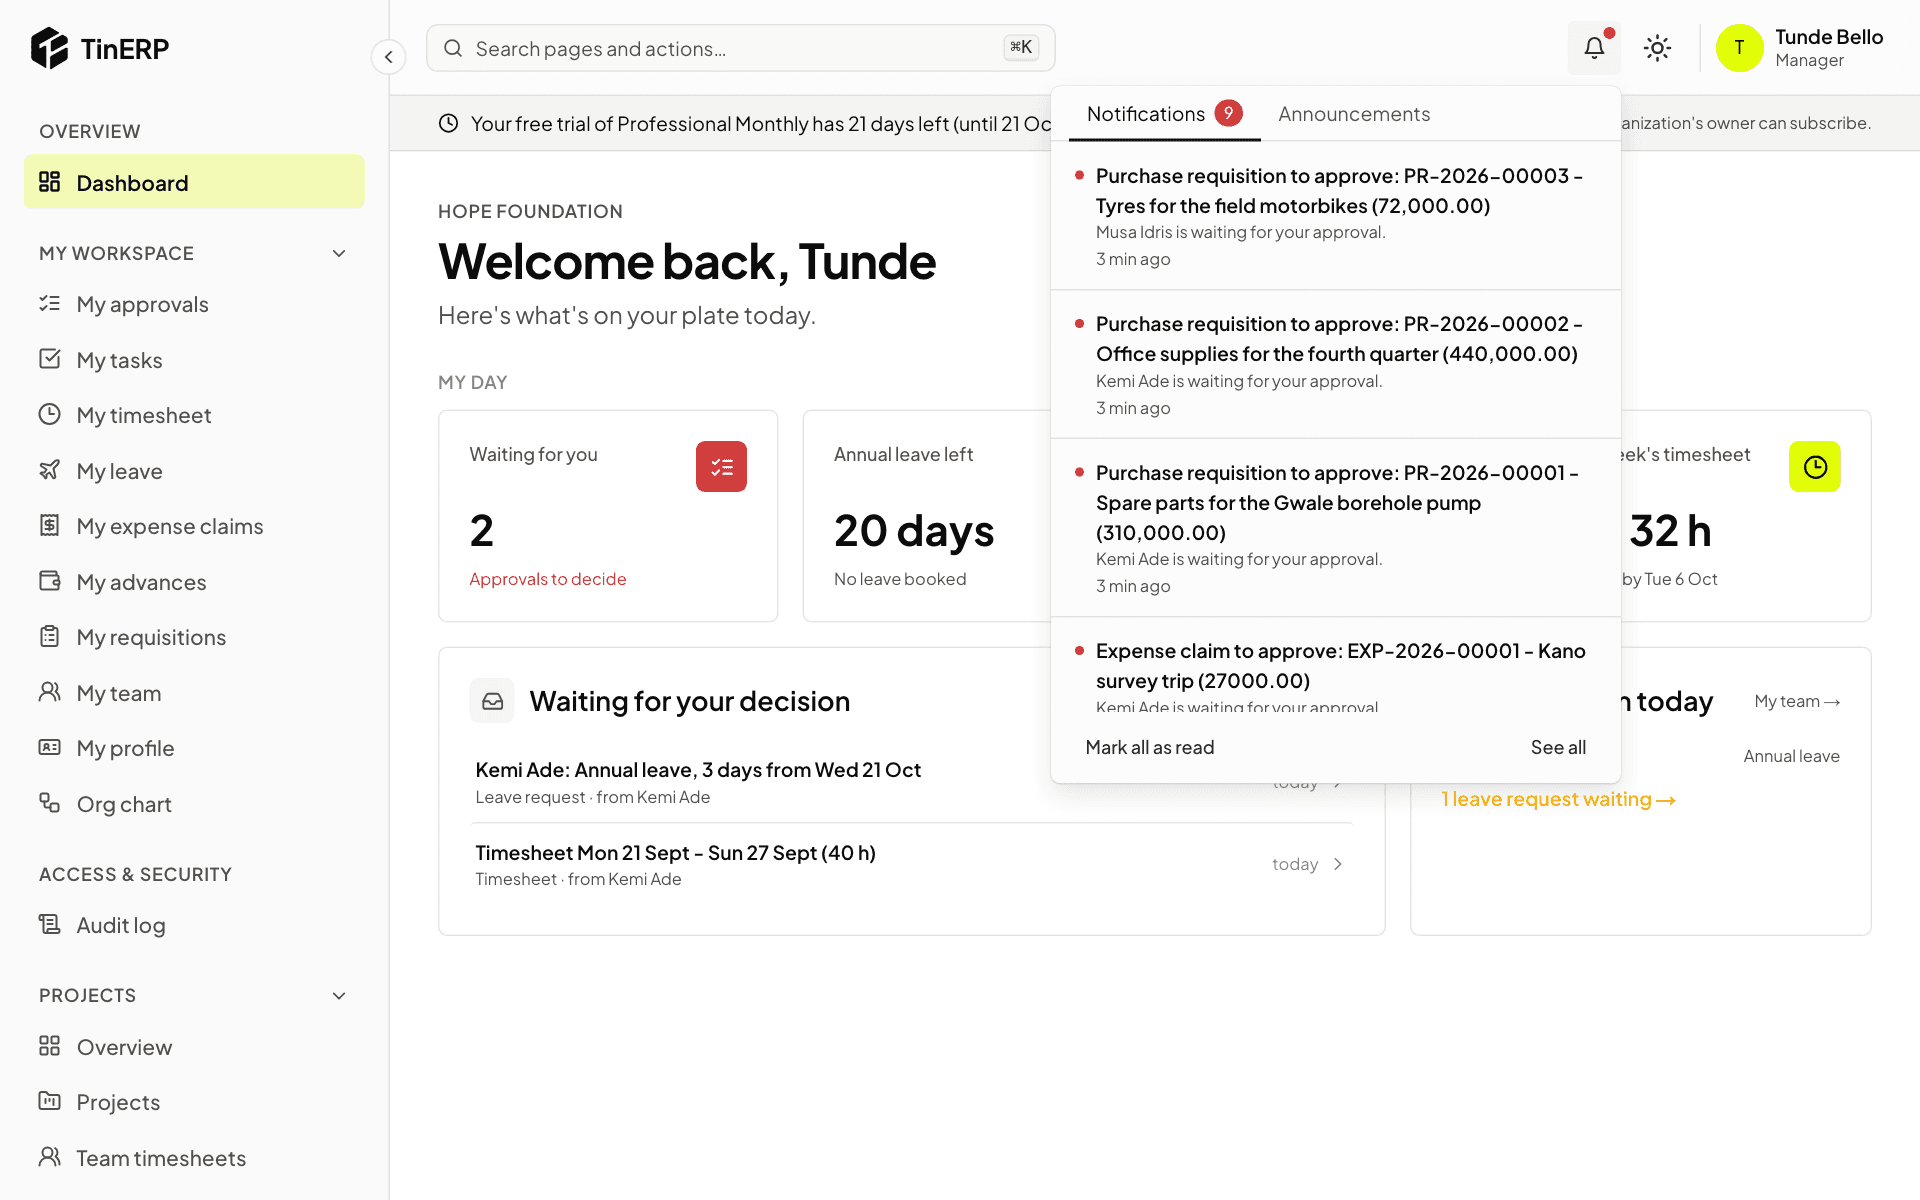
The bell at the top shows a dot when something new arrives.
1. Read and act
Select the bell. Notifications lists what's happened for you - select one to open it. Announcements are news from TinERP.
Select Mark all as read to clear the dot. You choose which notifications also come by email in My account.
The notifications panel open, with a leave request waiting for approval
Everyday tasks · Everyone · about 3 min
Your profile and account
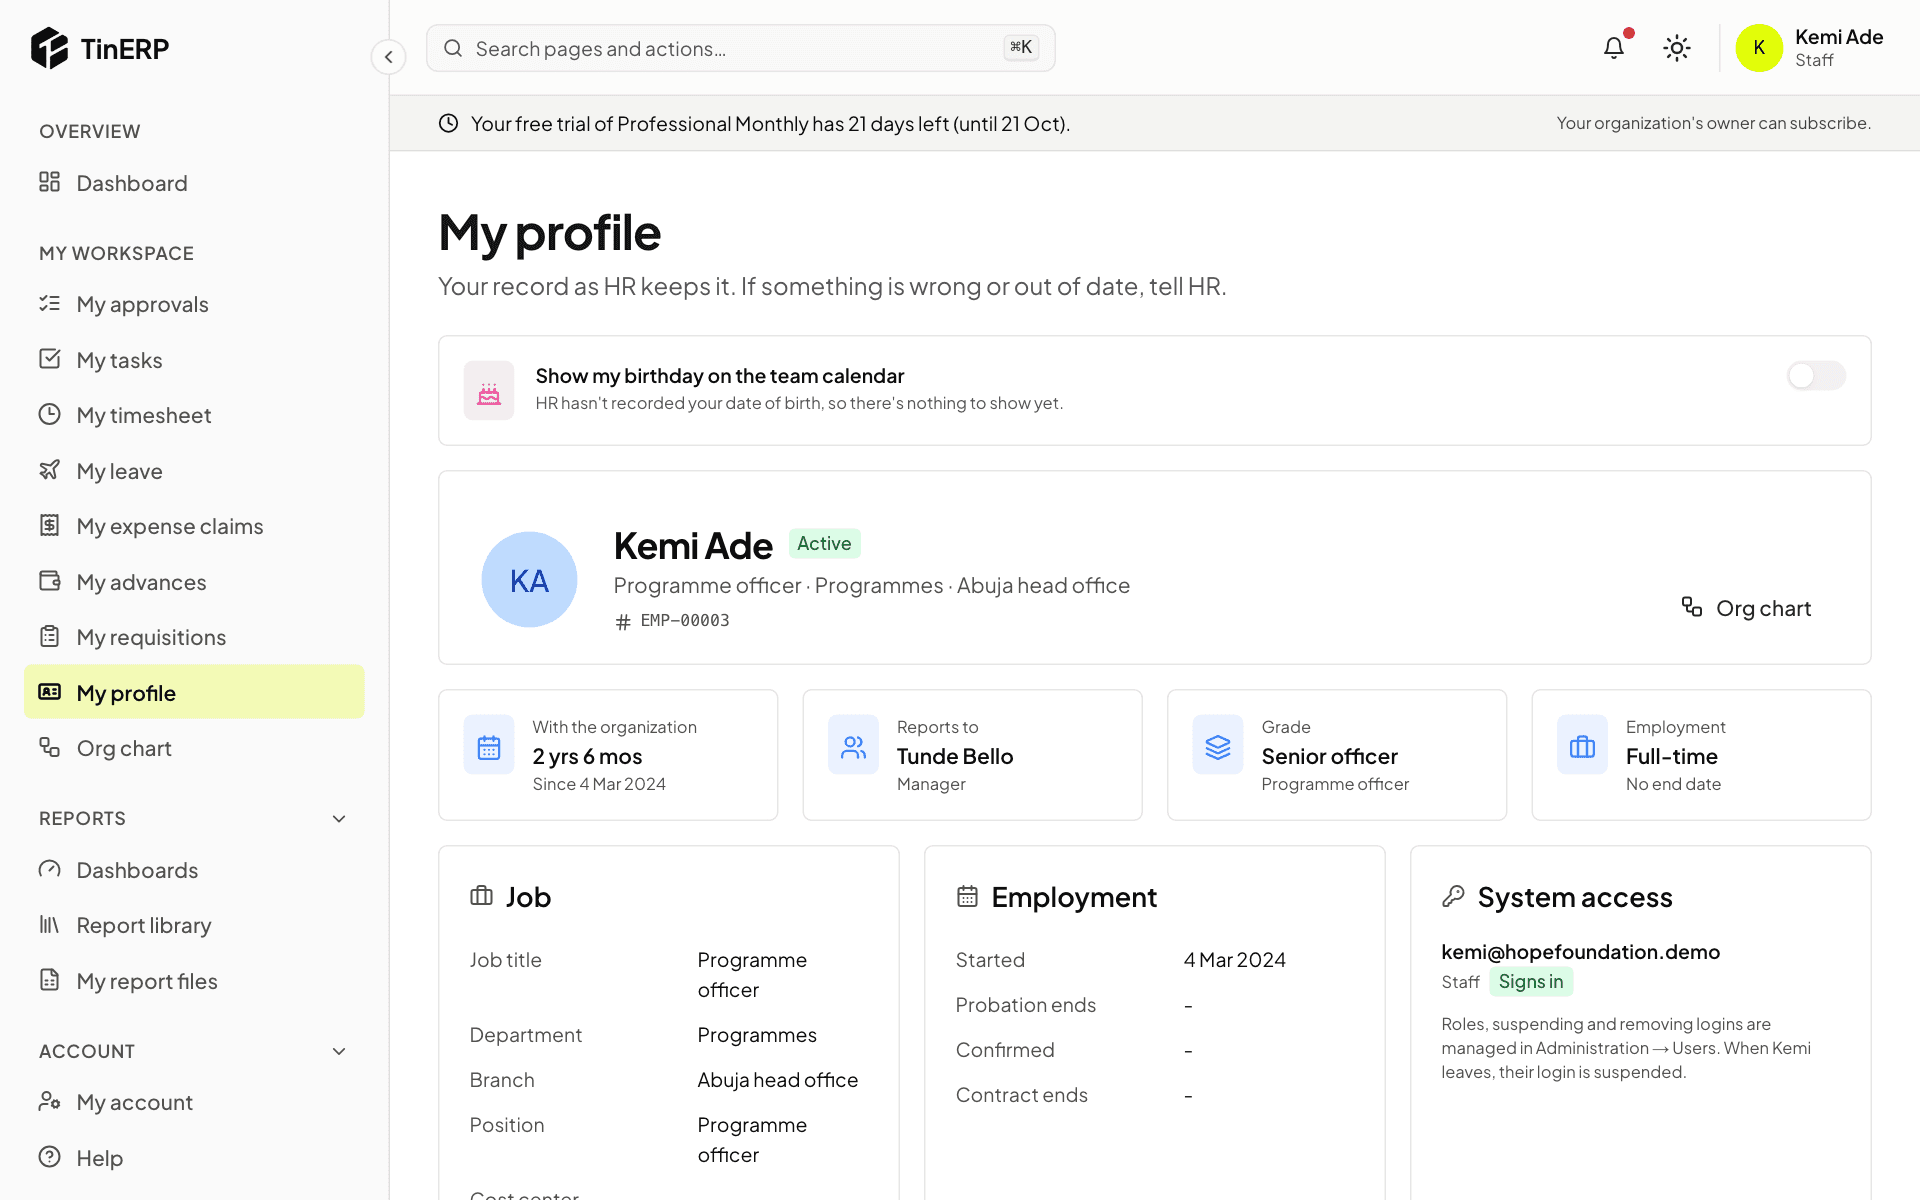
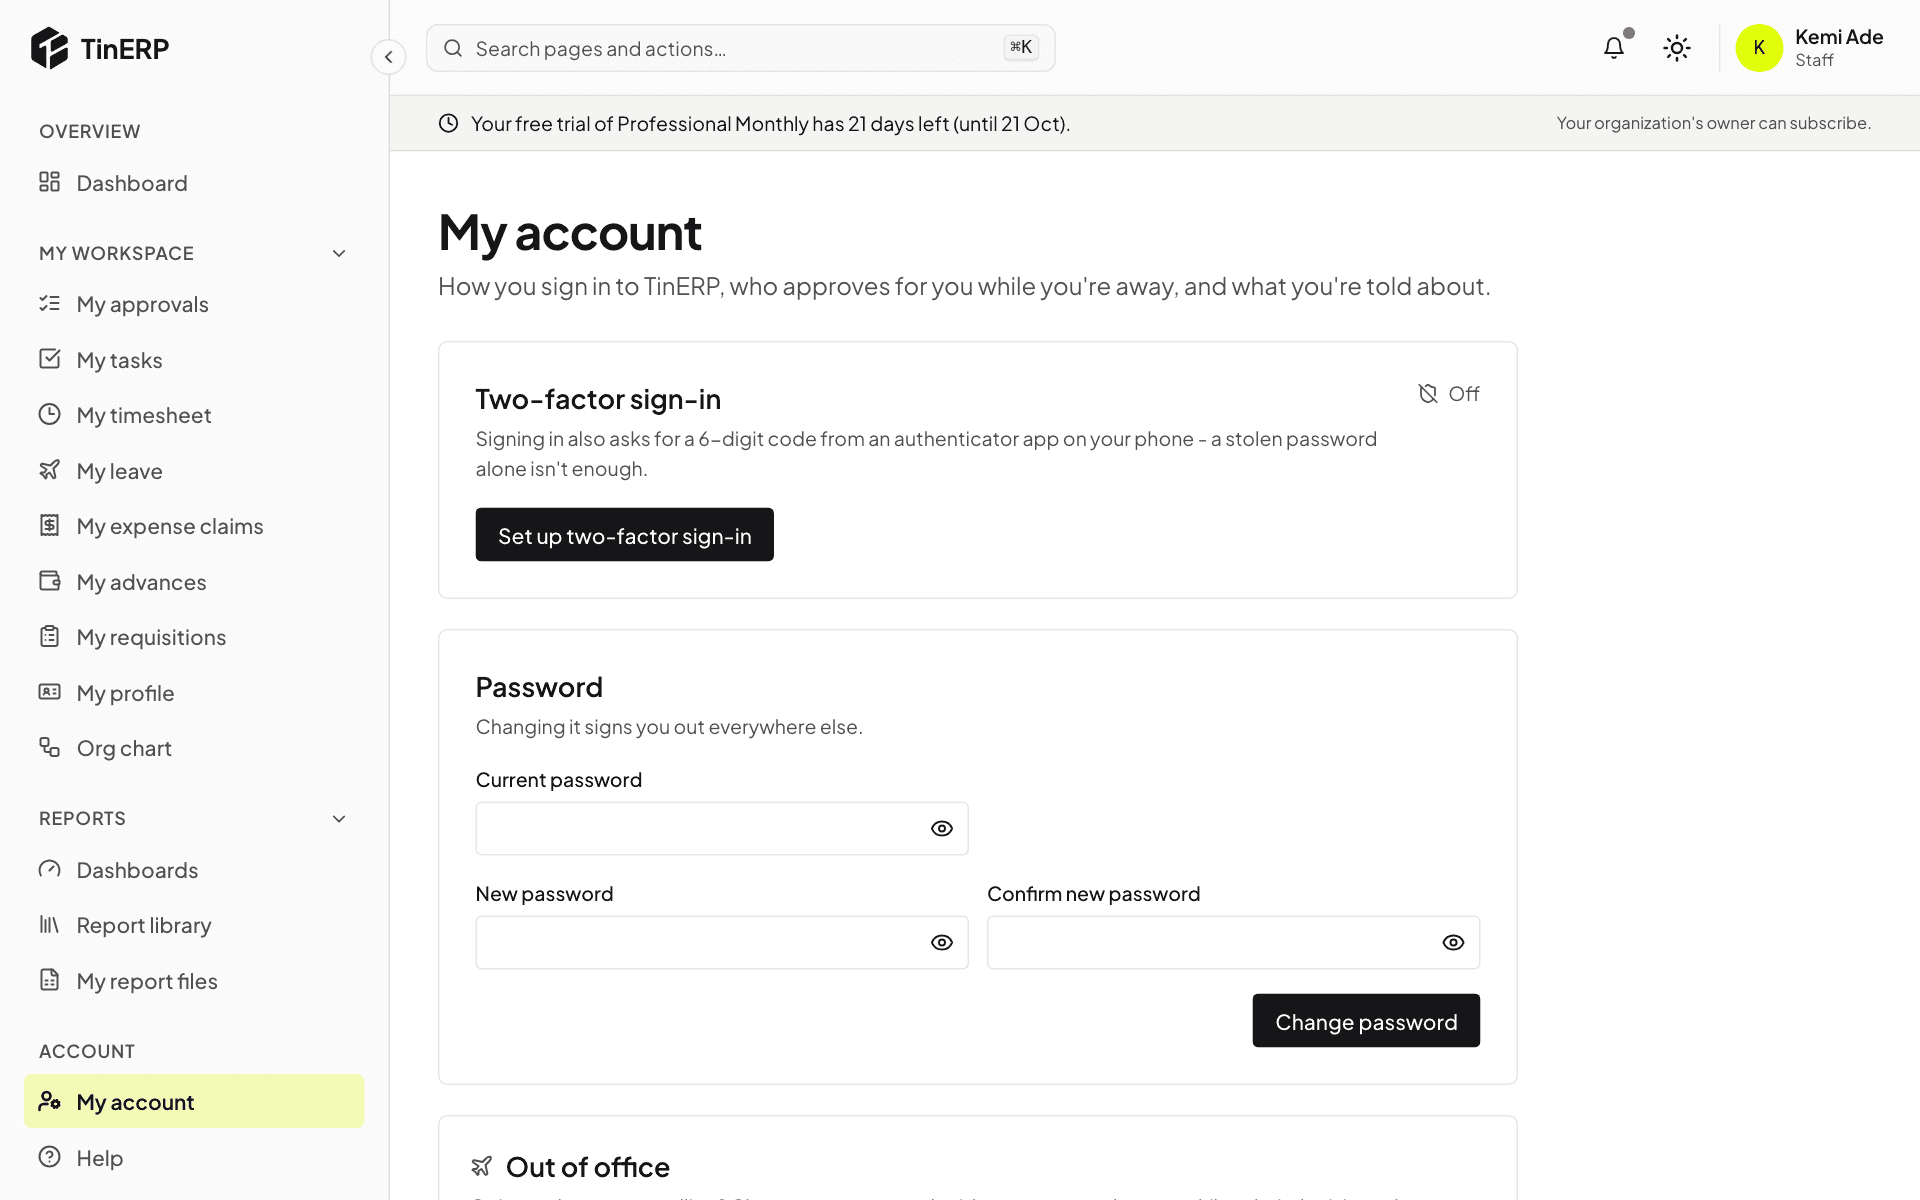
My profile is your record as HR keeps it. My account is how you sign in.
1. Check your profile
Go to My workspace → My profile to see your job, department, manager and employment details. If something is wrong or out of date, tell HR - they keep the record.
My profile: Kemi's job, reporting line and employment details
2. Secure your account
Go to My account. Select Set up two-factor sign-in and scan the code with an authenticator app on your phone - then signing in also asks for a 6-digit code, so a stolen password alone isn't enough.
You can change your password here too; changing it signs you out everywhere else.
My account with two-factor sign-in, password and out of office