10 guides ready to print - choose Save as PDF in the print window for a handout. Back to the help centre
TinERP user guide
HR
HR teams · Employee records, leave, joiners and leavers, the org chart and HR reports.
Printed 3 October 2026 · the latest version is always in the help centre online
Contents
HR
How HR works
Set up grades, positions and checklists
Set up leave
Add an employee
Keep employee records up to date
When someone leaves
Run leave for everyone
Joiners and leavers
The org chart
HR reports
HR · HR teams · about 4 min
How HR works
HR keeps your organization's employees - their jobs, reporting lines, records and leave. The rest of TinERP relies on it: leave and timesheets go to the right manager, and managers see their own team.
1. Employees and logins are different
An employee is someone you employ; a user is someone who signs in. Most people are both, linked together. A driver or cleaner can be an employee with no login - HR books their leave for them. An outside accountant can have a login and no employee record.
The link matters: it's how approvals find a person's manager, and how managers see their team.
HR → Employees: everyone's job title, department, branch, manager, type, start date and status
2. Who sees what
Everyone sees their own record in My profile, their leave in My leave, and the Org chart. Managers see their team in My team and HR reports for their people.
HR - anyone whose role manages employees, leave or HR settings, or sees every employee - gets the HR menu: Employees, Leave, Joiners & leavers, HR reports and HR settings.
3. Give your HR team a role
The Admin role has every HR permission but one: seeing sensitive details (date of birth, home address, ID numbers, next of kin, bank details and documents). Add an HR officer role with the HR permissions - including sensitive details - and give it to your HR team. See Roles and permissions.
4. Set up in this order
1. Grades, positions and checklists. 2. Leave types and policies. 3. Add your employees, with their managers. 4. Give logins to those who'll sign in. The guides that follow take each in turn.
HR · HR teams · about 5 min
Set up grades, positions and checklists
Do this before adding employees: their records use grades and positions, and new joiners get the onboarding checklist.
1. Add your grades
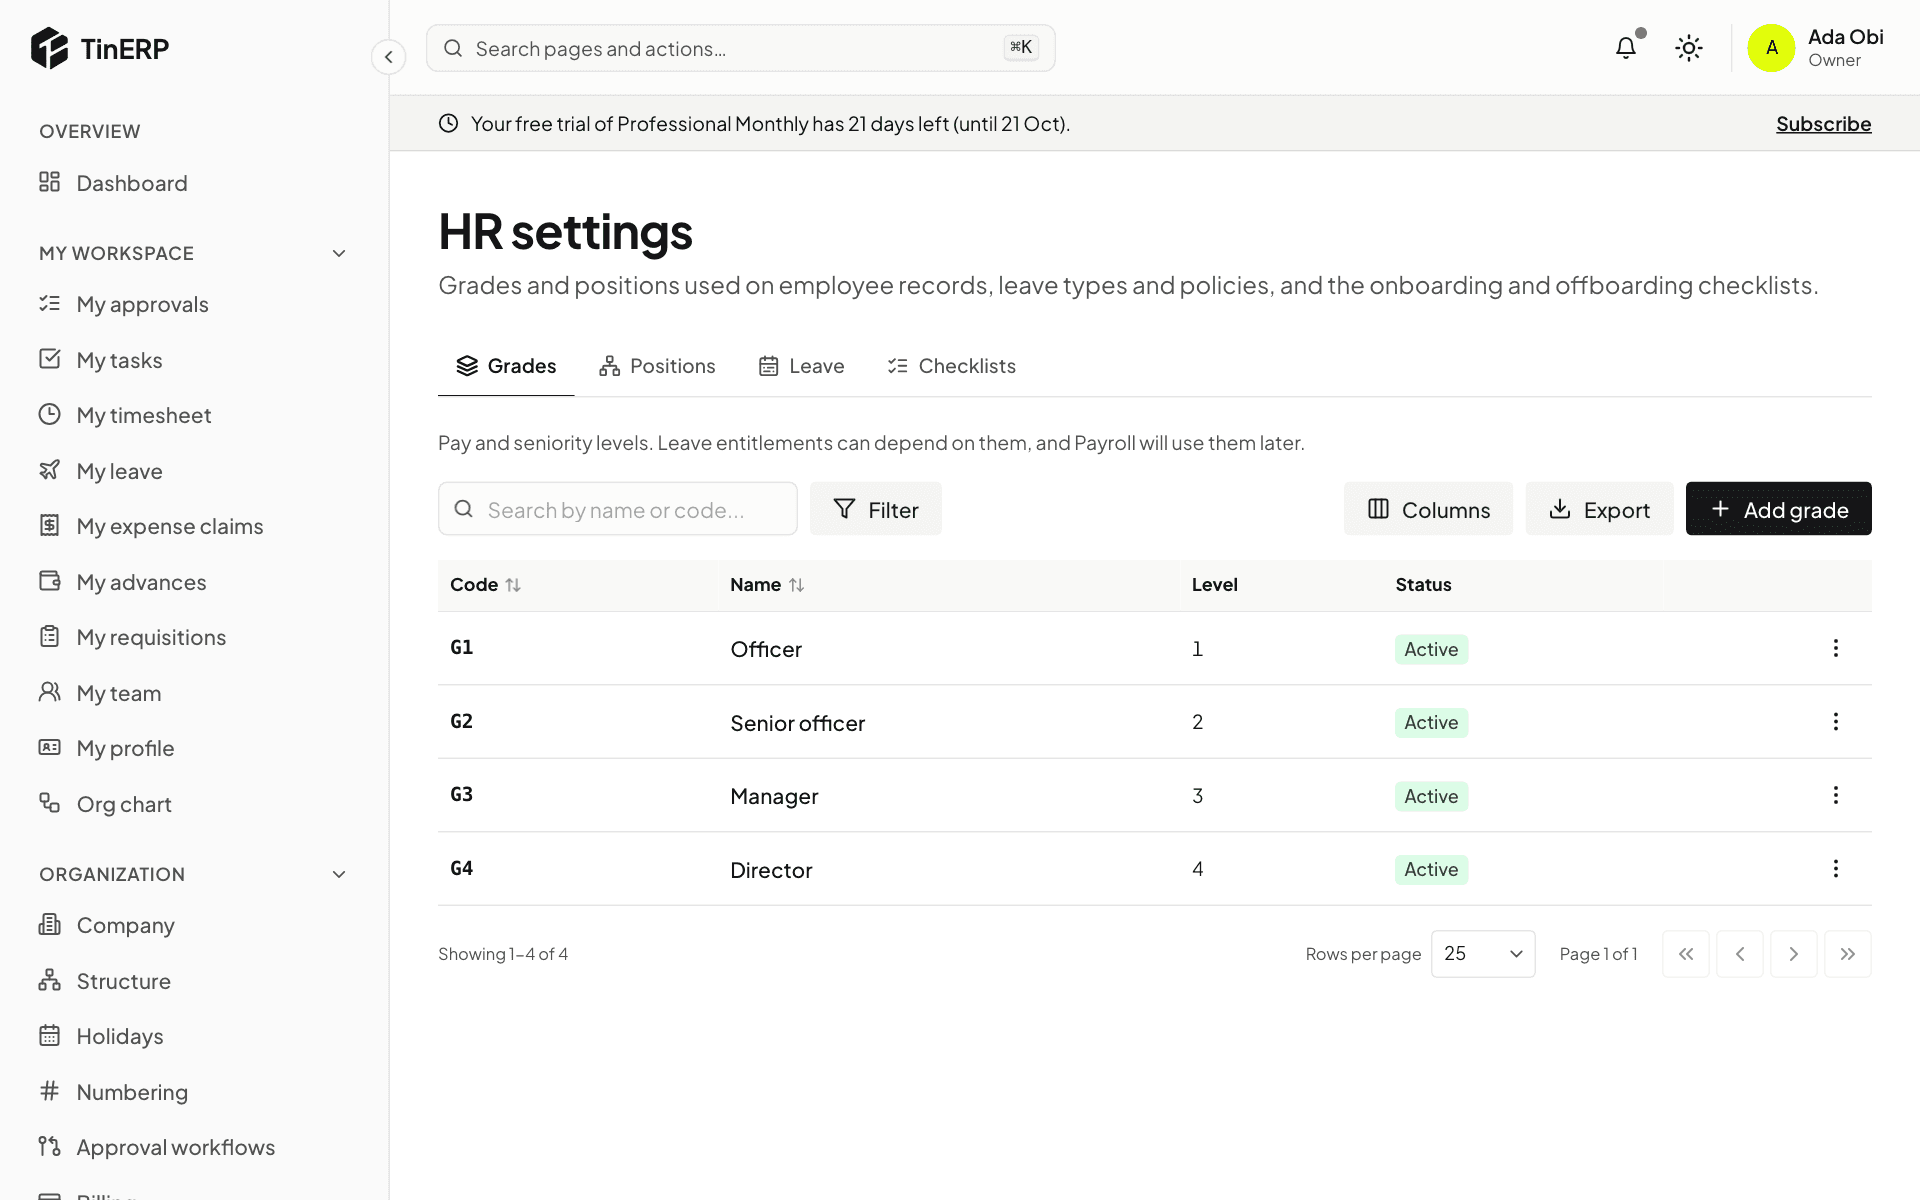
Go to HR → HR settings. Under Grades, select Add grade and give it a code, a name and a level. Leave allowances can depend on grade - for example more annual leave for managers.
HR settings → Grades: Officer, Senior officer, Manager and Director
2. Add positions (optional)
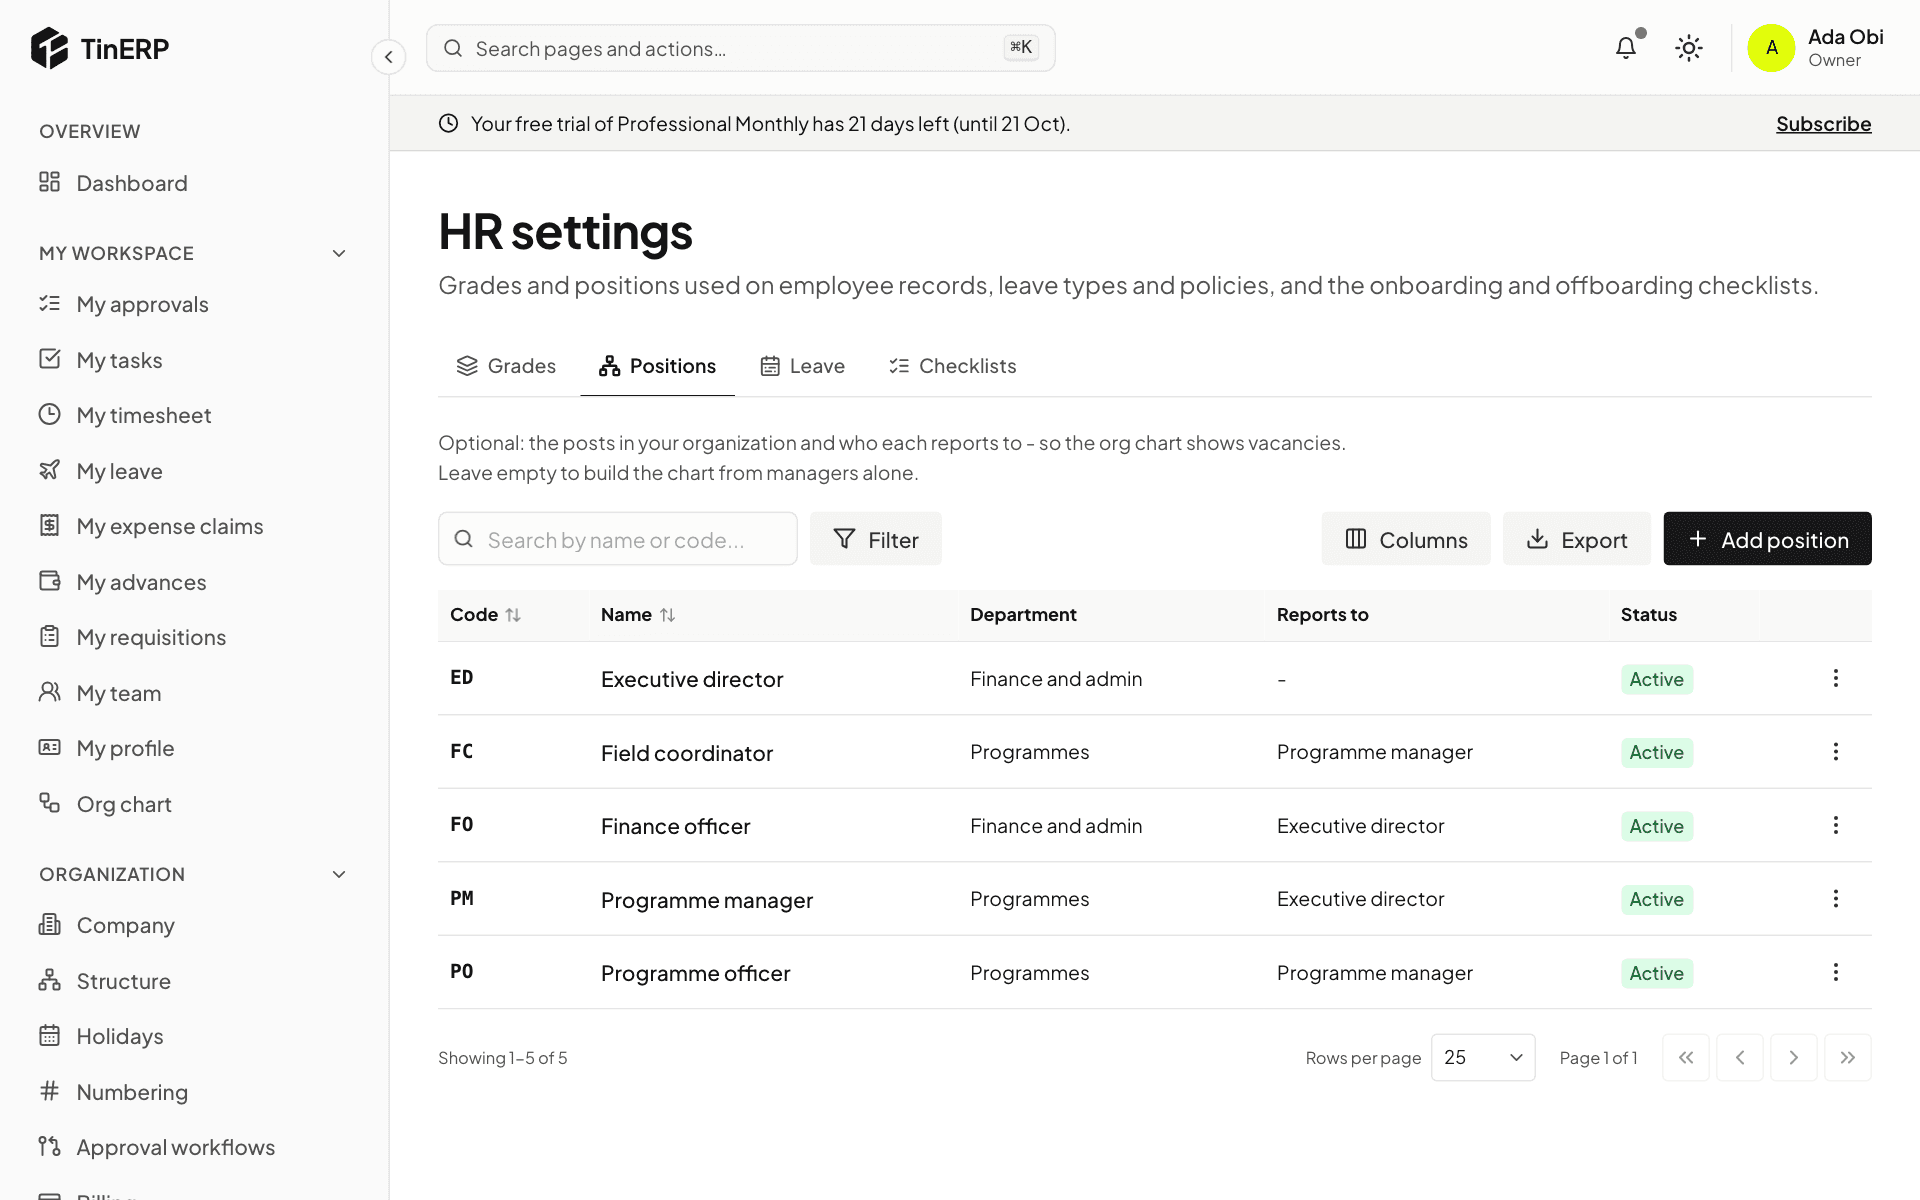
Under Positions, select Add position for each post in your organization, with its department and the post it reports to. Posts nobody holds show on the org chart as vacancies.
Small organizations can skip this: the org chart is then built from each employee's manager.
HR settings → Positions: each post with its department and the post it reports to
3. Check your checklists
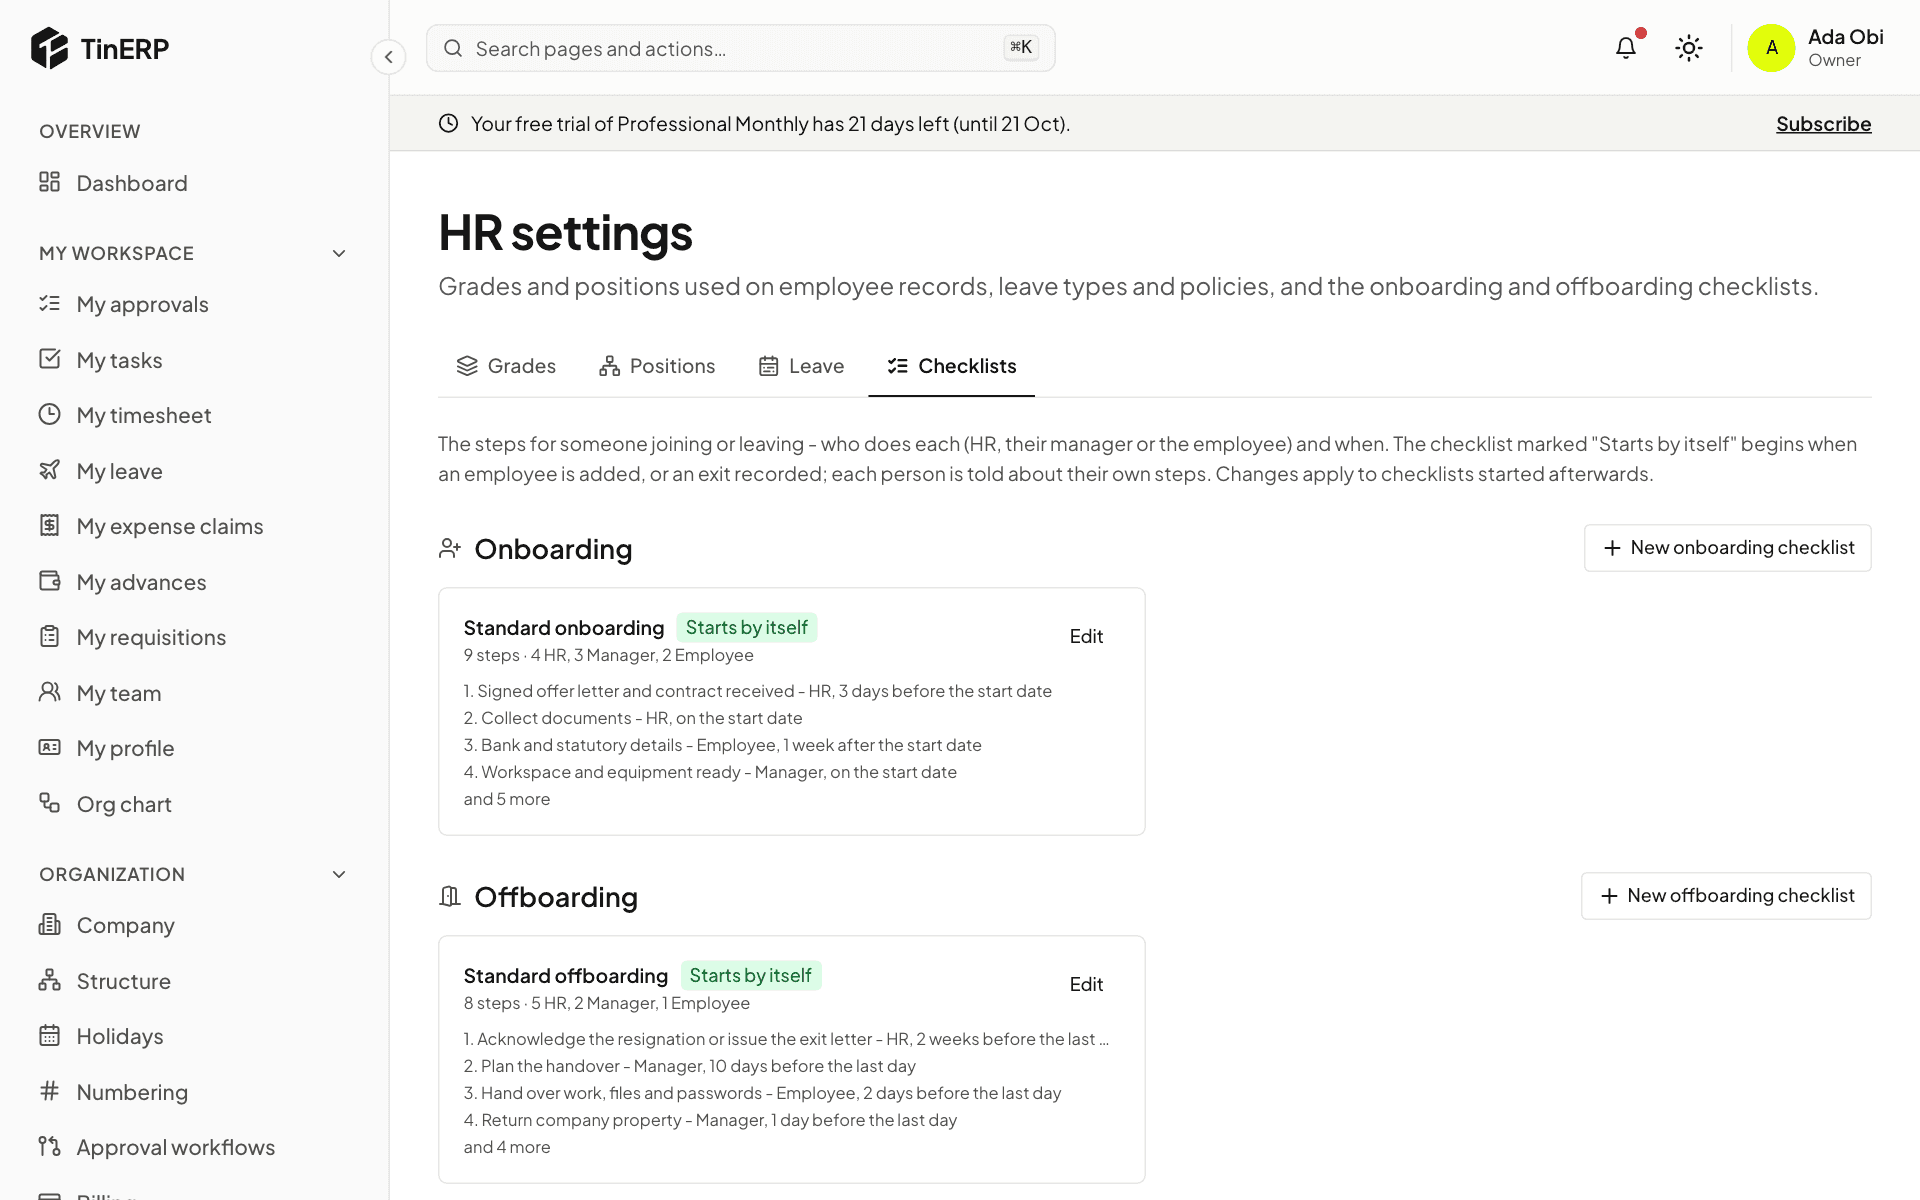
Under Checklists, TinERP starts you with a Standard onboarding and a Standard offboarding. Each step says who does it - HR, the person's manager or the employee - and when, counted from their start date or last day.
Select Edit to change the steps, or add your own checklists. The one marked Starts by itself begins when you add an employee or record an exit.
HR settings → Checklists: Standard onboarding and Standard offboarding, each marked Starts by itself
Tip: Changing a checklist affects checklists started afterwards. Ones already in progress keep their steps.
HR · HR teams · about 6 min
Set up leave
TinERP starts you with the usual leave types - annual, sick, maternity, paternity, compassionate, study, examination and unpaid - with allowances within the Labour Act's minimums. Check them against your own policy and change what's different.
1. Choose your leave year
Go to HR → HR settings → Leave. Under Leave year, choose the month it starts - January for the calendar year - and Save. Allowances start again, and unused days carry over, when a new leave year begins.
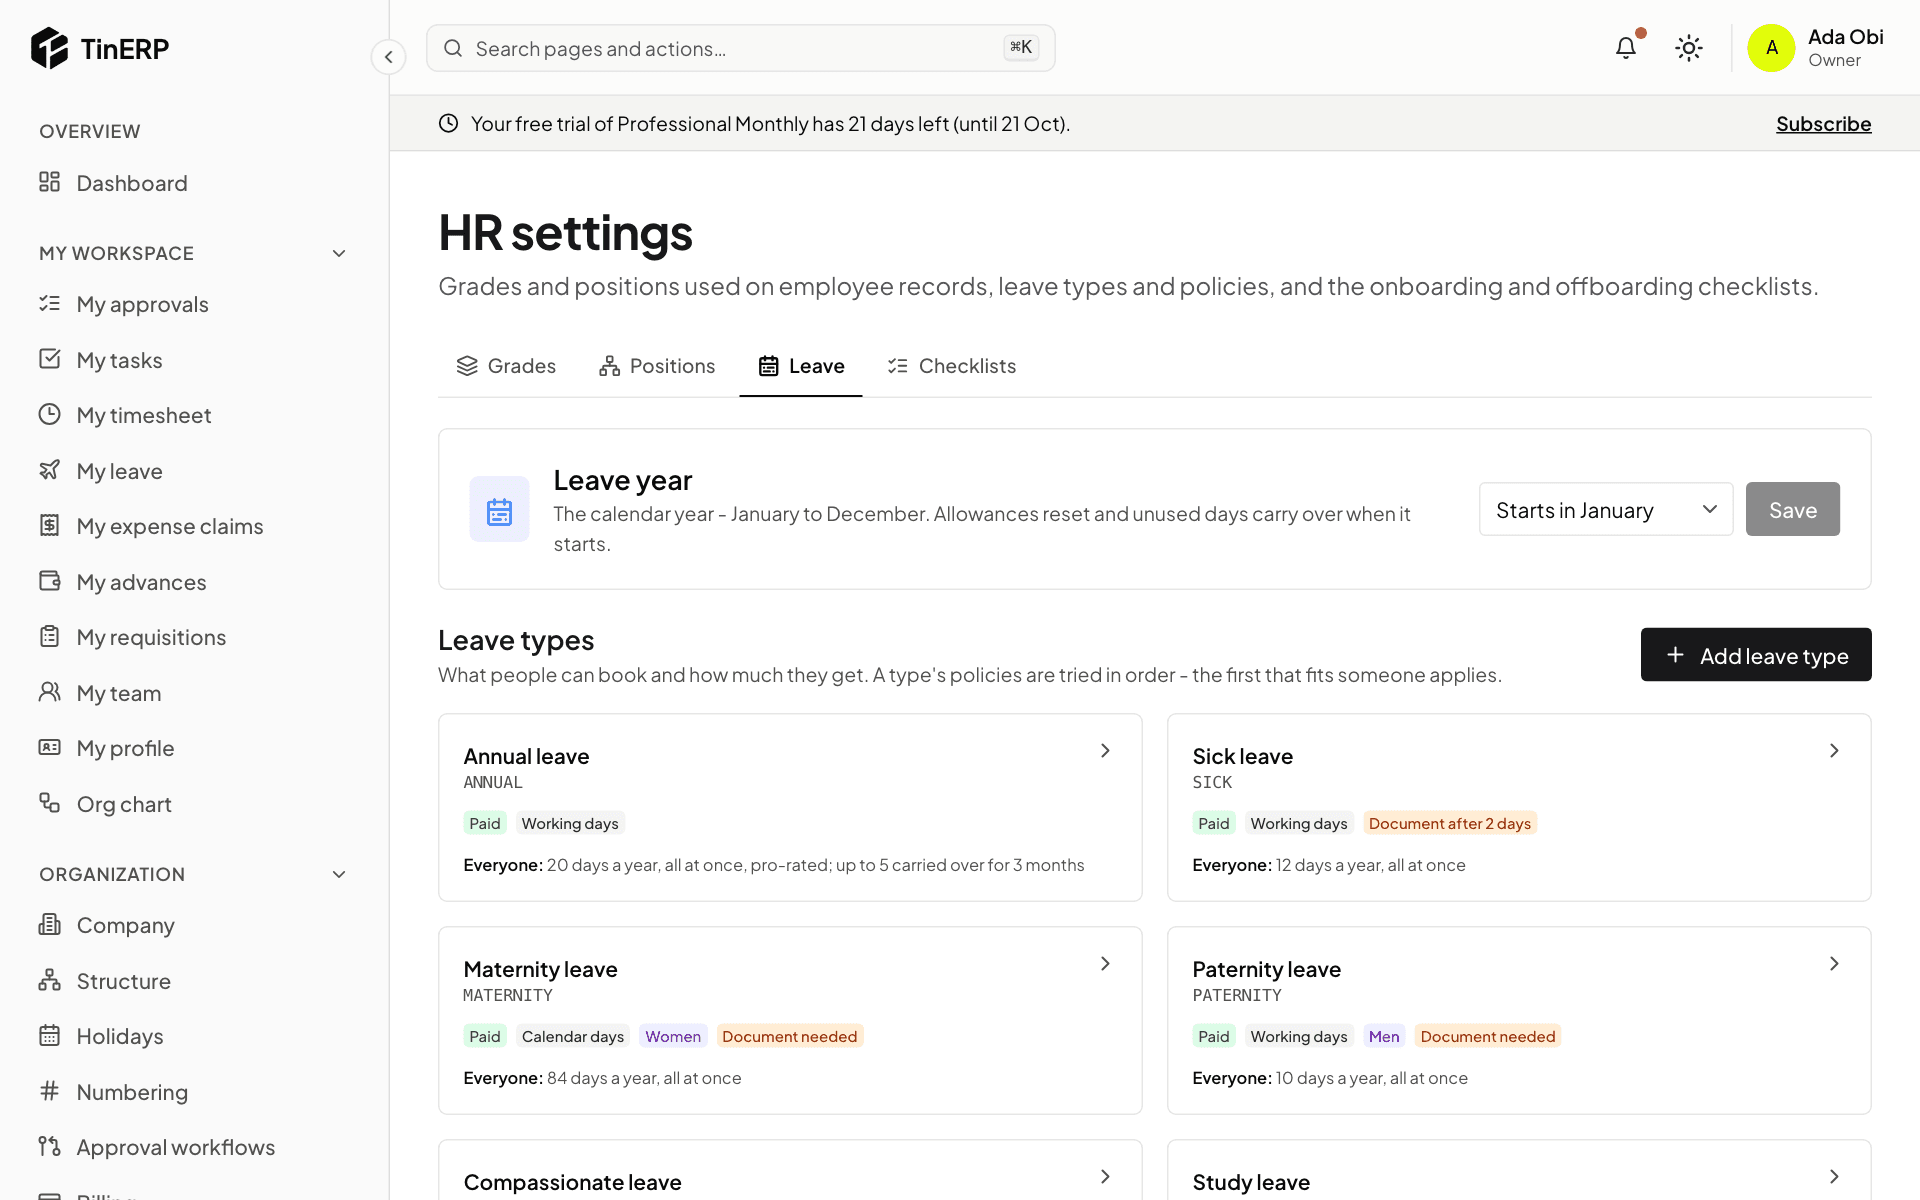
HR settings → Leave: the leave year and the leave types as cards
2. Review your leave types
Each card shows a leave type: paid or unpaid, whether it counts working or calendar days, who it's for, whether a document is needed, and its allowance in words. Select a card to change it, or Add leave type.
Turn off Has an allowance for leave that's approved and recorded but not counted, such as study or unpaid leave.
3. Set the allowance with policies
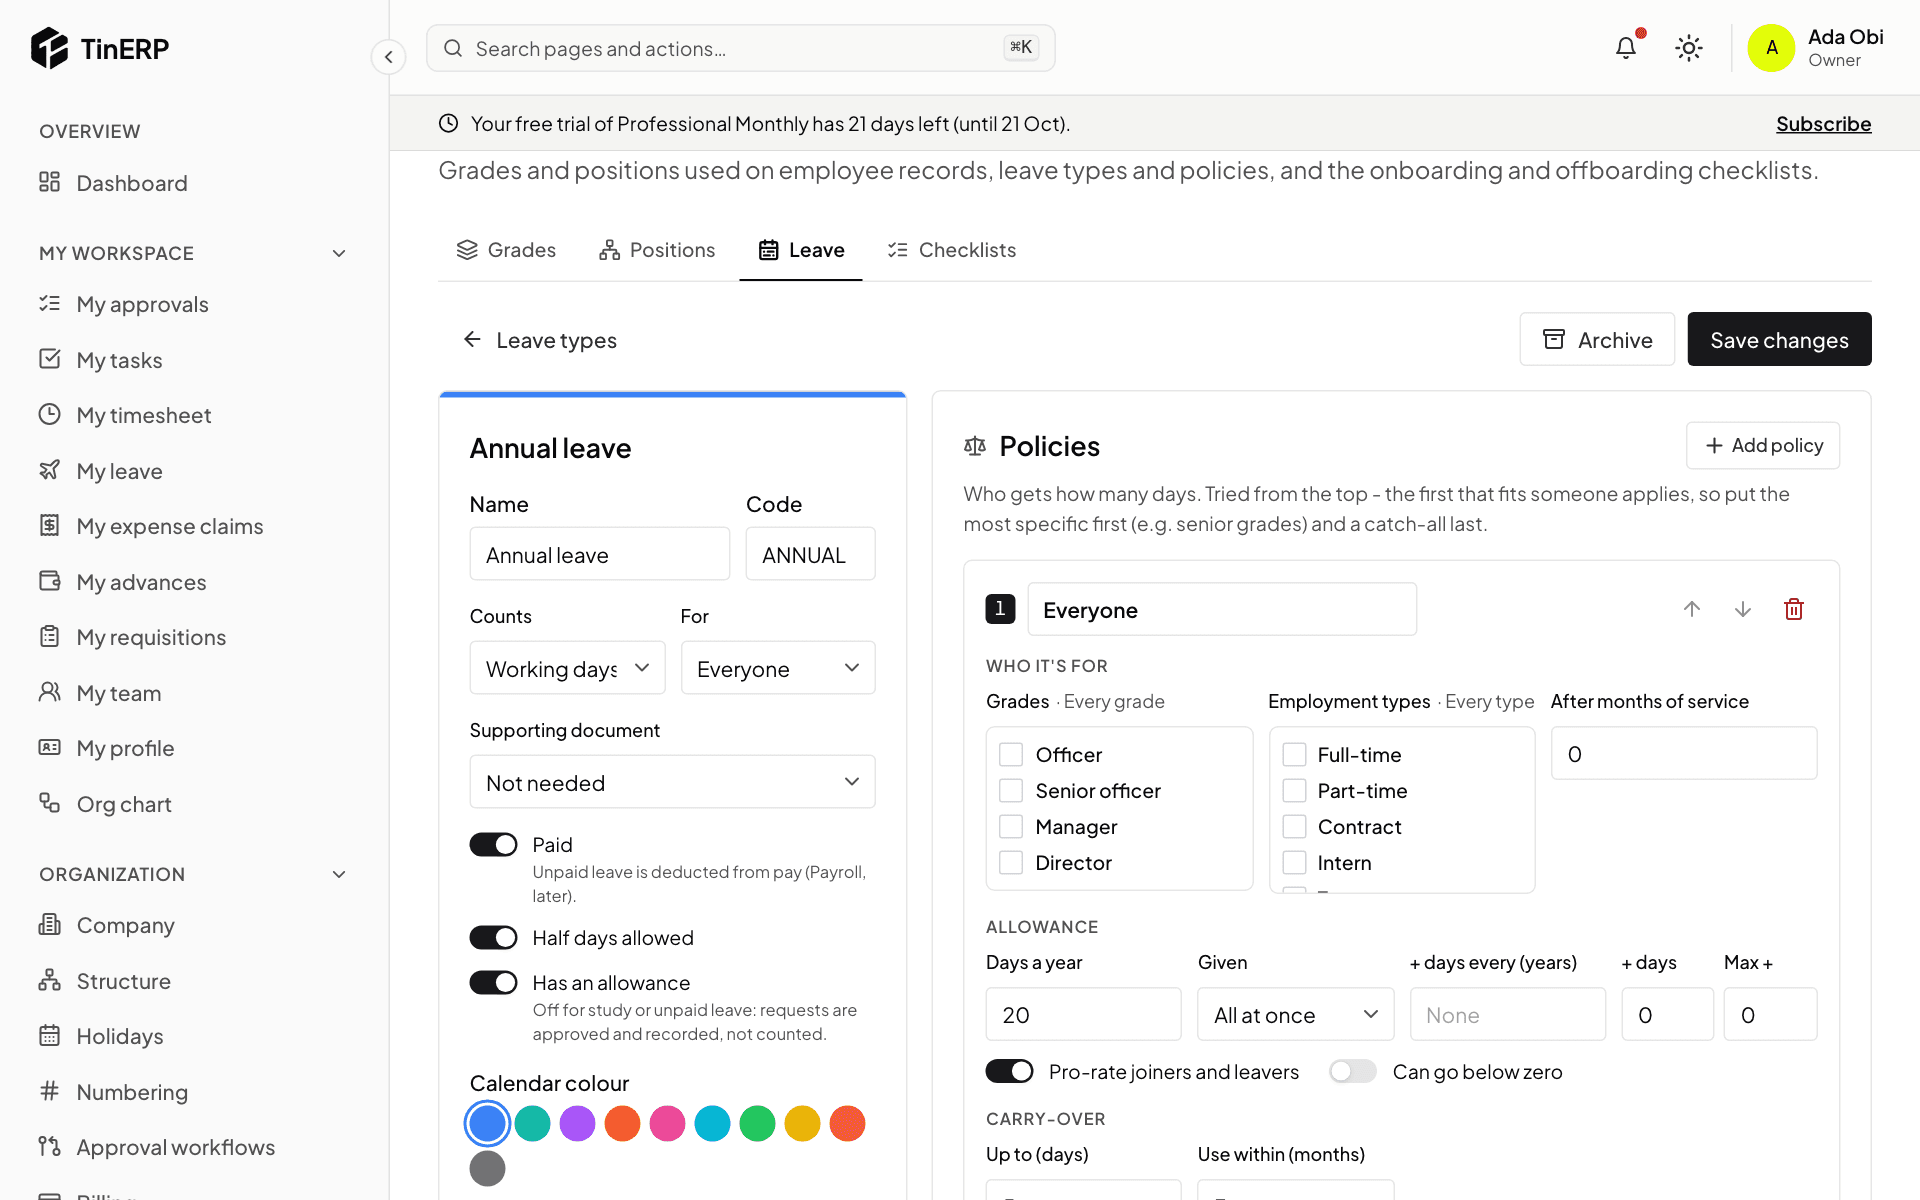
A leave type's policies decide how many days people get. Each says who it's for (grades, employment types, months of service), the days a year, whether they're given all at once or earned month by month, extra days for long service, and how many unused days carry over and for how long.
Turn on Pro-rate joiners and leavers so people who start or leave during the year get their share. Policies are tried in order and the first that fits a person applies - so put the most specific first, for example managers, then everyone. Select Save changes.
Editing Annual leave: its policy with days a year, pro-rating and carry-over
4. Enter opening balances
If people have days left from before TinERP, add them on each employee's page: in the Leave card select Adjust, add the days and give a reason such as "Opening balance".
Questions
Who approves leave?
By default the person's manager - and for 10 days or more, and for maternity, paternity and study leave, an Admin as well. Change it in Organization → Approval workflows; many organizations switch the second step to their HR role.
How do I stop a leave type being used?
Open it and select Archive. Nobody can book it any more; past leave and balances are kept, and you can restore it.
HR · HR teams · about 4 min
Add an employee
Add everyone you employ - including people who will never sign in.
1. Start a record
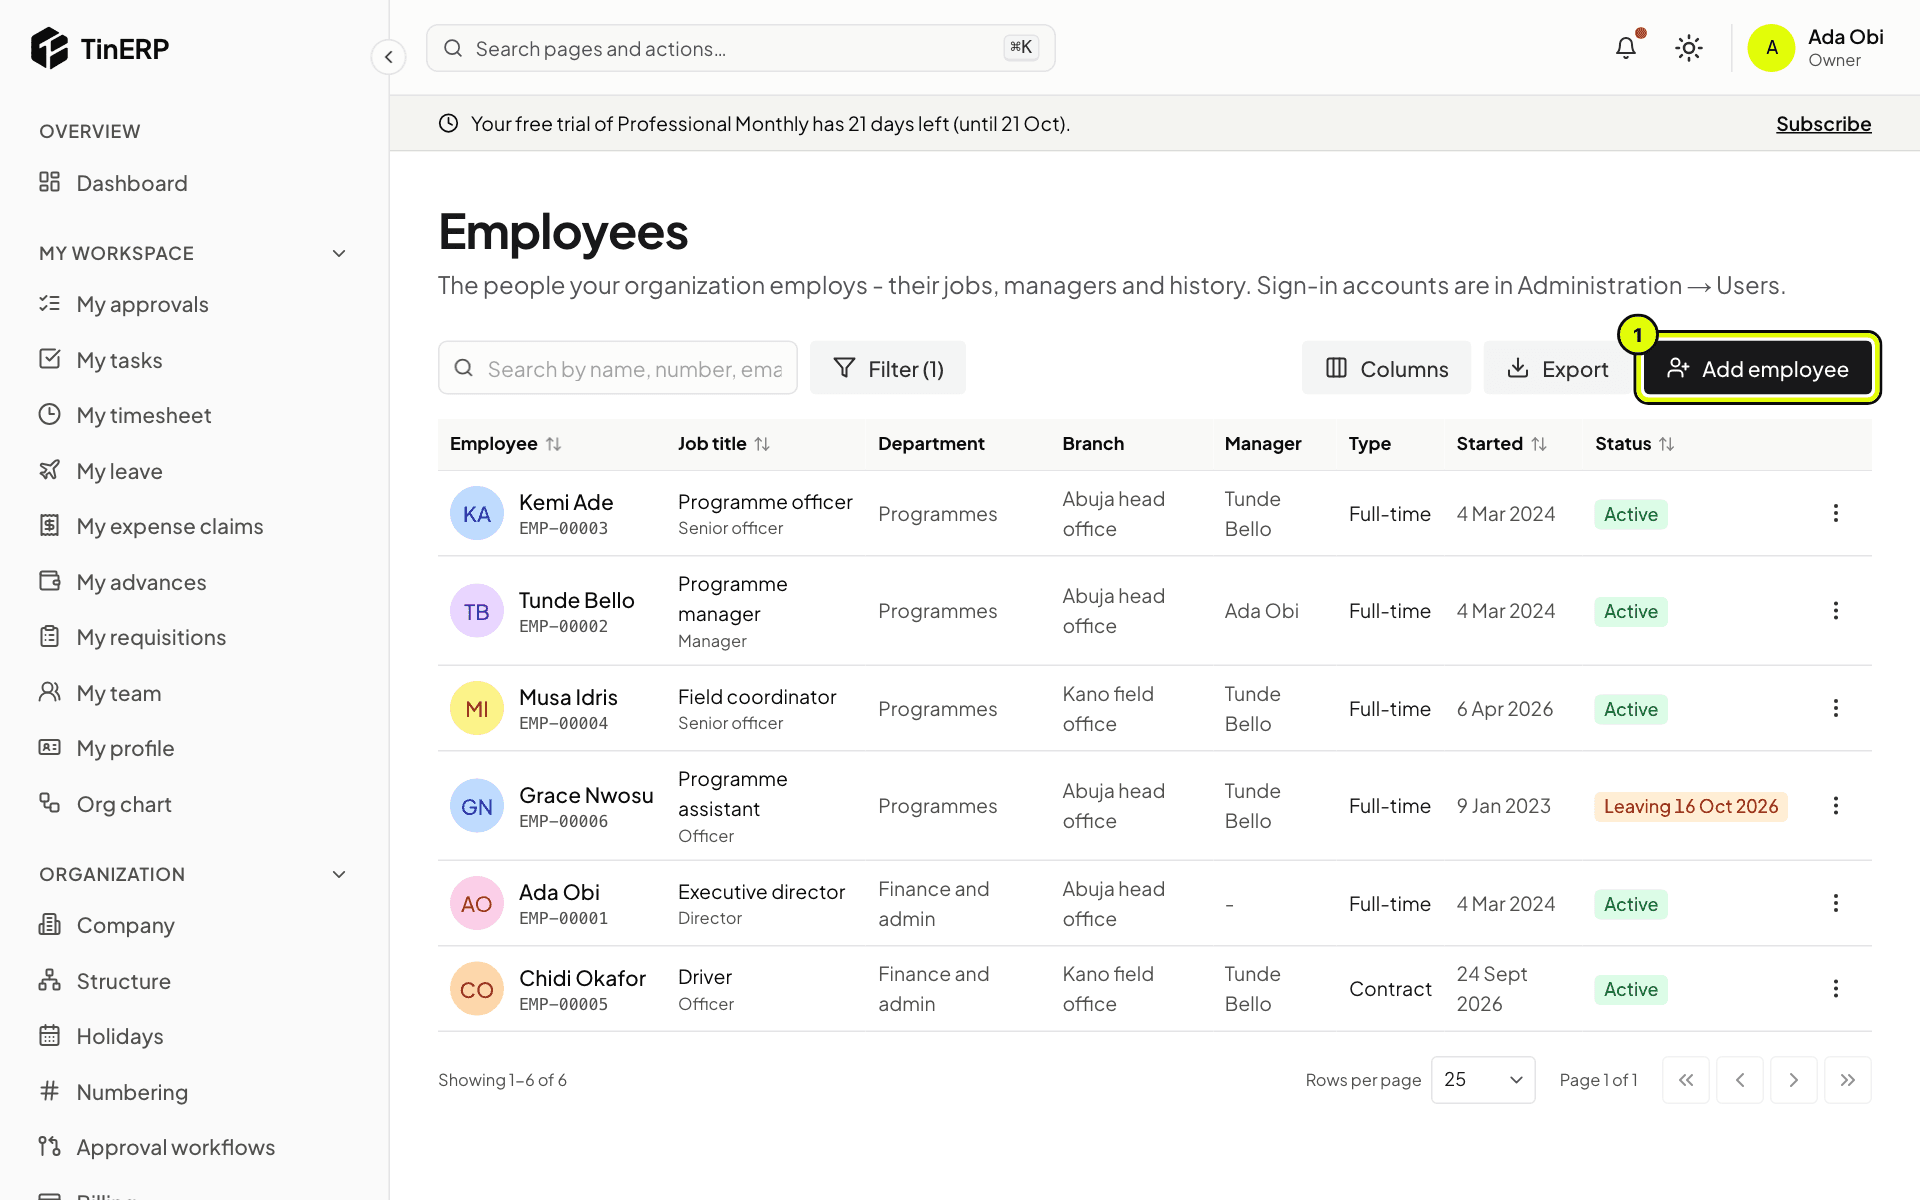
Go to HR → Employees and select Add employee (1).
HR → Employees with Add employee marked 1
2. Fill in their details
Personal details - their name, contacts, date of birth and statutory IDs: NIN, TIN, pension PIN and administrator, and NHF number.
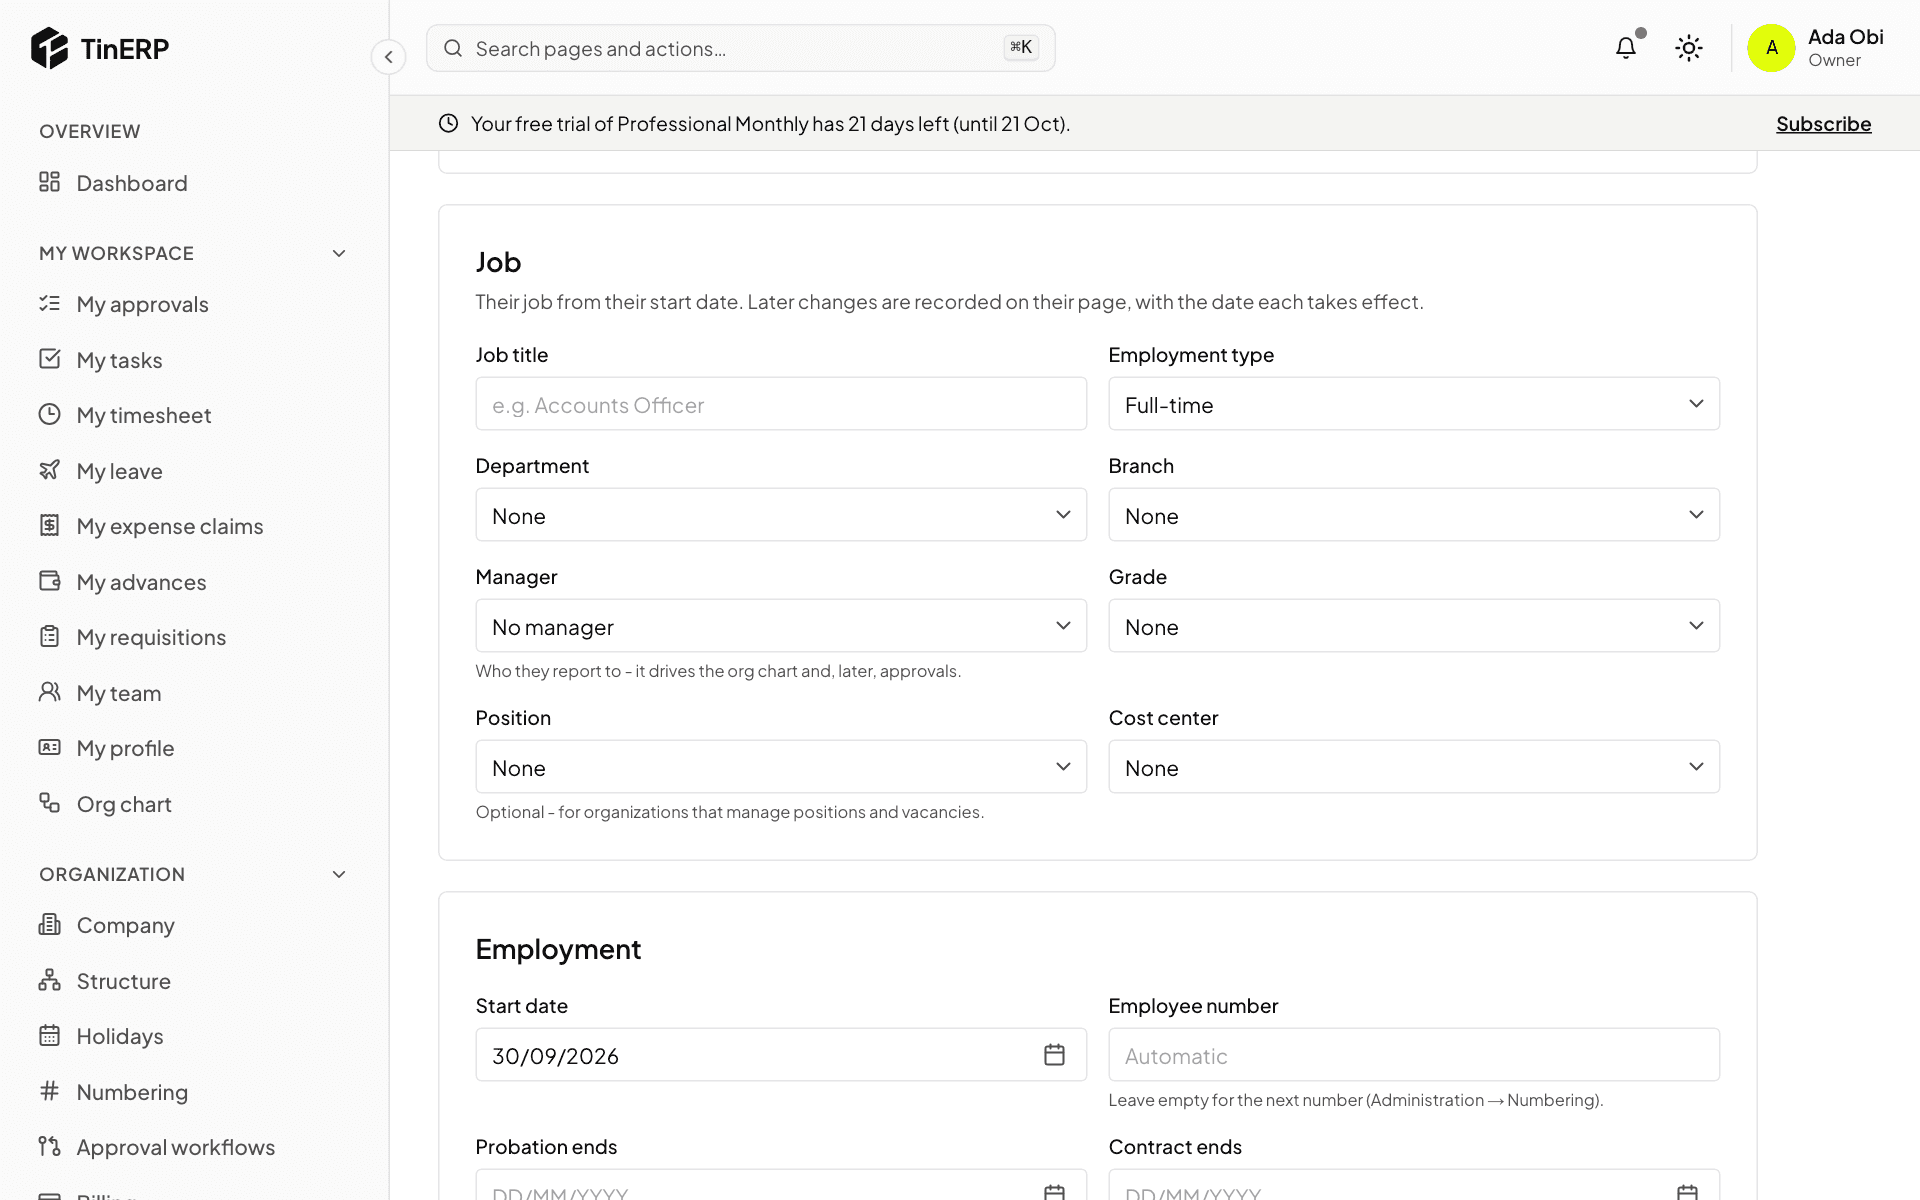
Job - job title, employment type, department, branch, manager, grade and position. Employment - their start date, and when probation and any contract end. The employee number is given automatically, or type your own (from your old system, for example). Select Add employee.
The Job and Employment sections of the Add an employee form
3. Onboarding starts by itself
If their start date is less than 30 days ago or still to come, the default onboarding checklist starts, and everyone with a step is told. Follow it on their page and in HR → Joiners & leavers.
Tip: Loading your existing team? People who started more than 30 days ago don't get a checklist each - you can start one by hand from their page.
4. Give them a login
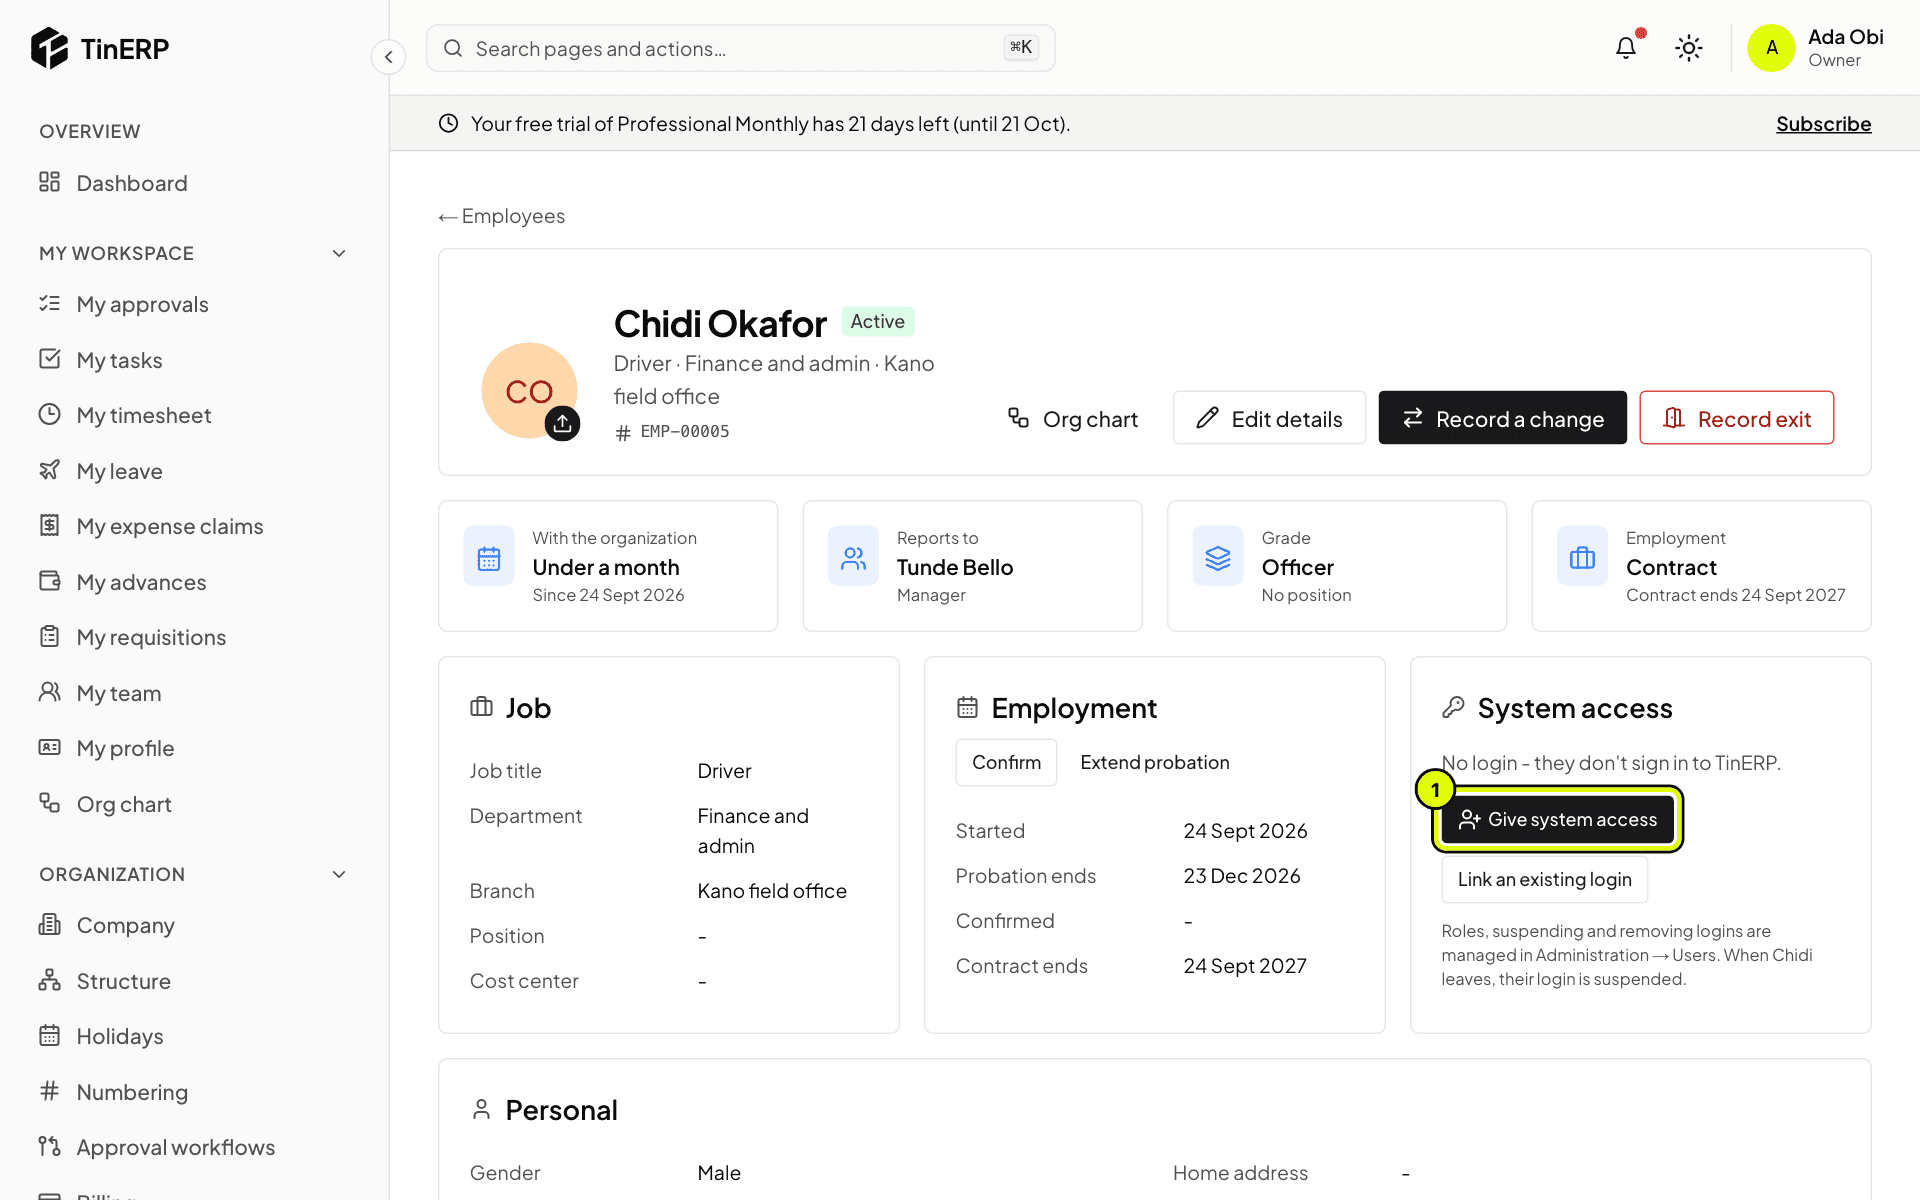
On their page, under System access, select Give system access (1) and choose their role. They get an email to set a password, and their login is linked to this record.
If they already have a login - someone you invited before adding their record - choose Link an existing login instead.
Chidi's page: no login yet, with Give system access marked 1
HR · HR teams · about 6 min
Keep employee records up to date
Everything about an employee is on their page. Changes to their job are kept as history, each with the date it took effect - nothing is overwritten.
1. Open their page
Go to HR → Employees and select the person. Their page shows their job, employment dates, login, personal details, leave, checklists and job history.
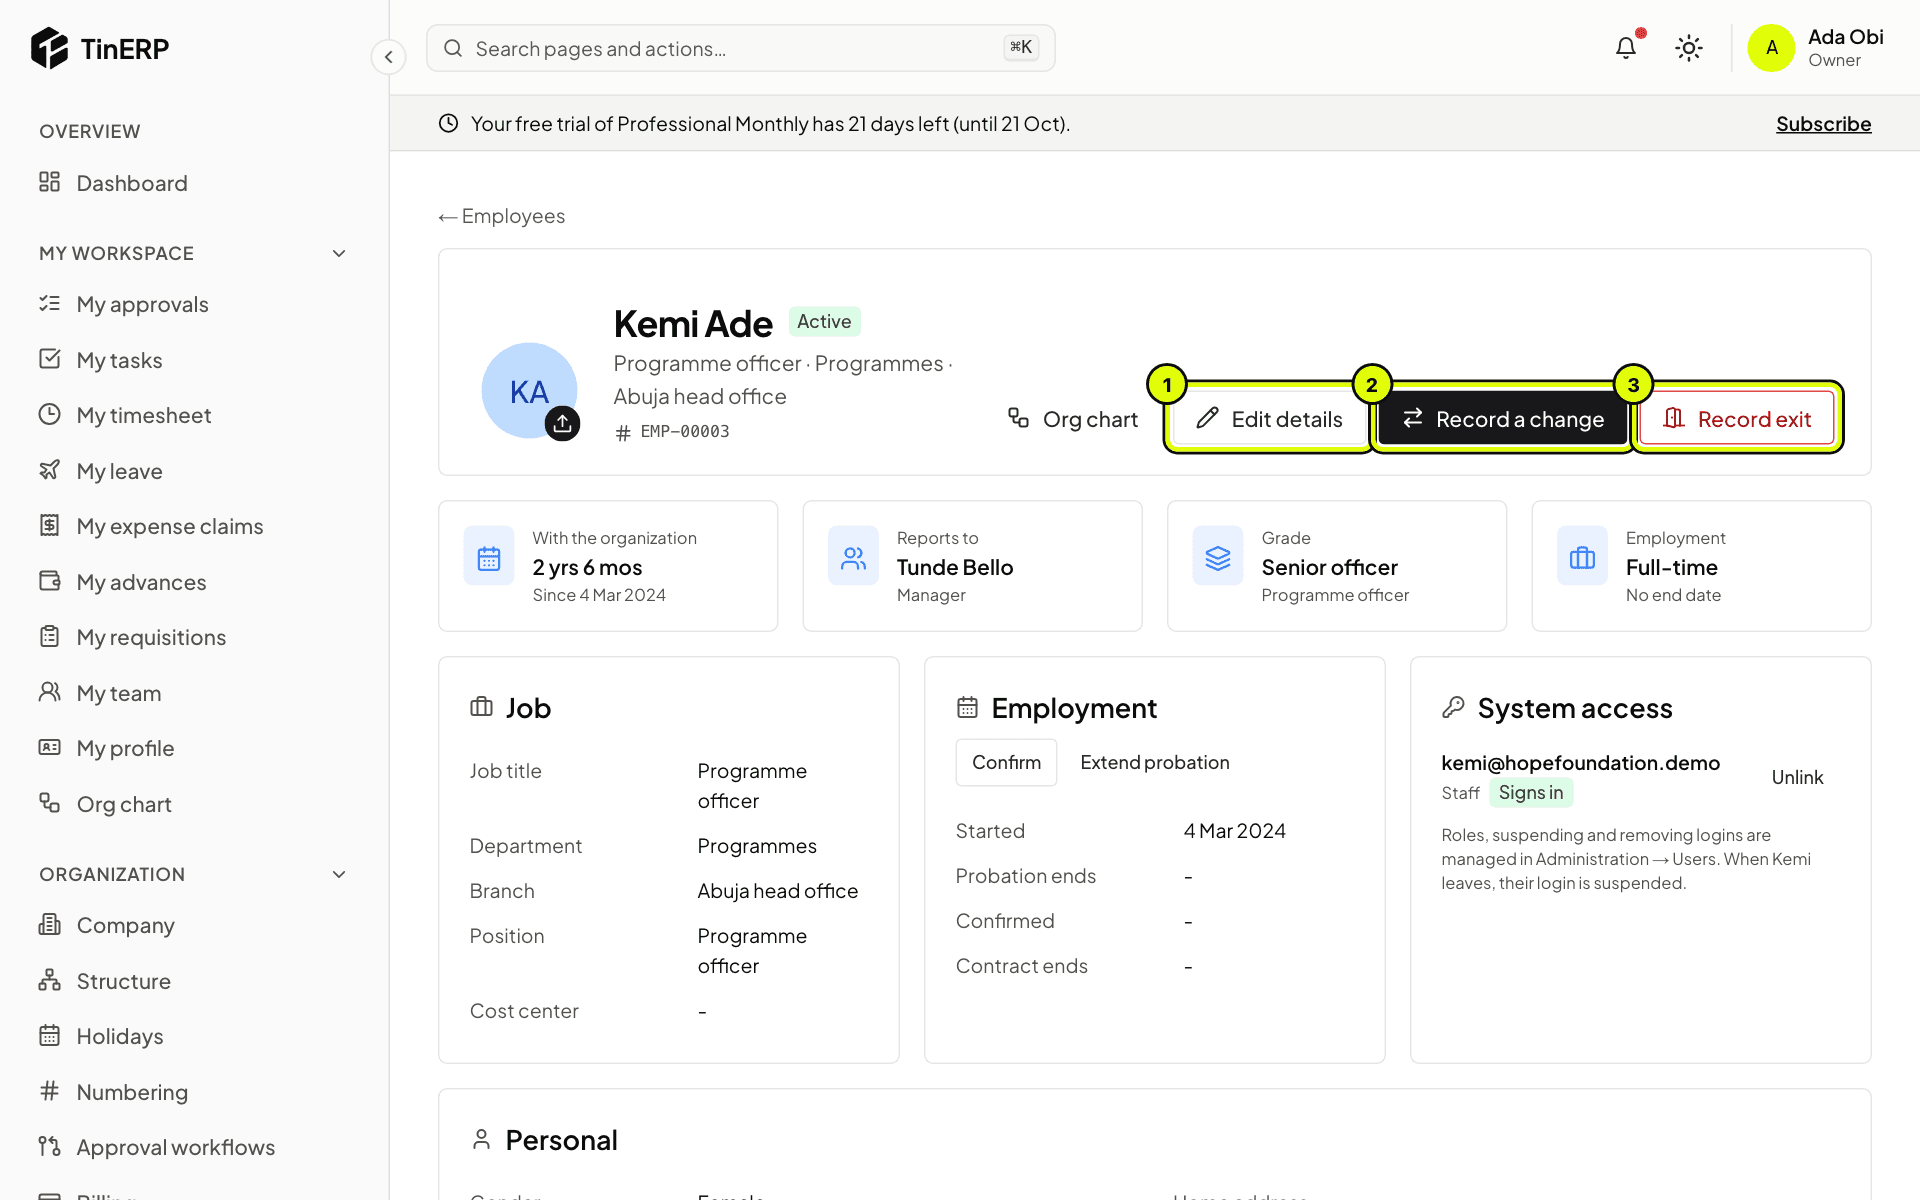
Edit details (1) corrects personal details. Record a change (2) is for their job. Record exit (3) is for when they leave.
Kemi's employee page, with Edit details, Record a change and Record exit marked 1 to 3
2. Record a promotion, transfer or new manager
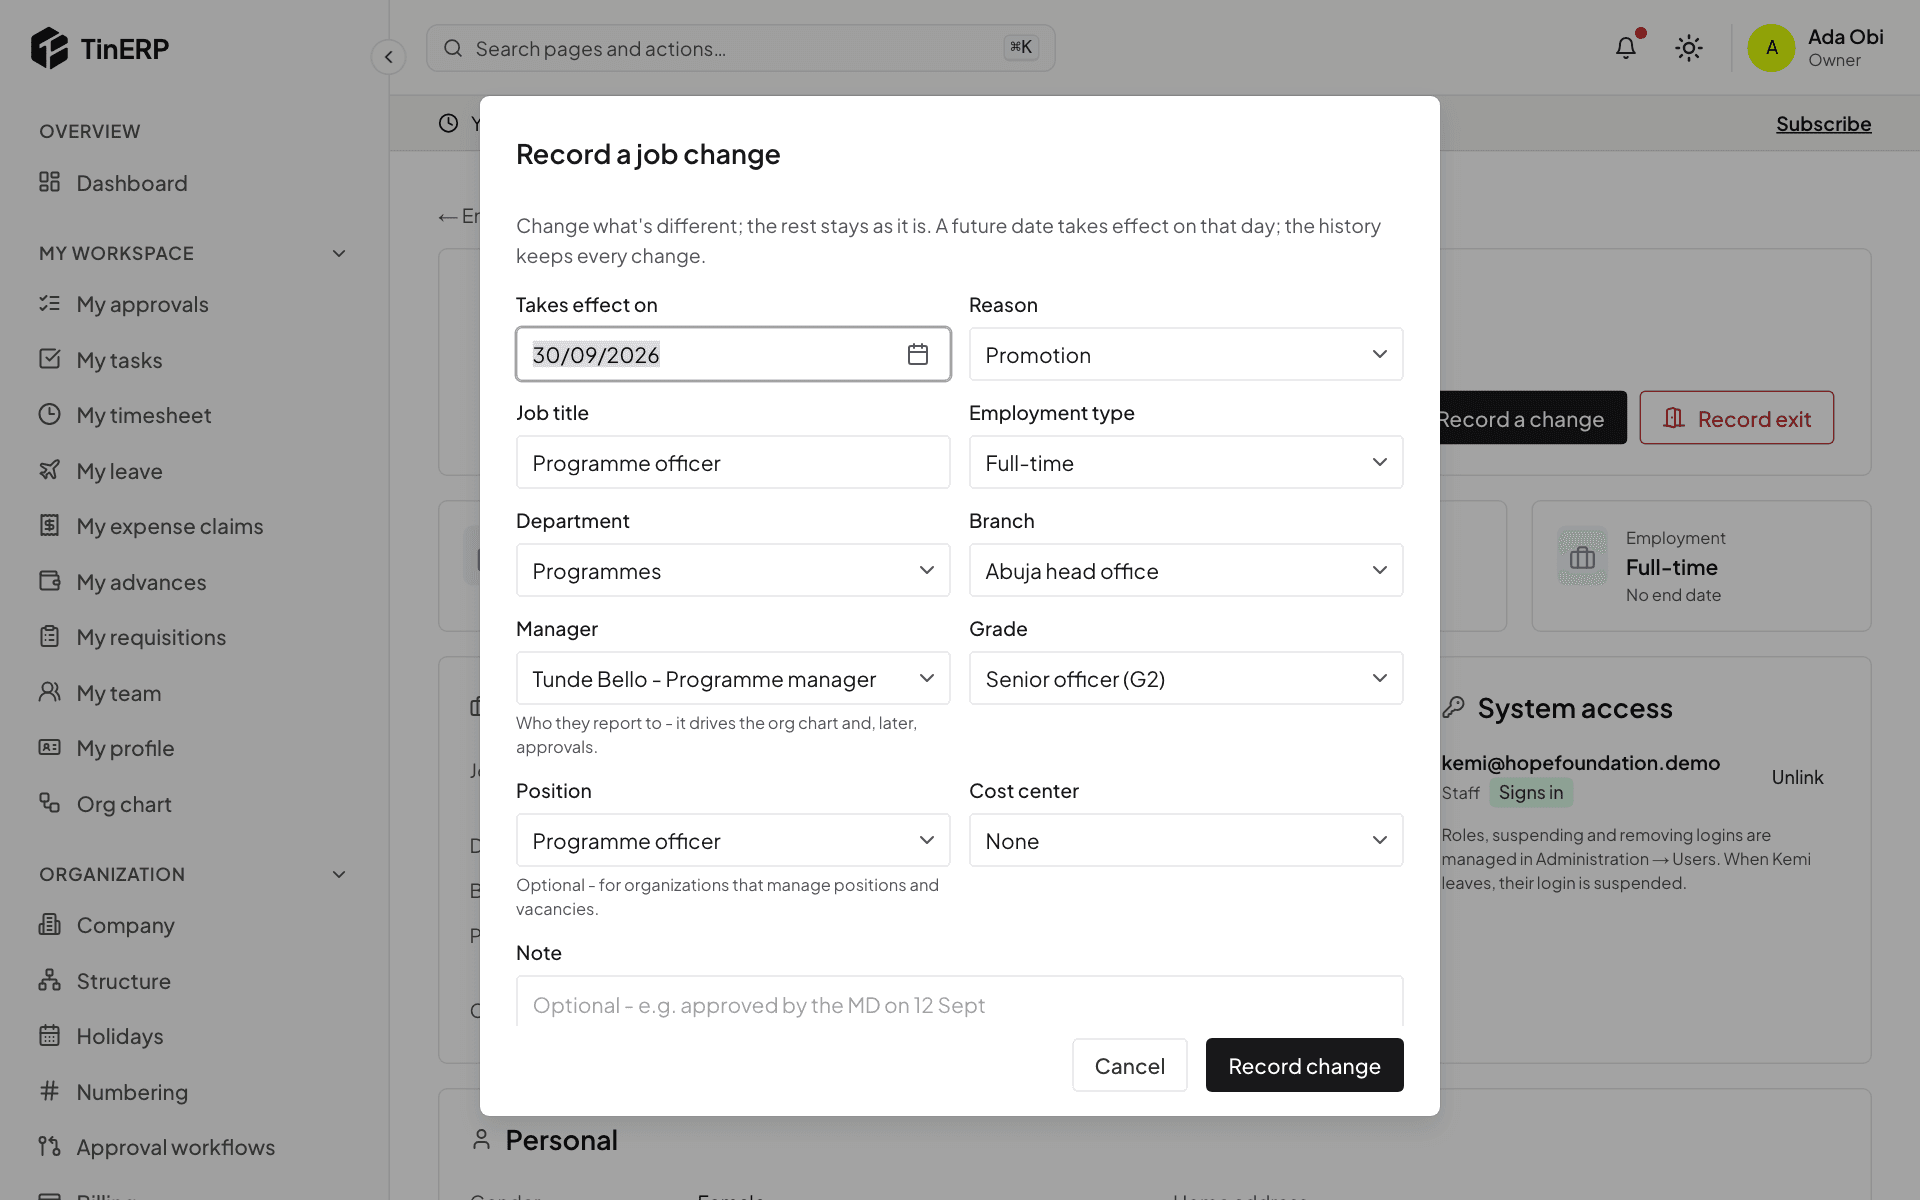
Select Record a change. Change only what's different - job title, department, branch, manager, grade, position or employment type - then choose the date it takes effect and the reason, such as a promotion or transfer.
A future date takes effect on that day. The job history keeps every change.
The Record a job change window with the job fields, the date it takes effect and the reason
3. Confirm or extend probation
Under Employment, select Confirm when someone passes probation, or Extend probation to set a later end date. HR and their manager are reminded 14 days before probation ends.
4. Contacts, bank details and documents
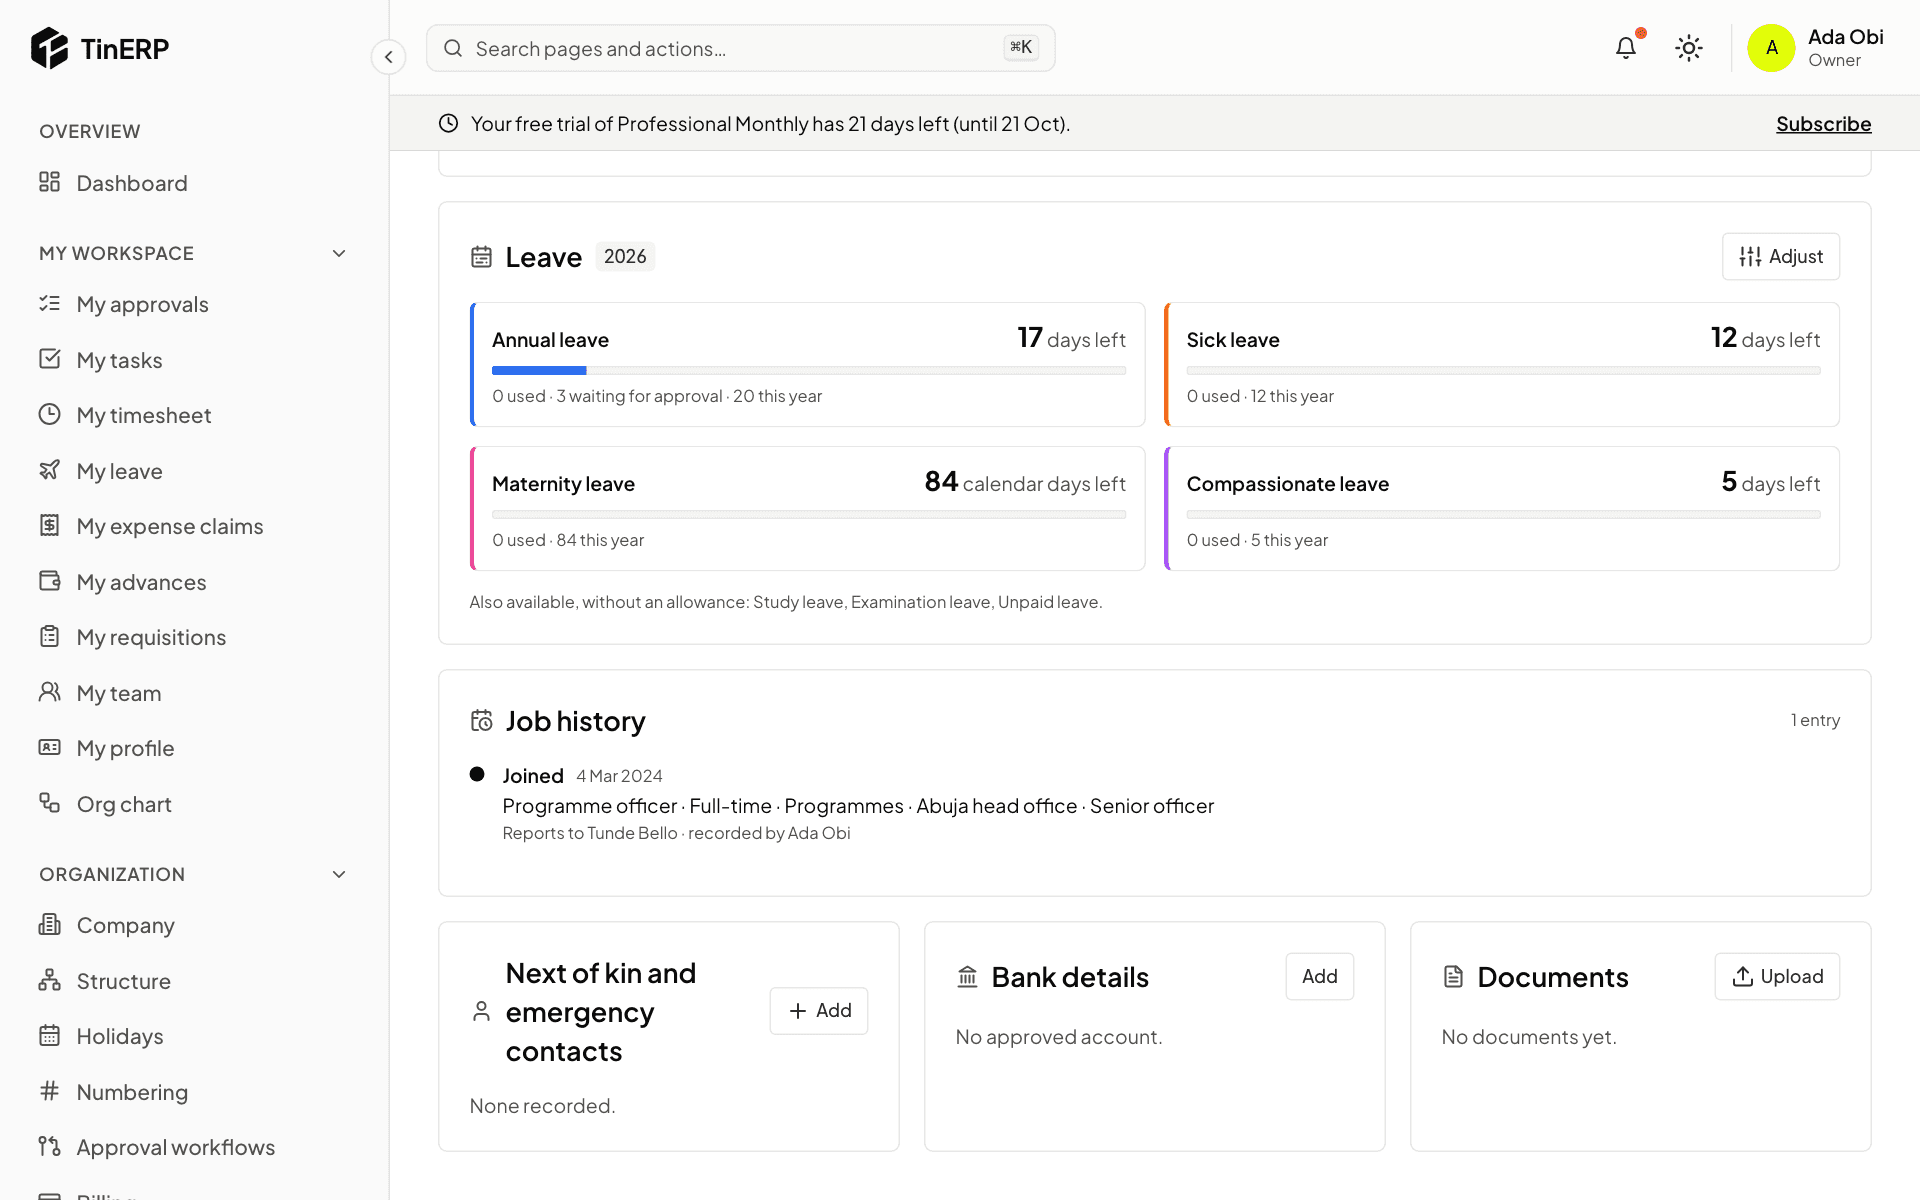
Further down are Next of kin and emergency contacts, Bank details and Documents - contracts, CVs, certificates, IDs - each with an expiry date if it has one.
A new bank account isn't used until someone other than the person who entered it approves it: a common fraud is changing an account just before pay day. These details need the sensitive-details permission.
Next of kin and emergency contacts, Bank details and Documents on an employee's page
5. Adjust a leave balance
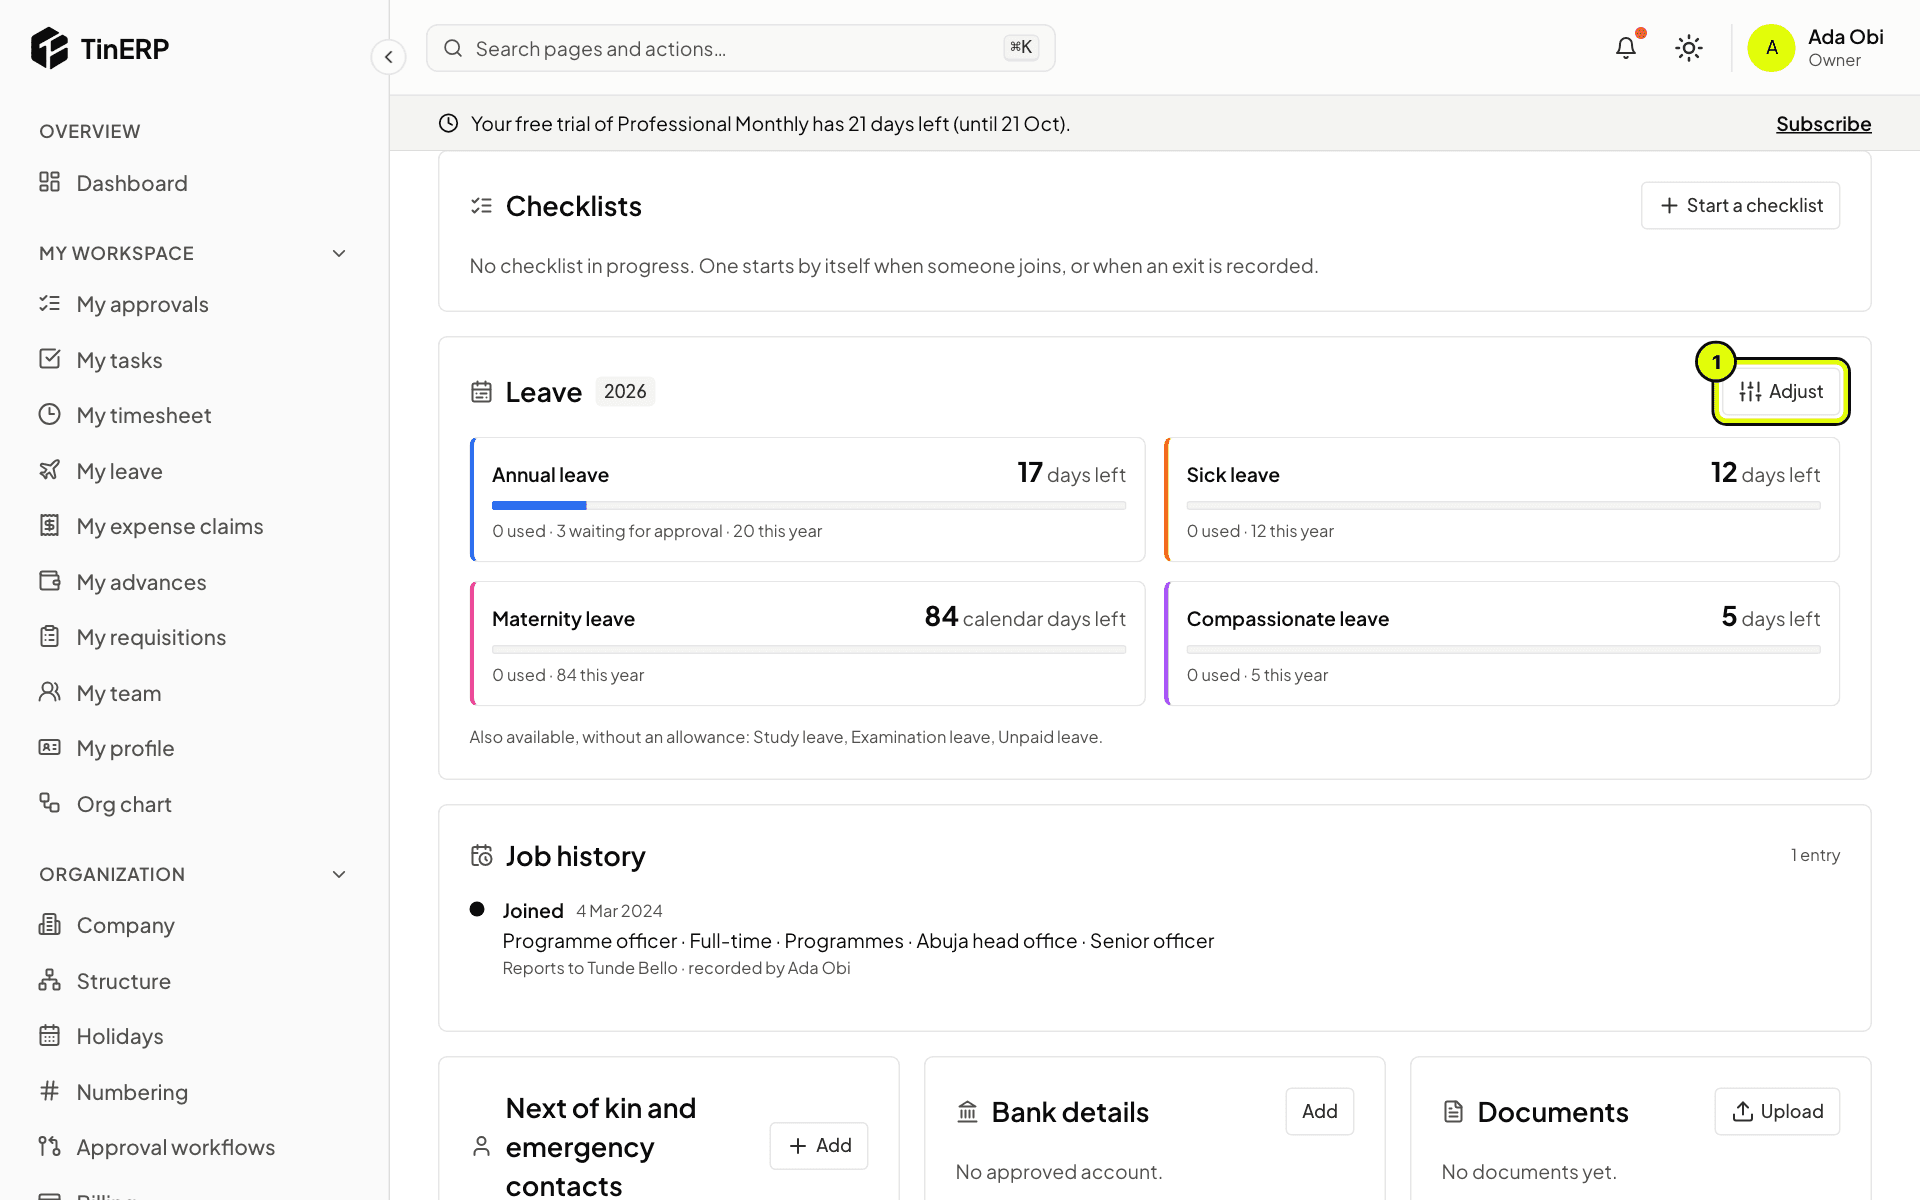
In the Leave card, select Adjust (1) to add or take away days - an opening balance, days given in lieu, or a correction - with a reason. It's kept with the balance and in the audit log.
The Leave card on Kemi's page with her balances and Adjust marked 1
HR · HR teams · about 3 min
When someone leaves
Employees are never deleted. When someone leaves, their record is kept, with the date and the reason.
1. Record their exit
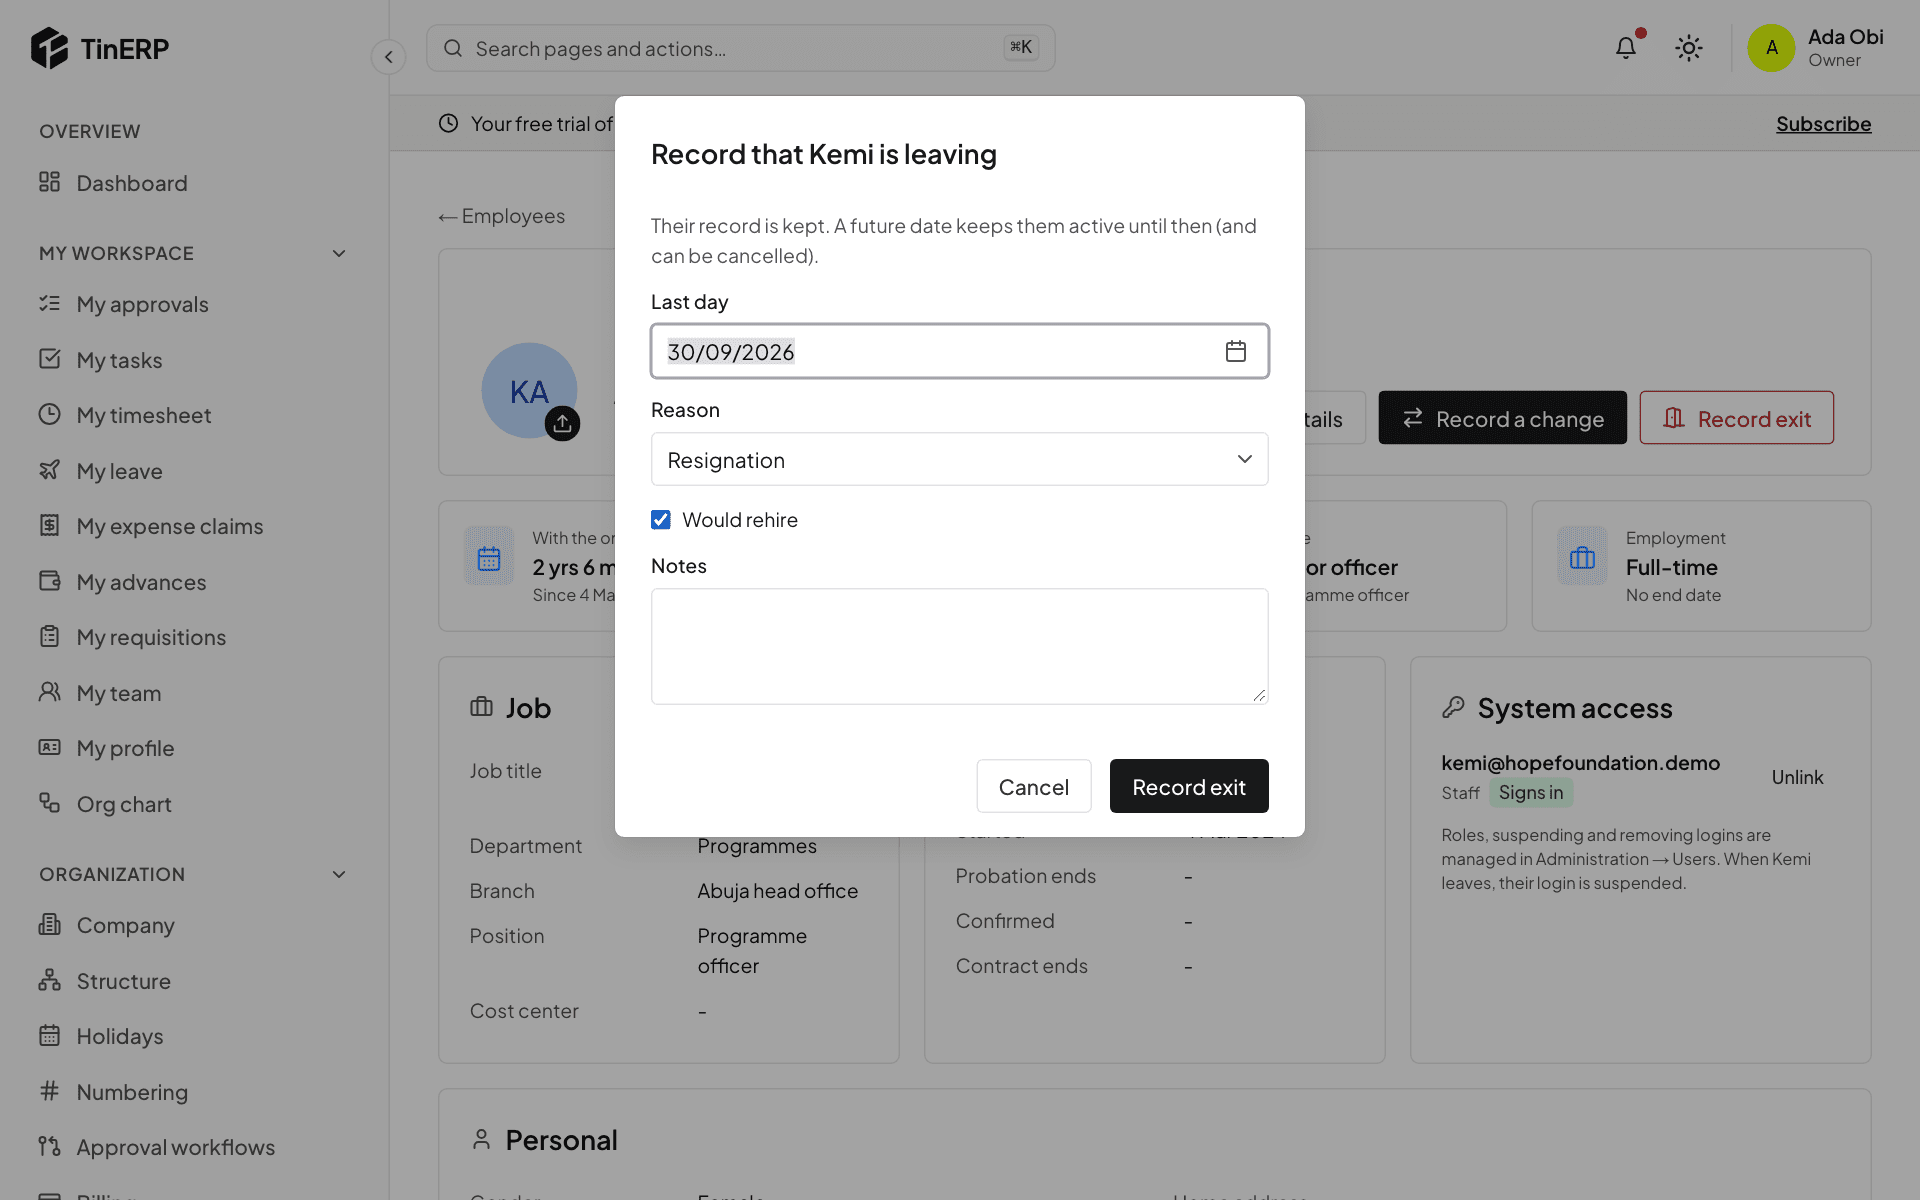
On their page, select Record exit. Enter their Last day, the reason, whether you'd rehire them, and any notes.
With a date still to come, they stay active until then. If they change their mind, select Cancel exit.
The Record exit window with the last day, reason, rehire and notes
2. Offboarding starts
The default offboarding checklist starts - handover, return of company property, clearance, exit interview - and everyone with a step is told.
3. Their access closes by itself
On their last day, their login is suspended and they're signed out everywhere. They drop out of headcount, calendars and lists of people to choose from; their record, history and leave stay.
Questions
They headed a department - what happens?
They stop heading it on their last day. Choose a new head in Organization → Structure, so approvals that go to the department head still find someone.
HR · HR teams · about 4 min
Run leave for everyone
People book their own leave in My leave, and their manager decides. HR → Leave is where HR sees everyone and steps in.
1. See everyone's leave
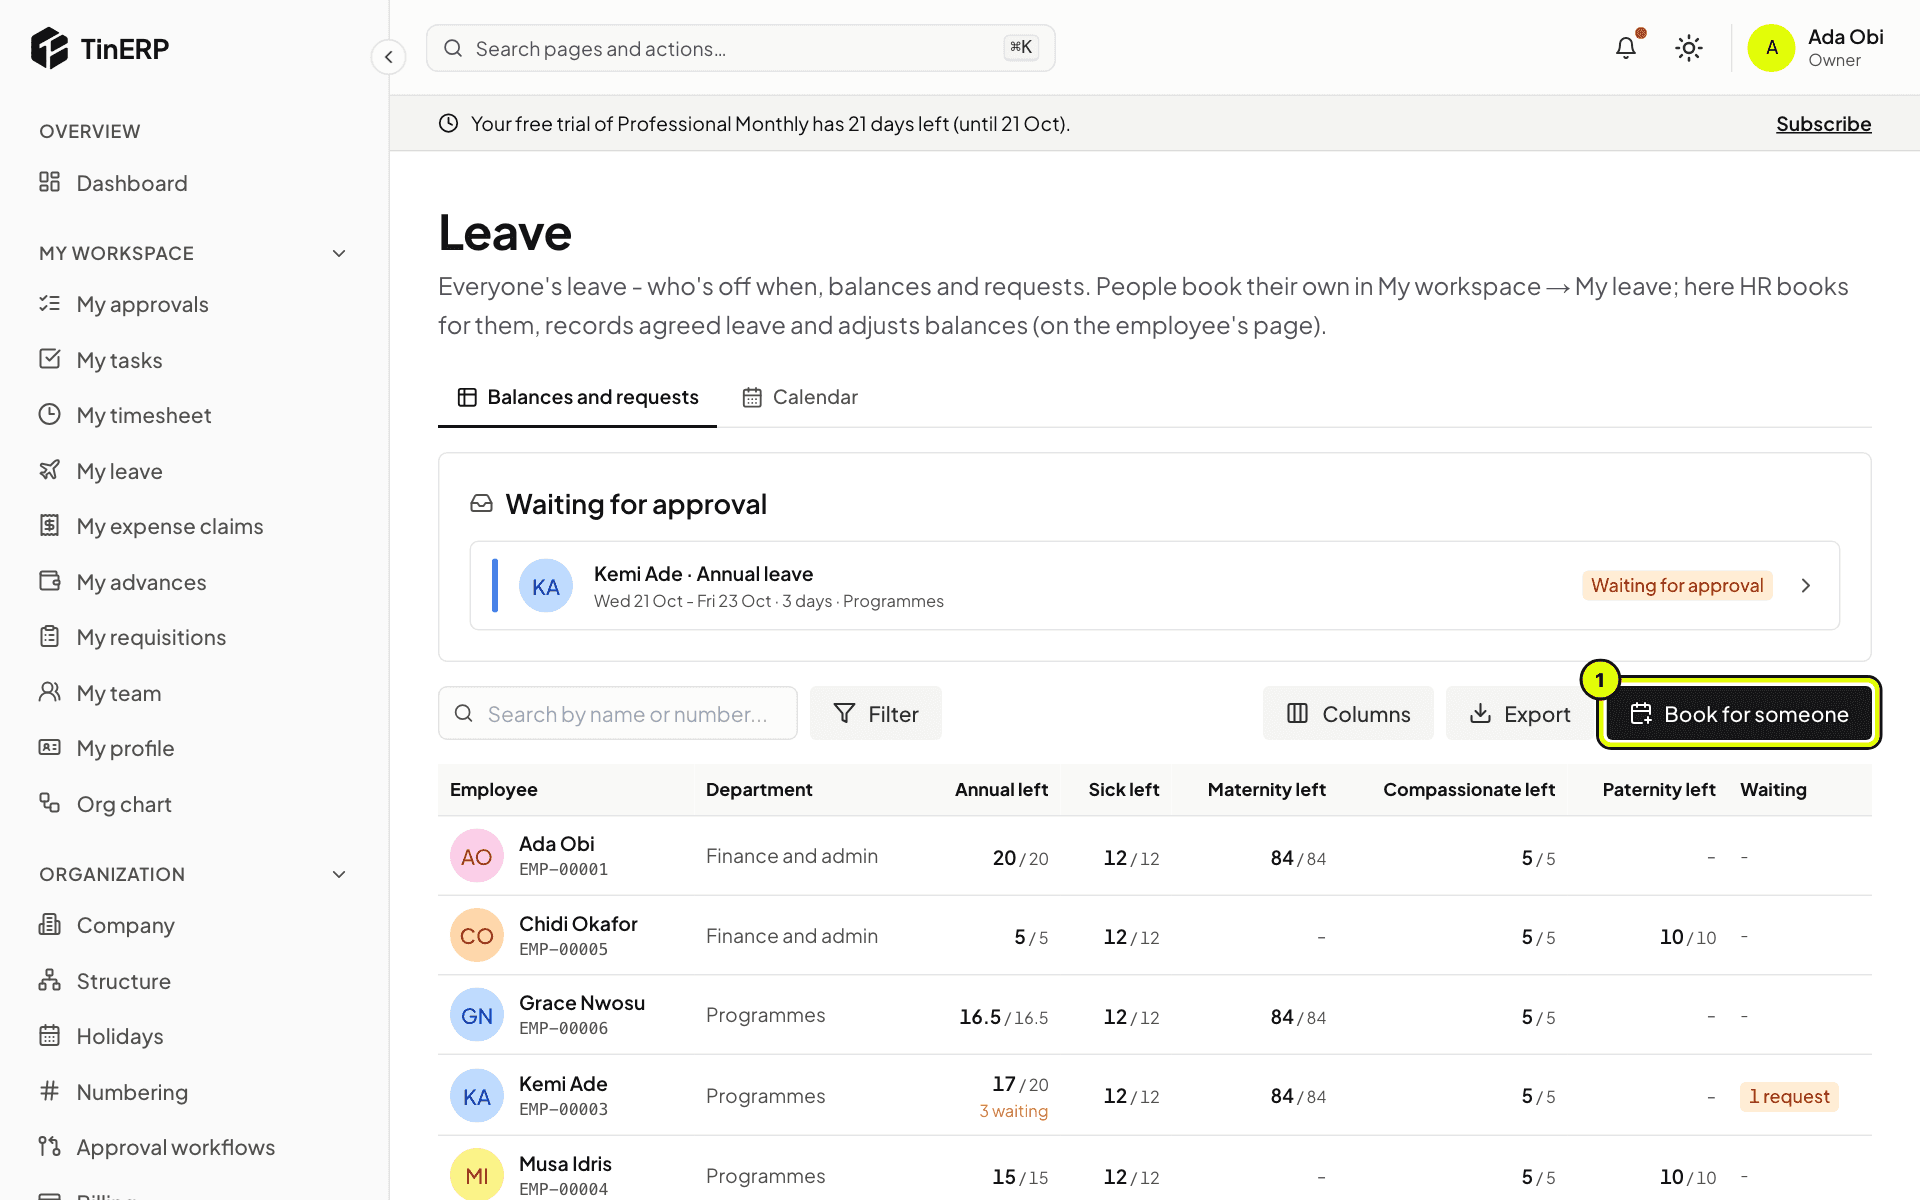
Go to HR → Leave. Waiting for approval lists the requests not yet decided. The table shows every employee's days left of each leave type and what's waiting. Search, filter by department, or Export it.
HR → Leave: the request waiting for approval, everyone's balances, and Book for someone marked 1
2. Book for someone
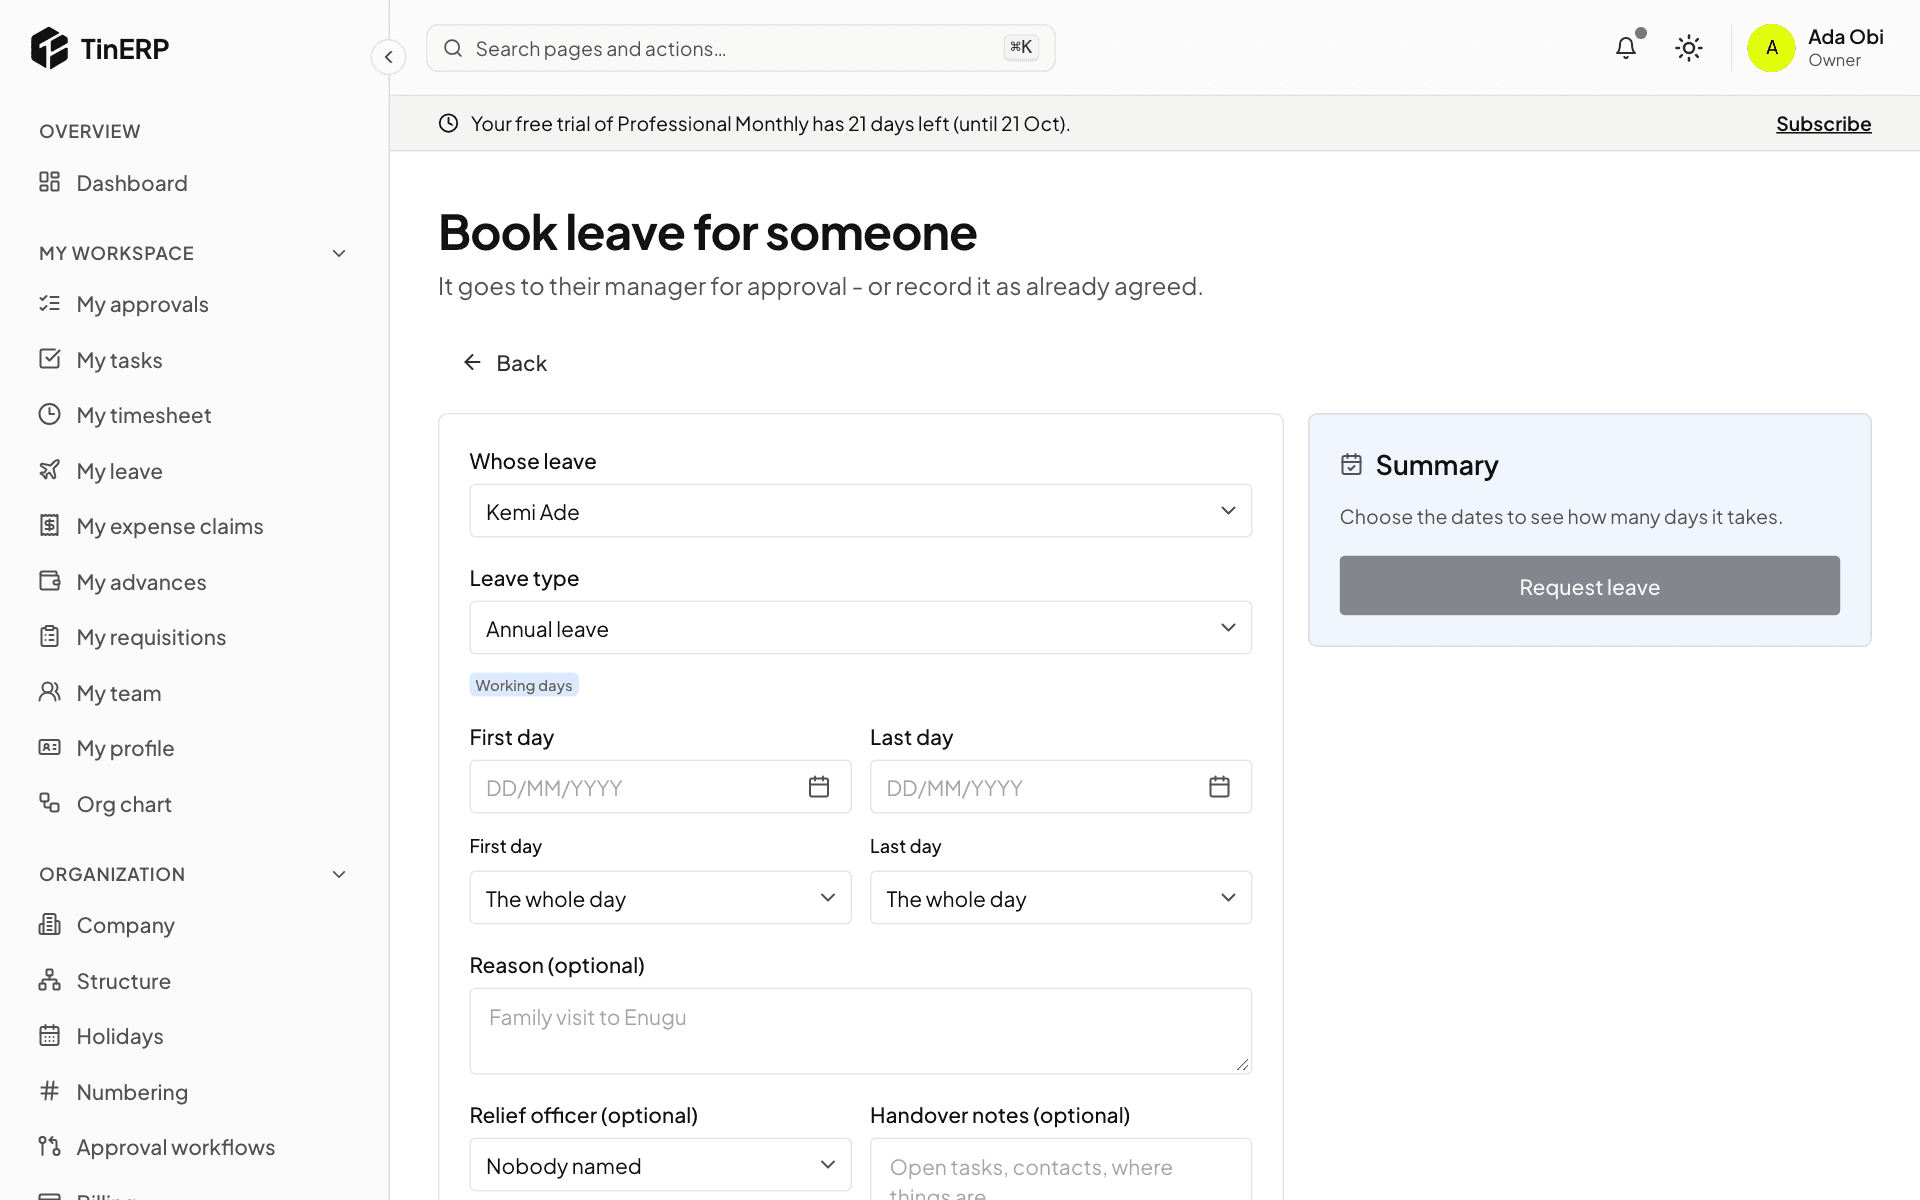
Select Book for someone (1) - for people who don't sign in, such as drivers. Choose whose leave it is, the type and the dates; it goes to their manager for approval.
For leave already agreed - sick leave recorded afterwards, for example - tick Record as already approved. It skips the approval, and the request says so.
The Book leave form for someone else, with Whose leave and Record as already approved
3. See the calendar
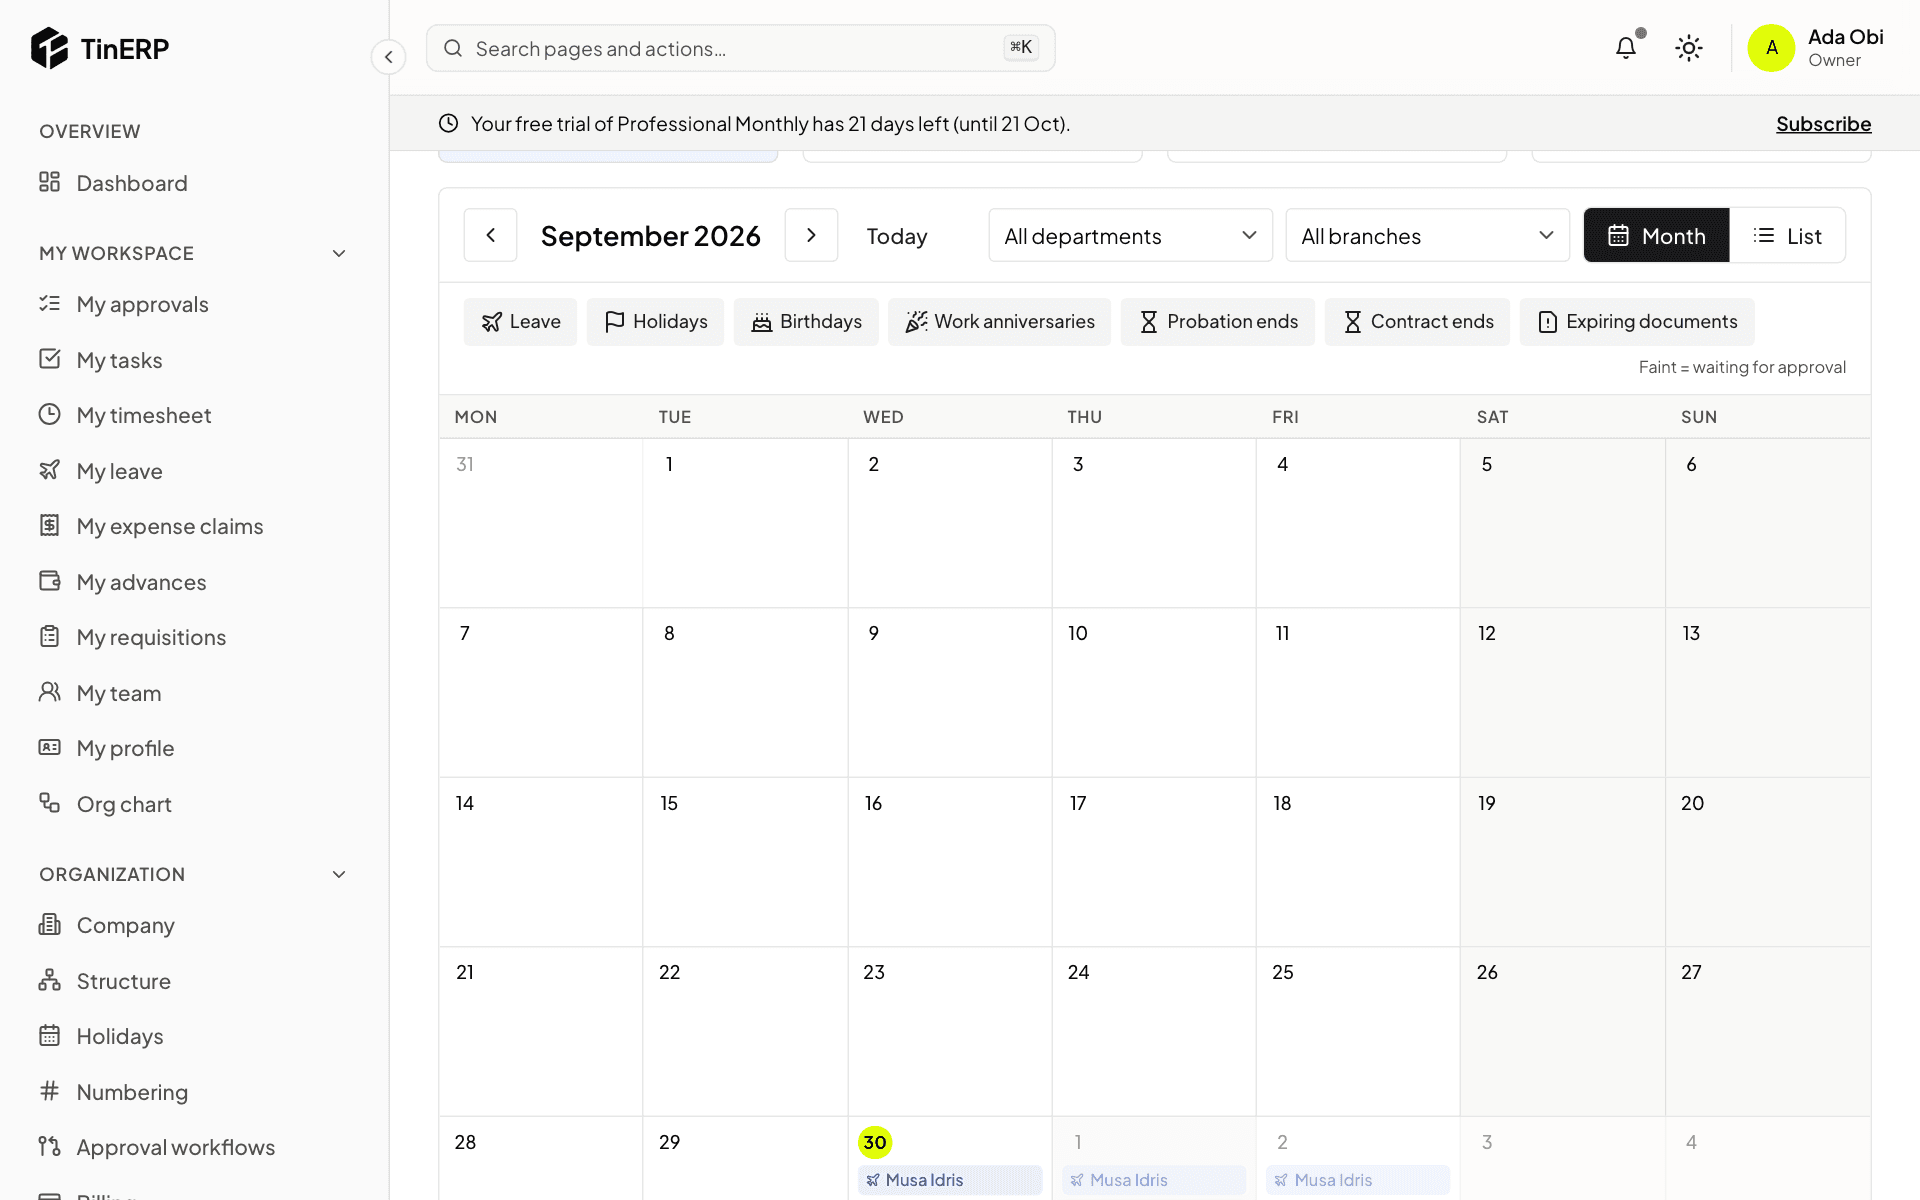
Select Calendar. Besides leave, holidays, birthdays people chose to share and work anniversaries, HR also sees probation ends, contract ends and - with the sensitive-details permission - documents about to expire.
The HR leave calendar for the month
Questions
Can approved leave be cancelled?
Yes, until it starts - from the request. The days go back to the person's balance.
HR · HR teams · about 3 min
Joiners and leavers
HR → Joiners & leavers brings together everything to follow up as people join and leave.
1. See what's coming up
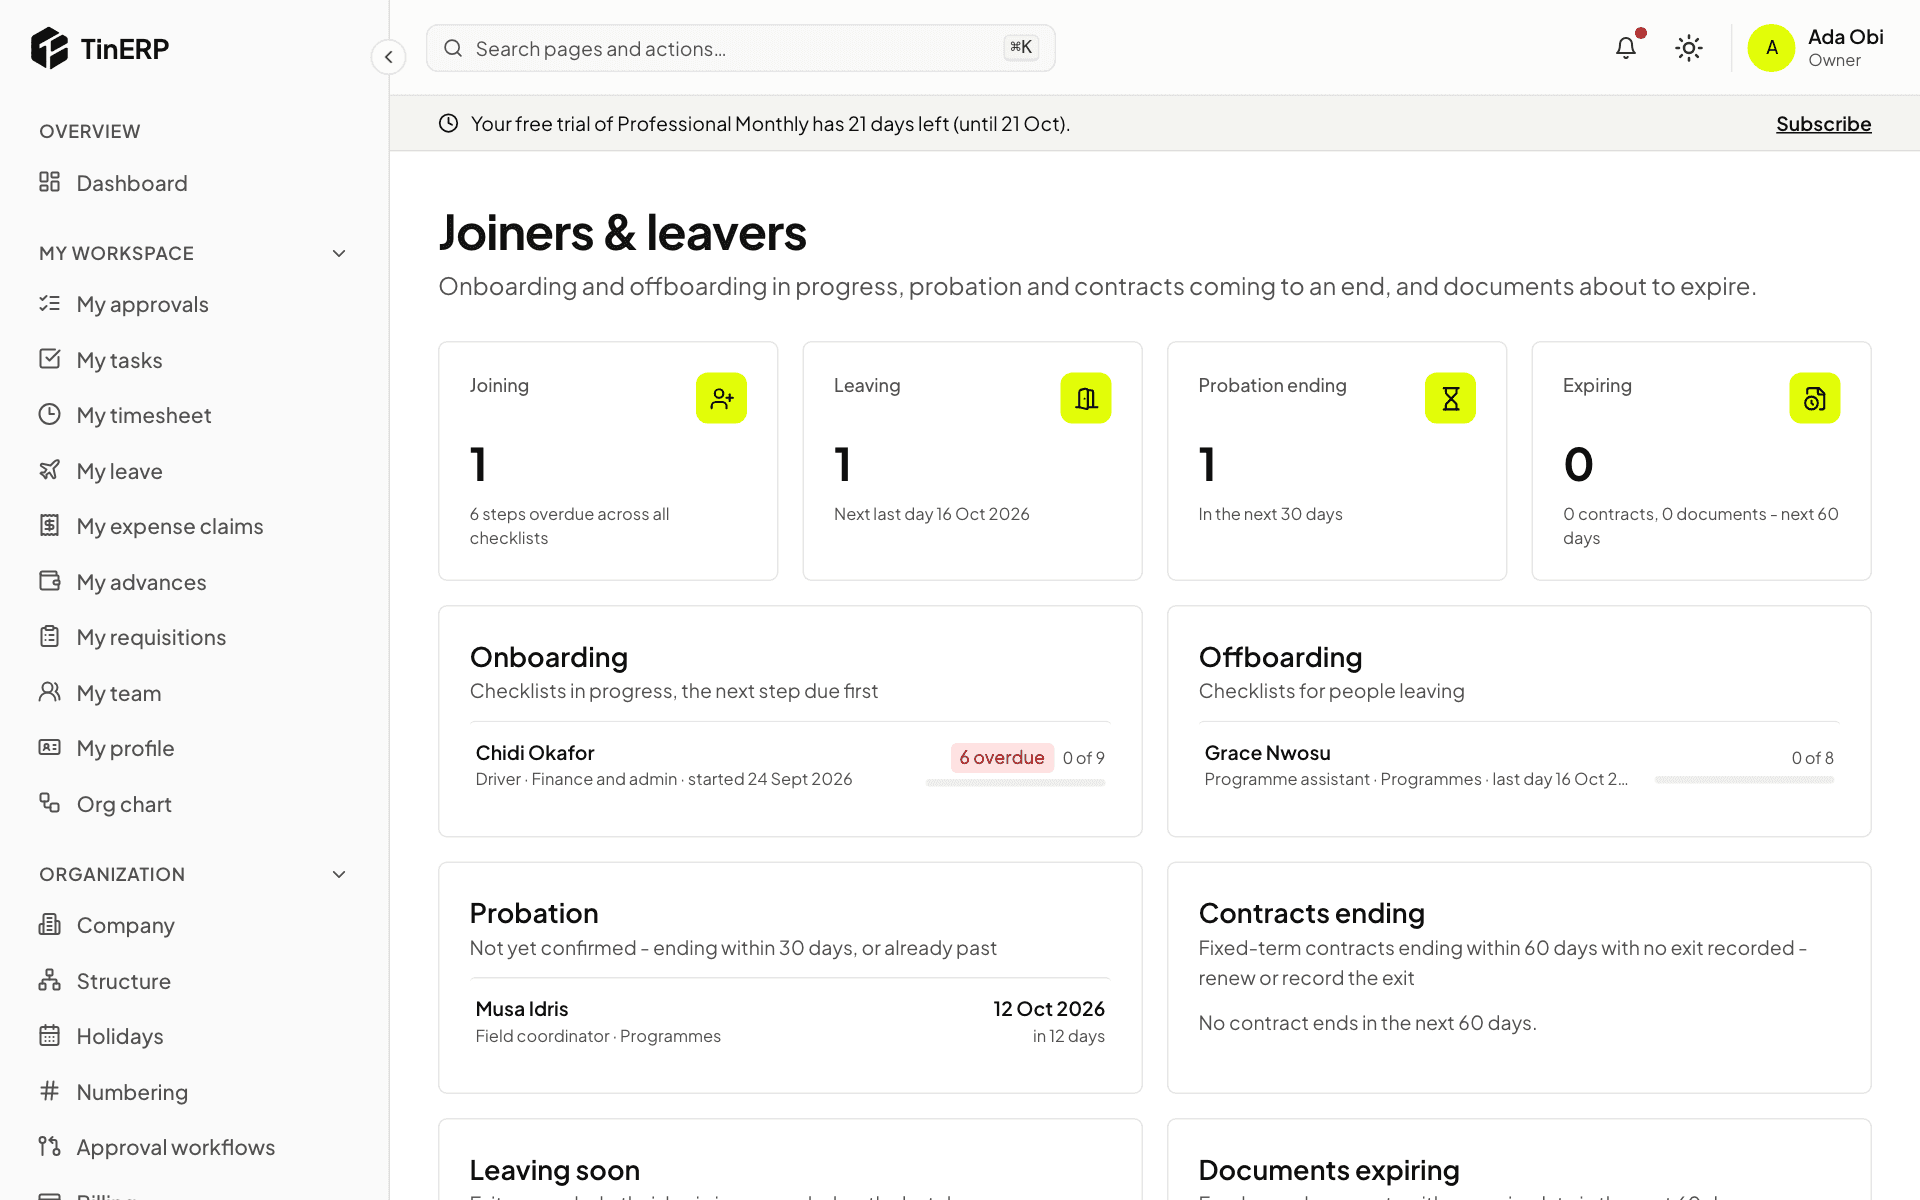
The page shows onboarding and offboarding in progress, with overdue steps; probation ending within 30 days or already past; fixed-term contracts ending within 60 days; people leaving soon; and documents expiring within 60 days.
Joiners & leavers: one joiner, one leaver, one probation ending, with the onboarding and offboarding checklists
2. Tick off the steps
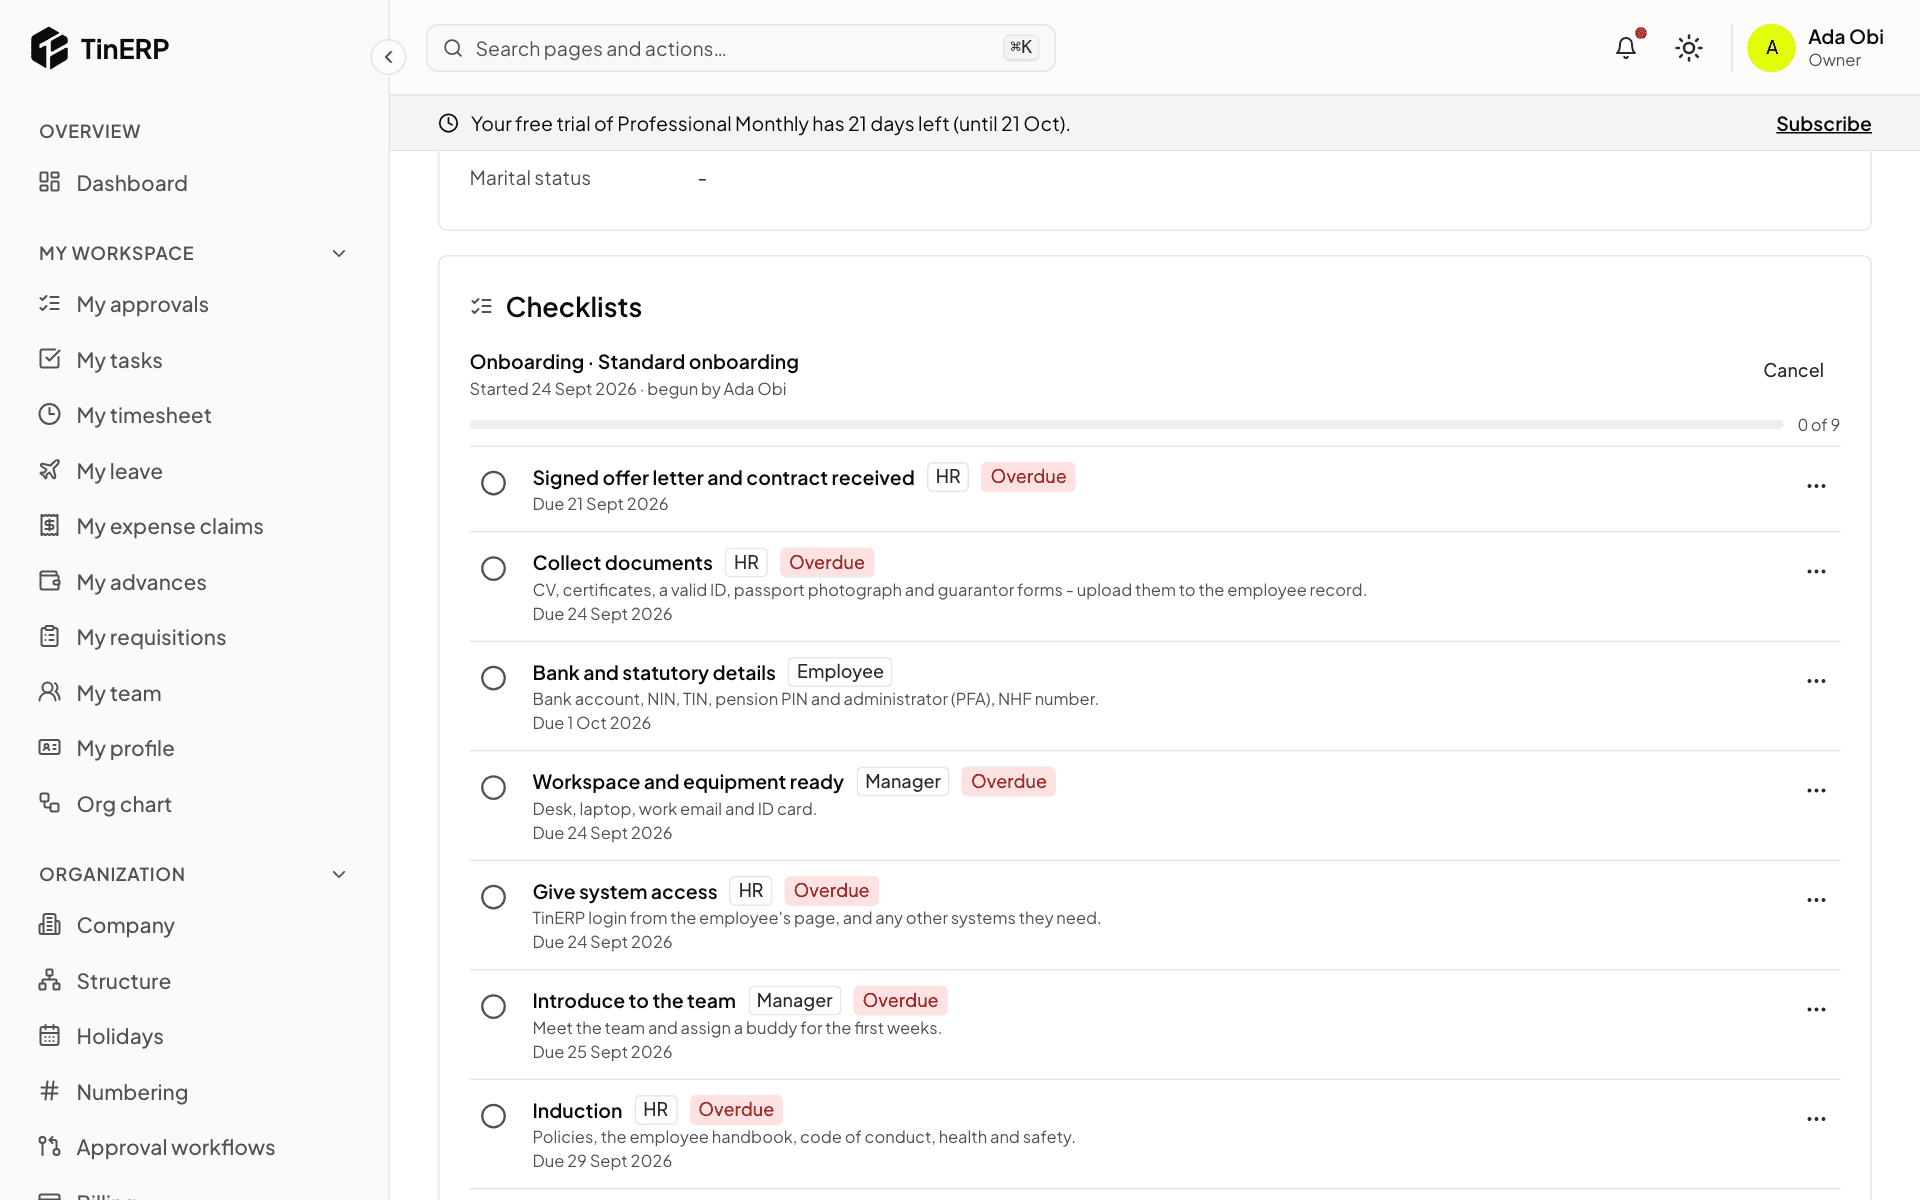
Open an employee to see their checklist: each step, who does it, when it's due, and whether it's overdue. Tick the circle when a step is done. If a step doesn't apply, open its menu (⋯) and choose Skip - doesn't apply, with a reason. The checklist completes when no steps are left.
Managers tick their steps on the employee's page, and employees theirs in My profile.
Chidi's onboarding checklist with steps for HR, his manager and him
Tip: Reminders come by themselves: probation ending in 14 days, fixed-term contracts ending in 30, and documents expiring in 30.
HR · Everyone · about 2 min
The org chart
The org chart is built from each employee's manager, and from positions if your organization uses them. Everyone can see it.
1. Explore it
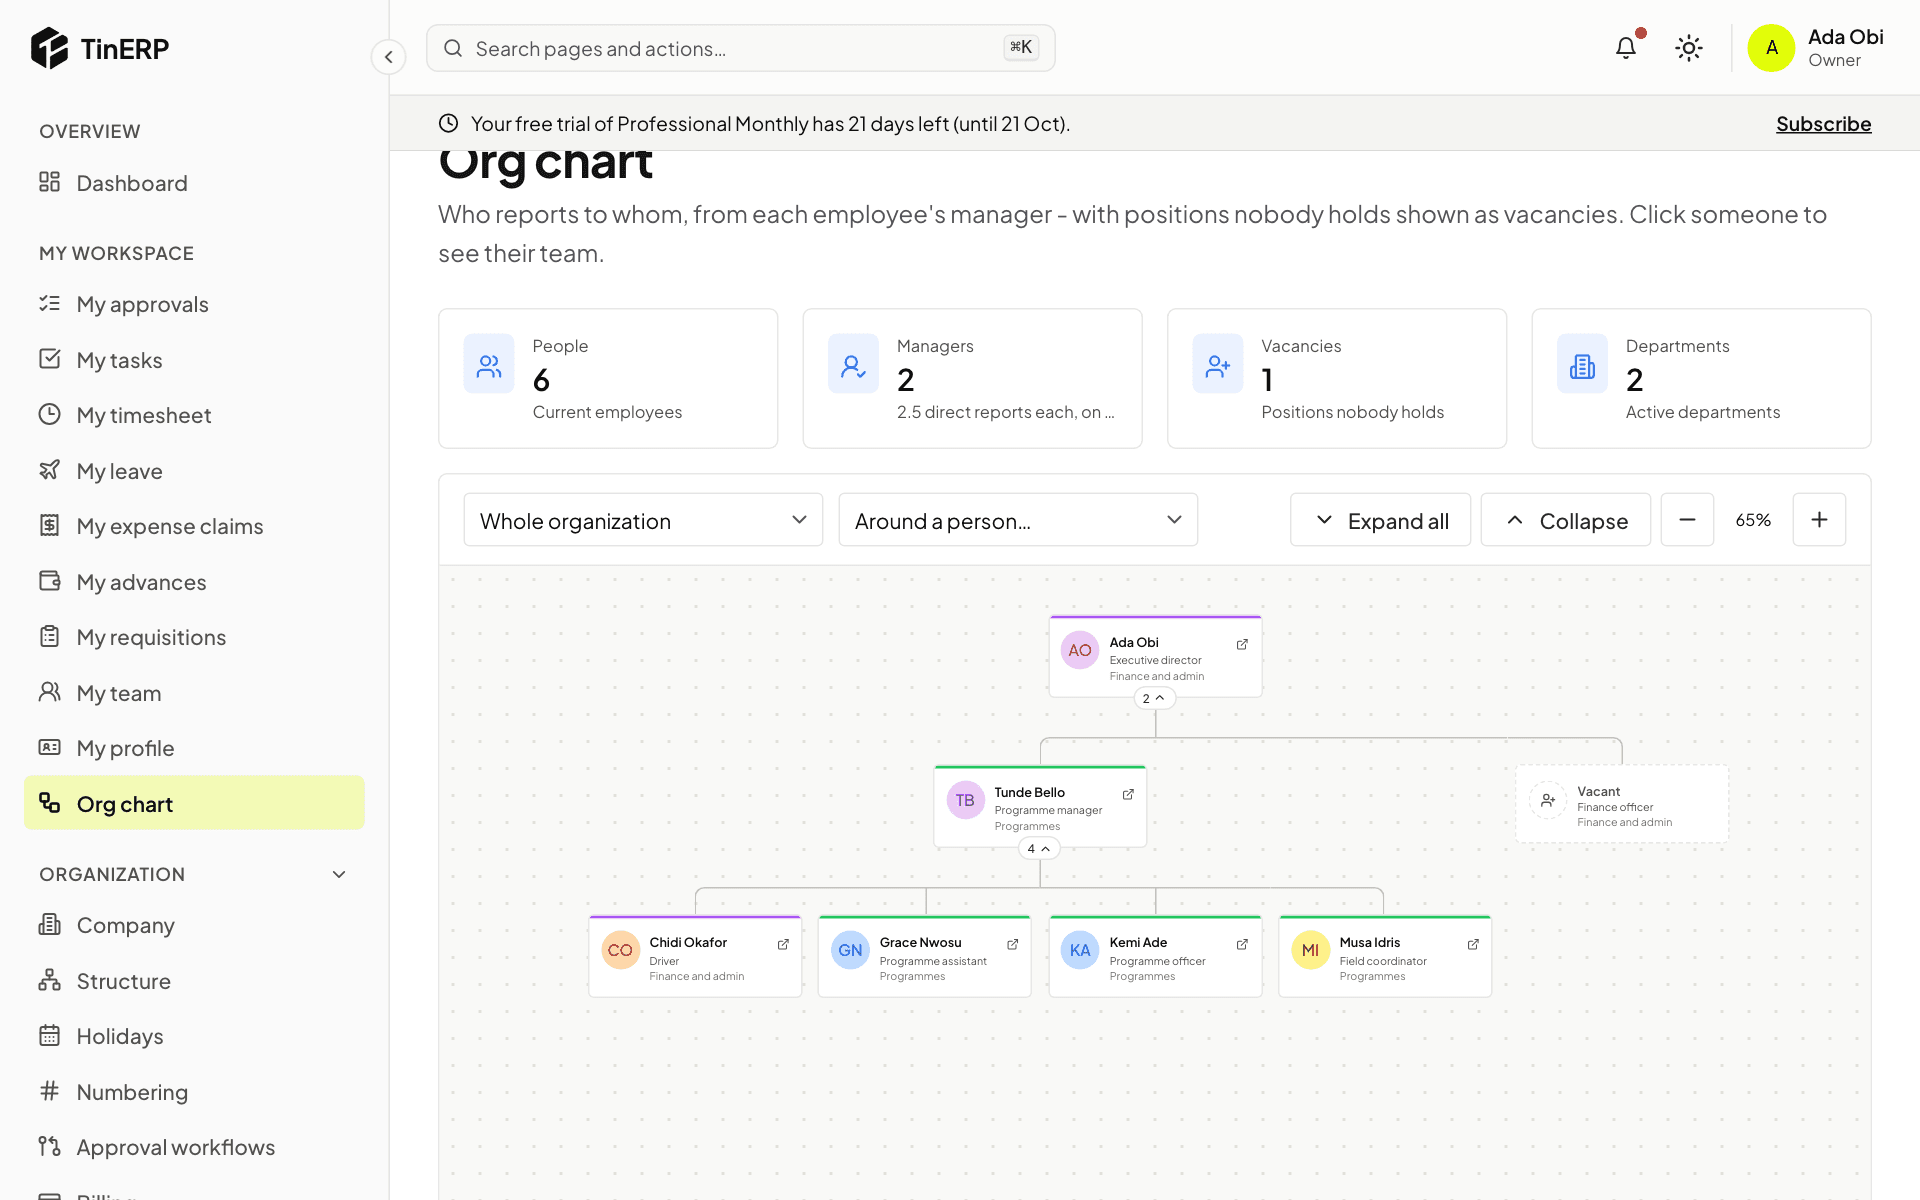
Go to My workspace → Org chart. Each box shows a person's name, job and department; the number under it is how many people report to them - select it to open or close their team. Expand all opens everything; zoom with + and −.
Choose a department at the top, or Around a person for someone's manager and team. Boxes marked Vacant are positions nobody holds.
The org chart fully expanded, with a vacant Finance officer position
Questions
Someone is in the wrong place on the chart.
The chart follows the manager on their employee record. HR corrects it with Record a change.
HR · HR teams and managers · about 3 min
HR reports
HR → HR reports has four reports. Each shows only the people you may see - HR sees everyone, a manager their department and reporting line. Every table can be exported as CSV.
1. Headcount
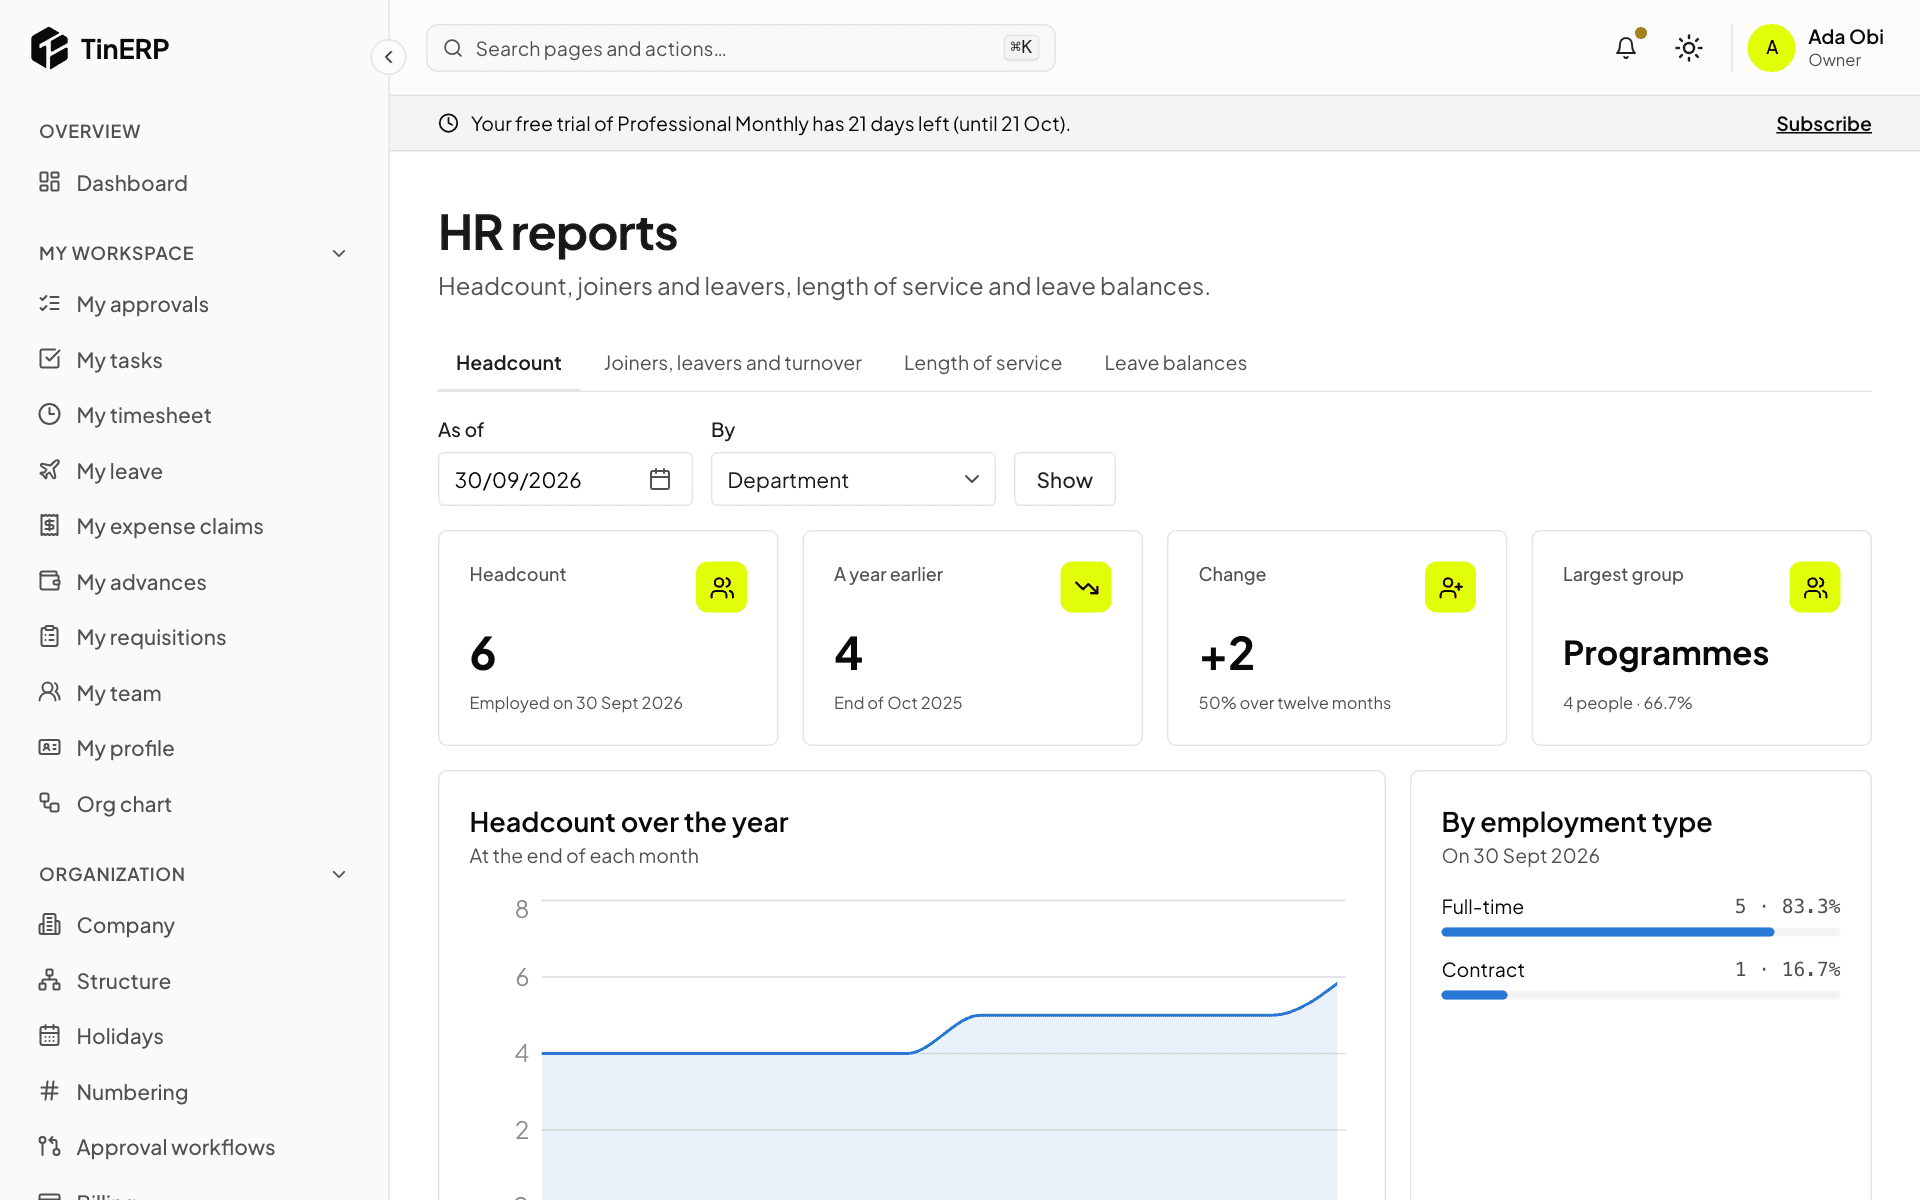
Who was employed on any date, grouped by department, branch, grade, employment type or gender - with the trend over the last year. Choose As of and By, then Show.
The Headcount report grouped by department, with the trend over the year
2. Joiners, leavers and length of service
Joiners, leavers and turnover covers a period you choose: who joined and left, turnover (leavers divided by the average headcount) and exit reasons. Length of service groups people by years of service, and lists work anniversaries and birthdays in the next 60 days.
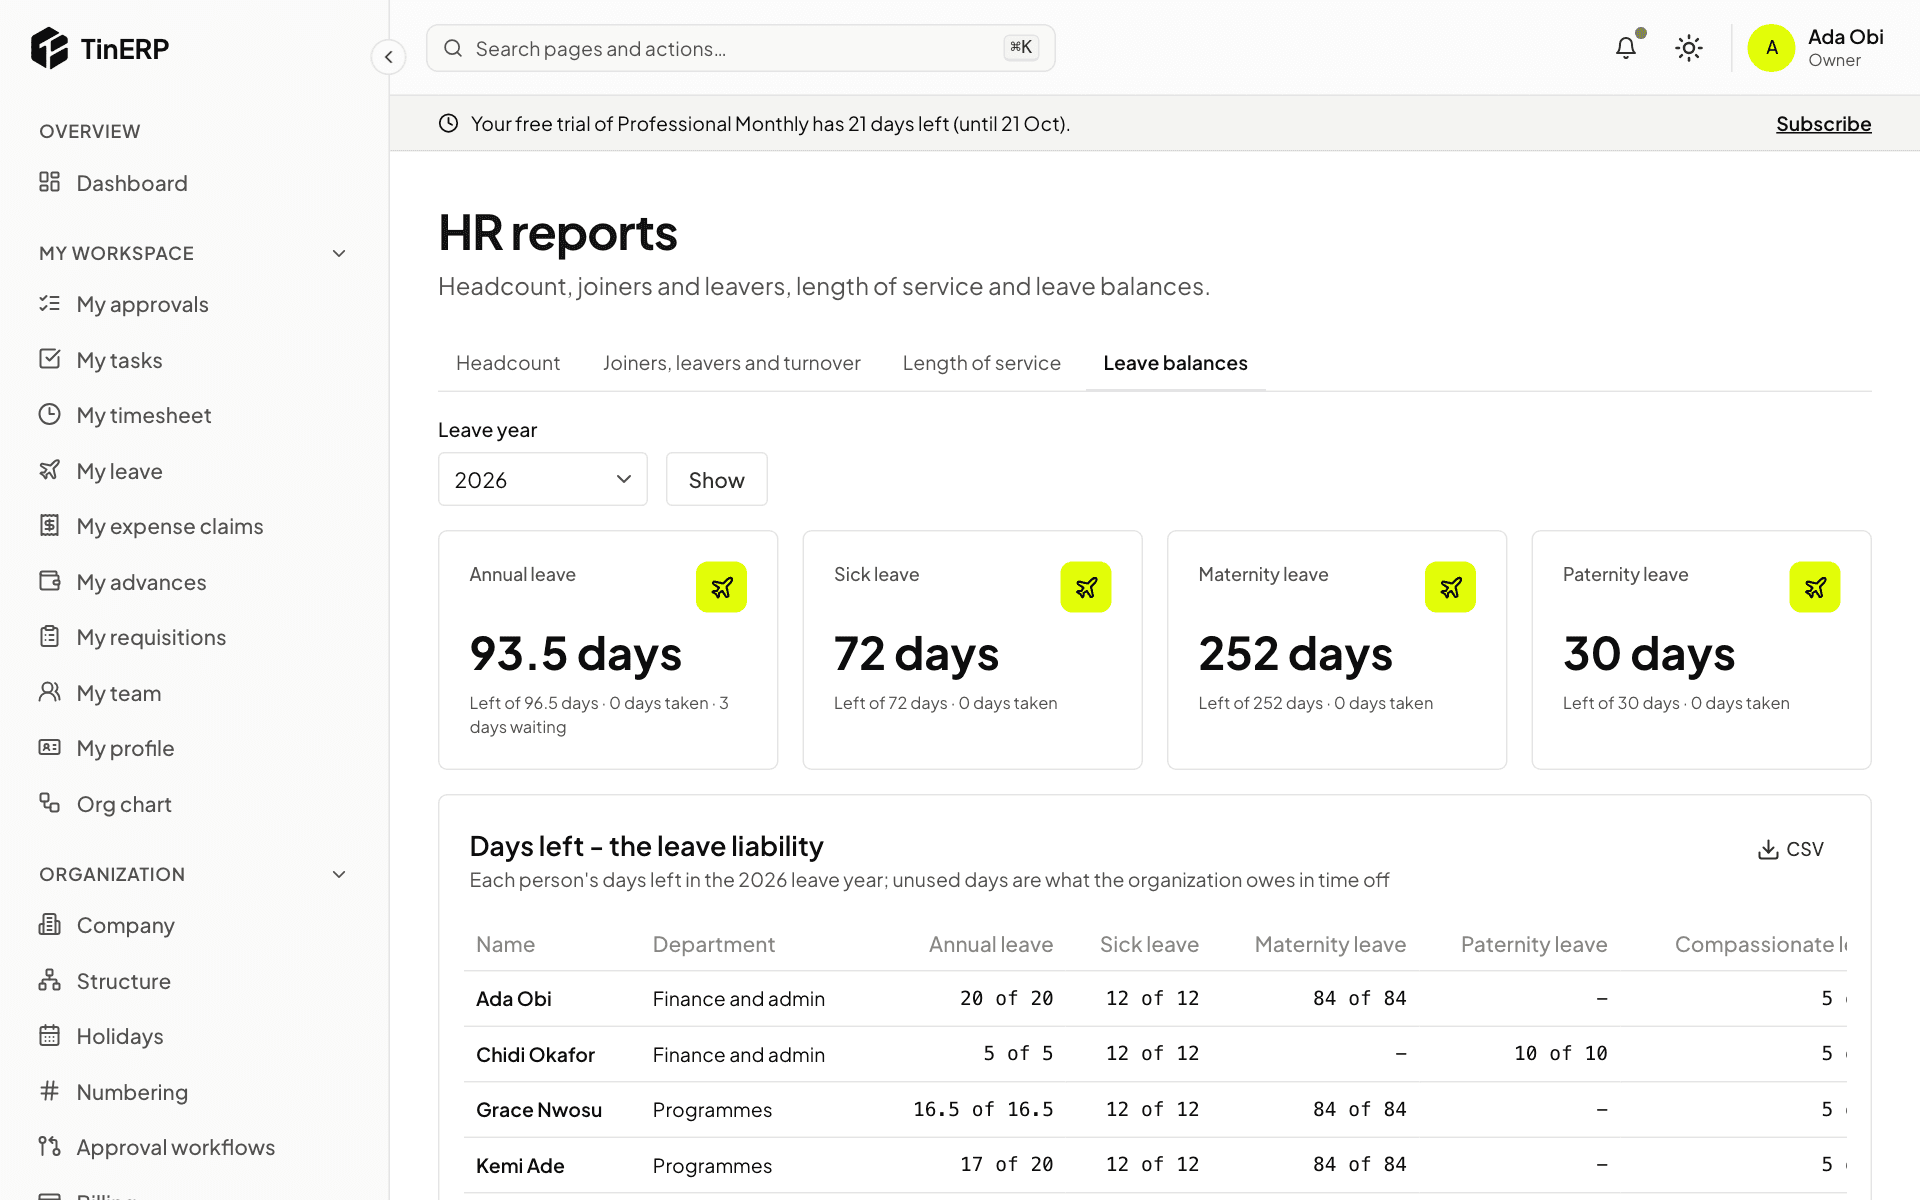
3. Leave balances
Each person's allowance, days taken, waiting and left, for every leave type with an allowance. The days left are your organization's leave liability.